Emmet Editor Plugin for Dynamic HTML/CSS Snippets
By Mark Volkmann, OCI Partner and Principal Software Engineer
March 2018
Overview
Emmet is an editor plugin for quickly entering HTML, XML, and CSS. It also supports many "actions" that operate on HTML and XML elements. The most commonly used action is to expand an abbreviation or snippet.
Emmet was created by Sergey Chikuyonok. The original name was "Zen Coding."
Emmet is available for many editors including Atom, Eclipse, Emacs, Notepad++, Sublime, Vim, Visual Studio (VS) Code, and WebStorm. However, some implementations do not support all the defined snippets and actions.
Emmet is not just a simple snippet manager. It parses entered text to extract meaning. These kinds of snippets are referred to as "dynamic snippets."
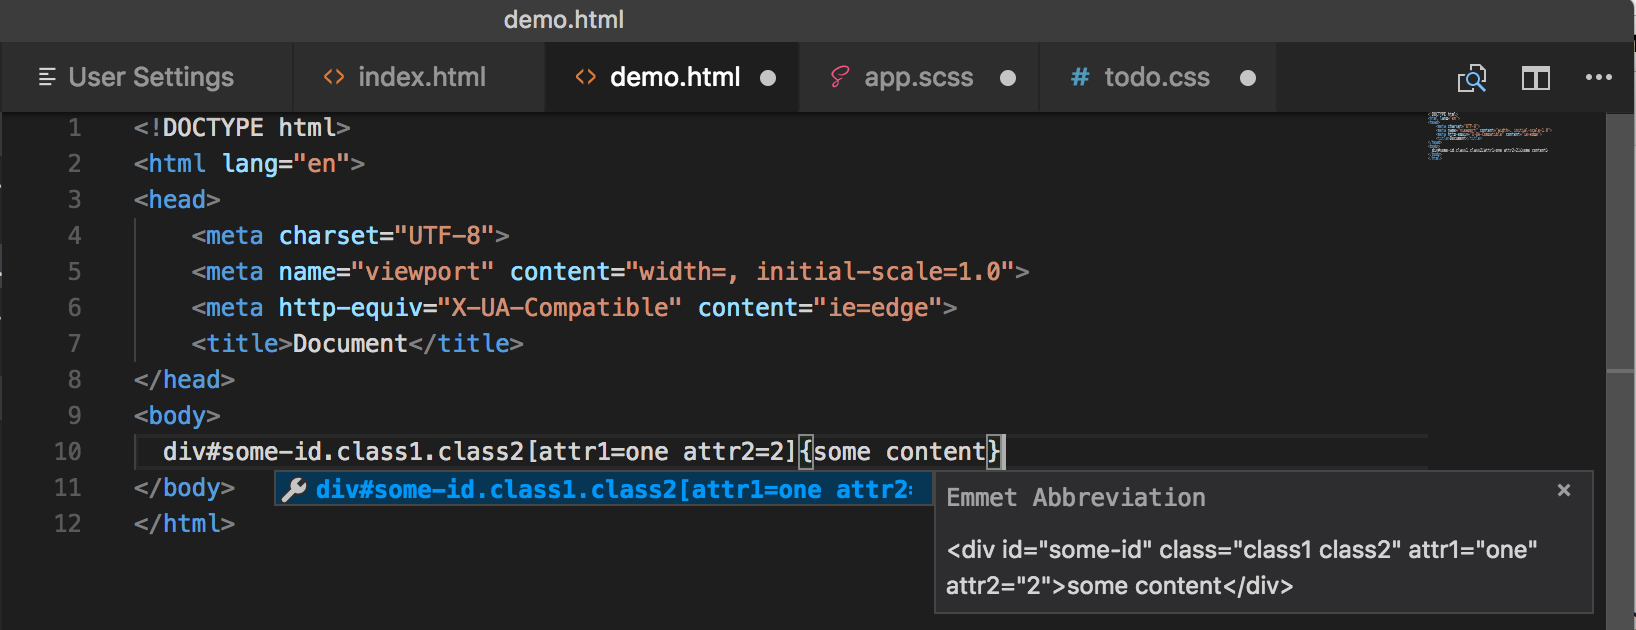
We will see many examples later, but here's one. The snippet div#some-id.class1.class2[attr1=one attr2=2]{some content} expands to <div id="some-id" class="class1 class2" attr1="one" attr2="2">some content</div>. Amazing!
Simpler snippets are also very useful. For example, the CSS snippet mb10 expands to margin-bottom: 10px;.
The main web site for Emmet is https://emmet.io/, and you'll find a handy cheat sheet at https://docs.emmet.io/cheat-sheet/.
Getting Started
You will need to configure Emmet within your editor/IDE of choice. Instructions for specific ones can be found at https://emmet.io/download/. Click the box for your editor to see the details.
Rather than walk through the steps for every editor, this article covers just two. Currently VS Code seems to be the most popular editor, so that is covered. I use Vim, so that is also covered.
Instructions for other popular editors can be found at the following sites:
- Atom: https://atom.io/packages/emmet
- IntelliJ: https://www.jetbrains.com/help/idea/enabling-emmet-support.html
- Notepad++: https://github.com/emmetio/npp/#readme
- Sublime: https://github.com/sergeche/emmet-sublime#readme
- Webstorm: https://www.jetbrains.com/help/webstorm/enabling-emmet-support.html
VS Code
Details on configuring Emmet for VS Code can be found at https://code.visualstudio.com/docs/editor/emmet. VS Code includes Emmet by default, enabled for these file types: css, haml, html, jade, jsx, less, sass, scss, slim, stylus, xml, and xsl. More file types can be added.
Configuring Emmet in VS Code
- Open Preferences ... Settings from the "File" menu in Windows and Linux, or the "Code" menu in macOS.
- Enter "Emmet" in the "Search Settings" input at the top.
- Note the available settings and their defaults on the left.
- Change settings in "USER SETTINGS" on the right.
- To enable use in React components in
.jsfiles, change the "emmet.includeLanguages" object to includejavascript: 'javascriptreact'.
Using Emmet in VS Code
Suggestions are displayed as snippets as typed, along with non-Emmet suggestions.
To use the top suggestion before the snippet is fully entered, press enter or tab. To use a different suggestion, use to the up and down arrows keys to navigate to it and press enter or tab.
The expansion for the highlighted Emmet suggestion is displayed in a "documentation fly-out" to the right of the suggestion, so you know what will be inserted before you select it.
Some expansions contain insertion points, which are locations where additional text can be entered. The cursor will automatically be moved to an insertion point.
For example, when div is expanded, the cursor is moved to the | in <div>|</div>.
For snippets with multiple insertion points, after entering a value in one, you can press tab to jump to the next one.
Vim Emulation in VS Code
In case you are interested in enabling Vim emulation in VS Code, here are the steps.
- Select View ... Extensions.
- Enter "vscodevim" in the search input.
- Press the "Install" button for the vscodevim extension.
To configure Vim emulation
- Select Code ... Preferences ... Settings.
- Enter "vim" in the "Search Settings" input at the top.
- See the available settings and their defaults on the left.
- Change settings in "USER SETTINGS" on the right.
Vim
The Emmet plugin for Vim is available at https://github.com/mattn/emmet-vim. Instructions for installing it using a variety of Vim plugin managers can be found there, as well as configuration details.
Configuration is accomplished by modifying your .vimrc file.
All keyboard shortcuts for Emmet commands begin with . By default this is ctrl-y.
The most commonly used keyboard shortcut expands a snippet. The key sequence that triggers this is followed by a comma.
To change the value of , set the variable g:user_emmet_leader_key.
For example, to change it to the space key, add the following:
let g:user_emmet_leader_key='<space>'Once these changes are made, Emmet expansions can be triggered by entering a snippet and pressing space followed by a comma while still in insert mode.
For snippets with more than one insertion point press <emmet-leader>n to move to next one and <emmet-leader>N to move to previous one.
By default Emmet snippets can be expanded in all file types. To restrict usage to specific file types, add the following.
let g:user_emmet_install_global = 0 " don't enable for all file types
autocmd FileType html,css,scss EmmetInstall " specifies file types
To use Emmet in .js or .jsx files that define React components, add the following.
let g:user_emmet_settings = {'javascript.jsx': {'extends': 'jsx'}}
autocmd FileType html,css,javascript.jsx,scss EmmetInstall
Syntax for HTML Snippets
The syntax for specifying HTML snippets is mostly like CSS selector syntax with no spaces.
In the examples that follow, the cursor position after triggering the snippet is indicated using the | character.
Child elements are specified with the > character.
For example, foo>bar>baz expands to:
<foo>
  <bar>
    <baz>|</baz>
  </bar>
</foo>
Sibling elements are specified with the + character.
For example, foo+bar+baz expands to:
<foo>|</foo>
<bar></bar>
<baz></baz>
Climb up the element hierarchy within a snippet using the ^ character. This adds a sibling to the parent of the last element that was generated.
For example, table>tr>th+th^tr>td+td expands to:
<table>
  <tr>
    <th></th>
    <th></th>
  </tr>
  <tr>
    <td></td>
    <td></td>
  </tr>
</table>
The same result can be achieved using parentheses instead of ^.
The equivalent snippet is table>(tr>th+th)+(tr>td+td). Perhaps this is easier to understand.
Even easier would be to enter this as multiple snippets rather than trying to reason about how to use just one.
Multiple ^ characters can be used to climb up multiple levels, but that results in snippets that are difficult to understand at a glance.
CSS class names are specified with the . character.
For example, div.my-class expands to:
<div class="my-class">|</div>and div.c1.c2 expands to:
<div class="c1 c2">|</div>Element ids are specified with the # character.
For example, div#my-id expands to:
<div id="my-id">|</div>Attributes are specified between square brackets.
Values with no special characters do not require quotes. If special characters are present, enclose attribute values in single or double quotes.
For example, div[foo=1 bar=two] expands to:
<div foo="1" bar="two">|</div>and div[foo="contains space" bar='single quotes'] expands to
<div foo="contains space" bar="single quotes"></div>Note that no commas are used between the listed attributes.
Element content is specified between curly braces.
For example, div{my content} expands to:
<div>my content|</div>Elements in a snippet can be repeated with the * character followed by a number.
For example, td*3 expands to:
<td>|</td>
<td></td>
<td></td>
Incrementing numbers can be added in repeated content with the $ character. This can be used for ids, classes, and content.
For example, ul>li.item$*3 expands to:
<ul>
  <li class="item1">|</li>
  <li class="item2"></li>
  <li class="item3"></li>
</ul>
Numbering starts at 1 by default. A different starting value can be specified with @start and *times.
For example, div{item $@4}*3 expands to:
<div>item 4|</div>
<div>item 5</div>
<div>item 6</div>
The syntax described above can be combined to create more powerful snippets.
For example, div#my-id.my-class[foo=1 bar=two]{my content} expands to:
<div id="my-id" class="my-class" foo="1" bar="two">my content|</div>Parts of snippets can be grouped using parentheses. This is useful for repeating specific sections.
For example, table>(thead>tr>th*3)+(tbody>(tr>td*3)*2) expands to:
<table>
  <thead>
    <tr>
      <th>|</th>
      <th></th>
      <th></th>
    </tr>
  </thead>
  <tbody>
    <tr>
      <td></td>
      <td></td>
      <td></td>
    </tr>
    <tr>
      <td></td>
      <td></td>
      <td></td>
    </tr>
  </tbody>
</table>
Emmet can sometimes guess desired tag names based on context. These are called "implicit tag names."
For example, .foo expands to:
<div class="foo">|</div>and ul>.foo expands to:
<ul>
  <li class="foo">|</li>
</ul>
Lorem Ipsum Text
"Lorem Ipsum" is scrambled Latin text that is frequently used as a placeholder for text that will be supplied later. Emmet can generate this text. By default it generates 100 words, but the number of desired words can be specified.
The snippet is the word "lorem" or the word "lipsum," optionally followed by a number.
For example, lorem and lipsum expand to 100 words, while lorem3 and lipsum3 expand to 3 words.
The words selected are random, but here is an example:
Sit debitis aliquam.HTML Snippets
Emmet supports a large number of HTML snippets. The ones shown below seem to be the most useful.
!expands to a common HTML template.
- <!DOCTYPE html>
- <html lang="en">
- <head>
- <meta charset="UTF-8">
- <title></title>
- </head>
- <body>
- |
- </body>
- </html>
aexpands to<a href="|"></a>a:linkexpands to<a href="http://|"></a>a:mailexpands to<a href="mailto:|"></a>btnorbuttonexpands to<button>|</button>cexpands to<!-- | -->imgexpands to<img src="|" alt="">input:{type}- type can be one of button, checkbox, color, date, datetime, datetime-local, email, file, hidden, image, month, number, password, radio, range, search, submit, tel, text, time, url, or week
- ex:
input:numberexpands to<input id="" type="number" name="">
labelexpands to<label for="|"></label>linkexpands to<link rel="stylesheet" href="|">link:faviconexpands to<link rel="shortcut icon" type="image/x-icon" href="|favicon.ico">ol+is an abbreviation for the snippetol>li
optoroptionexpands to<option value="|"></option>select+is an abbreviation for the snippetselect>optionscript:srcexpands to<script src="|"></script>table+is an abbreviation for the snippettable>tr>tdtareaortextareaexpands to<textarea id="|" name="" cols="30" rows="10"></textarea>tr+is an abbreviation for the snippettr>tdul+is an abbreviation for the snippetul>li
CSS Snippets
Emmet supports a large number of CSS snippets. The ones show below seem to be the most useful.
It may seem that there are too many to remember. However, in most cases your first guess for what a given snippet would be is correct.
acexpands toalign-content: |;ac:cexpands toalign-content: center;ac:feexpands toalign-content: flex-end;ac:fsexpands toalign-content: flex-start;ac:sexpands toalign-content: stretch;ac:saexpands toalign-content: space-around;ac:sbexpands toalign-content: space-between;aiexpands toalign-items: |;ai:bexpands toalign-items: baseline;ai:cexpands toalign-items: center;ai:feexpands toalign-items: flex-end;ai:fsexpands toalign-items: flex-start;ai:sexpands toalign-items: stretch;asexpands toalign-self: |;as:bexpands toalign-self: baseline;as:cexpands toalign-self: center;as:feexpands toalign-self: flex-end;as:fsexpands toalign-self: flex-start;as:sexpands toalign-self: stretch;bexpands tobottom: |;bdexpands toborder: |;bd:nexpands toborder: none;bdborbbexpands toborder-bottom: |;bdlorblexpands toborder-left: |;bdrorbrexpands toborder-right: |;bdtorbtexpands toborder-top: |;bgexpands tobackground: #000;bgcexpands tobackground-color: #fff;bgc:texpands tobackground-color: transparent;cexpands tocolor: #000;cur:dexpands tocursor: default;cur:pexpands tocursor: pointer;d:bordexpands todisplay: block;d:fexpands todisplay: flex;d:gdoes not givedisplay: grid;d:iexpands todisplay: inline;d:ibexpands todisplay: inline-block;d:liexpands todisplay: list-item;d:nexpands todisplay: none;d:texpands todisplay: table;fxdexpands toflex-direction: |;fxd:cexpands toflex-direction: column;fxd:rexpands toflex-direction: row;ffexpands tofont-family: |;ff:mexpands tofont-family: monospace;ff:sexpands tofont-family: serif;ff:ssexpands tofont-family: sans-serif;fsexpands tofont-style: |;fs:iexpands tofont-style: italic;fs:nexpands tofont-style: normal;fwexpands tofont-weight: |;fw:bexpands tofont-weight: bold;fw:nexpands tofont-weight: normal;fzexpands tofont-size: |;hexpands toheight: |;jcexpands tojustify-content: |;jc:cexpands tojustify-content: center;jc:feexpands tojustify-content: flex-end;jc:fsexpands tojustify-content: flex-start;jc:saexpands tojustify-content: space-around;jc:sbexpands tojustify-content: space-between;lexpands toleft: |;lhexpands toline-height: |;mexpands tomargin: |;mbexpands tomargin-bottom: |;mlexpands tomargin-left: |;mrexpands tomargin-right: |;mtexpands tomargin-top: |;oexpands tooutline: |;pexpands topadding: |;pbexpands topadding-bottom: |;plexpands topadding-left: |;prexpands topadding-right: |;ptexpands topadding-top: |;rexpands toright: |;texpands totop: |;ta:cexpands totext-align: center;ta:jexpands totext-align: justify;ta:lortaexpands totext-align: left;ta:rexpands totext-align: right;td:lexpands totext-decoration: line-through;td:nortdexpands totext-decoration: none;td:uexpands totext-decoration: underline;tt:cexpands totext-transform: capitalize;tt:lexpands totext-transform: lowercase;tt:uorttexpands totext-transform: uppercase;v:horvexpands tovisibility: hidden;v:vexpands tovisibility: visible;va:bexpands tovertical-align: bottom;va:mexpands tovertical-align: middle;va:torvaexpands tovertical-align: top;wexpands towidth: |;zexpands toz-index: |;@mediaor@mexpands to@media screen { | }
A number can be added after many CSS snippets to specify a value. These include snippets for border, font, margin, and padding.
For example, m20 expands to margin: 20px;.
Actions
The tables below describe Emmet actions and the keys to trigger them in VS Code and Vim. For Windows and Linux, substitute "ctrl" wherever you see "cmd."
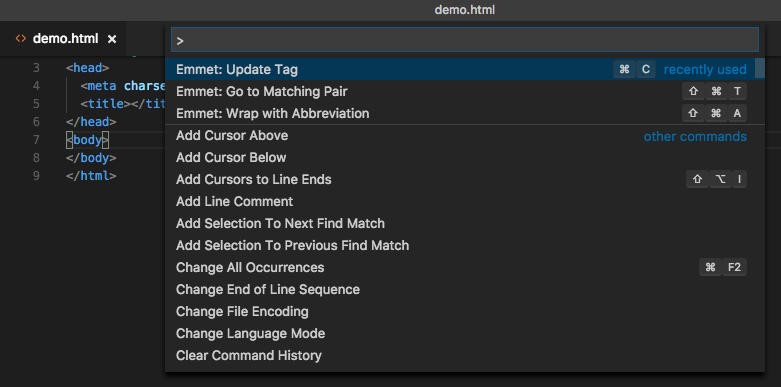
In VS Code, all Emmet actions can be selected from the "Command Pallete" which is opened by pressing cmd-P. None of these commands have a default keybinding.
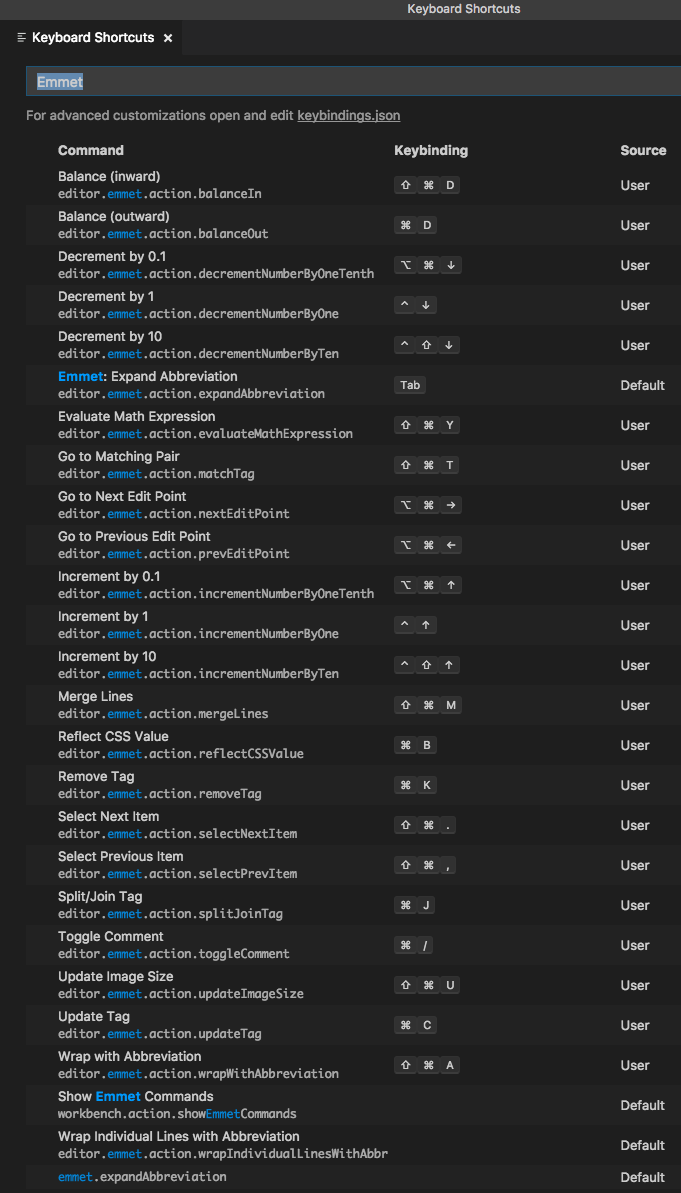
To add keybindings in VS Code:
- Open Preferences ... Keyboard Shortcuts from the "File" menu in Windows and Linux, or the "Code" menu in macOS.
- Enter "Emmet" in the search input at the top to filter the commands to just those supplied by Emmet.
- Select a command and press the "+" that appears to its left.
- Finally, type the shortcut key sequence to be associated with the command and press enter.
VS Code allows keybindings to be added to commands even if the keybinding is already assigned to another command. To determine if a keybinding has been assigned to multiple commands, right-click any command that uses it and select "Show Conflicts."
In the tables below, the "VS Code Key" column shows suggested shortcut keys, but none of these are configured by default.
Commonly Used Actions
| Action | Description | VS Code Key | Vim Key |
|---|---|---|---|
| expand abbreviation | the primary action | enter or tab | <emmet-leader> comma in insert mode |
| go to next edit point | jumps to next edit point | cmd-opt-right arrow | <emmet-leader> n |
| go to previous edit point | jumps to previous edit point | cmd-opt-left arrow | <emmet-leader> N |
| wrap with abbreviation | wraps selected text in a snippet for which you will prompted | select lines and cmd-A | <emmet-leader> comma in visual mode |
| balance tag outward | selects all of element under cursor; repeat to expand outward | cmd-d | <emmet-leader> d |
| balance tag inward | selects all of element under cursor, but one level less than current selection; repeat to expand inward | cmd-D | <emmet-leader> D, but doesn't work |
| remove tag | deletes tag under cursor, but not its contents | cmd-k | <emmet-leader> k (incorrectly also deletes contents) |
| toggle comment | toggles whether the tag under the cursor is commented out | cmd-/ | <emmet-leader> / |
| merge lines | merges selected lines into one line | cmd-M | <emmet-leader> m |
| split/join tag | toggles tag under cursor from having a closing tag to closing in shorthand way (deletes content) | cmd-j | <emmet-leader> j |
| go to matching pair | jumps between a start and end tag | cmd-T | not supported |
| select next item | moves to next start tag, attribute name, or attribute value and selects it | cmd-> | not supported |
| select previous item | moves to previous start tag, attribute name, or attribute value and selects it | cmd-< | not supported |
| increment number by 1 | adds to number under cursor | ctrl-up arrow | not supported |
| decrement number by 1 | subtracts from number under cursor | ctrl-down arrow | not supported |
| increment number by 10 | adds to number under cursor | ctrl-shift-up arrow | not supported |
| decrement number by 10 | subtracts from number under cursor | ctrl-shift-down arrow | not supported |
| increment number by .1 | adds to number under cursor | ctrl-opt-up arrow | not supported |
| decrement number by .1 | subtracts from number under cursor | ctrl-opt-down arrow | not supported |
Less Commonly Used Actions
| Action | Description | VS Code Key | Vim Key |
|---|---|---|---|
| evaluate math expression | replaces the math expression under cursor with result | cmd-Y | not supported |
| encode/decode image to data:URL | toggles CSS url function value between a file path and a data: URL | cmd-I | not supported |
| reflect CSS value | copies CSS value under cursor to all vendor-prefixed variations in same rule | cmd-b | not supported |
| update image size | adds width and height attributes to the img tag under cursor | cmd-U | <emmet-leader> i, but doesn't work |
Non-standard Actions
These are actions that are not described at https://docs.emmet.io but are implemented by either VS Code or vim-emmet.
| Action | Description | VS Code Key | Vim Key |
|---|---|---|---|
| update tag | changes tag under cursor; will prompt for new tag | cmd-c | not supported |
| anchorize URL | changes URL under cursor to an anchor tag using that URL; must start with http:// or https:// | not supported | <emmet-leader> a in insert mode |
"split/join tag" example
With the cursor over the start tag of the element foo, this would change <foo><bar>baz</bar></foo> to <foo />.
Custom snippets
Many Emmet plugins support user-defined custom snippets. For more information about these, see https://docs.emmet.io/customization/.
Summary
Emmet can save web developers a lot of time. Once you learn the basic syntax, it's pretty easy to use.
Give it a try in your favorite editor!
Software Engineering Tech Trends (SETT) is a regular publication featuring emerging trends in software engineering.
