Sensing the World from an Android™ Device
By Dale Wilson, OCI Principal Software Engineer
April 2011
Introduction
Calling it a mobile phone is like the blind man finding the elephant's tail and thinking he's found a snake.
Sure, it fits in your shirt pocket, and it will let you talk to you grandmother. But that just the beginning of what this device knows how to do.
- It knows which way is up.
- It knows which way is north.
- It knows where it is on the planet.
- It knows how high it is above sea level.
- It knows how bright the light is around it.
- It knows if there is anything close to its screen.
- It knows how the birds can get revenge on the pigs who stole their eggs.
- It is truly amazing.
To know what's going on in the world around it, a mobile device has sensors. Programming is needed to set those sensors up properly and accept the data they produce. That's the topic for this article – how to write programs that use those sensors.
To be more specific, this article focuses on Android-based devices. Equivalent articles could be written about iPhone™ , Windows 7 Mobile™, WebOS™, or BlackBerry™ devices, but that will have to wait for another time.
Development Environment
If you are writing a program for an Android device you are probably working in Java, and you almost certainly have downloaded and installed the free Android Software Development Kit. After that you need to understand the Android architecture. There are many ways to acquire that knowledge including taking OCI's Android Platform Development Course. This article will assume you have a basic understanding of Android programming.
At the time of this writing, there are two free IDEs in common use to develop Android applications, Eclipse and Jetbrains' IDEA Community Edition. Both of them require freely available Android plug-ins to support Android development. The example program for this article was developed using IDEA.
Getting Started – Finding a SensorManager
In Android any access to a sensor starts by finding the system-wide SensorManager. This code assumes you are running in the context of an Android Activity. You need to import the Android support for sensors using the following statements:
- import android.hardware.Sensor;
- import android.hardware.SensorEvent;
- import android.hardware.SensorEventListener;
- import android.hardware.SensorManager;
Now the following code will find the SensorManager:
 SensorManager sensorManager =
        (SensorManager)getSystemService(SENSOR_SERVICE);
Finding a Sensor
Every model of Android device will have a different set of sensors. Before using any of the sensors described here, you need to check to be sure the sensor is available. You can use the SensorManager to discover what sensors are available on this device or to find a particular sensor. There are two methods available to help:
SensorManager.getSensorList(type_specifier)will return a list of all the sensors of a particular type.SensorManager.getDefaultSensor(type_specifier)will return a single sensor - the default sensor for a particular type.
Be sure to check for anullreturn! It means no sensor of the requested type is available.
The type_specifer is one of the constants defined in the Sensor class. From now on, I'll refer to this as Sensor.TYPE but this is not a class or an enumerated value. It is just a set of integer constants with similar names.
Possible Sensor.TYPEs include:
TYPE_ACCELEROMETERTYPE_GRAVITYTYPE_GYROSCOPETYPE_LIGHTTYPE_LINEAR_ACCELERATIONTYPE_MAGNETIC_FIELDTYPE_PRESSURETYPE_PROXIMITYTYPE_ROTATION_VECTORTYPE_TEMPERATURE
When you are using the getSensorList() method, these values may be combined with an OR operator to include more than one type of sensor. There is also a special Sensor.TYPE, TYPE_ALL, that when used with getSensorList() will return a list of all the sensors on the mobile device. We will use that in our example program. For normal use, however, you probably want to call getDefaultSensor() with a specific type.
As an example, let's suppose you are writing a compass application. You want to use the magnetic field sensor in your phone to determine which way is north. To gain access to that sensor, use the following code:
Sensor magMeter =
        sensorManager.getDefaultSensor(Sensor.TYPE_MAGNETIC_FIELD);
There are some interesting points here. First of all there is no special Java class for the different types of sensors. The class Sensor provides a generic interface that is assumed to be flexible enough to support the requirements of any of the sensor types on the device.
The second point of interest is not obvious. There is a sensor type which is not included in the above list, TYPE_ORIENTATION. It is omitted from this list even though it's defined in the Android source code and documentation because Android has deprecated this Sensor.TYPE. Instead the SensorManager provides specialized support for orientation sensors. This orientation support is described later in this article.
Other features of the device such as the camera or gobal position sensor are supported through different APIs. They will have to wait for another article.
Using a Sensor
So now that we have a Sensor, what can we do with it? The surprising answer is, "Not much." The Sensor object itself serves two purposes.
It provides information about the sensor: Who makes it? How much power does it consume? How accurate is it?
It serves as a handle or identifier for the sensor if you want to talk about it to other parts of the system.
Notably missing from the sensor's interface is any way to read values from the sensor! As we'll see in a minute, that job is handled by the SensorManager.
Also missing is information about how many values the sensor provides. Does it give a single value or a 3-D vector? What units of measure does it use? And so on. For that information you need to go to the Android documentation. The SensorEvent page in particular tells you for each Sensor.TYPE how many and what types of values you can expect.
Reading Data from a Sensor
Assuming we don't really care who makes the sensor or how much power it consumes, but that we are interested in the values provided by the sensor, what's the next step? To read values from the sensor, we have to create an object that implements the SensorEventListener interface. [Aside: there is also an earlier, deprecated, interface named SensorListener - ignore it!]
We can then register our SensorEventListener and the Sensor object to the SensorManager. This does two things. It enables the sensor if it was turned off, and it provides a call-back function that the SensorManager can use when a new value is available from the sensor.
Here is the code that creates a SensorEventListener and provides implementations for the two abstract methods in the interface. These implementations just forward the call to corresponding methods in the containing object.
- SensorEventListener magneticEventListener =
- new SensorEventListener() {
- public void onSensorChanged(SensorEvent sensorEvent) {
- // call a method in containing class
- magneticFieldChanged(sensorEvent);
- }
-
- public void onAccuracyChanged(
- Sensor sensor, int accuracy) {
- // call a method in containing class
- magneticFieldAccuracyChanged(sensor, accuracy);
- }
- };
Having created a SensorEventListener, the program should register it with the SensorManager using code like this:
sensorManager.registerListener(magneticEventListener, magMeter, SensorManager.SENSOR_DELAY_NORMAL);
This SensorEventListener will now receive events from the magMeter Sensor acquired earlier.
The third argument to SensorManager.registerListener() is a suggestion about how often the application would like to receive new values. Possible delay values from fastest to slowest are:
SENSOR_DELAY_FASTEST,SENSOR_DELAY_GAME,SENSOR_DELAY_UI, andSENSOR_DELAY_NORMAL.
Faster speeds cause more overhead, but make the device more responsive to changes in the values detected by the sensor.
Housekeeping and Good Citizenship
Just as important as registering a SensorEventListener and enabling the sensor is disabling the sensor and unregistering the listener when it is no longer needed. Registering and unregistering should be handled as "bookends" so if you add the above code in your Activity's onResume() method (a good place for it) be sure to add this code to the onPause() method.
sensorManager.unregisterListener(magneticEventListener, magMeter);That will ensure that the device is turned off -- prolonging battery life. Even though most sensors can be shared, unregistering the listener when it is no longer needed will also make sure the sensor is available to other applications that may run on the device.
Handling Sensor Accuracy
Notice that there are two callback methods defined in SensorEventListener: onSensorChanged() and onAccuracyChanged(). We will discuss onAccuracyChanged() first.
As the name implies, this callback occurs when something has increased or decreased the expected accuracy of the values produced by this sensor. The integer argument will be one of the following values - in order from least to most accurate:
SENSOR_STATUS_UNRELIABLEmeans that the values cannot be trusted. Something is preventing the sensor from acquiring accurate readings, so any reported values are just wrong.SENSOR_STATUS_ACCURACY_LOWmeans that the values are correct, but not very accurate.SENSOR_STATUS_ACCURACY_MEDIUMmeans the values are fairly accurate, but they are not the best that this sensor is capable of under ideal conditions.SENSOR_STATUS_ACCURACY_HIGHmeans the sensor is producing the best values it can produce under excellent operating conditions.
Unfortunately, there seem to be some devices that always report SENSOR_STATUS_UNRELIABLE and others that always report SENSOR_STATUS_ACCURACY_HIGH. Don't place too much confidence in the accuracy status.
Using the Sensor Data
Finally, we are ready to discuss the interesting callback -- onSensorChanged(). The argument passed when this method is called is a SensorEvent structure. This structure contains real data from the sensor. Let's see what we've got.
I described SensorEvent as a structure. Technically it's a Java class, but this class does not have any useful methods - only public data members (fields).
The first field is one we've already seen: int accuracy will contain one of the same values as the argument to onAccuracyChanged() method. Thus for each sample of data from the sensor you know how accurate you can expect the data to be. For practical purposes you might be able to ignore the onAccuracyChanged() notice altogether and just use this value from the SensorEvent although you still must implement the abstract onAccuracyChanged() method.
The next field is Sensor sensor. This is the same Sensor that we used to register this callback. It is included in case we have common code handling the events from more than one Sensor.
The third field is long timestamp. It tells us when this event occurred. A timestamp in Android has a resolution in nanoseconds. It is based on the most precise timer on the device, but it is not tied to any particular real world clock. This timestamp can be used to calculate the interval between events, but not to determine the time of day (or month or year) when the event occurred.
The last field in the SensorEvent is float[] values. Yes, these are the values we are looking for. Most sensors will produce either one or three values in this array. The array in the SensorEvent is of a fixed size. It usually contains three floats even if the sensor produces fewer numbers. Be careful. Sometimes this array will have a size different from three.
The best approach is to use the Sensor.TYPE available via sensor.getType() to determine how many values are valid. The Sensor.TYPE also determines what units of measurement apply to this sensor. Fortunately Android has normalized the incoming sensor values so all sensors of the same type produce the same number of values using the same units.
Of course if you know what type of sensor you are working with you may not even need to check sensor.getType(). You can just write your code to handle the values you know you will receive.
Coordinates
Many of the sensors provide a three dimensional vector for the measured value. They provide value for the x-axis, the y-axis, and the z-axis as values[0], values[1], and values[2] respectively. Now all you need to know is the relationship of these axes to the actual device.
To simplify matters, all devices use the same axes albeit with different units. The axes are firmly attached to the device. If you move the device, the coordinate axes move right along with it.
Every device has a natural orientation. For most phones the natural orientation is portrait (taller than it is wide). For most tablets, on the other hand, the natural orientation is landscape (wider than taller). The axes for the device are based on this natural orientation.
The origin of the axes -- point (0,0,0) -- is in the center of the device's screen.
If you hold the device vertically in it's natural orientation the x axis runs left to right across the center of the screen. Positive values are to your right and negative points are to your left.
The y axis runs up and down in natural orientation. Positive values are up and negative values are down.
When you stare straight at the screen you are looking along the z axis. Negative values are behind the screen and positive values are in front.
Orientation
As mentioned previously, using the results from the orientation sensor directly through the SensorManager interface has been deprecated in Android. Instead, there is a different way to determine the orientation of the device.
What you want to know is not really how the device is being held, but rather what screen orientation Android is using. Interpreting the values received from the orientation sensor is only a small part of the puzzle. There are techniques an application can use to lock the screen into a particular orientation or to change orientations under program control regardless of the way the device is actually being held.
For the program presented in this article, we want to display the sensor data visually on the screen. In order to do so, the coordinates returned by the sensors have to be mapped into the coordinates used to draw on the screen.
The 2-D drawing coordinates are relative to the upper right corner. This means the Y values on the screen increase from top to bottom, but the Y values from the sensor increase from bottom to top. To reconcile sensor coordinates to drawing coordinates the Y values must be negated.
After this correction, the coordinates need to be rotated around the Z axis. Because the only orientations involve some number of ninety degree rotations, this can always be done by various combinations of swapping and/or negating X and Y coordinates.
Finally, the coordinates have to be scaled properly to match the size of the screen. There are a number of techniques for doing that including using the coordinate transformation matrix built into the Android View (which could handle the orientation-mapping, too), but the details are beyond the scope of this article. See the source code for one way to scale the coordinates.
But before any of this rotation can happen, the software needs to know the screen orientation Here's the code to find that out:
    Display display = ((WindowManager) getContext().getSystemService(Context.WINDOW_SERVICE)).getDefaultDisplay();
    int orientation = display.getOrientation();
At this point the variable orientation contains one of the following values:
Surface.ROTATION_0
This is the natural orientation of the device. Notice that for a phone this will be portrait mode, but for a tablet it will be landscape mode.Surface.ROTATION_90
This is the normal landscape mode for a phone, or portrait mode for a tablet.Surface.ROTATION_180
The device is upside down.Surface.ROTATION_270
The device has been turned "the unexpected direction."
A Working Application
So let's put this all together in a working application. The source code associated with this article includes a complete Android project consisting of three Activities.
- The first Activity displays all sensors reported by the
SensorManager.
Touching the name of any sensor gets you to the second Activity. - The second Activity displays the details for a particular sensor. It registers to receive updates from the sensor, and displays the resulting values.
Hitting the menu button while this Activity is showing gives you the option of displaying the final activity. - The final activity displays the readings from the sensor you have selected as a vector on the screen. Of course this only makes sense for a device that returns three coordinates, but the program as written doesn't check for that. Expect strange results if you use this option for a single-valued sensor.
Here's what it looks like running on a Samsung Epic™:
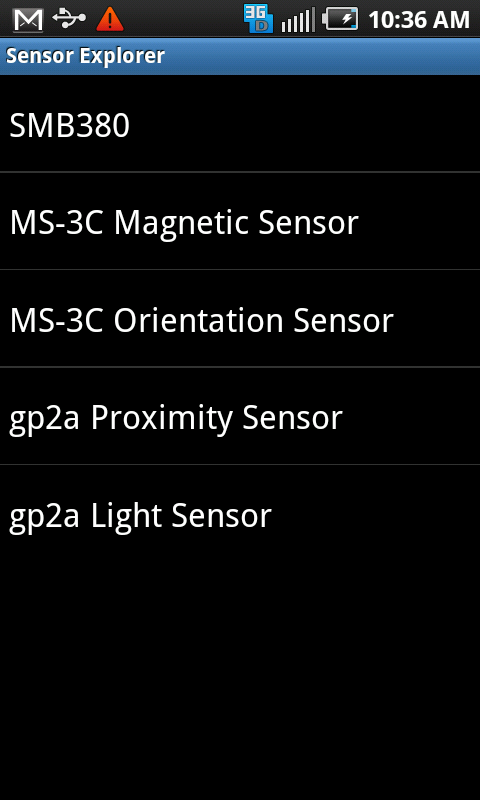
Screen 1: The first Activity shows a list of sensors returned from SensornManager.getSensorList(Sensor.TYPE_ALL).
Even though using Orientation Sensor as a Sensor object is deprecated, it still shows up on this list.
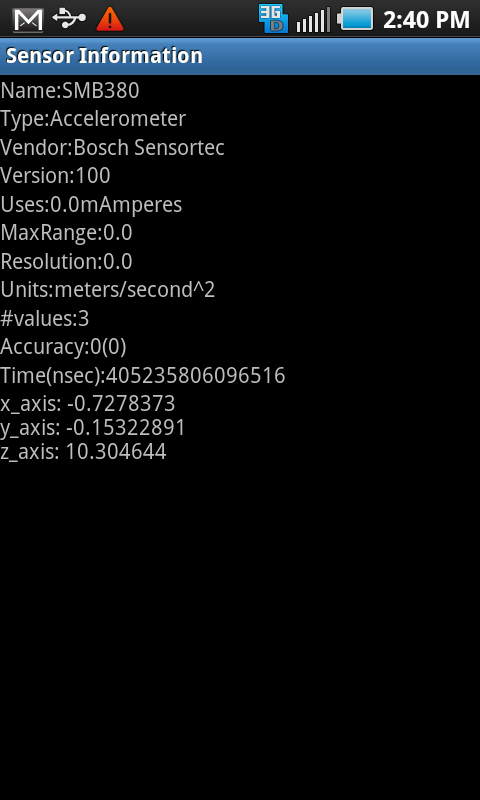
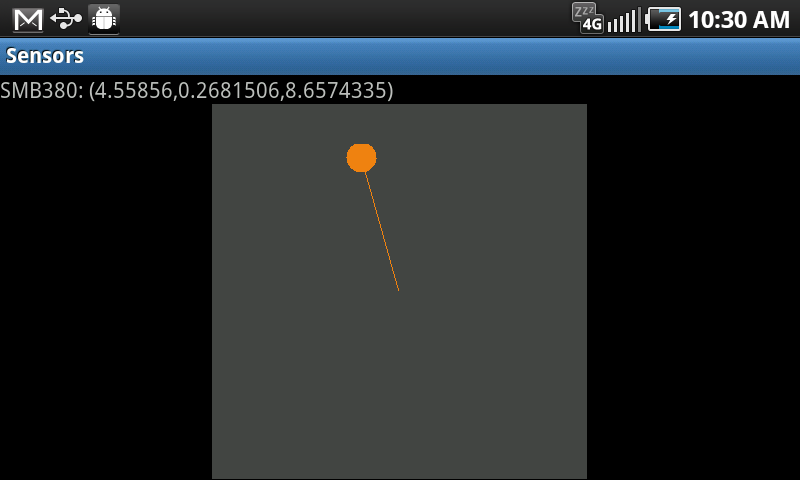
Screen 2: Selecting SMB380 from the opening screen gets this information about the accelerometer.
It is interesting to note that even when it is setting motionless on a table, the accelerometer reports an acceleration of over 10.3 m/sec2. This is acceleration due to gravity. But wait! Back in physics class we learned that acceleration due to gravity was 9.8 m/sec2. The moral here is that real world sensors (not just the ones built into mobile phones) usually need to be calibrated.
Also worth noting is that this sensor always reports an accuracy of 0 (meaning unreliable.) This accuracy status itself is unreliable! Except for the calibration issue, the accelerator on this device is quite accurate.
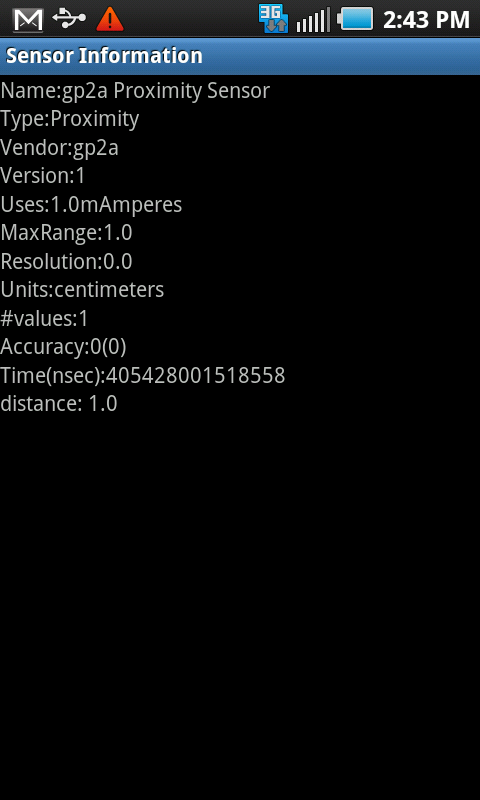
Screen 3: The proximity sensor only returns one value.
The only values returned by the proximity sensor on the Epic are 0.0 and 1.0. Software can tell if there's something close to the screen or not, but it can't really tell how far away it is. The moral of the story is not every sensor fits comfortably in the generic Sensor model supported by Android.
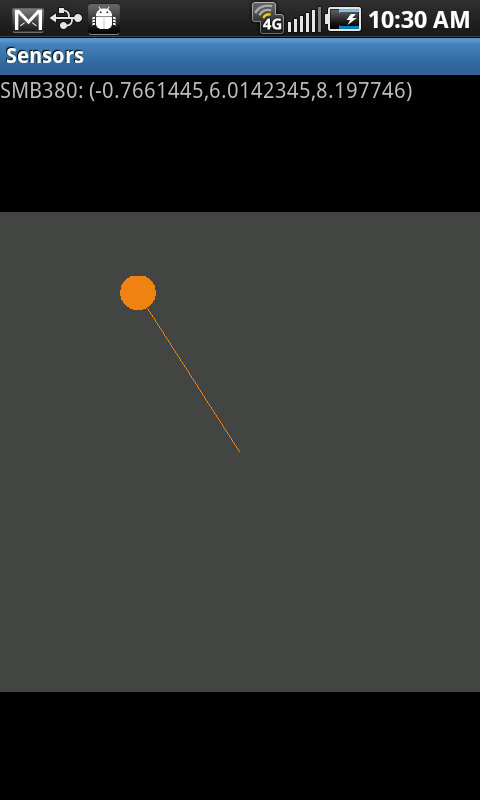
Screen 4: Accelerometer values as a vector (portrait mode).
Screen 5: Accelerometer values as a vector (landscape mode).
These two screen shots show the readings from the accelerometer displayed as a vector. Because the sensor coordinates are tied to the device, but the screen coordinates change when the display switches to landscape mode, the software has to check the orientation to map vector onto the screen.
Conclusions
Android makes it easy to access the sensors on the mobile device by normalizing the sensor's behavior and data into a common model. There are a few issues, however, that cannot be hidden from the application.
Not all sensors support all of the properties exposed by the Sensor object - for example the Bosch accelerometer shown on the screen shot above does not report how much current it uses.
Also not all devices return the types of data expected by Android. The units for a proximity sensor are expected to be centimeters, but the one shown above provides a yes/no answer to the question, "Is there something close to the screen?"
In spite of these limits, making an application aware of the world around it via the sensors in the mobile device is a relatively easy task that can potentially produce very useful behaviors from the application.
Source Code
The source code for this example application can be downloaded from the OCI Software Engineering Tech Trends web site as a zip file. It is a complete Android project that can be built and run in the Android Emulator or installed directly into a device via the USB Debugging port. Because IDEA was used to develop this project, Eclipse users might have do do a little extra work to import this project, but if you are familiar with the Android development environment it should be straightforward.
The download files also include Sensor.apk, a pre-built copy of the Sensors application ready to be loaded into your Android phone. If you would like to regenerate this signed application, the password for the digital signature (included in the "assets" directory) is "sensors".
The source code is covered by a liberal BSD-style license. This makes it available for any use, commercial or otherwise, with proper attribution.
If you are interested in moving beyond this simple application to explore the possibilities of harnessing the power of Android for your organization's needs, please contact us to ask about the wide variety of support and training available from OCI.
References
- [1] XKCD is worth visiting every Monday, Wednesday, and Friday
(http://xkcd.com/864) - [2] Information about developing software for iPhone™ phones
(http://developer.apple.com/devcenter/ios/index.action) - [3] Information about developing software for Windows 7 Phone™
(http://msdn.microsoft.com/en-us/windowsmobile/default) - [4] Information about developing software for WebOS™
(http://developer.palm.com/) - [5] Information about developing software for BlackBerry
(http://us.blackberry.com/developers/) - [6] Where to download the Android Software Development Kit.
(http://developer.android.com/sdk/index.html) - [7] A description of the Android architecture
(http://developer.android.com/guide/basics/what-is-android.html) - [8] OCI's Android Platform Development Course.
(https://objectcomputing.com/training/catalog/enterprise-mobile-computing/) - [9] Information about the Eclipse IDE
(http://www.eclipse.org/>) - [10] Information about Jetbrains' IDEA
(http://www.jetbrains.com/idea/download/) - [11] Details about the values available from different types of sensors.
(http://developer.android.com/reference/android/hardware/SensorEvent.html) - [12] Download the source code for this article (zip).
(http://sett.ociweb.com/sett/settApr2011_files/Sensors_20110227.zip)
