Cloud Microservices in 6 Easy Steps
by Tim Pollock, OCI Software Engineer
April 2018
Overview
With all of the available cloud platforms and the great tools and documentation they provide, creating a cloud-based microservices system should be easy. Each platform has a number of separate components that can be put together to make nearly any system you can think of.
How to put the parts together, however, is not always clear. The documentation is all there to read, but it's not always in the same place. This article pulls together some of those parts, presenting a simple cloud-based system that might be used as a foundation for a more complex system.
For instance, we might be trying to build a system that looks something like this:
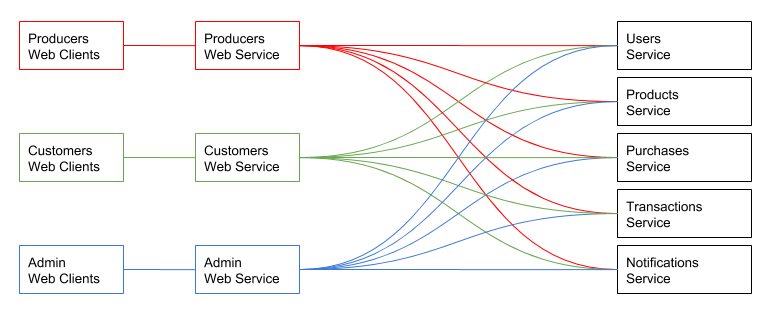
The simple system presented here consists of two services:
- One service is a publicly accessible web service that requires authentication.
- The other system provides data to the web service and cannot be accessed externally.
One or more web browsers hit our web service, which will authenticate each user and return a web page containing some data retrieved from the data service. The data service will only accept requests from the web service.
Our system will look like this:

Our goal is to create an easily managed and highly scalable system.
There are several cloud platforms to choose from, such as Microsoft Azure, Amazon Web Services (AWS), and Google Cloud Platform (GCP). This example uses GCP, which, like the others, has a free tier and a nice front end.
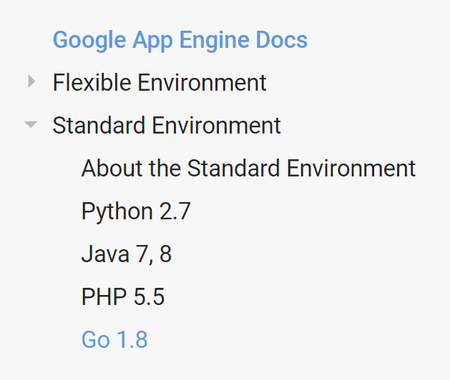
To keep things simple, we use Google App Engine, which provides two implementation paths that one can take: the Standard Environment and the Flexible Environment. This article uses the Standard Environment because:
- Cost – Services can scale down to 0 instances when there is no traffic.
- Performance – It provides a very fast scale-up time.
- Development – You can run the application locally with the App Engine SDK.
The Flexible Environment allows for development in more programming languages, can utilize other software packages, and can access resources and services that the Standard Environement cannot. The limitations of the Standard Environment do not really matter for the example presented here. Plus, the documentation states that:
"You can also choose to simultaneously use both environments for your application and allow your services to take advantage of each environment's individual benefits."
This page describes the differences between the two environments in detail:
This example uses the Standard Environment and the version of the Go programming language that it supports, but you could modify the examples for whichever language you prefer.
Microservices Architecture Assessment
Simplify your operations and establish a nimble approach to development by transforming your complex applications into interoperable services that can be modified and deployed independently.
Allow us to perform a review of your current technology, architecture, and digital tools, and we’ll show you how microservices can transform your IT organization.
Getting Started
If you want to build your own application that follows along with this tutorial, sign into the App Engine Console. All of the examples are executed in the Google Cloud SDK Shell, but the App Engine Console page provides visual tools to help you better understand the system you are building.
The App Engine Console page is available at:
To run the development server locally and deploy your application, download and install the Google Cloud SDK:
- Navigate to:
- Click "Download and Install", which will take you to a page where you can download the Google Cloud SDK installer.
- Run that installer with the default selections and install the App Engine Go and Python extensions using this command:
gcloud components install app-engine-go
- Finally, download and install Go from here:
Make sure you have the google.golang.org/appengine package installed. You can see which Go packages are installed on your system by entering this command:
go list ...
If that package is not installed, you will encounter a build error with the message "can't find import: "google.golang.org/appengine"" when you run the examples in this article.
To install it, set the GOPATH environment variable to where you want your Go packages installed (if it is not already set) and execute the following command:
go get google.golang.org/appengine
The examples in this article are designed to be easy to follow, but if you need clarification or find you want to dig deeper, you can look at these pages:
| Google Cloud Platform | https://cloud.google.com/ |
| App Engine | https://cloud.google.com/appengine/ |
| App Engine Console | https://console.cloud.google.com/ |
| Google Cloud SDK | https://cloud.google.com/sdk/ |
| App Engine Documentation | https://cloud.google.com/appengine/docs/ |
| Cloud SDK Documentation | https://cloud.google.com/sdk/docs/ |
| YAML Configuration Files | https://cloud.google.com/appengine/docs/standard/go/configuration-files |
| Appengine - GoDoc | https://godoc.org/google.golang.org/appengine |
| Firebase | https://firebase.google.com |
Step 1 - Create a Simple Hello World App
To begin, we create a Google Cloud project by entering the following command (you would choose a project id other than "sett-gae"):
gcloud projects create sett-gae --name="SETT GAE Project"
This first step will create a simple Hello World application consisting of a YAML file to define the project and a Go file containing the code for the service.
Make a folder on your system to hold the code for the following examples, then create a file named app.yaml.
The YAML file does the following:
- Indicates that the application should use the Go runtime environment
- Specifies the runtime version
- Defines a handler such that all URLs are routed by the Go application
See the app.yaml reference for other options.
The app.yaml file will look like this:
runtime: go
api_version: go1
handlers:
- url: /.*
  script: _go_app
Next, create a file named app.go.
The Go file imports several packages that will be used by the service, defines a main function that maps a request handler, then calls the principal appengine entry point.
The handler function simply writes a message, which will be returned to the web page:
package main
import (
"fmt"
"google.golang.org/appengine"
"net/http"
)
func main() {
http.HandleFunc("/", handler)
appengine.Main()
}
func handler(w http.ResponseWriter, r *http.Request) {
fmt.Fprint(w, "Hello world!")
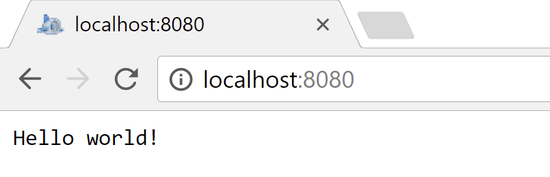
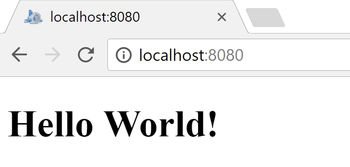
}Executing this command runs the website locally where you can view it at http://localhost:8080/:
dev_appserver.py app.yaml
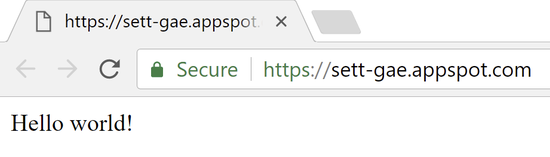
To deploy this application to the cloud, execute this command:
gcloud app deploy
After it is deployed, you can view the application log with this command:
gcloud app logs tail -s default
To view your application in a browser, execute the browse command:
gcloud app browse
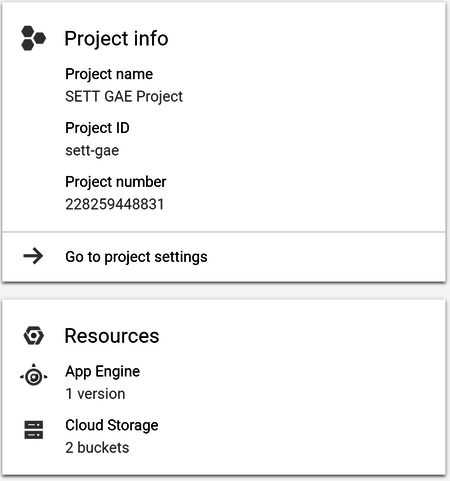
Looking at the GCP dashboard, you can see the project details:
Step 2 - Serve an index.html File
A much more realistic example would be to serve up an html file.
We want this to be a single-page web application and only serve up one file named index.html. We do that by modifying app.go to call ServeFile:
...
import (
  "google.golang.org/appengine"
  "net/http"
)
...
func handler(w http.ResponseWriter, r *http.Request) {
  http.ServeFile(w, r, "./index.html")
}
The file it serves, index.html, looks like this:
<!DOCTYPE html>
<html>
<body>
<h1>Hello World!</h1>
</body>
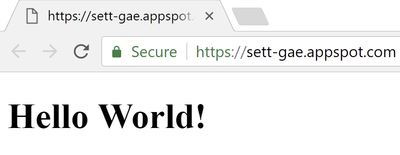
</html>Running locally and deploying the application results in the expected output:
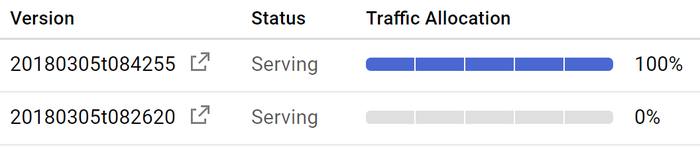
After deploying the second version, you can see both versions on the App Engine Versions page for your project. That page lets you delete old versions of your application, change to an older version, or split traffic between versions:
Step 3 - Add Logging
Logging is important for diagnosing issues and can easily be added.
Here is the change to app.go to add logging:
- import (
- ...
- "google.golang.org/appengine/log"
- ...
- )
- ...
- func handler(w http.ResponseWriter, r *http.Request) {
- ctx := appengine.NewContext(r)
- log.Debugf(ctx, "Serving index.html from handler function")
- http.ServeFile(w, r, "./index.html")
- }
After deploying you can view your logs here:
A log that you add in this way does not show up as a top-level item in the list of log entries; it resides within the log entry for the particular request that was in effect when you added the entry.
For instance:

Step 4 - Organize Project files
If this were a production application, it would probably utilize a module loader to ensure the proper loading of JavaScript files. It would also likely have folders to organize the different file types.
In this step we modify our example code in that way. The files (including new files for this step) will have this structure:
app.go
app.yaml
static
   +---html
   |       head.html
   |       homeDiv.html
   |       index.html
   |
   +---js
   |       init.js
   |
   \---lib
           require.js
The module loader we use is require.js, which can be downloaded at:
The index.html file is modified to load require.js and have it execute a new init.js file:
<!DOCTYPE html>
<html>
  <head>
    <script data-main="static/js/init.js" src="static/lib/require.js"></script>
  </head>
  <body>
  </body>
</html>
The init.js file loads jQuery and adds some html, anticipating possibly using different html files based on the sign-in state of the user:
requirejs.config({
  paths: {
    'jquery': 'https://code.jquery.com/jquery-3.2.1.min'
  }
});
require(['jquery'], function(jquery) {
  $.get("./static/html/head.html", function(data) {
    $('head').html(data);
    $.get("./static/html/homeDiv.html", function(data) {
      $('body').html(data);
    });
  });
});
The head.html file looks like this:
<meta charset="utf-8">
<meta http-equiv="X-UA-Compatible" content="IE=edge">
<meta name="viewport" content="width=device-width, initial-scale=1, shrink-to-fit=no">
And the homeDiv.html file looks like this:
<div id="homeDiv">
  <h1>Hello World!</h1>
</div>
Since index.html was moved, app.go must be modified to reflect that change:
...
func main() {
http.Handle("/static/", http.FileServer(http.Dir(".")))
http.HandleFunc("/", handler)
appengine.Main()
}
func handler(w http.ResponseWriter, r *http.Request) {
ctx := appengine.NewContext(r)
log.Debugf(ctx, "Serving index.html from handler function")
http.ServeFile(w, r, "./static/html/index.html")
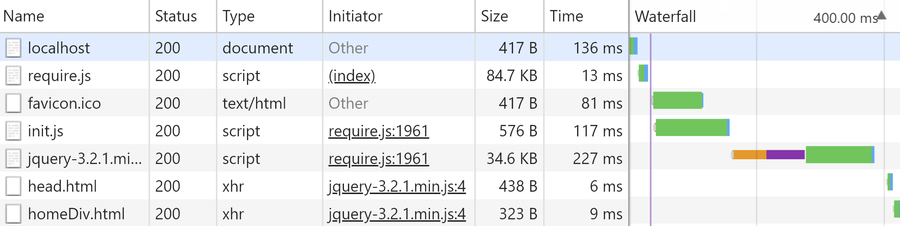
}When running the application locally, you can see how the application is loaded.
Using the module loader ensures that all of the parts are loaded in the proper order:
Step 5 - Add Authentication
Adding authentication is simple, but there are several steps involved.
The GCP documentation states that Firebase Authentication is the easiest method to implement, so that is what we use here.
- Sign into the Firebase console to create a Firebase app and associate it with your web application here:
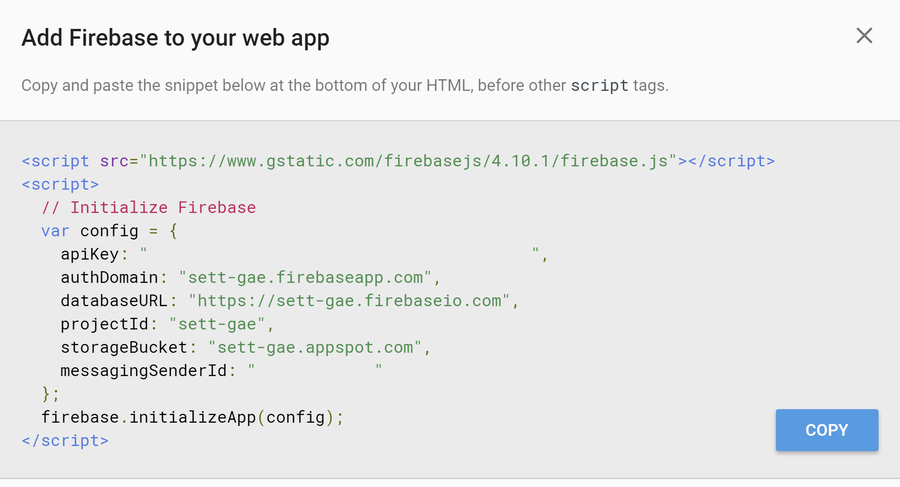
- Add a Firebase project, then click "Add Firebase to your web app" to get the configuration information (apiKey, etc.) necessary to authenticate your app.
- Click the "Copy" button, then paste the Firebase initializion settings somewhere to be used later in this section when modifying the init.js file (when creating an
initFirebasefunction).
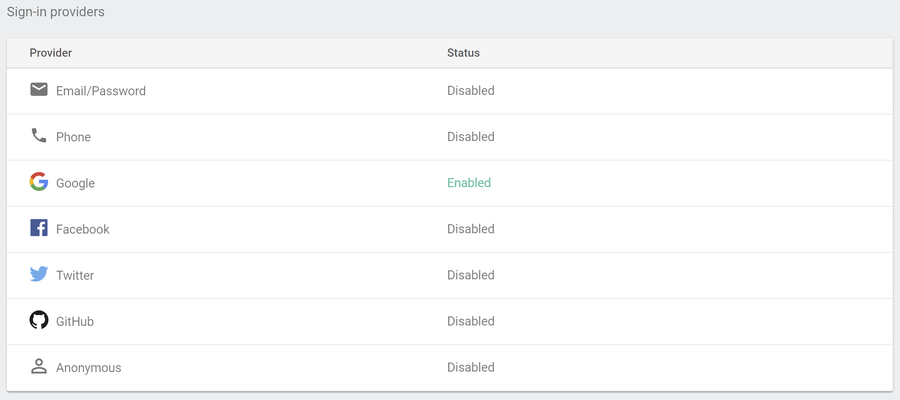
- Go to the Firebase Authentication page and click on "Sign-in Method" to enable Google as a sign-in provider.
You will need to enable the Google provider, which should be pre-populated with your project Id and your Web SDK configuration.
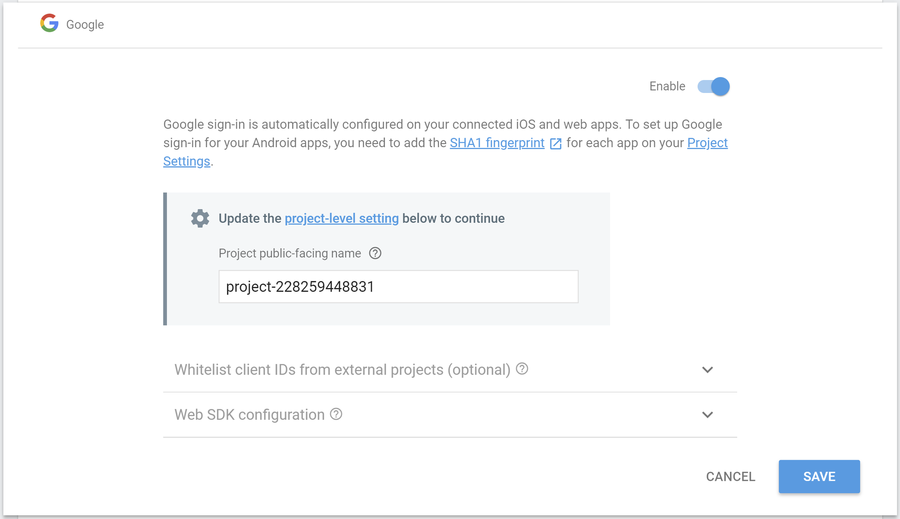
- Click "Save" to persist that change, and you should see that the Google provider is enabled:
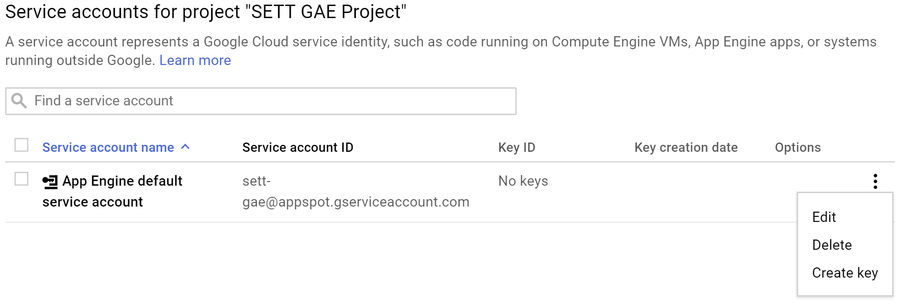
You will also need to create a service account key.
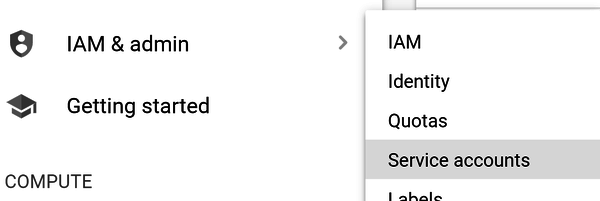
- Select "IAM & admin", then "Service accounts"
- Next, click on "Create key"
That will open a "Create private key" dialog.
- Click "Create"
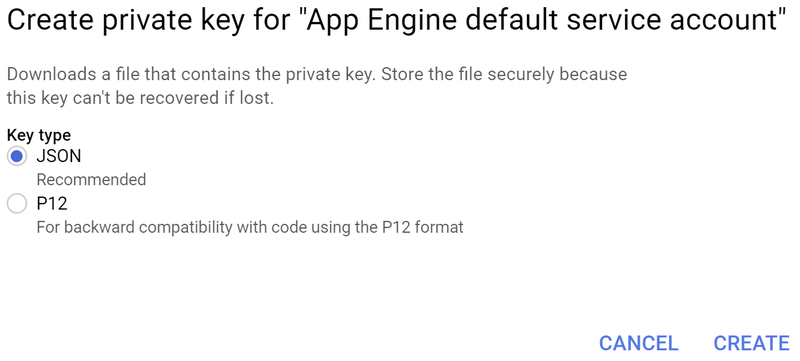
That will download a file containing the key, which you should save and reference from your app.
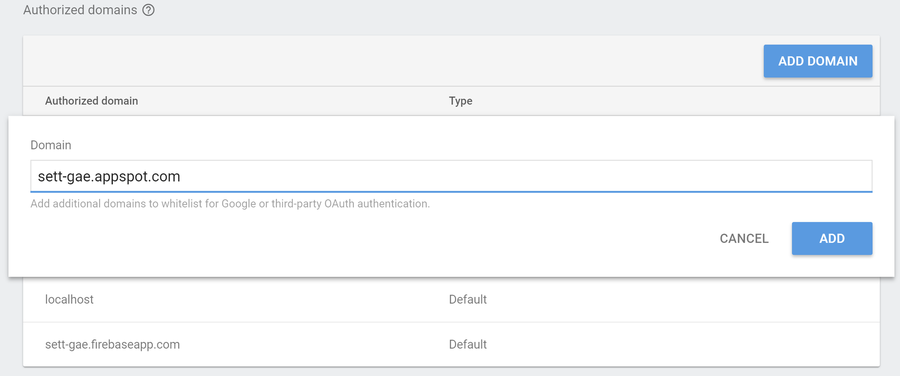
You will also need to add an authorized domain to the Firebase Authentication page:
To let the user sign into our application, we add a sign-in button to the homeDiv.html:
<div id="homeDiv">
  <h1>Hello World!</h1>
  <button id="sign-in">Sign in</button>
</div>
A userDiv.html file is added to provide a sign-out button:
<div id="userDiv">
  <h1>You're signed in!</h1>
  <button id="sign-out">Sign out</button>
</div>
Next, init.js is modified to load the Firebase JavaScript file, then call initApp to determine which div to load:
requirejs.config({
  paths: {
    'jquery': 'https://code.jquery.com/jquery-3.2.1.min',
    'firebase': 'https://www.gstatic.com/firebasejs/4.10.1/firebase'
  },
  shim: {
    'firebase': {
      exports: 'firebase'
    }
  }
});

require(['jquery', 'firebase'], function(jquery, firebase) {
  $.get("./static/html/head.html", function(data) {
    $('head').html(data);
    initApp();
  });
});
The initApp function initializes Firebase, then specifies a function to be called when the Firebase onAuthStateChanged event occurs.
When sign-in is successful, we get the IdToken and send it to the web service by calling login to make sure the authentication token is valid and the user signing in is allowed to use the system.
The login handler (defined in the web service app.go file) might look up the user in a database, then present a Join page if the user is not found. For this example we just call initUserDiv to load userDiv.html. When login returns and indicates that sign-in was unsuccessful, we call a initHomeDiv function to load homeDiv.html.
The initApp function also calls the Firebase getRedirectResult function, which returns a user credential object from the redirect-based sign-in flow. For this example we are just writing user information to the console, but a real application might have logic to present user-specific content.
Here is what the initApp function in init.js looks like:
function initApp() {
  initFirebase();

  firebase.auth().onAuthStateChanged(function(user) {
    if (user) {
      user.getIdToken().then(function(id_token) {
        $.post("login", { Id: id_token }, function() {
          console.log("onAuthStateChanged - verifying login");
        })
        .done(function(result) {
          console.log("onAuthStateChanged - done.  result.WasSuccessful: " + result.WasSuccessful);
          console.log("onAuthStateChanged - done.  result.Message: " + result.Message);
          if (result.WasSuccessful) {
            initUserDiv();
          }
          else {
            firebase.auth().signOut();
          }
        })
        .fail(function() {
          console.log("onAuthStateChanged - fail");
        })
        .always(function() {
          console.log("onAuthStateChanged - always");
        })
        .catch(function(error) {
          console.log("onAuthStateChanged - exception");
        });
      });
    }
    else {
      initHomeDiv();
    }
  });

  firebase.auth().getRedirectResult().then(function(result) {
    if (result.credential) {
      var token = result.credential.accessToken;
      console.log("getRedirectResult - token: " + token);
      if (result.user) {
        console.log("getRedirectResult - user name: " + result.user.displayName);
        console.log("getRedirectResult - user email: " + result.user.email);
      }
    }
  }).catch(function(error) {
    console.log("getRedirectResult - error code: " + error.code);
    console.log("getRedirectResult - error message: " + error.message);
  });
}
When the webpage is initially loaded, initApp initializes Firebase, which results in onAuthStateChanged triggering and either the HomeDiv or the UserDiv being loaded.
The initFirebase function (called by initApp) creates a config object, then uses it to call the Firebase initializeApp function.
You will want to use the configuration values from the "Add Firebase to your web app" step for your project:
function initFirebase() {
  var config = {
    apiKey: "<API-KEY>",
    authDomain: "<AUTH-DOMAIN>",
    databaseURL: "<DATABASE-URL>",
    projectId: "<PROJECT-ID>",
    storageBucket: "<STORAGE-BUCKET>",
    messagingSenderId: "<MESSAGE-SENDER-ID>"
  };

  firebase.initializeApp(config);
}
The initHomeDiv and initUserDiv functions load the appropriate html, then define click handlers for sign-in or sign-out:
function initHomeDiv() {
  $('#userDiv').remove();
  $.get("./static/html/homeDiv.html", function(data) {
    $('body').html(data);
    $('#sign-in').click(function() {
      $('#sign-in').prop('disabled', true);
      var provider = new firebase.auth.GoogleAuthProvider();
      firebase.auth().signInWithRedirect(provider);
    });
  });
}

function initUserDiv() {
  $('#homeDiv').remove();
  $.get("./static/html/userDiv.html", function(data) {
    $('body').html(data);
    $('#sign-out').click(function() {
      $('#sign-out').prop('disabled', true);
      firebase.auth().signOut();
    });
  });
}
The app.go file is modified to handle the login request by calling login_handler:
import (
  "encoding/json"
  "firebase.google.com/go"
  "fmt"
  "google.golang.org/api/option"
  "google.golang.org/appengine"
  "google.golang.org/appengine/log"
  "net/http"
)

func main() {
  http.Handle("/static/", http.FileServer(http.Dir(".")))
  http.HandleFunc("/login", login_handler)
  http.HandleFunc("/", handler)
  appengine.Main()
}
A login_handler function is added to app.go. That function returns a JSON string representing a LoginResult structure.
- First create a
LoginResultobject inlogin_handler, then verify the token passed in from the web client when theonAuthStateChangedevent occurs. - That verification is done by the Firebase
VerifyIDTokenfunction, which verifies the signature and payload of the provided ID token. VerifyIDTokenis called on a FirebaseClientobject, which is obtained by calling the FirebaseAuthfunction.Authis called on a FirebaseAppobject, which is obtained by calling the FirebaseNewAppfunction.NewApptakes aClientOptionobject, which is obtained by callingWithCredentialsFileto read the JSON service account file.- After we call
VerifyIDToken, we simulate looking up the user in a database. In this case, we compare the UID member of the token with a known UID and set the members of theLoginResultaccordingly. A more complete system would handle that lookup differently.
The login_handler function looks like this:
type LoginResult struct {
  WasSuccessful bool
  Message string
}

func login_handler(w http.ResponseWriter, r *http.Request) {
  ctx := appengine.NewContext(r)
  log.Debugf(ctx, "login called")

  result := LoginResult{false, ""}

  id_token := r.FormValue("Id")
  if id_token == "" {
    result.Message = "failed to get id_token"
    log.Debugf(ctx, result.Message)
  } else {
    log.Debugf(ctx, "id_token: %s", id_token)
    opt := option.WithCredentialsFile("./serviceAccountKey.json")
    if opt == nil {
      result.Message = "failed to get service account key"
      log.Debugf(ctx, result.Message)
    } else {
      app, err := firebase.NewApp(ctx, nil, opt)
      if err != nil {
        result.Message = fmt.Sprintf("error initializing app: %v\n", err)
        log.Debugf(ctx, result.Message)
      } else {
        client, err := app.Auth(ctx)
        if err != nil {
          result.Message = fmt.Sprintf("error getting Auth client: %v\n", err)
          log.Debugf(ctx, result.Message)
        } else {
          token, err := client.VerifyIDToken(id_token)
          if err != nil {
            result.Message = fmt.Sprintf("error verifying ID token: %v\n", err)
            log.Debugf(ctx, result.Message)
          } else {
            // Simulate looking up user in a database...
            if (token.UID != "<YOUR UID HERE>") {
              result.Message = fmt.Sprintf("Invalid user - UID: %v\n", token.UID)
              log.Debugf(ctx, result.Message)
            } else {
              result.WasSuccessful = true
              result.Message = fmt.Sprintf("Verified UID: %v\n", token.UID)
              log.Debugf(ctx, result.Message)
            }
          }
        }
      }
    }
  }
  w.Header().Set("Content-Type", "application/json; charset=utf-8")
  json.NewEncoder(w).Encode(result)
}
That method references the serviceAccountKey.json file that was saved in the "Create a private key" step.
That file looks like this:
{
"type": "service_account",
"project_id": "<YOUR_VALUE_HERE>",
"private_key_id": "<YOUR_VALUE_HERE>",
"private_key": "<YOUR_VALUE_HERE>",
"client_email": "<YOUR_VALUE_HERE>",
"client_id": "<YOUR_VALUE_HERE>",
"auth_uri": "https://accounts.google.com/o/oauth2/auth",
"token_uri": "https://accounts.google.com/o/oauth2/token",
"auth_provider_x509_cert_url": "https://www.googleapis.com/oauth2/v1/certs",
"client_x509_cert_url": "<YOUR_VALUE_HERE>"
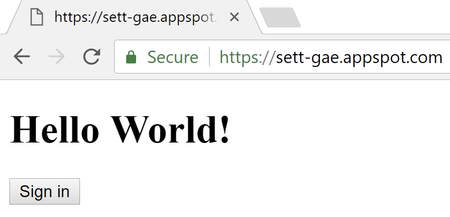
}When the website first loads, when the user has signed out, or when sign-in is not successful, this page is displayed:
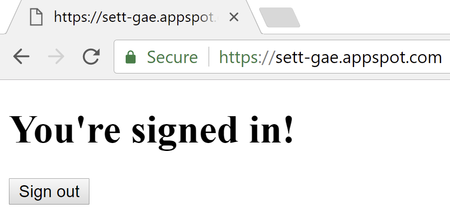
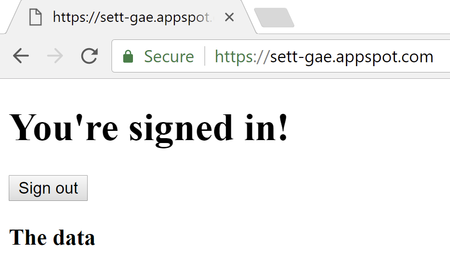
When sign-in is successful this page is displayed:
Step 6 - Add a Backend Service
The final step is to add a backend service to provide data to the website. We will limit access to that backend service so that only the web service can access it.
To begin, we will create a new service with the sole job of returning some data. That service will consist of app.yaml and app.go.
The app.yaml file specifies the name of the data service, which will be created when we first deploy it:
runtime: go
api_version: go1
service: data-service
handlers:
- url: /.*
  script: _go_app
The app.go file defines a handler that will provide the data.
We are only allowing the HTTP GET method for this example and returning some data by populating a DataResponse object and encoding it as JSON.
The app.go file looks like this:
package main

import (
  "encoding/json"
  "net/http"
  "google.golang.org/appengine"
  "google.golang.org/appengine/log"
)

type DataResponse struct {
  Status string
  Data string
}

func main() {
  http.HandleFunc("/data", data_handler)
  http.HandleFunc("/", error_handler)
  appengine.Main()
}

func data_handler(w http.ResponseWriter, r *http.Request) {
  ctx := appengine.NewContext(r)
  log.Debugf(ctx, "data function called")
  log.Debugf(ctx, "method: %s", r.Method)
  if r.Method == http.MethodGet {
    w.Header().Set("Content-Type", "application/json; charset=utf-8")
    response := DataResponse{"success", "The data"}
    json.NewEncoder(w).Encode(response)
  } else {
    log.Debugf(ctx, "invalid method")
    w.WriteHeader(http.StatusBadRequest)
  }
}

func error_handler(w http.ResponseWriter, r *http.Request) {
  ctx := appengine.NewContext(r)
  log.Debugf(ctx, "unknown function called")
  w.WriteHeader(http.StatusBadRequest)
}
Deploying the app will create the specified service in the current project, resulting in an app whose data can be accessed at:
Once deployed, the services can be seen on the App Engine Versions page:
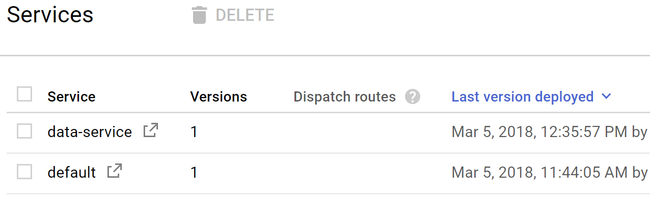
The default service (our web service) is:
The data-service service is:
To understand the "-dot-" part of that address, read the "How Requests are Routed" page:
Entering https://data-service-dot-sett-gae.appspot.com/data results in:

We do not want to make the data service public; it should be accessible only from the web service.
If the deployed application is running, we check the X-Appengine-Inbound-Appid header field to see if it contains the unique application ID associated with our web service. Google will strip the X-Appengine-Inbound-Appid field from any external requests, so if the request has the field and it matches the ID of our web service, we know it is a valid request.
If we are running the development app server, we skip the check for X-Appengine-Inbound-Appid, since it will be nil in that case.
With the Appid check, data_handler looks like this:
func data_handler(w http.ResponseWriter, r *http.Request) {
  ctx := appengine.NewContext(r)
  log.Debugf(ctx, "data function called")
  log.Debugf(ctx, "method: %s", r.Method)
  if r.Method == http.MethodGet {
    if !appengine.IsDevAppServer() {
      inbound_appid := r.Header.Get("X-Appengine-Inbound-Appid")
      log.Debugf(ctx, "inbound_appid: %s", inbound_appid)
      if inbound_appid != "sett-gae" {
        log.Debugf(ctx, "invalid inbound_appid")
        w.WriteHeader(http.StatusBadRequest)
        return
      }
    }
    w.Header().Set("Content-Type", "application/json; charset=utf-8")
    response := DataResponse{"success", "The data"}
    json.NewEncoder(w).Encode(response)
  } else {
    log.Debugf(ctx, "invalid method")
    w.WriteHeader(http.StatusBadRequest)
  }
}
For this last example, we modify initUserDiv in the init.js file to call the web service to get the data. The web service will call the data service and return the results to the client. We then show the response on the web page:
function initUserDiv() {
  $('#homeDiv').remove();
  $.get("./static/html/userDiv.html", function(data) {
    $('body').html(data);
    $('#sign-out').click(function() {
      $('#sign-out').prop('disabled', true);
      firebase.auth().signOut();
    });
    $.get("./data", function(data) {
      $('body').append("<h3>" + data.Data + "</h3>");
    }).fail( function() {
      $('body').append("<h3>Error</h3>");
    });
  });
}
We also make some modifications to the app.go file of the web service.
First we import the urlfetch package, since we will be using that to call the data service:
import (
  ...
  "google.golang.org/appengine/urlfetch"
  ...
)
We then modify the app.go file of the web service to have a handler for a data request.
The web client calls the data method of the web service, which creates a urlfetch Client using the current context, then calls Get on that client, passing in the URL of the data service method to call.
The response from the data service is then returned to the web client:
func main() {
...
http.HandleFunc("/data", data_handler)
...
}
func data_handler(w http.ResponseWriter, r *http.Request) {
ctx := appengine.NewContext(r)
log.Debugf(ctx, "data function called")
log.Debugf(ctx, "method: %s", r.Method)
if r.Method == http.MethodGet {
log.Debugf(ctx, "GET - data")
w.Header().Set("Content-Type", "application/json; charset=utf-8")
client := urlfetch.Client(ctx)
var url = ""
if appengine.IsDevAppServer() {
url = "http://localhost:8081/data"
} else {
url = "https://data-service-dot-sett-gae.appspot.com/data"
}
data_service_response, err := client.Get(url)
if err != nil {
log.Debugf(ctx, "Error calling data. Error: %s", err.Error())
http.Error(w, err.Error(), http.StatusInternalServerError)
return
}
bodyBytes, err := ioutil.ReadAll(data_service_response.Body)
bodyString := string(bodyBytes)
log.Debugf(ctx, "Response: %s", bodyString)
w.Write(bodyBytes)
} else {
log.Debugf(ctx, "invalid method")
w.WriteHeader(http.StatusBadRequest)
}
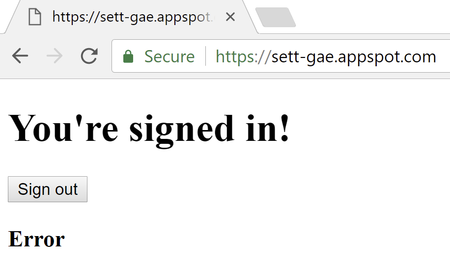
}An error will be displayed if the data cannot be obtained:
If there are no errors, the data is displayed:
The files associated with this final step have this structure:
data_service
       app.go
       app.yaml

web_service
   |   app.go
   |   app.yaml
   |   serviceAccountKey.json
   |
   \---static
        +---html
        |       head.html
        |       homeDiv.html
        |       index.html
        |       userDiv.html
        |
        +---js
        |       init.js
        |
        \---lib
                require.js
The code for all of the examples in this article can be downloaded here.
Summary
This article demonstrated how to create a simple cloud application that could be used as a starting point for a more complex system.
The tasks of user authentication and service isolation, which are necessary for any production system, were demonstrated. For your own system you might want to look into the other authentication methods provided by Firebase, such as password authentication, which lets users log in with an email address and a password, and which simplifies password reset and email address updates.
You might also want to look at some of the other Google Cloud Platform components that you can pull into your system, such as cloud storage, load balancing, and system monitoring.
Hopefully this article will be useful to anyone trying to get started with cloud system development.
Request a Microservices Architecture Assessment
Simplify your operations and establish a nimble approach to development by transforming your complex applications into interoperable services that can be modified and deployed independently.
Allow us to perform a review of your current technology, architecture, and digital tools, and we’ll show you how microservices can transform your IT organization.
What you can expect from a microservices architecture assessment:
- An organizational readiness analysis and accompanying set of recommendations for microservices development
- Identification of key areas best suited to a microservices architecture
- An outline of platform infrastructure options to prepare your organization for a transition to microservices
- Development of CI/CD strategies to optimize microservices testing and delivery
- An execution plan, comprising relevant options and a technical training plan
