Greenfoot: a live object world for students
By Nathan Tippy, OCI Senior Software Engineer
August 2008
Background
Homeschooling parents, computer science instructors and tutors continually seek new and engaging ways to teach children computer skills. One very popular platform for teaching the basics of programming logic is Scratch from the Lifelong Kindergarten group at the MIT Media Lab. It's a great environment that requires only basic reading and math skills; anyone six and up would have a blast with it. Scratch distills programming down to a series of drag and drop operations. For this reason, it has its limitations (such as no dynamic object creation), which can lead to frustration once the platform is mastered. When this happens, it should be taken as a sign that it's time to move on to a more powerful platform like Greenfoot. However, don't let this discourage you from letting your little ones try out Scratch.
Being proficient enough with programming to be able to write Java source using Eclipse or any of the other popular IDEs is the ultimate goal, but new students who find Scratch easy often find a fully integrated development environment intimidating. Students can also be discouraged with all the scaffolding that must be built before their creations come to life. Greenfoot solves this problem by creating a live object world framework in which students interact with new objects as they are developed. In addition to teaching programming, Greenfoot can also be used as a meta framework for micro worlds. This gives teachers of other subjects an easy-to-use tool to create domain specific visual scenarios for students. Because Greenfoot has built-in support for exporting scenarios to applets and the web, it provides a very easy way to quickly prototype games, utilities and other ideas.
Greenfoot is a joint project funded by Sun Microsystems and implemented at the University of Kent at Canterbury (UK) and Deakin University, Melbourne (Australia). The goal is to target students in the pre-teen years and older by providing a development environment which is both engaging and flexible. Greenfoot was built by some of the same people who created BlueJ: Poul Henriksen, Michael Kölling, Davin McCall, Bruce Quig (BlueJ, by the way, is a great teaching tool for understanding simple Java object relationships via UML.) Although Greenfoot uses the same UML as BlueJ to clearly show the object oriented design of each scenario, its true power resides in object visualization. It greatly lowers the bar for building graphical applications in Java; this is important because the quick positive feedback inspires students to work with the code more.
There are just a few classes to learn in order to make full use of the platform. The Greenfoot API is made up of only five classes (for details, see Greenfoot Java docs). The two primary classes that will be used in any scenario are World and Actor. These two are the base classes for everything that will have a visual representation in the scenario. World represents the canvas and provides the cell size and coordinate system for positioning the Actors. Actors are visual representations of objects which can interact with one another and the world. Both of these classes have an act() method which should be overridden with the desired behavior for the World or Actor. The act() method will be called by Greenfoot in a round-robin fashion on each object and this process will repeat as long as the scenario is running. This is a simplistic threading model; however, it provides a great opportunity for students to learn about the consequences of wasteful processes and encourages efficient code. This feature also gives the student an opportunity to think about asynchronous solutions without burdening them with other complexities such as synchronization.
Getting Started
To get started, download the installer and follow the installation instructions. Greenfoot projects are known as scenarios; a fresh install comes with a few to help the new student get started. Because Greenfoot simplifies the visual aspects of development, it frees up students to experiment and try out new ideas. As a result there are lots of game scenarios available to play with on-line, and some of the available scenarios are great demonstrations of emergent behavior (i.e. behavior resulting from interactions between actors that is not created by any single actor or rule). The boids and ants scenarios are excellent examples of this. We will be looking further at the ants scenario.
When Greenfoot is first started after a fresh install it may ask you to pick a JDK if you have more than one installed. Anything Java 5 (JDK 1.5) or better will work fine. After this it will ask if you would like to open the tutorial. Skip the tutorial for now; you can open it later from the help menu. Once it has started up use the Scenario menu item to open the ants scenario. If the default install location is used, the ants scenario should be found here: \scenarios\ants inside the Greenfoot installation folder.
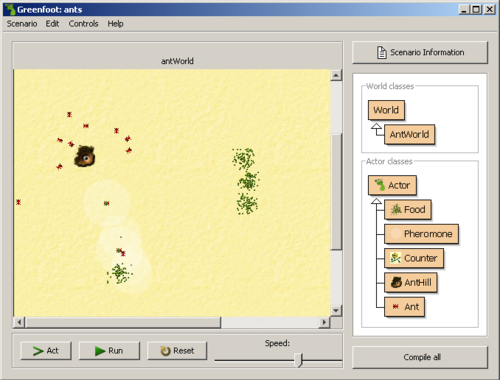
Once you have the scenario open, you will see the graphical representations of the objects to the left with simplified UML on the right representing the classes. Press the Run button to see the scenario at work. In this scenario, there is a world with a few AntHill and Food objects scattered about. The AntHills have a fixed number of Ant objects that will come out and randomly walk around until a Food object is found. Once a Food object is found part of the Food will be carried back to the AntHill. As the Ant object returns, it drops some Pheromone objects that will help the other Ants find more food.
Pressing the pause button temporarily suspends the action and allows the developer to directly interact with the actors. It also enables the Act button for viewing the simulation one step at a time. The location of any actor can be changed by simply dragging it with the mouse: try this in the ants scenario. Move some Food or an AntHill and watch to see how the rest of the simulation will react. Using the right click menu, try removing some Food from the world after the ants have established a path to it.
The right click menu also provides features such as dynamic inspection of all the member and static variables. An object inspector dialog can only be opened while the scenario is paused; however, it is updated in real time. The class inspector dialog is also updated in real time, but it can be opened any time from the right click menu of the class. Methods found on classes or objects are made available for direct invocation by the user on this same menu. If the calling method returns a value, it will be displayed; if it requires input, the user will be prompted. New actors can be added to the world by right clicking on the class and invoking the constructor. This will cause the actors image to appear with the mouse until it is placed in the world. Multiple instances can be created by holding down the shift key during this process. Invoking the constructor of the AntWorld class does the same thing as the Reset button and will start the scenario over from the beginning state.
All these features are excellent for both the new student and anyone wanting to try out some new idea. Debugging features that are often taken for granted by more senior developers have been seamlessly integrated into Greenfoot. Abstractions are commonplace in software development, but why make things abstract when they don't need to be? Greenfoot has helped greatly in this respect by clearly showing what happens "under the covers" as the scenario runs. The depth of visibility into what is happening as the scenario runs really helps to solidify the students' understanding of how things work.
Double clicking on the World or Actor classes will display their javadoc, but clicking on the other classes will open the source in a nice syntax-colored editor. The remainder of this news brief will highlight some interesting code snips of the Ants scenario. For more details and modifications, the source for each of these classes can be opened from the scenario.
AntWorld
The purpose of this class is simply to build the world and populate it with actors. At the top it imports Greenfoot.* All the classes generated by Greenfoot do this to ensure the API is available. AntWorld extends World and uses its constructor which defines the dimensions of the world and the size of each cell within the world. For this scenario, the cell size is fairly small, but a simple game like tic-tac-toe would have much larger cells. The SetBackground folder uses an image file to tile over the world. Any images used by a scenario will be put in a folder called /images within the scenarios folder. Setting the paint order is easy to overlook: it will become a problem if the Ants are painted under the AntHills. This method can take any class such as a common base class to allow for more complex situations. Limiting the declaration of paint order to simple class types helps the student to focus on the purpose of each class type. This is an example of one of the small ways that Greenfoot helps form an object oriented mindset in the new student.
The constructor calls scenario3() to place AntHills and Food in various locations within the world. Change this to scenario2() or scenario1() to see how the Ants react when the AntHills and Food are in other locations. When changes are made to a source file, it is marked with cross hatches in the main window to indicate that it needs to be compiled. There is no Save button: simply press Compile. This may be disconcerting for an experienced developer but it greatly simplifies the steps for the young student.
- public AntWorld()
- {
- super(SIZE / RESOLUTION, SIZE / RESOLUTION, RESOLUTION);
- setBackground("sand.jpg");
- setPaintOrder(Ant.class,
- Counter.class, Food.class, AntHill.class, Pheromone.class);
- scenario3();
- }
Counter
Within the Counter class is an example of how to update an image associated with an actor. The GreenfootImage class greatly simplifies this to prevent students from having to deal with the complexities of graphic contexts. Another way to view text data from actors is to send it to System.out but this would not be displayed within the world. Add something like system.out.println(text + value); to the end of the method below. This will cause a console window to open - displaying all the standard out text. Thus, illuminating what is going on in the scenario.
- private void updateImage()
- {
- GreenfootImage image = getImage();
- image.clear();
-
- image.setColor(Color.BLACK);
- image.drawString(text + value, 1, 12);
- }
AntHill
The act() method creates new ants at random intervals and adds them to the world. The helper methods getWorld(), getX() and getY() greatly simplify the logic involved in placing an Ant at the same location as its hill. All actors have X and Y coordinates that can be accessed and set. When the AntHill creates a new Ant it passes itself in. Hence, the Ant knows where to return the Food.
- public void act()
- {
- if(ants < maxAnts) {
- if(randomizer.nextInt(100) < 10)
- {
- getWorld().addObject(new Ant(this), getX(), getY());
-
- ants++;
- }
- }
- }
Ant
The act() method for Ant is easy to read. The hope is that students will emulate this clean approach.
- /**
- * Do what an ant's gotta do.
- */
- public void act()
- {
- if (haveFood()) {
- headHome();
- }
- else {
- walk();
- }
- }
-
- /**
- * Walk around in search of food.
- */
- private void walk()
- {
- if (foundLastPheromone > 0) { // if we can still remember...
-
- foundLastPheromone--;
-
- headAway();
- }
- else if (smellPheromone())
- {
-
- move();
- }
- else {
- randomWalk();
- }
- checkFood();
- }
The checkFood() method, called from the walk() method above, has another example of an excellent helper method. The getOneIntersectingObject() is provided by the Actor base class and deals with all the complexities of determining if spites intersect. It also restricts the intersection by class, once again pointing the student towards an object oriented approach to programming. Spending some time to review the Greenfoot Java docs would serve the student well. There are many other helpful methods such as getObjectsInRange(...) and setRotation(...) which greatly simplify the development of games and other graphically heavy applications. Making use of all these helper methods will also encourage cleaner, more readable source code.
- /**
- * Is there any food here where we are? If so, take some!.
- */
- public void checkFood()
- {
- Food food = (Food) getOneIntersectingObject(Food.class);
- if (food != null) {
- takeFood(food);
- }
- }
Conclusions
Greenfoot is an excellent and well thought-out tool for introducing youth to the art of software development. For the experienced developer there are features, like the absence of code completion, that may frustrate. However, it meets the need of the target audience admirably. One must admit, however, that nothing is perfect. When opening Greenfoot with window sizes other than the default, there are minor issues with repaint. And sluggishness is apparent here and there, especially on older hardware or inside a virtual machine. But these issues don't greatly impact the average user.
Give Greenfoot a try and share it with all the young people in your life. The quick feedback and tight development cycles provided by the Greenfoot environment are very addicting, making it a fantastic introductory platform for new students. For even more fun be sure to try out the Export to Webpage feature under the Scenario menu. There is nothing quite like the pride a student feels when they are publishing their own creations to the web. Remember that these experiences may be the student's first steps toward a career in software engineering. Make it fun!
If you are interested in looking deeper into Greenfoot visit the blog and join the mailing list.
Special thanks to Michael Kölling for helping with this JNB and providing the source examples.
Other great Greenfoot tutorials and scenarios
- [1] Wombat tutorial
- [2] Going to the Moon
- [3] Programmers manual
- [4] Greenfoot Gallery
