Introduction to Hudson Plugin Development
By Dan Lewis, OCI Senior Software Engineer
August 2010
Introduction
Hudson is the excellent continuous integration server written by Kohsuke Kawaguchi and others. Integral to Hudson is a plugin mechanism that allows third-parties to extend Hudson in several ways, including reporting test failures, results of automated code inspections, notification of broken builds and publication of build artifacts. This article will introduce the reader to the process of developing and modifying Hudson plugins through an easy-to-follow set of instructions and illustrations. While not a comprehensive treatise on Hudson plugin development or architecture, this article will help get you started with plugin development. This article does assume basic familiarity with Hudson. For a suitable introduction, see Automated Builds Made Easy with Hudson.
The Hello World Builder Plugin
The Plugin Tutorial on the Hudson WIKI gives the steps to create the example Hudson Plugin using Maven and how to open up the Plugin using IDE's that support Maven project integration. This article supplements the wiki by providing additional illustrated instructions.
1. Obtain Maven 2 and add to PATH
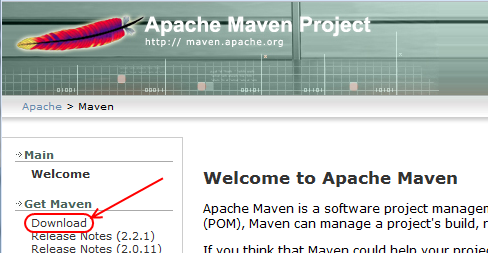
Navigate to http://maven.apache.org and download the latest Maven 2 release. The author used Maven 2.2.1.
2. Run Maven command to create Hudson Plugin Workspace
This will connect to the central Maven repository and download the necessary Maven information to create the workspace, then create it.
mvn -cpu hpi:create
...
"Enter the groupId of your plugin:" com.ociweb.jnb.aug2010
"Enter the artifactId of your plugin:" hpiExample
After answering the prompts as shown, a new workspace will be created inside the directory hpiExample. The Java package com.ociweb.jnb.aug2010 will be used.
3. Build the plugin
This will build the plugin.
cd hpiExample
mvn package
This will build the file target\hpiExample.hpi.
4. Download and run Hudson
Before proceeding, we need to download and run Hudson so that we will have somewhere to deploy this new plugin. Navigate to http://hudson-ci.org and download the latest Hudson release. The author used Hudson 1.369.

Create a directory, say "hudson" and copy the downloaded hudson.war to that directory and start it. This will start Hudson on the embedded Winstone servlet container.
mkdir hudson
cd hudson
java -jar hudson.war
Running from: C:\hudson\hudson.war
[Winstone 2010/07/27 06:34:58] - Beginning extraction from war file
hudson home directory: C:\Users\lewisd\.hudson
[Winstone 2010/07/27 06:34:59] - HTTP Listener started: port=8080
[Winstone 2010/07/27 06:34:59] - AJP13 Listener started: port=8009
Using one-time self-signed certificate
...
You may now navigate with your web browser to http://localhost:8080.

5. Install the plugin
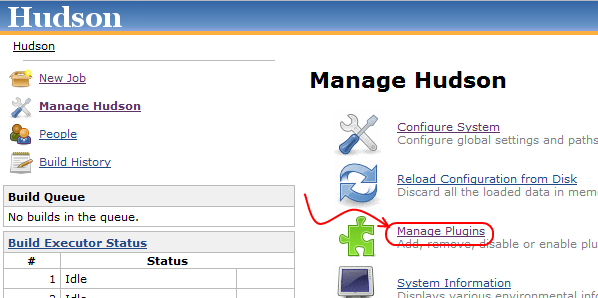
We can now install the plugin we built to the local Hudson instance we created. First, click to Manage Hudson.

Next, click to manage plugins.
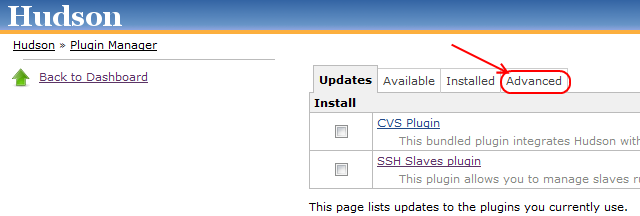
Next, click Advanced tab.
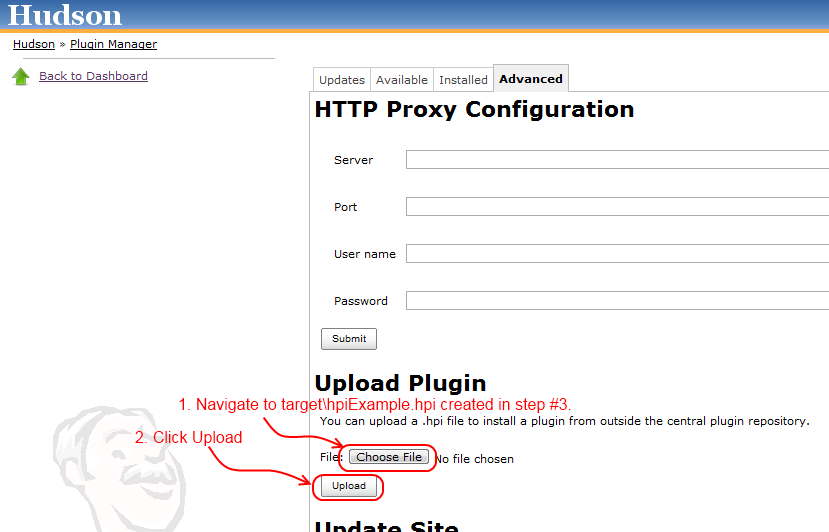
Next, upload the plugin.
Next, verify the plugin is installed. Note: You will need to stop and restart Hudson. On Windows, you may press Ctrl-C in the command window running Hudson.

Finally, we have the plugin installed.
6. Exercise the plugin
To exercise the plugin, let's check first for any global configuration options the plugin contributed.

Observe that it does provide the option to say hello in French as well as help available if you click on the question mark icon.
To exercise the plugin further let's first create a new trivial job. From the main "Manage Hudson" page click the "Create New Job" link.

Next, in the job config screen, type a name for the job, choose free-style project, and press OK.
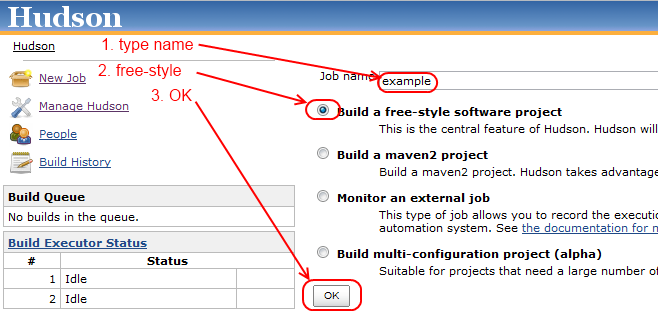
This will create a new Job and take you directly to the Job Configuration page. Scroll down to the Build section and click to add a new build step.

Now we see the Job configuration options for the Hello World Builder, again with help available if you click on the question mark icon.

Now, type a name and scroll to the bottom of the job configuration page and click "Save." Note that if your name is less than four characters long, i.e. "Dan", a warning will appear when you navigate away from the name field.

Next, you can run the job.
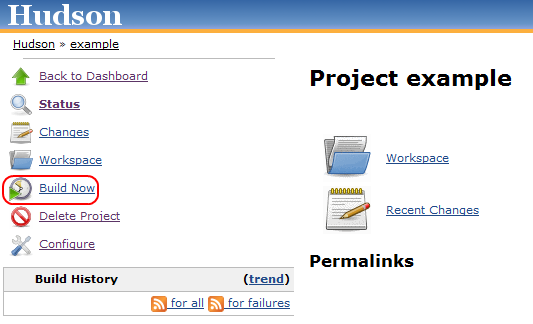
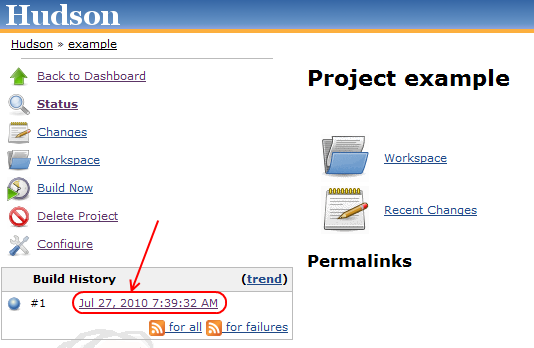
Next, you can see that the job ran and see the results. Click build #1 in this history.
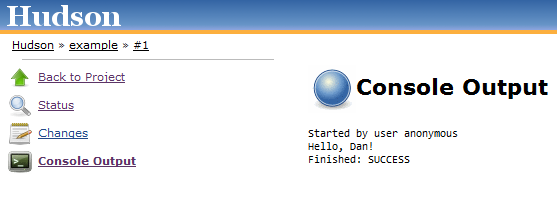
Now from the build page, you can click to see the console output.

Now we can see that our plugin performed it's build step by printing "Hello, Dan!".
Customizing the Hello World Builder Plugin
In the previous section we built, installed, verified and exercised the Hello World plugin that is available for download from the central Maven 2 repository. In this section, we will make some minor changes to the plugin and observe the results. For this article, the free and open source IntelliJ IDEA Community Edition will be used. However, Eclipse, Netbeans, or even a simple text editor could be used.
1. Open the Hudson Plugin project
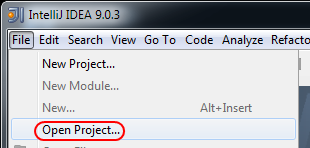
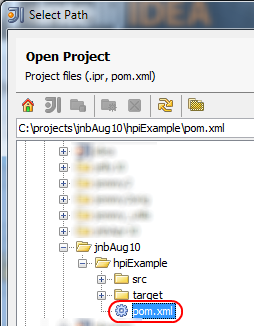
Open IDEA and click File->Open Project... from menu, then navigate to the pom.xml. IntelliJ IDEA recognizes the pom.xml as a Maven build file. Select "OK".
2. Navigate to the HelloWorldBuilder class
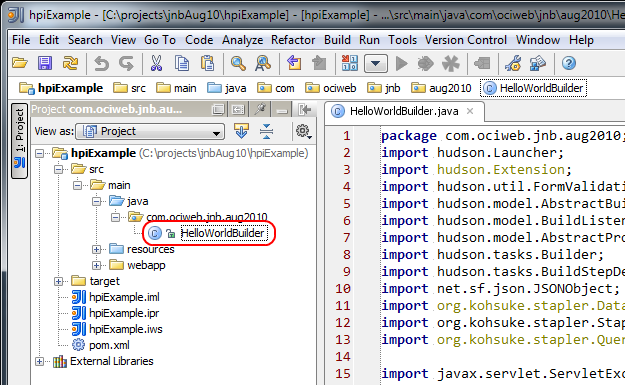
Click to open the project pane on the left side of the IDE, then navigate to hpiExample/src/main/java/com/ociweb/jnb/aug2010/HelloWorldBuilder and double click on HelloWorldBuilder.java.
3. Modify the Plugin
Now we're ready to make a small change. Because "Dan" is a common name, let's modify the name field validation to only warn if names are less than 3 characters long. To do this, we can edit the doCheckName() method.
/**
 * Performs on-the-fly validation of the form field 'name'.
 *
 * @param value
 *      This parameter receives the value that the user has typed.
 * @return
 *      Indicates the outcome of the validation. This is sent to the browser.
 */
public FormValidation doCheckName(@QueryParameter String value) throws IOException, ServletException {
    if(value.length()==0)
        return FormValidation.error("Please set a name");
    if(value.length()<3)
        return FormValidation.warning("Isn't the name too short?");
    return FormValidation.ok();
}
Note that if you look for usages of doCheckName() using the IDE's "find usages" feature, you won't find any. That is because Hudson is using Stapler to bind the validation of the name field to the doCheckName() method using Java reflection.
4. Build the Plugin and Observe Changes
At this point you can return to step three to rebuild, upload the updated plugin. However, a shortcut exists. Simply do mvn hpi:run. This will automatically start the Jetty servlet container with your plugin already deployed.

Observe that we don't see the "Isn't the name too short?" validation message anymore when the "Name" field loses focus.
We have customized the Hello World plugin and learned the basic techniques for building and installing a plugin. In the next section, we'll modify a more useful plugin that the author has used in a production environment.
Modifying an Existing Plugin
One of the strengths of Hudson is the ease with which you can take an existing plugin and modify it to suit your purposes. To illustrate this strength we will modify the Text-Finder Plugin. The Text-Finder Plugin can search the workspace and/or console for files containing a given regular expression and optionally fail the build or mark the build unstable. The author has used this relatively simple plugin in a production environment and found it to be useful. We will enhance the Text-Finder Plugin to add a description indicating why the build failed or was marked unstable. To start, we will check out the Text-Finder Plugin from the source control repository. The wiki page Checking out existing plugins describes the process of checking out an existing plugin. We will utilize this information in the next step.
1. Check out the Text-Finder Plugin
For this step you will need a command-line svn client. On Windows, the author recommends SlikSVN.
Once you have installed a command-line svn client, you may issue the following command:
svn co https://svn.dev.java.net/svn/hudson/trunk/hudson/plugins/text-finder2. Build the Text-Finder Plugin
We have now checked out the Hudson Text-Finder plugin into the text-finder directory. Now, let's build it.
cd text-finder
mvn package
This will build the file target\text-finder.hpi.
At this time you can install it into your Hudson instance as described above and exercise it inside the job we created in the previous section. This exercise is left to the reader.
3. Modify the Text-Finder Plugin
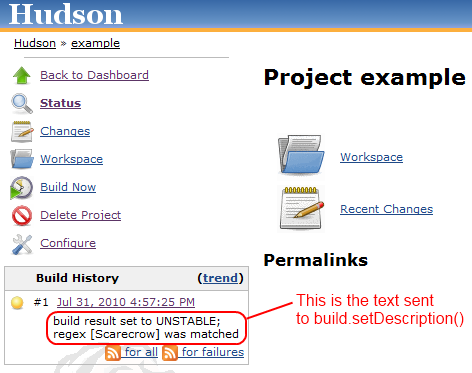
Now we can open the Text-Finder pom.xml using IntelliJ IDEA. Navigate to TextFinderPublisher.java and double-click to open. Scroll down to the end of the findText() method and modify the code to call the Build.setDescription() method. This method sets the description of an individual build of a project. The build description is visible in the Build History pane on the left side of the project page. It is also visible in the build detail page.
Before:
             if (foundText != succeedIfFound)
                build.setResult(unstableIfFound ? Result.UNSTABLE : Result.FAILURE);
        } catch (AbortException e) {
            // no test file found
            build.setResult(Result.UNSTABLE);
        }
    }
After:
            if (foundText != succeedIfFound) {
                build.setResult(unstableIfFound ? Result.UNSTABLE : Result.FAILURE);
                build.setDescription("build result set to " + build.getResult()
                		+ "; regex [" + regexp + "]" + (foundText ? " was " : " was not ") + "matched");
            }
        } catch (AbortException e) {
            // no test file found
            build.setResult(Result.UNSTABLE);
            build.setDescription("build result set to " + build.getResult()
            		+ " because Text-Finder aborted");
        }
    }
4. Observe the Changes
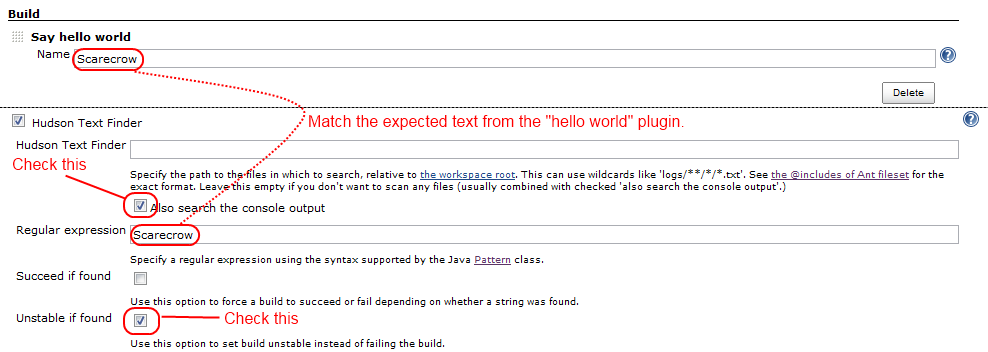
To observe the changes, edit the project configuration page and use "Scarecrow" as the name in Hello-World Plugin and also as the regular expression in the Text-Finder Plugin. Be sure the check the "Also search the console output" checkbox and the "Unstable if found" checkbox as shown in the image below.
Now save the changes and build the project. You should see something like the following image.
Conclusion
Hudson is a mature free and open-source continuous integration solution with a rich set of free third-party plugins available. With the help of this article you created and modified your own "toy" Hudson plugin and modified an existing "real" plugin. For further reading about Hudson Plugin development, please see the Hudson Wiki page Extend Hudson.
References
- [1] Hudson
http://hudson-ci.org - [2] Plugin Tutorial on Hudson Wiki
http://wiki.hudson-ci.org/display/HUDSON/Plugin+tutorial - [3] SETT Article (Dec 2006): Automated Builds Made Easy with Hudson
- [4] Kohsuke Kawaguchi personal website
http://kohsuke.org - [5] JSON (JavaScript Object Notation)
http://json.org - [6] Stapler
https://stapler.dev.java.net/ - [7] Apache Commons Jelly
http://commons.apache.org/jelly/ - [8] Winstone Servlet Container
http://winstone.sourceforge.net/ - [9] IntelliJ IDEA Community Edition
http://www.jetbrains.com/idea/free_java_ide.html
