MongoDB
By Nathan Tippy, OCI Senior Software Engineer
August 2011
Introduction
MongoDB is a popular open source document-oriented NoSQL solution from 10gen. It is known for having excellent performance and scalability. The most frequent criticism of MongoDB has been its purported lack of single server durability. As of this writing the server is at version 1.8.2 and the Java driver is at 2.6.3.
Striking a balance between Performance, Durability and Consistency
MongoDB has an abundance of configuration options when setting up a new server or cluster. What are the consequences of each of these in your production environment? How can you get the best performance out of the given hardware and meet your durability and consistency requirements? It might take many days to set up and test each of the possible configurations that look promising. This is especially likely if the setup needs to be tested with many gigabytes or even terabytes of data. To assist in answering these questions I have put together a small utility to quickly test out different configurations and some of the results are here for comparison.
MongoDB Stress Test (MOST)
MOST is a small Java program driven by configuration values in the most.properties file. The application will launch and configure all the required MongoDB instances. Once it starts up the server instances, it will run a simple load test against the configuration. MOST will also log each of the command line instructions and JavaScript configuration commands out to the console so you can see exactly how the configuration was set up. This will be helpful for duplicating the configuration for a production environment.
Download the MOST utility here and download the appropriate version of the MongoDB server from http://www.mongodb.org/downloads. Be sure to download the 64-bit version; the 32-bit version is only appropriate for small scale testing. You will also need Maven and 64-bit JDK installed on your test machine.
The most.properties file contains all the properties needed to define the MongoDB configurations and the size/type of the tests to run. Please review this file for the test setup details.
If you wish to do your own testing be sure to set the following platform-specific properties. There are many other properties that can be set for testing but they are outside the scope of what we are focusing on.
mongodb.install = <Folder where you unzipped MongoDB>
mongodb.databaseFolders=<folders separated by ; one for each db instance>
mongodb.shard.configFolders=<folders separated by ; only for sharding config>
Once all the properties are set the tests can be launched with Maven
mvn compile exec:java -Dexec.mainClass="com.ociweb.mongoDB.most.MOST" -Dexec.args="./src/main/resources/most.properties"Each test writes one million documents documents of 16KB each batched in groups of 256. This pushes data into MongoDB in blocks of 4MB at a time which is optimal for its design. These numbers also give us a final test database of 16GB. This is large enough to get some good results but small enough to allow for multiple test runs. Each test writes the documents 1 to N into the database and then immediately, and on separate threads, reads the documents back N down to 1. This is done as an attempt to capture the case where writes have not been flushed to disk fast enough for the reads.
In a real world situation there would be a much broader mix of read and write commands, so many of the numbers below may not be achievable. However, they are good for comparison against one another. The test hardware used has 16GB of RAM and five 7200 RPM drives. Many others have reported excellent results with SSD, but when it comes to very large data sets a traditional hard drive is still the most economical decision. All the tests were run locally so network limitations were not a consideration. The CPU is a 6 core 3.7 GHz setup and it was not maxed out except where noted in the single instance test. It is highly recommended, when deploying a MongoDB solution, that multiple servers are used to ensure durability.
Testing a Single Instance
Setting up a single instance of MongoDB is the simplest configuration possible. This may not be desirable in a real world production environment but is ideal for our investigation into some of features that will also be applicable in more complex configurations.
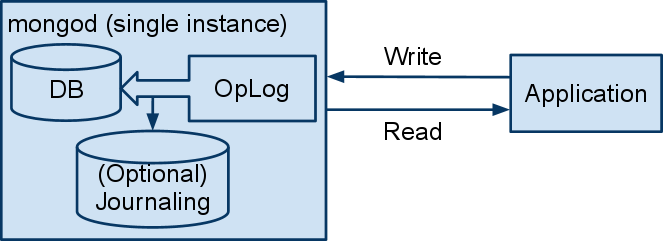
Diagram 1
When writing to MongoDB, operation documents are put in the operations log before getting saved to disk. Setting the write concern to NORMAL allows the write call to return without waiting for the write to complete. This allows for greater performance but can lead to consistency problems. A second connection to this single instance will continue to read the old state until this particular document is written.
Setting the write concern to SAFE forces the operation to be written to disk before returning to the caller. This will slow performance but provide greater consistency. Note that for a single threaded application or one that uses a single connection, reads will always reflect the most recent writes even when using the NORMAL write concern. This is because it's aware of what is still pending to be written from this connection.
Setting the write concern to FSYNC_SAFE will wait to return until after the server has flushed the write to disk based on its own configuration. By default this occurs at a rate of once every 60 seconds and can be modified with the --syncDelay command line argument. The MOST utility supports other arguments like this one in the property file so feel free to try configurations beyond the ones demonstrated here.
Journaling is off by default but it can be easily enabled to ensure quick start up times after unexpected events. MongoDB uses memory mapped files for storing information to disk and if the server should be shutdown uncleanly it may be left in an indeterminate state. When this occurs the administrator must run the mongod --repair command. This may take many hours depending on the size of the database. If journaling is enabled with the --journal argument it will consume more drive space but the lengthy repair after an unexpected event will be avoided. Journaling will hurt performance a little but if the drive space is available it might worth the cost. Note that journaling is for rapid recovery and assists some in durability but has no impact on consistency.
Capped collections are initialized to have a fixed size before they are used. When they become full the oldest data is discarded to make room for new documents. Because they do not have to allocate drive space on the fly they can provide much faster writes than a traditional collection can achieve. Capped collections are often used for logging or queuing up data for momentary processing. The operations log itself is a capped collection. All the tests using capped collections have been initialized to be large enough to hold the entire test so none of the test documents are lost. This initialization can take many minutes and is not reflected in the test times because it would only be done once in a production deployment.
Test Results 1 were produced with a smaller test data set of 1.6GB (only 100,000 docs), well inside the 16GB of RAM in the test machine. This provides some of the best results achievable from a single machine because the entire database can be held in RAM. Not surprisingly, these tests maxed out the CPU because all the read operations were exclusively from RAM.
In an effort to keep the test result tables simple the documents per second will be left off. All the tests are run with 16KB documents so an estimate of the documents per second can be computed by dividing the MBs value by 16. This will produce an estimated value in units of thousands of documents per second.
Test Results 1: (Single instance all In RAM test) MBs == 2^20 Bytes per second
| Write Concern | Journal | Capped | Write Result | Read Results | Consistent Reads | |
|---|---|---|---|---|---|---|
| A | NORMAL | No | No | 481 MBs | 797 MBs | >99% |
| B | SAFE | No | No | 296 MBs | 927 MBs | 100% |
| C | NORMAL | Yes | No | 51 MBs | 738 MBs | 100% |
| D | SAFE | Yes | No | 47 MBs | 891 MBs | 100% |
| E | NORMAL | No | Yes | 501 MBs | 831 MBs | 100% |
| F | SAFE | No | Yes | 295 MBs | 832 MBs | 100% |
| G | NORMAL | Yes | Yes | 51 MBs | 845 MBs | 100% |
| H | SAFE | Yes | Yes | 46 MBs | 851 MBs | 100% |
Overall it is clear that an instance of MongoDB works best when it has enough RAM to hold the full database. In this configuration it may be faster than many caching solutions. However, since this is probably not very common the remaining tests will investigate how well it can perform when there is not enough RAM for the database.
(A) was unable to read the last 153 documents out of 1M because they were still in the operation log. The test reads all the documents in the reverse order on a separate thread to ensure MongoDB is doing what we expect. In this case we were willing to give up some read consistency in exchange for performance. If we would have waited a few split seconds later the issue would not have been seen.
(A,C,E,G) The NORMAL write concern is noticeably faster than the equivalent setup using SAFE. Although most of the tests demonstrated 100% read consistency this is not guaranteed when using the NORMAL write concern. For guaranteed read consistency on a single instance SAFE must be used.
(C,D,G,H) These tests are much slower because they are forced to journal to the disk. The other tests are significantly faster but they may require a lengthy database repair process in the event of an unexpected crash.
Console output from test C: (a single instance with journaling listening on two ip addresses)
CMD> /opt/mongodb-linux-x86_64-1.8.2/bin/mongod --dbpath /media/Yellow/db_shard --bind_ip 192.168.111.4,127.0.0.1 --port 27117 --journal Test Results 2 were produced with a test data set of 16GB. The OS and other services running on the test machine leave about 11GB of RAM remaining so MongoDB is forced to make use of the hard drive. Obviously there will be a gradual decrease in performance as the database gets significantly larger than RAM, so this test only demonstrates a single point on that continuum.
Test Results 2: (Single instance database larger than available RAM test)
| Write Concern | Journal | Capped | Write Results | Read Results | Consistent | |
|---|---|---|---|---|---|---|
| A | NORMAL | No | No | 90 MBs | 137 MBs | 100% |
| B | SAFE | No | No | 78 MBs | 151 MBs | 100% |
| C | NORMAL | Yes | No | 33 MBs | 161 MBs | 100% |
| D | SAFE | Yes | No | 32 MBs | 151 MBs | 100% |
| E | NORMAL | No | Yes | 95 MBs | 102 MBs | 100% |
| F | SAFE | No | Yes | 92 MBs | 150 MBs | 100% |
| G | NORMAL | Yes | Yes | 33 MBs | 146 MBs | >99% |
| H | SAFE | Yes | Yes | 32 MBs | 162 MBs | 100% |
(F) This configuration is efficient enough to nearly max out the read/write speeds of the 7200 RPM drive. Because the capped collection is used and the documents are inserted in order, the drive probably does not need to reposition the heads much.
(C,G) Journaling has slowed the writes down noticeably. On some runs it had consistent reads but at other times it had not quite finished in time.
Testing a replica set
Replica sets in MongoDB are also easy to set up and provide a great deal of redundancy via replication. This feature ensures the data is safe in multiple places but comes at the cost of slow write performance due to replication overhead.
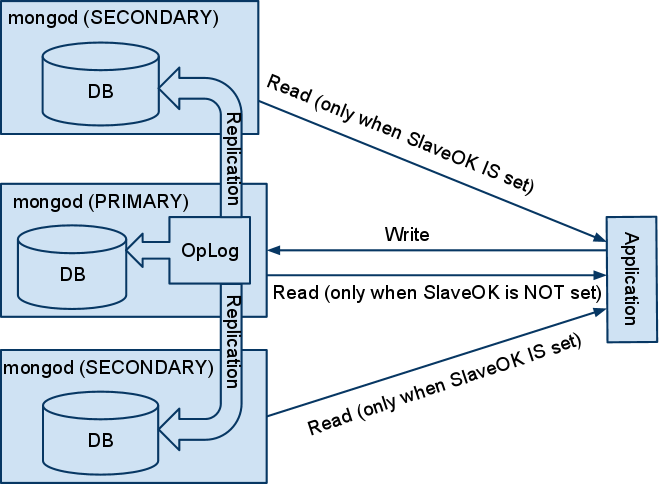
Diagram 2
Replication for MongoDB is very efficient and is done by sending the same operations given to the master's operation log to each of the slaves. The slaves are not far behind the master but they are not always caught up so reading from the slaves may not return the same results as the master. Find requests can use the SlaveOk setting on the DBCursor to allow the results to be read from one of the slaves vs the master. For maximum read performance multiple find calls can be made at the same time, resulting in requests against multiple slaves in the replica set. Note that when SlaveOK is in use none of the reads will be done against the master, it remains free to focus on accepting new updates.
Each member of a replica set will hold a full copy of the database but only one is elected to be the master. The driver is aware of which is the master and sends it all the write operations and the slaves listen to the master's operation log so they can apply the same changes. In the event that the master should go down or become unreachable a new master is elected. If this should happen while using the write concern of NORMAL its very likely that that the most recent writes will be lost forever. This is because when the old master comes back up it will have old information and it will automatically begin reading from one of the other machines in the replica set. Once complete it will become a slave.
To achieve read consistency and ensure no writes are lost the write concern value can be set just as it was in the single instance. Setting the write concern to REPLICA_SAFE will cause the write call to block until at least 2 members of the set have the operation. This can be customized to include more slaves by creating an instance of the WriteConcern object rather than using the built in constants. Diagram 2 above only shows 3 members for simplicity but the test server was configured with 5 members, each on a separate drive. The results for both replicating to 2 of the 5 and replicating to all 5 before returning are displayed in Test Results 3.
Operation documents are not kept in the operations log forever. If a slave is down for a period of time and then comes back up, the documents it missed may no longer be available. If this is the case it will be forced to remain offline and begin a full copy of the database - a very expensive operation. Resizing the operations log with the --oplogSize command can help. None of the tests here were run with this argument so this is another one you may want to try on your own.
Test Results 3: (Five member replica set test)
| Write Concern | Journal | Capped | Write Results | SlaveOK Reads | SlaveOK Consistent | MasterOnly Reads | |
|---|---|---|---|---|---|---|---|
| A | NORMAL | No | No | 54 MBs | N/A | < 1% | 35 MBs |
| B | SAFE | No | No | 42 MBs | 26 MBs | 93% | 36 MBs |
| C | REPLICA_SAFE (2) | No | No | 35 MBs | 70 MBs | 100% | 37 MBs |
| D | REPLICA_SAFE (5) | No | No | 25 MBs | 89 MBs | 100% | 38 MBs |
| E | NORMAL | Yes | No | 23 MBs | N/A | < 1% | 35 MBs |
| F | SAFE | Yes | No | 20 MBs | 17 MBs | 100% | 35 MBs |
| G | REPLICA_SAFE (2) | Yes | No | 15 MBs | 46 MBs | 100% | 34 MBs |
| H | REPLICA_SAFE (5) | Yes | No | 12 MBs | 95 MBs | 100% | 39 MBs |
| I | NORMAL | No | Yes | 47 MBs | N/A | 33 MBs | |
| J | SAFE | No | Yes | 42 MBs | 24 MBs | 20% | 35 MBs |
| K | REPLICA_SAFE (2) | No | Yes | 34 MBs | 70 MBs | 100% | 34 MBs |
| L | REPLICA_SAFE (5) | No | Yes | 24 MBs | 90 MBs | 100% | 38 MBs |
| M | NORMAL | Yes | Yes | 17 MBs | N/A | 35 MBs | |
| N | SAFE | Yes | Yes | 14 MBs | 15 MBs | 100% | 33 MBs |
| O | REPLICA_SAFE (2) | Yes | Yes | 13 MBs | 82 MBs | 100% | 31 MBs |
| P | REPLICA_SAFE (5) | Yes | Yes | 11 MBs | 98 MBs | 100% | 35 MBs |
(A) Max write speed is used because it does not need to do any replication before the write command returns. Once the writes stop then the replication will take place. If we wait long enough all the members of the replica set will once again have the same data.
(A,E,M) Less than 1% of the documents were readable by the time the reading test took place. This is not enough to produce a reliable result for MBs read. The data was not lost; it is still in the operations log to be written when the master is not busy.
(A-P) Reading from the master is about the same speed in all these tests. The master will only be used for reads if SlaveOK was not set. SlaveOK enables reading from the slaves only so in this 5-member replica set only 4 of them will be slaves suitable for read requests. The MOST application does have a property for allowing reads from both slaves and the master in case you need to test this on your own.
(D,H,L,P) Based on the single instance testing above we should have expected to see read results greater than 98 MBs. When a find operation is given to the driver it picks one of the slaves, ifSlaveOK is set. The cursor for this query remains attached to that server until it is closed. The selection of these slaves by the driver is not quite round robin but the distribution over many requests appears flat. In order to maximize the read results we would need to bump up the number of simultaneous requests to compensate for this. By default MOST will use one thread for each detected core and it might require 10 times that many threads to get balanced reads. This can be changed in the property file if running with more threads is desirable.
Console output from test M: (5 member replica set with journaling and a capped collection)
CMD> /opt/mongodb-linux-x86_64-1.8.2/bin/mongod --dbpath /media/Yellow/db_shard --bind_ip 192.168.111.4,127.0.0.1 --port 27117 --replSet testSet --journal
CMD> /opt/mongodb-linux-x86_64-1.8.2/bin/mongod --dbpath /media/Green/db_shard --bind_ip 192.168.111.4,127.0.0.1 --port 27118 --replSet testSet --journal
CMD> /opt/mongodb-linux-x86_64-1.8.2/bin/mongod --dbpath /media/Orange/db_shard --bind_ip 192.168.111.4,127.0.0.1 --port 27119 --replSet testSet --journal
CMD> /opt/mongodb-linux-x86_64-1.8.2/bin/mongod --dbpath /media/Blue/db_shard --bind_ip 192.168.111.4,127.0.0.1 --port 27120 --replSet testSet --journal
CMD> /opt/mongodb-linux-x86_64-1.8.2/bin/mongod --dbpath /media/Red/db_shard --bind_ip 192.168.111.4,127.0.0.1 --port 27121 --replSet testSet --journal
#Wating on 5 out of 5 servers to accept connections.
mongo> use admin
mongo> db.runCommand({ "replSetInitiate" : { "_id" : "testSet" , "members" : [ { "_id" : 0 , "host" : "192.168.111.4:27117"} , { "_id" : 1 , "host" : "192.168.111.4:27118"} , { "_id" : 2 , "host" : "192.168.111.4:27119"} , { "_id" : 3 , "host" : "192.168.111.4:27120"} , { "_id" : 4 , "host" : "192.168.111.4:27121"}]}})
#Waiting for election to take place between 192.168.111.4:27117  192.168.111.4:27118  192.168.111.4:27119  192.168.111.4:27120  192.168.111.4:27121
mongo> use MOSTDB
mongo> db.createCollection(stress.test,{ "capped" : true , "size" : 17523466240})
Testing a Sharded Cluster
The general advice about sharding is to avoid it unless its not possible to meet your requirements using any of the other configurations. The sharding implementation is designed to support very large data sets and/or fast writes. The shard key choice is critical and can impact the performance dramatically. Note in diagram 3 that we have 3 shard servers and we have configured them to hold the data 0-2, 2-4 and 4-6, respectively. This will work out very well if the distribution of our records is flat with respect to this unnamed field. If it turns out that all the documents fall into only one of these ranges the other two shardsvr instances will not be used.
In the event that one shardsvr becomes overweight by holding significantly more data than the others it will be auto-balanced. The balance process works behind the scenes to move data from the overloaded server to the less used ones. Then it redefines the bounds in an attempt to keep the situation balanced. As you can see, this is a lot of extra drive work and is often the source of performance problems for new users of this feature.
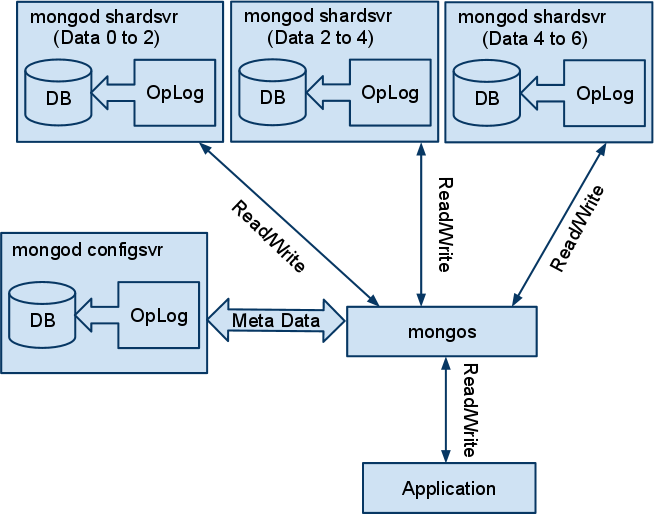
Diagram 3
Once all the data is in place and everything is balanced the cluster will deliver excellent performance. However, it might take a long time to get there. It is possible to speed the process along, especially when importing a large set of data, but it requires a deep understanding of your data and some planning.
In the test each of the documents stored has a field called count which increments. There is an additional field called group which has been defined to hold count&63. So this value will never be more than 6 bits long and will cycle through all the numbers 0 to 63. I am using this as the shard key for the tests because its easy to generate and has well defined upper and lower limits. Look at the console output for (A) Notice that instead of waiting to let the server determine where to split the groups, the script defines each chunk and moves each of them to the desired shard. By doing this, they will not have to be moved a second time in the middle of the import process. This is an easy example where the distribution is perfectly flat and this may not be the case for your data.
Test Results 4: (Five-member sharded cluster test)
| Write Concern | Journal | PreSplit Write | PreSplit Read | PreSplit Consistent | Auto Write | Auto Read | Auto Consistent | |
|---|---|---|---|---|---|---|---|---|
| A | NORMAL | No | 250 MBs | 127 MBs | 100% | 100 MBs | 204 MBs | 100% |
| B | SAFE | No | 180 MBs | 145 MBs | 100% | 111 MBs | 199 MBs | 100% |
| C | NORMAL | Yes | 132 MBs | 121 MBs | 100% | 41MBs | 186 MBs | 100% |
| D | SAFE | Yes | 69 MBs | 177 MBs | 100% | 41 MBs | 181 MBs | 100% |
Notice the pre-split writes are about twice as fast as the auto writes because they need to do additional work re-balancing. It is somewhat surprising that the auto reads are consistently faster but this might relate to more of the data still kept in RAM due to the chunk moves it had to do.
Capped collections are not supported in sharding configurations so they do not appear on the table.
Console output from test A: (5-member replica set pre-split on key 'g' an int >=0 and
CMD> /opt/mongodb-linux-x86_64-1.8.2/bin/mongod --dbpath /media/Blue/db_config --bind_ip 192.168.111.4,127.0.0.1 --port 27117 --configsvr
CMD> /opt/mongodb-linux-x86_64-1.8.2/bin/mongod --dbpath /media/Yellow/db_shard --bind_ip 192.168.111.4,127.0.0.1 --port 27118 --shardsvr
CMD> /opt/mongodb-linux-x86_64-1.8.2/bin/mongod --dbpath /media/Blue/db_shard --bind_ip 192.168.111.4,127.0.0.1 --port 27119 --shardsvr
CMD> /opt/mongodb-linux-x86_64-1.8.2/bin/mongod --dbpath /media/Red/db_shard --bind_ip 192.168.111.4,127.0.0.1 --port 27120 --shardsvr
CMD> /opt/mongodb-linux-x86_64-1.8.2/bin/mongod --dbpath /media/Orange/db_shard --bind_ip 192.168.111.4,127.0.0.1 --port 27121 --shardsvr
CMD> /opt/mongodb-linux-x86_64-1.8.2/bin/mongod --dbpath /media/Green/db_shard --bind_ip 192.168.111.4,127.0.0.1 --port 27122 --shardsvr
CMD> /opt/mongodb-linux-x86_64-1.8.2/bin/mongos --bind_ip 192.168.111.4,127.0.0.1 --port 27123 --configdb 192.168.111.4:27117
#connect to mongos on port 27123
mongo> use admin
mongo> db.runCommand({ "addshard" : "192.168.111.4:27118"})
mongo> db.runCommand({ "addshard" : "192.168.111.4:27119"})
mongo> db.runCommand({ "addshard" : "192.168.111.4:27120"})
mongo> db.runCommand({ "addshard" : "192.168.111.4:27121"})
mongo> db.runCommand({ "addshard" : "192.168.111.4:27122"})
mongo> use MOSTDB
mongo> db.stress.test
mongo> db.runCommand({ "enablesharding" : "MOSTDB"})
mongo> db.runCommand({ "shardcollection" : "MOSTDB.stress.test" , "key" : { "g" : 1}})
mongo> db.runCommand({ "split" : "MOSTDB.stress.test" , "middle" : { "g" : 51.2}})
mongo> db.runCommand({ "split" : "MOSTDB.stress.test" , "middle" : { "g" : 38.4}})
mongo> db.runCommand({ "split" : "MOSTDB.stress.test" , "middle" : { "g" : 25.6}})
mongo> db.runCommand({ "split" : "MOSTDB.stress.test" , "middle" : { "g" : 12.8}})
mongo> db.runCommand({ "moveChunk" : "MOSTDB.stress.test" , "find" : { "g" : 57.6} , "to" : "shard0004"})
mongo> db.runCommand({ "moveChunk" : "MOSTDB.stress.test" , "find" : { "g" : 44.8} , "to" : "shard0003"})
mongo> db.runCommand({ "moveChunk" : "MOSTDB.stress.test" , "find" : { "g" : 32.0} , "to" : "shard0002"})
mongo> db.runCommand({ "moveChunk" : "MOSTDB.stress.test" , "find" : { "g" : 19.2} , "to" : "shard0001"})
mongo> db.runCommand({ "moveChunk" : "MOSTDB.stress.test" , "find" : { "g" : 6.4} , "to" : "shard0000"})
Note the complexity of setting up a sharded cluster for testing. This is why a tool like MOST or some other script comes in handy. In the first block above each of the needed servers are started. After this each of the shards are added to mongos. Sharding is then enabled for the DB and the collection has the shard key defined. The next few lines are the complicated part and are only needed for pre-splitting, this part could be skipped if you want auto-sharding. The split command tells mongos where the dividing lines are for the given key. In this example we know g is always less than 64 and we know that we have 5 servers so we have split the 64 values into 5 equal chunks. After doing the split operation each of these chunks is still on the same (e.g. first) shard server. Before populating the DB each of these chunks must be moved to a different shard. The moveChunk command is used to take care of this. To use moveChunk we must define a value for find. It can be any value which should be found in the chunk we want to move. This value need not be present in the data; it is only used as a way to identify the chunk in question.
This is a simple sharded cluster where each shard is a single server instance. In general this configuration is not recommended due to the lack of redundancy. So the last test will focus on putting all the parts together.
Testing a Sharded and Replicated Cluster
This is by far the most complex set up and makes it clear why scripting or some app is needed to manage the cluster. In most cases a setup like this would be done with multiple servers but for our testing we will be doing this on one machine.
As you can see from diagram 4 there is no single point of failure other than the application itself. The configuration can scale up by continuing to add members to each of the replica sets or by adding new shards. These decisions all depend on the need for more performance, capacity, consistency, and durability.
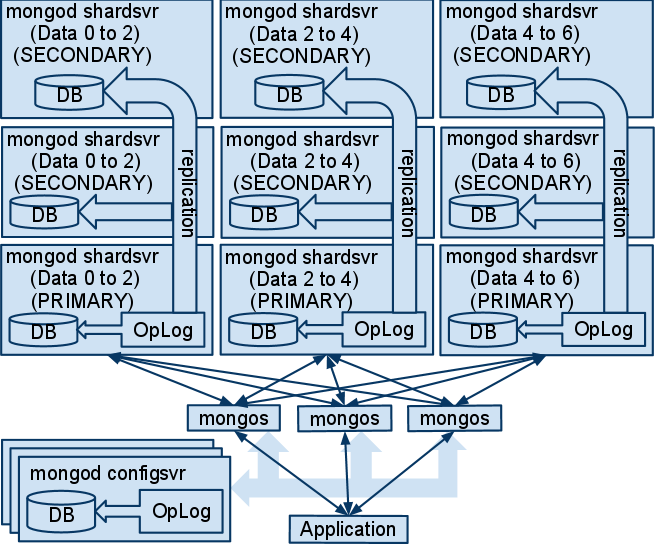
Diagram 4
The test configuration differs from the diagram in that it's using 5 shards - each made up of replica sets with 3 members. This has all been put on 5 drives where no two members of the same replica set are on the same drive. In this configuration, 2 of the drives could fail and the cluster would remain up. If the write concern REPLICA_SAFE for 3 servers were used for the writes, there would also be no data loss.
Diagram 4 also shows multiple mongos instances attached to multiple config servers. This is an excellent practice as it provides redundancy and may help performance. Due to time and hardware limitations the test configuration uses one mongos and one configsvr. If you would like to test this on your own it is supported in the property file.
Test Results 5: (Five shards each part of three-member replica set test)
| Write Concern | Journal | Write Results | SlaveOK Reads | SlaveOK Consistent | Master Reads | |
|---|---|---|---|---|---|---|
| A | NORMAL | No | 54 MBs | 94 MBs | 100% | 96 MBs |
| B | SAFE | No | 39 MBs | 82 MBs | 100% | 101 MBs |
| C | REPLICA_SAFE (2) | No | 40 MBs | 109MBs | 100% | 112 MBs |
| D | REPLICA_SAFE (3) | No | 33 MBs | 113MBs | 100% | 97 MBs |
| E | NORMAL | Yes | 22 MBs | 86 MBs | 100% | 82 MBs |
| F | SAFE | Yes | 15 MBs | 98 MBs | 100% | 107 MBs |
| G | REPLICA_SAFE (2) | Yes | 14 MBs | 100 MBs | 100% | 95 MBs |
| H | REPLICA_SAFE (3) | Yes | 14 MBs | 103 MBs | 100% | 109 MBs |
Considering all the redundancy provided by this configuration and the fact that this is all running on one machine, these are still very good numbers. With multiple machines over a fast network and solid state drives it can only get better.
The master only reads are normally much slower than the SlaveOK reads however this test is limited by the available hardware. This configuration requires 5 shards each part of a replica set of 3, that is 15 servers in total not including the configsvr and mongos. Running this setup on 5 physical drives greatly reduced the expected read performance when using SlaveOK however it did give us excellent redundancy should one of the drives fail.
Console output from test A: (Five shards each part of three member replica set and pre-split)
CMD> /opt/mongodb-linux-x86_64-1.8.2/bin/mongod --dbpath /media/Blue/db_config --bind_ip 192.168.111.4,127.0.0.1 --port 27117 --configsvr
CMD> /opt/mongodb-linux-x86_64-1.8.2/bin/mongod --dbpath /media/Red/db_shard_1 --bind_ip 192.168.111.4,127.0.0.1 --port 27118 --replSet testSet0 --shardsvr
CMD> /opt/mongodb-linux-x86_64-1.8.2/bin/mongod --dbpath /media/Blue/db_shard_4 --bind_ip 192.168.111.4,127.0.0.1 --port 27119 --replSet testSet3 --shardsvr
CMD> /opt/mongodb-linux-x86_64-1.8.2/bin/mongod --dbpath /media/Green/db_shard_2 --bind_ip 192.168.111.4,127.0.0.1 --port 27120 --replSet testSet1 --shardsvr
CMD> /opt/mongodb-linux-x86_64-1.8.2/bin/mongod --dbpath /media/Yellow/db_shard_5 --bind_ip 192.168.111.4,127.0.0.1 --port 27121 --replSet testSet4 --shardsvr
CMD> /opt/mongodb-linux-x86_64-1.8.2/bin/mongod --dbpath /media/Red/db_shard_4 --bind_ip 192.168.111.4,127.0.0.1 --port 27122 --replSet testSet3 --shardsvr
CMD> /opt/mongodb-linux-x86_64-1.8.2/bin/mongod --dbpath /media/Orange/db_shard_3 --bind_ip 192.168.111.4,127.0.0.1 --port 27123 --replSet testSet2 --shardsvr
CMD> /opt/mongodb-linux-x86_64-1.8.2/bin/mongod --dbpath /media/Blue/db_shard_2 --bind_ip 192.168.111.4,127.0.0.1 --port 27124 --replSet testSet1 --shardsvr
CMD> /opt/mongodb-linux-x86_64-1.8.2/bin/mongod --dbpath /media/Green/db_shard_5 --bind_ip 192.168.111.4,127.0.0.1 --port 27125 --replSet testSet4 --shardsvr
CMD> /opt/mongodb-linux-x86_64-1.8.2/bin/mongod --dbpath /media/Red/db_shard_2 --bind_ip 192.168.111.4,127.0.0.1 --port 27126 --replSet testSet1 --shardsvr
CMD> /opt/mongodb-linux-x86_64-1.8.2/bin/mongod --dbpath /media/Yellow/db_shard_3 --bind_ip 192.168.111.4,127.0.0.1 --port 27127 --replSet testSet2 --shardsvr
CMD> /opt/mongodb-linux-x86_64-1.8.2/bin/mongod --dbpath /media/Blue/db_shard_5 --bind_ip 192.168.111.4,127.0.0.1 --port 27128 --replSet testSet4 --shardsvr
CMD> /opt/mongodb-linux-x86_64-1.8.2/bin/mongod --dbpath /media/Orange/db_shard_1 --bind_ip 192.168.111.4,127.0.0.1 --port 27129 --replSet testSet0 --shardsvr
CMD> /opt/mongodb-linux-x86_64-1.8.2/bin/mongod --dbpath /media/Orange/db_shard_4 --bind_ip 192.168.111.4,127.0.0.1 --port 27130 --replSet testSet3 --shardsvr
CMD> /opt/mongodb-linux-x86_64-1.8.2/bin/mongod --dbpath /media/Yellow/db_shard_1 --bind_ip 192.168.111.4,127.0.0.1 --port 27131 --replSet testSet0 --shardsvr
CMD> /opt/mongodb-linux-x86_64-1.8.2/bin/mongod --dbpath /media/Green/db_shard_3 --bind_ip 192.168.111.4,127.0.0.1 --port 27132 --replSet testSet2 --shardsvr
# connect to 27120
mongo> use admin
mongo> db.runCommand({ "replSetInitiate" : { "_id" : "testSet1" , "members" : [ { "_id" : 0 , "host" : "192.168.111.4:27120"} , { "_id" : 1 , "host" : "192.168.111.4:27124"} , { "_id" : 2 , "host" : "192.168.111.4:27126"}]}})
#connect to 27121
mongo> use admin
mongo> db.runCommand({ "replSetInitiate" : { "_id" : "testSet4" , "members" : [ { "_id" : 0 , "host" : "192.168.111.4:27121"} , { "_id" : 1 , "host" : "192.168.111.4:27125"} , { "_id" : 2 , "host" : "192.168.111.4:27128"}]}})
#connect to 27119
mongo> use admin
mongo> db.runCommand({ "replSetInitiate" : { "_id" : "testSet3" , "members" : [ { "_id" : 0 , "host" : "192.168.111.4:27119"} , { "_id" : 1 , "host" : "192.168.111.4:27122"} , { "_id" : 2 , "host" : "192.168.111.4:27130"}]}})
#connect to 27118
mongo> use admin
mongo> db.runCommand({ "replSetInitiate" : { "_id" : "testSet0" , "members" : [ { "_id" : 0 , "host" : "192.168.111.4:27118"} , { "_id" : 1 , "host" : "192.168.111.4:27129"} , { "_id" : 2 , "host" : "192.168.111.4:27131"}]}})
#connect to 27123
mongo> use admin
mongo> db.runCommand({ "replSetInitiate" : { "_id" : "testSet2" , "members" : [ { "_id" : 0 , "host" : "192.168.111.4:27123"} , { "_id" : 1 , "host" : "192.168.111.4:27127"} , { "_id" : 2 , "host" : "192.168.111.4:27132"}]}})
Waiting for election to take place between 192.168.111.4:27118  192.168.111.4:27129  192.168.111.4:27131
Waiting for election to take place between 192.168.111.4:27119  192.168.111.4:27122  192.168.111.4:27130
Waiting for election to take place between 192.168.111.4:27120  192.168.111.4:27124  192.168.111.4:27126
Waiting for election to take place between 192.168.111.4:27121  192.168.111.4:27125  192.168.111.4:27128
Waiting for election to take place between 192.168.111.4:27123  192.168.111.4:27127  192.168.111.4:27132
CMD> /opt/mongodb-linux-x86_64-1.8.2/bin/mongos --bind_ip 192.168.111.4,127.0.0.1 --port 27133 --configdb 192.168.111.4:27117
# connect to mongos on 27133
mongo> use admin
mongo> db.runCommand({ "addshard" : "testSet0/192.168.111.4:27118,192.168.111.4:27129,192.168.111.4:27131"})
mongo> db.runCommand({ "addshard" : "testSet4/192.168.111.4:27121,192.168.111.4:27125,192.168.111.4:27128"})
mongo> db.runCommand({ "addshard" : "testSet3/192.168.111.4:27119,192.168.111.4:27122,192.168.111.4:27130"})
mongo> db.runCommand({ "addshard" : "testSet1/192.168.111.4:27120,192.168.111.4:27124,192.168.111.4:27126"})
mongo> db.runCommand({ "addshard" : "testSet2/192.168.111.4:27123,192.168.111.4:27127,192.168.111.4:27132"})
mongo> use MOSTDB
mongo> db.stress.test
mongo> db.runCommand({ "enablesharding" : "MOSTDB"})
mongo> db.runCommand({ "shardcollection" : "MOSTDB.stress.test" , "key" : { "g" : 1}})
mongo> db.runCommand({ "split" : "MOSTDB.stress.test" , "middle" : { "g" : 51.2}})
mongo> db.runCommand({ "split" : "MOSTDB.stress.test" , "middle" : { "g" : 38.4}})
mongo> db.runCommand({ "split" : "MOSTDB.stress.test" , "middle" : { "g" : 25.6}})
mongo> db.runCommand({ "split" : "MOSTDB.stress.test" , "middle" : { "g" : 12.8}})
mongo> db.runCommand({ "moveChunk" : "MOSTDB.stress.test" , "find" : { "g" : 57.6} , "to" : "testSet2"})
mongo> db.runCommand({ "moveChunk" : "MOSTDB.stress.test" , "find" : { "g" : 44.8} , "to" : "testSet1"})
mongo> db.runCommand({ "moveChunk" : "MOSTDB.stress.test" , "find" : { "g" : 32.0} , "to" : "testSet3"})
mongo> db.runCommand({ "moveChunk" : "MOSTDB.stress.test" , "find" : { "g" : 19.2} , "to" : "testSet4"})
mongo> db.runCommand({ "moveChunk" : "MOSTDB.stress.test" , "find" : { "g" : 6.4} , "to" : "testSet0"})
Summary
MongoDB clearly works best when the full database can be kept in RAM so adding more memory to any deployment is a great way to help tweak the performance. Journaling is a nice feature but it seems like using a replica set across multiple drives/machines would give the same reliability but with better performance. If you are lucky enough to know exactly how much data you will be storing ahead of time or can afford to have old data deleted the use of capped collections should be seriously considered. Lastly if you are still not satisfied with the scalability and/or performance there is always sharding. It may be complicated to set up but it seems very much worth the effort.
References
Test machine details:
 OS:                Ubuntu 10.04
Motherboard:       MSI 890FXA-GD70 AM3 AMD 890FX SATA 6Gb/s
CPU:               AMD Phenom II X6 1100T 3.7 GHz
RAM:               16GB DDR3 1600
Disks(5):          HITACHI Deskstar 7K3000 2TB 7200 RPM 64MB Cache SATA 6.0Gb/s each labeled with one of the colors Red, Orange, Yellow, Green, Blue
Test Settings:
 Total Test Size:       17,179,869,184 (16GB)
Total Documents:            1,048,576 (One Million 2^20)
Document Size:                 16,384 (16KB)
Batch Size:                       256
Threads:                            6

(just to be safe and make sure the tests are not interrupted the following were set)
 MongoDB Options ConnectionsPerHost:                                  100
MongoDB Options ThreadsAllowedToBlockForConnectionMultiplier:        100
MongoDB Options MaxWaitTime:                                     1200000
