Supporting Mobile Devices in a Web Application
By Jeff Schmitz, OCI Senior Software Engineer
December 2012
Introduction
In its early days, the combination of HTML, CSS and JavaScript was a difficult medium on which to develop applications, primarily due to incompatibility between browsers, but also due to poor JavaScript performance. With the recent trend of browser vendors focused on standards-compliance, faster JavaScript engines, 4G data speeds, libraries like jQuery and tools like JSLint to help with the remaining compatibility problems, web applications have offered an exciting development platform in recent years.
Since the introduction of the iPhone in 2007, mobile devices, have been the source of an increasing share of web traffic. According to All Things D, over 20% of U.S. web traffic is from mobile devices. Another study, reported by Information Week, showed mobile with a 10% traffic share in the U.S, and higher rates elsewhere.
This trend toward means that web application developers must now consider mobile devices and their smaller screen sizes, virtual keyboards, and touch interfaces in web application development.
This paper will take a simple web application that works perfectly in modern desktop browsers, and examine the issues encountered when running it on a mobile device. The structure of the application will be examined to determine the cause of these problems, and then the issues will be addressed, one-by-one.
Companion Site
There is a companion site for this paper, where the reader can see Sign Maker in action, and run it - both in a desktop and mobile environment. The companion site can be found at http://sett.ociweb.com/sett/settDec2012_files/signmaker.
At the completion of each step, the reader can access companion site to run each version of Sign Maker, and view the full source of the various files.
Application Overview
The application in question is a simple text editor, called Sign Maker, created specifically for this paper. It allows the user to create text snippets, style their size and color, and place them on the screen. This simple application is entirely transient - keeping no state between sessions.
Text snippets are created by clicking and typing in the editor. Characters can be deleted through the backspace or delete keys. The user can also drag and drop text to change its position. To help the user align text, Sign Maker shows a tool tip with text's coordinates when the pointer hovers over a text snippet.
When any text snippet is selected, size and color controls appear. The size control is an HTML 5 slider control, falling back to a vanilla text input in unsupported browsers. The color control is a text input, allowing the user to enter any acceptable CSS color format, such as 3 and 6 digit hex values, rgb, and rgba values.
This is a JavaScript-heavy web application. It makes use of the jQuery library, plus some Twitter Bootstrap for presentation - specifically, the layout of the controls area.
Mobile Device Issues
Running this application on both desktop and mobile devices, the reader will notice the mobile experience is lacking most of the functionality of the desktop environment.
No Touch Keyboard
One of the main differences between the desktop and mobile environment, at least for touch devices, is the physical versus a virtual keyboard. In the desktop environment, the keyboard can be used at any time. However, in a touch mobile environment, the keyboard does not appear until the browser is focused within a text input. Note that while some mobile devices do have physical keyboards, they are decreasing in popularity.
The reason for this is simple - the keyboard takes up valuable space on the small screen. Showing the keyboard at all times would degrade the mobile browsing experience. But without a keyboard, Sign Maker can create no text. Without text, the signs are rather empty, so fixing this issue will be the first task of mobile deployment.
Not Rendered Well for Small Form Factor
Mobile devices come in a variety of screen resolutions, and are built to render sites designed for desktop environments. To compensate for this, the mobile browser will scale a site so that it can be displayed within the smaller resolution of the mobile browser.
It is not adequate to rely on this scaling to render an application for the smaller screen resolution. Techniques called responsive layouts are used to make a wider site appear narrower, stacking content vertically that otherwise appears side-by-side in the wider browser. Responsive designs allow a single design to render well in multiple resolutions.
In Sign Maker, the text at the bottom of the screen is not legible, appearing too small to read easily. Ideally, it would appear larger, and the controls would appear in usable sizes.
No Drag and Drop
Since Sign Maker can't necessarily create text at this point, it may be difficult to realize that drag and drop is not available in mobile Sign Maker either. In the desktop environment, even an empty text snippet can be dragged - affecting the location the text appears once characters are added to it.
In the mobile browser, tapping in the main area creates an empty snippet - visible only by its white border. The user can then try to drag it by zooming in, then touching and dragging the snippet. The browser gives the illusion of dragging the item. However, this is only the browser scrolling and panning within the viewport in response to the touches. Once the browser is restored to its original zoom level, the user will see the text back in its original location.
No Tool Tips
The desktop browser shows tool tips automatically, when the pointer hovers over an html element with a title attribute. Sign Maker sets the title attribute of text snippets to show their X and Y coordinates.
The touch browser has no pointer, but only reacts to touches to the screen. Without a pointer, there can be no hover event, and therefore, no automatic rendering of tool tips. A new way of displaying them is needed for mobile Sign Maker.
Application Implementation
Understanding the reasons that Sign Maker has these issues when running in a mobile context requires a deeper look into the application architecture and implementation. This section will examine Sign Maker's implementation in detail.
HTML Document Structure
Sign Maker consists of a single HTML, JavaScript and CSS file. Examining the HTML file, you can see it is an HTML 5 file with the proper HTML 5 doctype:
- <!DOCTYPE html>
As stated earlier, Sign Maker has its own CSS file for styling, but also makes use of Twitter Bootstrap. Both stylesheet references are next.
- <head>
- <link href="stylesheets/bootstrap.min.css" rel="stylesheet">
- <link href="stylesheets/application.css" rel="stylesheet">
- </head>
The body of the document divides the screen into two areas: a main div (id="main") where text is rendered, and a control area (id="controls") for the text controls. More on these later.
- <body>
- <div id="main">...</div>
- <div id="controls">...</div>
The body ends with the JavaScript includes. It is a best practice to put JavaScript includes appear at the end of the body. Doing so earlier in the document delays rendering of and DOM elements appearing after the JavaScript.
- <script type="text/javascript" src="https://ajax.googleapis.com/ajax/libs/jquery/1.8.2/jquery.min.js"></script>
- <script type="text/javascript" src="javascripts/bootstrap.min.js"></script>
- <script type="text/javascript" src="javascripts/application.js"></script>
- </body>
The main area contains a non-breaking space ( ), and a conspicuous div with the ID ofprototype.
- <div id="main">
- <div id="prototype" class="hidden unselectable text"></div>
- &/nbsp;
- </div>
The prototype div has classes of hidden, unselectable, and text; all of which are explained in the CSS file section, below. Without the non-breaking space (or an alternative trick), the main div would not be displayed. The prototype div is used by the application JavaScript file, which will be explained later.
The controls area starts with header text. The headers are centered within Bootstrap's 12-column grid, identified by the row class on the containing div. Each header takes up 12 columns, or the whole width, indicated by the span12 class.
- <div id="controls">
- <div class="row">
- <h1 class="centered span12">Sign Maker</h1>
- <h2 class="centered span12">Click & Type to Create Text</h2>
- </div>
Next, the actual controls in their control area are laid out, within new rows:
- <div class="row controls hidden">
Note that the row, like the prototype div, has the class of hidden. The controls class is used for styling, only, and is not described here.
The two divs in the row have the class of span6, which in the Bootstrap grid means they will be side-by-side and take up half the page width each. The first div contains the size slider, which can set font sizes from 0.5 to 25.0 ems. It also shows the current value of the slider in a span (id="size-val").
- <div class="span6 controls centered">Size:
- <input id="size" type="range" required name="size" min="0.5" max="25" step="0.1"/>
- <span id="size-val">val</span>
- </div>
The second div in the row contains the color text input.
- <div class="span6 controls centered">Color:
- <input type="text" class="color" value="#000"></input>
- <a class="btn btn-mini">Done</a>
- </div>
- </div>
- </div>
Take a look at the full HTML listing to see the entire file.
Application Stylesheet
The CSS file is used to do simple formatting, plus it is used to add some functionality to Sign Maker. This paper will forgo explaining the general formatting and layout styles in the file, but explain the parts relevant to application functionality, and mobile deployment.
The CSS file begins by styling the body.
- html, body {
- padding: 0;
- margin: 0;
- min-width: 320px;
- height: 100%;
- font-family: sans-serif;
- line-height: inherit;
- }
This section makes sure the body is flush against the top-left corner of the screen, by removing any browser's automatic padding or margin, and setting it to full width. Also of note in this selector is the min-width setting, which ensures the application renders full-screen on mobile devices. Finally, the 40 pixel default line-height of Bootstrap is reset to the default.
The next section ensures the main area leaves room for the control area, by limiting its height to 80% of the screen.
- #main {
- background: #ccc;
- height: 80%;
- }
Next, the CSS defines the hidden style to not display an element, used by the prototype and the controls row.
- .hidden { display: none; }
Later, the JavaScript will add and remove the hidden class to hide and show elements.
The next section of interest is the unselectable class.
- .unselectable {
- -webkit-touch-callout: none;
- -webkit-user-select: none;
- -khtml-user-select: none;
- -moz-user-select: none;
- -ms-user-select: none;
- user-select: none;
- }
This class was set on the prototype div only. Its purpose is to override the browser's default behavior of selecting text when the user clicks or drags an area of the window. Since Sign Maker uses drag and drop, if the text snippets did not have this class, they would become highlighted as the user dragged the text.
Finally, there are two text-related styles. The first is the text class, applied to all text snippets. Additionally, there is an optional class, selected. Text snippets always have the text class, and sometimes have the selected class.
- .text {
- position: absolute;
- min-height: 16px;
- padding: 4px;
- }
-
- .selected {
- border: 1px solid white;
- padding: 3px;
- }
Looking closely at these, texts will always have an absolute position, allowing their coordinates to change during drag and drop. They will also have different padding based on whether they are selected or not. The selected style removes a pixel of padding, but adds it to the border. This keeps the text from rendering with jitter when it becomes selected.
Take a look at the full stylesheet listing to see the entire file.
Application JavaScript
The JavaScript file has several responsibilities, including:
- Detecting a click in the main area and creating a new text snippet.
- Detecting a click on an existing text snippet and populating the controls area with its size and color.
- Updating the selected snippet when a key is pressed, or the control settings change.
- Deselecting the selected snippet when the escape key is pressed.
- Moving the selected snippet during a drag operation.
Taking a look at the JavaScript source, the reader will see first, the JSLint options comments:
- /*jslint white: false, onevar: false */
- /*globalVariables $, window */
Next come the module-wide declarations:
- var lastX, lastY;
The lastX and lastY variables are used to implement the drag and drop feature, discussed below. Next is the first function, used to move text in the window:
- function moveText(text, x, y) {
- text.offset({left: x, top: y}).attr("title", "x: " + x + ", y: " + y);
- }
The moveText() function changes the CSS offset values of a text snippet to the given X and Y coordinates. It also sets the title attribute for the snippet to these coordinates for display in the desktop tool tips. Since they are updated together, this keeps the two in synch.
The next function detects if there any text snippets with the class selected, and if so returns the jQuery object with that selector. If not, it will return undefined.
- function selected() {
- var lastDiv = $(".selected");
- if (lastDiv.get(0)) {
- return lastDiv;
- }
- }
The selected() function is useful when the script needs to both detect if any text is selected, and to gain access to it, all in one call.
The next two functions are used to select a text snippet for editing, and to clear the selection:
- function clearSelected() {
- var lastDiv = $(".selected");
- if (lastDiv.html === "") {
- // No contents, delete
- lastDiv.remove();
- }
- $(".selected").removeClass("selected");
- $(".controls").addClass("hidden");
- $("input:focus").blur();
- }
The clearSelection() function finds the element, if any, with the class of selected. If the selected element has no text, it is removed. Then, the element is stripped of the selected class. Since no snippets are then selected, the controls are hidden, by adding the hidden class, and finally, the focus is removed from any input using jQuery's blur() function. This last line is necessary for browsers who have made a less-than exemplary effort on compatibility, and show the blinking text insert cursor with focus on a hidden element.
The next function is used to select a text snippet for editing:
- function setSelected(elt) {
- clearSelected();
- var selected = $(elt).addClass("selected");
- var size = selected.data("size");
- var color = selected.data("color");
- $("#size").attr("value", size).change();
- $(".color").attr("value", color).change();
- $(".controls").removeClass("hidden");
- }
The setSelected() function first clears any selection, and then adds the selected class to the text snippet passed into it, which gives the text a white border. Settings for size and color controls are then retrieved using jQuery's data() function. We will see elsewhere calls to data() that set these values.
Then setSelected() sets size and color values on their respective controls, and triggers a change event on each. Finally, the controls are made visible by removing the hidden class.
To those not familiar with jQuery, the next line may be a bit confusing. The $() function waits for the document to be entirely downloaded, and parsed into the DOM before executing the function passed to it (known as the ready handler). Within that function is first, a handler of mousedown events on text snippets:
- $(function() {
- $("#main").on("mousedown", ".text", function(evt) {
- $(this).addClass("moving");
- lastX = evt.clientX;
- lastY = evt.clientY;
- });
This handler adds the moving class to the snippet, and then records the X and Y coordinates (with respect to the client-area origin) of the event. Recall that lastX and lastY were declared at the file scope. These are used during the drag operation.
The next function handles mouseup events:
- $("#main").mouseup(function(evt) {
- $(".moving").removeClass("moving");
- });
This one-liner simply removes the moving class from the moving text snippet. The next function is a handler of mousemove events:
- $("#main").mousemove(function(evt) {
- if ($(".moving").length > 0) {
- var dx = evt.clientX - lastX;
- var dy = evt.clientY - lastY;
- var offset = $(".moving").offset();
- moveText($(".moving"), offset.left + dx, offset.top + dy);
- lastX = evt.clientX;
- lastY = evt.clientY;
- return false;
- }
- });
This function first verifies there is a text snippet which is being dragged, from a prior mousedown event. Then, the function calculates how much the coordinates of the event have changed since the previous mousemove event. These differences then are applied to the moving snippet, by calling the moveText() function. Finally, the coordinates are saved for the next mousemove event.
Note that this delta approach is preferred, rather than just setting the text's coordinates to the event coordinates. This is because in a large snippet (sized to several ems), the move event coordinates can be drastically different from the text coordinates, causing it to jump in the browser.
The next function handles a click event on a text snippet:
- $("#main").on("click", ".text", function(evt) {
- setSelected(evt.target);
- evt.preventDefault();
- return false;
- });
In this handler, the text snippet is then selected using the setSelected() function. Then, the event is prevented from bubbling to the main area with the call to preventDefault().
Next appears a handler of click events in the main area:
- $("#main").click(function(evt) {
- clearSelected();
- var lastDiv = $("#prototype").clone().removeAttr("id").removeClass("hidden").
- data("size", 1).data("color", "#000");
- $(this).append(lastDiv);
- moveText(lastDiv, evt.clientX, evt.clientY);
- setSelected(lastDiv);
- });
This hander first clears any selected snippet by calling clearSelection(). Then, it locates the prototype div, and makes a copy of it, though the call to jQuery's clone() function. The cloned div is has its id attribute and hidden class removed.
Next, the snippet is given default values for its size and color, through a call to jQuery's data() function. The reader will recall that these will be retrieved inside the setSelected() function. The div is then added to the main area though a call to jQuery's append() function. In this case, the this variable is set to the main div.
Next moveText() is called to set the initial X and Y coordinates of the snippet, using the coordinates of the click. Finally, the new div is set as the selected div, so the controls will be populated with its values.
Next is a handler of keydown events:
- $("body").keydown(function(evt) {
- if ((evt.target !== this) && (evt.target !== $("#main").get(0)) &&
- (evt.target !== $(".selected").get(0))) {
- return true;
- }
- var lastDiv = selected();
- if (lastDiv) {
- // Handle delete
- if (evt.which === 8 || evt.which === 46) {
- var contents = lastDiv.html();
- lastDiv.html(contents.substr(0, contents.length - 1));
- return false;
- // Handle escape
- } else if (evt.which === 27) {
- clearSelected();
- }
- }
- });
This handler first tries to filter out events originating from an unexpected place. A keydown event could originate at a text input, for example. Next, if there is a selected text snippet, the key itself is checked. Backspace or delete keys result in the last character being trimmed off of the text snippet. In the event of an escape key, the selection is cleared.
The next handler processes keypress events, in order to update the contents of the text snippet:
- $("body").keypress(function(evt) {
- if ((evt.target !== this) && (evt.target !== $("#main").get(0)) &&
- (evt.target !== $(".selected").get(0))) {
- return true;
- }
- if (evt.which < 48) {
- // Reject non-printable character
- return true;
- }
- var lastDiv = selected();
- if (lastDiv) {
- lastDiv.append(String.fromCharCode(evt.which));
- }
- });
Like the keydown handler, events originating from an unexpected target are rejected. This handler also rejects non-printable characters. Note that most, but not all, browsers will filter this by not triggering a keypress event for non-printable characters. Finally, the handler appends the proper character to the text snippet's contents.
The next two handlers process changes to the controls. First is the size change handler:
- $("#size").change(function() {
- // Limit to one decimal place
- var val = Math.round(parseFloat($("#size").attr("value")) * 10) / 10;
- $(".selected").css("font-size", "" + val + "em").data("size", val);
- $("#size-val").html("" + val.toFixed(1) + "em");
- });
In this function, the value attribute is used to get the setting of the slider. The value is then rounded to the nearest tenth, and used to set the font-size CSS property. It is also stored using jQuery's data() function. Finally, the size value label is updated to display the current value.
Finally is the handler of the change events to the color input, followed by the close of the ready handler function:
- $(".color").change(function() {
- var color = $(this).attr("value");
- $(".selected").css("color", color).data("color", color);
- });
- });
This handler simply gets the value attribute from the control, sets the CSS color property, and stores the value using the data() function.
Take a look at the full JavaScript listing to see the entire file.
Solutions to Mobile Problems
Mobile Problem #1 Missing Keyboard
The first problem has an obvious cause - on a touch device, in an effort to save screen space, keyboards are not displayed unless the focus is on a text input element. The first consequence, visible here, is that there is no way for the user to type in the text on these devices. As seen above in the overview, Sign Maker handles key events - not necessarily originating from an input element.
There are other consequences as well, although not impacting Sign Maker. For example, apps can check to see if the alt or ctrl keys are depressed during an event. This is impossible on a touch device. In addition, some apps handle arrow or function keys, not present on at least some touch keyboards.
Step 1: Add an Input Editor
While there are some methods for forcing a keyboard to appear with JavaScript, none of them work across the necessary array of mobile operating systems and browsers. The right solution is to add an explicit text input element to the controls area and handle key events from there instead.
- <div class="editor controls hidden">
- <div class="centered">
- Text: <input id="editor" type="text" autocorrect="off"/> <a class="btn btn-mini">Done</a>
- </div>
- </div>
This change adds a new text input with an id of editor. This editor turns off autocompletion with the attribute autocorrect="off".
Step 2: Focus on Editor on Click
This solution requires some JavaScript changes. First, when setting the selected text snippet, the editor input should be populated and receive focus:
- function setSelected(elt) {
- clearSelected();
- var selected = $(elt).addClass("selected");
- var size = selected.data("size");
- var color = selected.data("color");
- $("#size").attr("value", size).change();
- $(".color").attr("value", color).change();
- $(".controls").removeClass("hidden");
- $("#editor").attr("value", $(elt).html()).focus();
- }
Unfortunately, the focus() call does not work on certain mobile browsers for security reasons.
Step 3: Handle Editor Key Events
With the editor input now in place, key events can now originate from the editor input only - bubbling to the main div is not a worry. The JavaScript can now ignore the delete and backspace keys, and update the text with the value of the input. To do this, the script must handle keyup events, rather than keydown and keypress events, because keyup are processed after the input is updated.
- // Keyup is after the input is changed by the keypress
- $("#editor").keyup(function(evt) {
- if (evt.which === 27) { // Handle escape
- clearSelected();
- } else {
- $(".selected").html($(this).attr("value"));
- }
- });
This is much simpler than before, replacing two handlers with one. One other possibility exists. The input can change as a result of non-key events, such as cut and paste, so the script must handle input change events as well:
- $("#editor").change(function() {
- $(".selected").html($(this).attr("value"));
- });
At this point, Sign Maker is able to create text snippets for the mobile platform. You can run the second version at the companion site, and see the updated JavaScript file.
Mobile Problem #2 - Mobile Rendering
With the basic text editing capability intact, it's time to focus on rendering on mobile devices. The initial screen shot, below in figure 1, looks like the screen is far away. The font is definitely rendered too small.
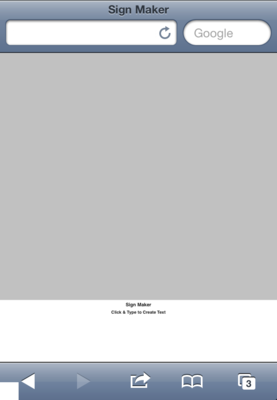
Figure 1. Initial Screen
Testing Sign Maker, more issues appear. The range slider is difficult to use, being so small. Some times, instead of moving the slider, the touch targets the background. Even worse, on the stock Android browser, the range slider does not appear at all. Finally, when the user does tap the main div, some mobile browsers highlight it.
Step 1: Add a Viewport Meta Tag
Without direction, the mobile browser is free to render the screen at any resolution it deems fit. This can cause what is seen here: the browser zoomed out drastically. This may be ideal for a web page, but less so for a web application.
To fix this, a meta tag is inserted within the HTML headelement.
- <meta name="viewport"
- content="width=device-width,
- initial-scale=1.0,
- minimum-scale=1.0
- maximum-scale=1.0,
- user-scalable=no">
This sets the rendering viewport to the same resolution as the device itself, which makes the text much more readable. In addition, the default "pinch to zoom" and "zoom on focus" capabilities are removed by eliminating scaling.This change makes the browser much more usable.
Step 2: Style the Slider
The default slider, seen in figure 2, can be slightly smaller than desired on mobile Safari. While Sign Maker works this way, the user can miss the thumb entirely. On a related note, older versions of the stock Android browser does not render the range input at all by default. At first, it appears to not support the range input. However, the behavior for unknown input types is to default to text input. This is a rendering issue.

Figure 2: Default Slider
The solution to both of these problems is to style the range input, and the thumb. This will make it visible on the stock Android browser, and larger on mobile Safari.
- input[type="range"]{
- border: #000;
- min-height: 10px;
- }
-
- input[type="range"]::-webkit-slider-thumb{
- background: #222;
- height: 25px;
- width: 25px;
- border-radius: 25px;
- }

Figure 3: Styled Slider
Step 3: Remove Default Touch Highlighting
Finally, to remove the default touch highlighting, we need to set the webkit CSS property tap-highlight-color. The key is to make the final parameter (the alpha channel) 0, so the highlight is transparent:
* { -webkit-tap-highlight-color: rgba(0,0,0,0); }At this point, Sign Maker is much more usable on the mobile platform. You can run the third version at the companion site, and see the updated JavaScript and stylesheet files.
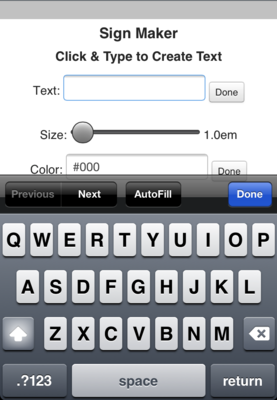
Figure 4: Scrolled on Input Focus
Mobile Problem #3 - Jumping Within Viewport
While it is now easier for the user to edit text in Sign Maker, usability problems remain. Chief among them is the fact that the controls, being at the bottom, force the viewport to scroll down to edit. After finishing editing, the user must then scroll back up to find the text. Ideally, the controls would appear without moving the viewport.
Step 1: Add a Controls Dialog
Luckily Bootstrap provides a modal dialog. To use it, Sign Maker's controls area needs slight transformation. First, the outer controls div needs the Bootstrap class of modal.
<div id="controls" class="modal">In order to prevent it from popping up on page load, and to use a fading animation when rendering, Sign Maker will add the Bootstrap classes hide and fade.
<div id="controls" class="modal hide fade">Within a modal dialog, the first header can now be part of the dialog header, along with a button for exiting.
- <div class="modal-header">
- <button type="button" class="close" data-dismiss="modal" aria-hidden="true">×</button>
- <h1 class="centered">Sign Maker</h1>
- </div>
Since the dialog will be displayed after the user has clicked or tapped, the header Click & Type to Create Text is no longer needed. Other minor formatting changes remove the use of Bootstrap's layout grid, since the controls will be stacked.
There are some JavaScript changes to incorporate this dialog. First, the dialog should be initialized in the ready handler:
- $("#controls").modal({show: false}).on('shown', function() {
- $("#editor").focus();
- }).on('hidden', function() {
- clearSelected();
- });
The above code attempts to focus on the editor input, once the dialog is displayed, and clears the selection, once the dialog is hidden. Another initializer must handle the close button, hiding the dialog and clearing the selected text snippet:
- $("a.btn").click(function(evt) {
- $("#controls").modal('hide');
- clearSelected();
- });
A click in the body must activate the dialog:
- function setSelected(elt) {
- clearSelected();
- var selected = $(elt).addClass("selected");
- var size = selected.data("size");
- var color = selected.data("color");
- $("#size").attr("value", size).change();
- $(".color").attr("value", color).change();
- $("#editor").attr("value", $(elt).html());
- $("#controls").modal('show');
- }
The dialog automatically disappears on the pressing of the escape key, so the key handlers don't need to do that:
- $("#editor").keyup(function(evt) {
- $(".selected").html($(this).attr("value"));
- });
However, hitting return in the input now needs to close the dialog, in any input:
- $("input").keyup(function(evt) {
- if (evt.which === 27) { // Handle escape
- clearSelected();
- } else if (evt.which === 13) { // Handle return
- $("#controls").modal('hide');
- clearSelected();
- }
- });
Step 2: Prevent Dialog on Drag and Drop
Finally, the dialog presents a new problem. Previously, after a (desktop) drag and drop, the text would get selected, causing no problem. With this change, if the text becomes selected as a result of a drag, the dialog will pop up.
Instead, the script must track when text is moved, and prevent the dialog from popping up. To start, a module-scope variable is added to track moves:
var didMove = false;Once a mousemove event is triggered while dragging text, the variable must be set to true:
- $("#main").mousemove(function(evt) {
- if ($(".moving").length > 0) {
- didMove = true;
- var dx = evt.clientX - lastX;
- var dy = evt.clientY - lastY;
- var offset = $(".moving").offset();
- moveText($(".moving"), offset.left + dx, offset.top + dy);
- lastX = evt.clientX;
- lastY = evt.clientY;
- return false;
- }
- });
And the on a click event, the variable must be tested and reset. If it was false, the text snippet can be selected (and the dialog opened):
- $("#main").on("click", ".text", function(evt) {
- if (didMove) {
- didMove = false;
- } else {
- setSelected(evt.target);
- }
- });
Step 3: Make the Main Area Full-Sized
Since the controls area is now overlaid in a dialog, the main area no longer has to give up the final 20% of the screen either:
- #main {
- background: #ccc;
- height: 100%;
- }
After this iteration, Sign Maker has a much improved mobile user experience, showing the dialog seen in figure 5, rather than jumping to the input. You can run the fourth version at the companion site, and see the updated JavaScript and stylesheet files.
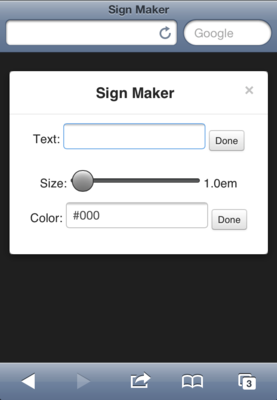
Figure 5: Modal Dialog
Mobile Problem #4 - No Touch Drag and Drop
Perhaps the most complex mobile problem to solve is the lack of drag and drop. Recall that the drag and drop operations are processed using mouse events: mousedown,&mousemove, and mouseup.
There are two possibilities to handle mobile drag and drop. First, one could handle touch events and translate them into mouse events. This adapter version is possible and works well in many situations. See this example of how to simulate mouse events from touch events.
One problem with this approach is that an application may want to use the default touch handlers in some situations. An alternative to this all-or-none approach is to handle the touch events. To understand the touch events and their structure, see the HTML5 Rocks article.
Step 1: Refactor Mouse Event Handling
Much of the handling of mouse events and touch events will be common, so before touches are handled, it makes sense to refactor the mouse handling logic, and pull it out to common functions, that can be called from either mouse or touch events:
- function onStartMove(evt) {
- $(evt.target).addClass("moving");
- lastX = evt.clientX;
- lastY = evt.clientY;
- }
-
- function onMove(evt) {
- if ($(".moving").length > 0) {
- didMove = true;
- var dx = evt.clientX - lastX;
- var dy = evt.clientY - lastY;
- var offset = $(".moving").offset();
- moveText($(".moving"), offset.left + dx, offset.top + dy);
- lastX = evt.clientX;
- lastY = evt.clientY;
- }
- }
-
- function onEndMove() {
- $(".moving").removeClass("moving");
- }
With these in place the mouse event handlers should call the common functions:
- $("#main").on("mousedown", ".text", function(evt) {
- onStartMove(evt);
- });
-
- $("#main").on("mousemove", function(evt) {
- onMove(evt);
- evt.preventDefault();
- });
-
- $("#main").on("mouseup", function(evt) {
- onEndMove();
- });
Each calls the implementation function. The mousemove handler also prevents event bubbling.
Step 2: Add Touch Event Handling
Now, the touch events can be handled:
- $("#main").on("touchstart", ".text", function(evt) {
- onStartMove(evt);
- });
-
- $("#main").on("touchmove", ".moving", function(evt) {
- onMove(evt.originalEvent.targetTouches[0]);
- evt.preventDefault();
- });
-
- $("#main").on("touchend", ".text", function(evt) {
- onEndMove();
- });
-
This is also straightforward. Again, the touchmove handler prevents propagation. Note that in the case of touch events, the coordinates are not stored directly within the event. The reason for this is simple - while a mouse event can only have one pair of coordinates, touch events can have multiple coordinates. As such the coordinates must be stored in an array of objects within the event.
Further complicating the situation is jQuery, which performs some event normalization. In this case, the normalization does not copy the touch arrays. They can only be accessed through the originalEvent.
In the case above, the coordinates are drawn from the targetTouches array, which contains all touches on the target DOM element at the time of the event. There are also touches for all touches on the device, and changedTouches for those which have changed.
One final change: since the touch interface is less accurate (being a physical interface, rather than a virtual one), there is a chance that during the drag, the touch happens outside the text snippet. This will not effect the move, as the next move event will compensate for it.
The problem, however is at the end of the touch. The touch can create a click event. If the touch is entirely within the text element, the text will get that click. If any of the events are outside the text, the browser can fire a click event on the main div as well, causing the dialog to pop up. To compensate, the didMove variable must be checked in the click handler:
- $("#main").click(function(evt) {
- // Verify not a drop click
- if (didMove) {
- didMove = false;
- } else {
- clearSelected();
- var lastDiv = $("#prototype").clone().removeAttr("id").removeClass("hidden").
- data("size", 1).data("color", "#000");
- $(this).append(lastDiv);
- moveText(lastDiv, evt.clientX, evt.clientY);
- setSelected(lastDiv);
- }
- });
At this point, Sign Maker is able to do drag and drop on the mobile platform. You can run the fifth version at the companion site, and see the updated JavaScript file.
Mobile Problem #5 - No Tool Tips
The final problem of tool tips is a paradigm issue. Touch devices have no pointer, which indicates where a click would happen if the user clicked the mouse. Without a pointer, there is no hover event, and no tool tips.
Note that the touch specification does provide for events indicating a touch has moved into and out of a DOM element. No browsers have implemented these at the time of this writing, and this would not work in all apps anyway. Sign Maker will need to manually show its coordinates.
Step 1: Add an Area to Display the Coordinates
Sign Maker must have a div to put the coordinates in:
<div id="coords" class="hidden unselectable"></div>Here, the new div (id="coords") will hold the coordinates. It has the classes hidden, so it is not visible at the start, and unselectable so that it won't be highlighted during a desktop drag operation.
The coords div needs to be styled:
- #coords {
- margin-left: 5px;
- margin-top 5px;
- color: #fff;
- z-index: 10;
- font-size: .9em;
- }
Step 2: Update Coordinates Area
The coordinates area needs to be populated when a text moves, or a move starts (but has not yet moved). Since this happens in response to more than one event, a function should be added for the common steps:
- function updateCoords(text) {
- var coords = text.offset();
- $("#coords").html("x:" + coords.left + ", y:" + coords.top);
- }
Then, the call should be made whenever the script was updating the text's title attribute:
- function moveText(text, x, y) {
- text.offset({left: x, top: y}).attr("title", "x: " + x + ", y: " + y);
- updateCoords(text);
- }
When a move starts, the coords need to be updated and displayed. The update is necessary to prevent the previous text's coordinates from being displayed prior to a move.
One problem this approach will unveil is that the user now can touch text to see its coordinates, but it will cause a click event, and show the resulting dialog. To prevent this, we can simulate a move by setting the didMove variable if the event lasts long enough to read the coordinates - which I put at 400 milliseconds:
- function onStartMove(evt) {
- longTapTimer = setTimeout(function() {
- // Cancel clicks
- didMove = true;
- }, 400);
- updateCoords($(evt.target));
- $("#coords").removeClass("hidden");
- $(evt.target).addClass("moving");
- lastX = evt.clientX;
- lastY = evt.clientY;
- }
This change to onStartMove() updates and displays the coords div, and sets a timer to simulate a move to prevent a click event.
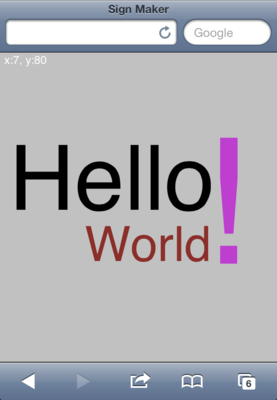
Figure 6: Tool Tips While Dragging
During the move, moveText() is already called, which will now update the coords div. Finally, when the move ends, the coords div must be hidden:
- function onEndMove(evt) {
- clearTimeout(longTapTimer);
- $(".moving").removeClass("moving");
- $("#coords").addClass("hidden");
- }
After this iteration, Sign Maker now has the equivalent functionality in mobile and desktop versions, including the tool tip coordinates. You can run the sixth version at the companion site, and see the updated JavaScript and stylesheet files.
Putting in the Final (Multi-)Touches
The reader may have noticed one problem with the way the mobile issues were addressed. Beginning with the drag and drop fixes, there was an underlying assumption in the implementation that only a single text snippet was being dragged at a time. This is true in a desktop environment, but not true in the mobile environment, where the user is free to touch with multiple fingers.
This causes a problem with the saving of coordinates lastX and lastY, as there is no longer only one set of "last" coordinates. Another problem is the sole coordinates div for tool tips. With multi-touch, there can be multiple sets of coordinates to show to the user.
Step 1: Eliminate Static Coords Div
Since there must be multiple coordinates divs, Sign Maker can no longer define the one and only coordinates div. Instead, the coordinates should work like texts - a prototype in the HTML to facilitate copying. The existing div (id="coords) will be used for cloning.
<div id="coords" class="coords hidden unselectable"></div>With this change, the coordinates divs need to be styled according to a class, rather than an ID, since there can be multiple instances:
- .coords {
- margin-left: 5px;
- margin-top 5px;
- color: #fff;
- z-index: 10;
- font-size: .9em;
- }
Step 2: Modify Handlers to Accept a Touch ID
The change to make is to look up lastX, lastY, the coords div, and even the move target by touch ID. In the desktop case, there is no touch ID. But, since there can be only one mouse event series at a time, Sign Maker can just use a simulated, constant touch ID.
The module-level variables now contain an associative array, rather than a single X and Y value:
- var targets = {};
- var didMove = false;
- var longTapTimer;
In order to update the contents of a coords div, updateCoords() will need to know which div to update:
- function updateCoords(text, element) {
- var coords = text.offset();
- element.html("x:" + coords.left + ", y:" + coords.top);
- }
In order for moveText() to pass the proper coordinates div to updateCoords(), it will need to know the ID of the event causing the move, and look up the div:
- function moveText(text, x, y, id) {
- text.offset({left: x, top: y}).attr("title", "x: " + x + ", y: " + y);
- var info = targets[id];
- if (info !== undefined) {
- updateCoords(text, info.coords);
- }
- }
Now onStartMove() will need to create a new coords div, and store information related to the touch, including the target, the coords div, and the last X and Y coordinates:
- function onStartMove(evt, id) {
- longTapTimer = setTimeout(function() {
- // Cancel clicks
- didMove = true;
- }, 400);
- // Create a new coords element
- var coords = $("#coords").clone().removeAttr("id").removeClass("hidden");
- $("#prototype").before(coords);
- updateCoords($(evt.target), coords);
- // Remember this event
- targets[id] = { target: evt.target, coords: coords,
- lastX: evt.clientX, lastY: evt.clientY };
- }
To handle multiple touches, onMove() will need to find, use and update the last X and Y coordinates for a given event. It also will use the stored target, rather than assume there is only one div with the class of moving:
- function onMove(evt, id) {
- var info = targets[id];
- // If known event
- if (info !== undefined) {
- didMove = true;
- var dx = evt.clientX - info.lastX;
- var dy = evt.clientY - info.lastY;
- var target = $(info.target);
- var offset = target.offset();
- moveText(target, offset.left + dx, offset.top + dy, id);
- info.lastX = evt.clientX;
- info.lastY = evt.clientY;
- }
- }
The onEndMove() function needs to clean up the coords div, and the entry in the targets associative array.
- function onEndMove(id) {
- clearTimeout(longTapTimer);
- var info = targets[id];
- if (info !== undefined) {
- // Remove from DOM
- info.coords.remove();
- delete targets[id];
- }
- }
Step 3: Pass Synthetic Touch ID to Helper Functions For Mouse Events
At this point the handlers should be modified to call the updated helpers. Each now expects a touch ID. Since the desktop does not have one, a synthetic ID is used.
- $("#main").on("mousedown", ".text", function(evt) {
- onStartMove(evt, "mouse");
- });
-
- $("#main").on("mousemove", function(evt) {
- onMove(evt, "mouse");
- evt.preventDefault();
- });
-
- $("#main").on("mouseup", function(evt) {
- onEndMove("mouse");
- });
Step 4: Pass Touch ID to Helper Functions For Touch Events
In the case of touch events, a touch ID is available. Sign Maker will use the first target touch intouchstart and touchmove. Note that in the touchend, the target touches array no longer has the needed touch, so Sign Maker uses the changedTouches:
- $("#main").on("touchstart", ".text", function(evt) {
- onStartMove(evt.originalEvent.targetTouches[0],
- evt.originalEvent.targetTouches[0].identifier);
- });
-
- $("#main").on("touchmove", function(evt) {
- onMove(evt.originalEvent.targetTouches[0],
- evt.originalEvent.targetTouches[0].identifier);
- evt.preventDefault();
- });
-
- $("#main").on("touchend", function(evt) {
- onEndMove(evt.originalEvent.changedTouches[0].identifier);
- });
One final change - the main div's click handler calls moveText() to initialize a new text snippet's location. Since onStartMove() has yet to be called, there won't be an entry for this touch - so Sign Maker passes undefined.
- $("#main").click(function(evt) {
- // Verify not a drop click
- if (didMove) {
- didMove = false;
- } else {
- clearSelected();
- var lastDiv = $("#prototype").clone().removeAttr("id").removeClass("hidden").
- data("size", 1).data("color", "#000");
- $(this).append(lastDiv);
- moveText(lastDiv, evt.clientX, evt.clientY, undefined);
- setSelected(lastDiv);
- }
- });
At the end of this migration, the mobile device now support for the desktop's capability, plus multi-touch. You can run the seventh version at the companion site, and see the updated JavaScript and stylesheet files.
Summary
The purpose of this paper was to prepare the reader for possible issues when preparing a web application for mobile deployment. The paper is an exercise to help the reader gain some experience prior to having to do the same.
When taking on this task, keep in mind the following issues:
- Fewer keys on the keyboard with limited access to it.
- Small, and varying screen size.
- Default behaviors (highlighting on tap, zooming initially, and on input focus) which are web-site oriented.
- Limited support for new HTML5 input types.
- Touch events, in addition to mouse events.
- Lack of hover events.
- Multiple, Simultaneous Touch Events.
References
- [1] jQuery
http://jquery.com - [2] JSLint
http://jslint.com - [3] All Things D: Mobile Devices Now Make Up About 20 Percent of U.S. Web Traffic
http://allthingsd.com/20120525/mobile-devices-now-make-up-about-20-percent-of-u-s-web-traffic - [4] Information Week: 10% Of Web Traffic Now From Mobile Devices
http://www.informationweek.com/mobility/smart-phones/10-of-web-traffic-now-from-mobile-device/240000155 - [5] Sign Maker Companion Site
http://sett.ociweb.com/sett/settDec2012_files/signmaker - [6] Twitter Bootstrap
http://twitter.github.com/bootstrap - [7] Tiffany Brown: Input type="range" and Android's stock browser
http://tiffanybbrown.com/2012/02/07/input-typerange-and-androids-stock-browser - [8] Simulating Mouse Events From Touch Events
https://gist.github.com/943636 - [9] HTML5 Rocks: Developing for Multi-Touch Web Browsers
http://www.html5rocks.com/en/mobile/touch
Source Code
Initial Version
- HTML - http://sett.ociweb.com/sett/settDec2012_files/signmaker/application.html
- CSS - http://sett.ociweb.com/sett/settDec2012_files/signmaker/stylesheets/application.css
- JavaScript -http://sett.ociweb.com/sett/settDec2012_files/signmaker/javascripts/application.js
Second Version - Text Editing
- HTML - http://sett.ociweb.com/sett/settDec2012_files/signmaker/application2.html
- CSS - No changes
- JavaScript -http://sett.ociweb.com/sett/settDec2012_files/signmaker/javascripts/application2.js
Third Version - Mobile Rendering
- HTML - http://sett.ociweb.com/sett/settDec2012_files/signmaker/application3.html
- CSS - http://sett.ociweb.com/sett/settDec2012_files/signmaker/stylesheets/application3.css
- JavaScript -http://sett.ociweb.com/sett/settDec2012_files/signmaker/javascripts/application3.js
Fourth Version - Modal Dialog
- HTML - http://sett.ociweb.com/sett/settDec2012_files/signmaker/application4.html
- CSS - http://sett.ociweb.com/sett/settDec2012_files/signmaker/stylesheets/application4.css
- JavaScript -http://sett.ociweb.com/sett/settDec2012_files/signmaker/javascripts/application4.js
Fifth Version - Mobile Drag and Drop
- HTML - http://sett.ociweb.com/sett/settDec2012_files/signmaker/application5.html
- CSS - No changes
- JavaScript -http://sett.ociweb.com/sett/settDec2012_files/signmaker/javascripts/application5.js
Sixth Version - Mobile Tool Tips
- HTML- http://sett.ociweb.com/sett/settDec2012_files/signmaker/application6.html
- CSS - http://sett.ociweb.com/sett/settDec2012_files/signmaker/stylesheets/application6.css
- JavaScript -http://sett.ociweb.com/sett/settDec2012_files/signmaker/javascripts/application6.js
Seventh Version - Multi-Touch
