Room with a Vue Part 1: Introduction to Vue.js
By Zachary Klein, OCI Software Engineer
January 2018

Introduction
The recently released State of JS survey results suggest that, while React and Angular are by far the dominant players in the front-end development space, there is a strong and fast-growing interest in a new library: Vue.js.
Positioning itself between React's focus and simplicity and Angular's developer-empowering feature set (and arguably erring towards the latter), Vue attempts to build off of the good ideas in both of its more established competitors.
This is the first of three articles introducing the Vue.js library:
- In Part 1, we introduce Vue.js and survey the ecosystem that has already grown around the library.
- In Part 2, we build a simple Vue application with a RESTful backend step-by-step.
- In Part 3, we compare Vue with its more established competitors, React and Angular.
Vue.js aims to be accessible to any web developer with basic HTML, CSS, and JavaScript knowledge. This article is intended to be similarly approachable; although some references to other JavaScript frameworks will be made, experience with them is not necessary to follow along.
Hello World
The simplest Vue.js example can be created on a single HTML page:
<html>
<head>
  <script src="https://unpkg.com/vue"></script>
</head>
<body>

  <div id="app">
    {{message}}
  </div>

  <script>
    var app = new Vue({
      el: '#app',
      data: { message: 'Hello World!' }
    })
  </script>

</body>
</html>
While trivial, you can already learn a few things about Vue from this sample.
Vue.js itself does not require any additional JavaScript tooling or the use of a CLI to build an app. This reduces the barrier of entry when learning the library.
While modern JavaScript frameworks have largely provided starters and CLIs to make it easy to start a new project, at its simplest, Vue requires nothing more than linking in the vue library and creating a new Vue Instance by calling new Vue().
Let's break down this sample.
In the <script> tags, we create our Vue app (as described above) by creating a Vue Instance. We pass into the constructor a plain JavaScript "options" object, which is sometimes referred to as the instance definition. It is in this object (or similar objects that we will define for our future components) that we will write most of our Vue-specific code.
We will go over the various elements of the instance definition shortly, but for now you can see that it defines both behavior (e.g., which DOM element to render) and state (the string to display) of the app.
When we build components with Vue, we will pass essentially the same sort of object to add behavior and state to those components.
A Vue instance typically renders a template. In this example, the contents of the <div> marked with an id of app will be used as the template, but more typically you will define a discrete template for your app and each component.
Within the template you can use Vue-specific directives, as well as JavaScript expressions, within double-curly-braces (e.g., {{ message }} or `{{ 1 + 1 }}).
The Vue Instance
Understanding the Vue instance is key to learning this library.
Like React and Angular 2+, Vue apps are composed of a hierarchy of components; however it is the instance that holds the core of Vue's magic.
Every Vue app begins with an instance. It accepts (in its constructor) an object of options (called instance definition as described above) and participates in Vue's reactive rendering cycle, which (simplified) is as follows:
-
Data contained in the instance is used in the template (or returned in a render function), which is then rendered as HTML in the browser.
-
When the data changes, the instance will re-render its template to reflect the new data.
On a more technical note, Vue does this re-render using a Virtual DOM (very similar to React) to compute the minimal number of changes that need to be applied to the DOM.
Let's look at some of the most common properties that you will use when creating an instance.
el
new Vue({
  el: '#app'
})
As we saw in our first code sample, el tells Vue to mount this instance to an element on the DOM with the supplied selector (usually the id of a <div> tag).
Normally only your top-level instance will use this option. Instances used as components (which we will discuss later) will instead supply a template or a render method to define their output.
When an el value is supplied, Vue will extract the HTML contained within the DOM element and use that as a template. The same syntax that is used in templates can therefore be used within the el element.
data
new Vue({
  data: {
    myValue: 3,
    myObject: {
      prop: 'abc'
    }
  }
})
The data object defines the state of the instance.
Each property in the object will be "wired" into Vue's reactive rendering system, which supports both one- and two-way binding (using directives).
One important factor to remember is that only properties that exist when the instance is created will participate in the render cycle. If, after an instance is created, you add a new property to thedataobject, you will be able to access the new property normally, but the template will not be updated when that property changes.
Typically, this means you will want to define all the properties you plan to use in the initialdataobject. The properties don't need useful values, they just need to be present (and set to an "empty" value, likenull,0, or'') in order to be used by Vue to trigger new renders.
The data property can also be set to a function, which then returns the data object following the above rules. Here's an example:
new Vue({
  data() {
    return {
      myValue: 3,
      myObject: {
        prop: 'abc'
      }
    }
  }
})
What’s special about using a data() function over a plain object? This will be important when we discuss components.
Because components are also Vue instances, but many "instances" of a component can be used on a page, using the same data object when the component is first instantiated would result in every instance of the component having the same data.
In other words, if you had four <Widget> components on a page and changed a data property on any one of them, all four <Widget> components would have the same value.
This is not usually what you want. However, because the data()function is called when the component is rendered (not instantiated), each instance of a component will have its own data object, and updates can be made independently.
You can access properties on the data object from methods and from templates via this.$data.myValue. However, Vue proxies all those properties to the instance itself, so you can also use this.myValue (or simply {{myValue}} in a template).
METHODS
new Vue({
  methods: {
    toggleLinks: function () {
      this.showLinks = !this.showLinks
    }
  }
})
methods does what you probably expect; it defines methods on the Vue instance.
The methods are, for the most part, plain JavaScript functions. They can be event handlers, utility functions, and just about anything you’d like.
Methods can be called from other methods, as well as from templates (within the {{doubleCurlyBraces}} syntax). Within methods, this refers to the Vue instance.
It's important to note that the scope of these functions is set when they are called on the Vue instance and not when they are defined in the object. If you were to replace thefunction() {}block with an ES6 arrow function() ⇒ {}, you would find that the method would be unable to access the Vue Instance viathis. This is because the arrow function (a.k.a. closure) has lexical scoping and captures the value ofthisat the point it is defined, regardless of where it’s called. TL;DR: Don’t use arrow functions in Vue methods unless you know what you’re doing!
computed
new Vue({
  data() { message: 'Hello world' },
  computed: {
     reversedMessage: function () {
       return this.message.split('').reverse().join('')
     }
   }
})
Computed Properties are effectively dynamic data values. They are accessed in templates and methods just like you would access data properties. For example, you would access the reversedMessage() computed property above, via this.reversedMessage or {{reversedMessage}}.
One important feature with computed properties (as opposed to "plain" methods) in Vue is that they are only "computed" when the values they access from the data object change.
For example, the reversedMessage() function will only be executed if the value of this.message (i.e., data.message) has changed. If the "inputs" (the values from data) haven't changed, then there's no need to run the function again, and Vue will simply return the previous value (this is done with caching).
Lifecycle Hooks
new Vue({
created: function () {
fetch(`${this.$data.serverURL}/application`)
.then(response => response.json())
.then(json => this.serverInfo = json)
}
}
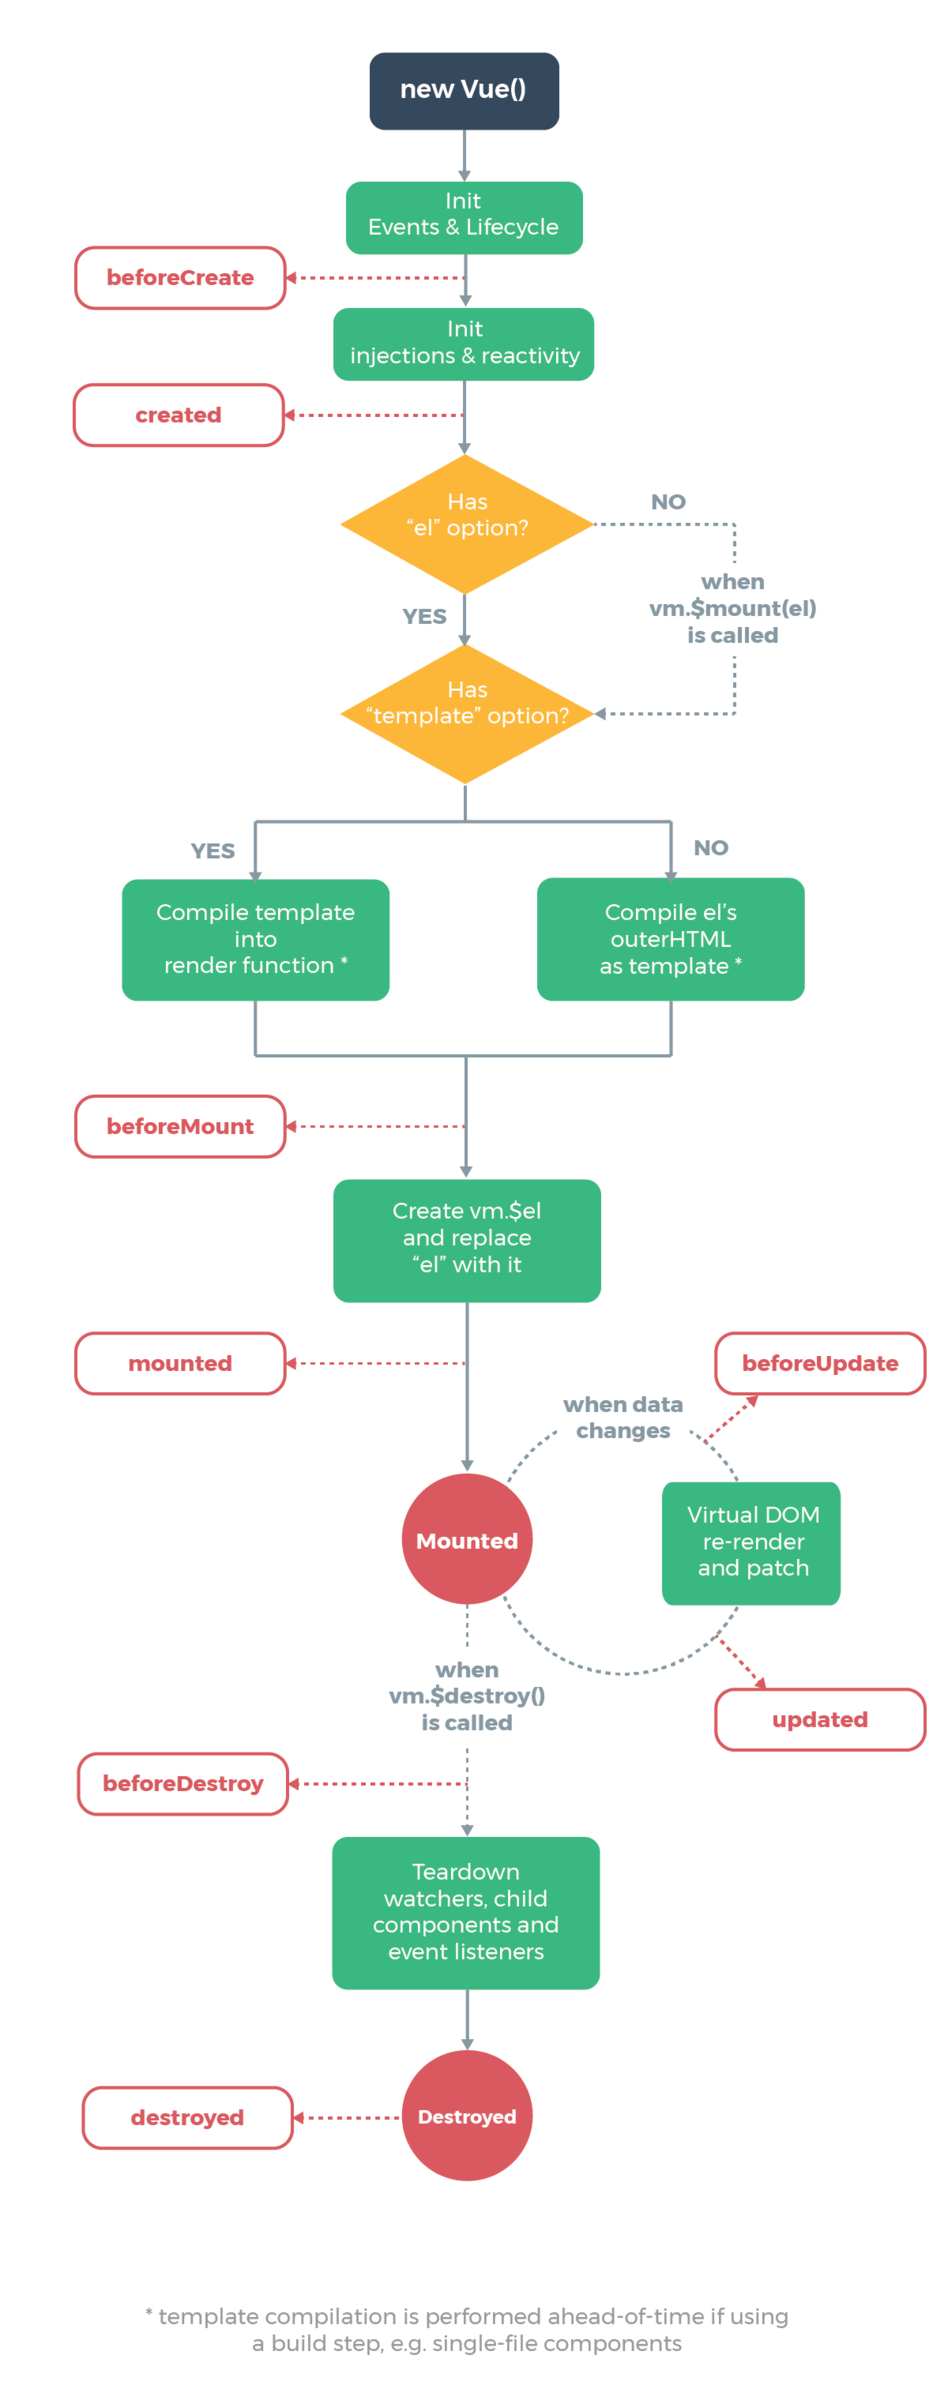
})Like other component-oriented libraries, Vue instances have a multi-step lifecycle which can be augmented by the developer using lifecycle methods (or "hooks").
The above example shows a created method, which will be executed immediately after the instance is initialized (but before it is rendered). As one would expect, there are hooks for when a component is mounted, unmounted, prior and post update, and when the component is destroyed.
The possible lifecycle hooks are laid out in this diagram from the Vue.js documentation:
Templates
<template>
  <div class="form">
    <div class="title cell">
      <label>Title</label>
      <input ref="bookTitle" v-model="book.title" type="text"/>
    </div>
    <div class="pages cell">
      <label>Pages</label>
      <input v-model="book.pages" type="text"/>
    </div>
    <div class="author cell">
      <label>Author</label>

      <select v-model="book.author">
        <option disabled selected value="">Choose Author</option>
        <option v-if="author !== null"
          v-bind:value="{ id: author.id }"
          v-for="author in authors">{{author.name}}</option>
      </select>
</template>
As we discussed above, Vue provides a template syntax that is embedded in HTML. This means that Vue templates are always valid HTML, with custom directives and JavaScript expressions (bracketed by {{…}}).
Directives
Directives in Vue look very similar to those in Angular – they are prefixed with v- and are added as attributes to HTML tags (as seen in the example above).
Directives can take arguments separated by colons.
For example, <input v-bind:value="myValue" /> will bind a data property myValue to the value attribute of the <input> element.
Because this particular directive (v-bind) is commonly used, Vue provides a shortcut syntax: <input :value="myValue" />.
In addition to arguments, directives can have modifiers, which are special indicators to the directive to modify its behavior in a predefined way.
A good example (and something you’ll probably do in your own code) is binding a function to the on-submit event of a <form>.
<form v-on:submit.prevent="submitNewBook">In this example, we are using the v-on directive. The argument is submit, which is the event we want to bind our function to. .prevent is the modifer, and combined with this directive, it will cause event.preventDefault() to be called on the event.
Some common directives include:
-
v-for– iteration over a collection -
v-if/v-else– conditional directives -
v-show– conditionally toggles an element's CSSdisplayproperty -
v-on– binds a function to an event on a particular element; accepts arguments such as:click,:change, and:submit -
v-bind– reactively binds a data value to an element attribute; when the data value changes, the element will be updated to reflect the new value (this is one-way data binding) -
v-model– combines the behavior ofv-bindandv-on; when the data value changes, the element will be updated and when the element value is changed, the data value will be updated (as you might expect, this is two-way binding)
Shorthand
Of all the directives in Vue, v-on (for binding functions to elements) and v-bind (for binding data to elements) are some of the most common. Because of this, Vue offers a handy shorthand syntax for both of these directives:
<input v-bind:value="myValue" />
<!-- is equal to -->
<input :value="myValue" />

<button v-on:click="myFunction()" ></button>
<!-- is equal to -->
<input @click="myFunction()" />
The Virtual DOM, Render Functions, and JSX
As mentioned above, Vue uses a Virtual DOM to optimize the reactive rendering of templates.
Each template is compiled into a render function, and these render calls are combined to build out the Virtual DOM's version of the UI.
Whenever an instance's data changes, Vue uses the Virtual DOM to generate a diff against the actual DOM in the browser, computing which components need to be re-rendered and applying the minimal number of changes to reflect the new data.
Using templates is optional, of course. If you supplied your instance with an el property of an existing DOM element ID, Vue will use that element’s HTML markup as a template. This is usually only done for the top-level instance, such as an App or a main component.
You can also implement your own render function for an instance. When you do this, you have the option of using JSX, which will be familiar to React developers.
new Vue({
  el: '#demo',
  render (h) {
    return (
      <div>
        <h1>Hello from JSX!</h1>
      </div>
    )
  }
})
As in React, JSX is actually syntatic sugar for createElement function calls.
It's important to note that if you use JSX in your Vue app, you will also need to process your code through the appropriate Babel transpiler plugin – you won't be able to run the code directly in your browser.
Components
We've mentioned components a few times in this article. What's the distinction between a component and an instance?
In Vue, a component refers to a custom element that can be used in templates and render functions.
A component is a Vue instance, but it is an instance that can be represented as a tag within HTML – e.g., <my-custom-component />.
You might think of it this way: A component is an instance that is being used to compose a UI.
This means that all of the features we've discussed above regarding instances also apply to components.
Typically you may have a single top-level Vue instance to represent your entire app, and then have many Vue components which you will use to compose your app.
Components, like all instances, render to a template, and they include other components in their templates.
A component can be declared similarly to a standalone instance, using the Vue.component() method to "register" the component with Vue:
Vue.component('hello-component', {
  template: '<div @click="hello()">Click me to say hello!</div>',
  methods: {
    hello: function() {
      console.log('hello!')
    }
  }
})
Note that when declaring components this way, you need to make sure the component is registered before creating your "main" Vue instance withnew Vue().
Once the component is registered, you can use it in your instance (or another component's) template, just like any HTML element.
<div id="app">
  <hello-component></hello-component>
</div>

<script>
Vue.component('hello-component', {
  //... component instance definition
})

new Vue({
  el: '#app'
})
</script>
Again, notice that we register our component prior to creating our app's main Vue instance. This means that the instance can use hello-component in its own template, as shown.
Props
In addition to the other instance properties (methods, data, computed, lifecycle hooks, etc) to which components have access, components can also accept props, which appear as attributes on the component's DOM element.
These props can be bound using directives like v-bind and v-model and allow components to accept data and behavior (functions) from their parents.
Props are defined using a props instance property:
Vue.component('hello-component', {
  props: ['name'],
  template: '<h1>Hello {{ name }}</h1>'
})
In a template, the parent instance can now bind a value to the name prop, and it will be available inside the component as name. Just as with other reactive data properties, when the prop value changes, the component will be re-rendered with the new prop.
<div id="app">
  <hello-component :name="username"></hello-component>
</div>
One thing to note is that, while you can use camel-casing for your prop names, HTML attributes are case-insensitive, so you must covert your prop names to "kebab-case" (hyphen-separated) in your templates.
Vue.component('button-component', {
  props: ['clickHandler'],
  template: '<button @click="clickHandler">Click Me</button>'
})<div id="app">
<button-component @click-handler="buttonWasClicked()"></button-component>
</div>data()
As mentioned above, components share almost all of the properties of a "normal" Vue instance. However, the dataproperty is handled a bit differently.
Because you will often use multiple "instances" of a given component in a template, but only one "Instance" (i.e., a Vue Instance) of the component is registered, you need to make sure that each instance of the component has its own data.
If you were able to register your component with a data object, like we did with our main Vue Instance earlier in this article, then every single instance of the component would share the same data object.
This would mean that if we had multiple <hello-component> components on the page, every single one would have the same data object. If you changed a value in one, it would change in every other one. This is almost certainly not what you want!
To prevent this, Vue requires that a component use a data() function rather than a data object. That function in turn, returns the data object for that specific component.
Note that the data() function is only called when the instance is initialized; the object returned by the function will then be used as the instance's data object.
Vue.component('hello-component', {
  data() {
    return {
      greeting: 'Hello'
    }
  }
})
Because data() is a function, when Vue creates each instance of the component and initializes the data for each one, every instance will receive its own data object. If the value of greeting changes in one <hello-component>, it will not affect the greeting of another component.
As mentioned above, Vue enforces this rule and will provide a helpful warning if you forget and use a plain data object in a component.
Single-file Components
While you can register multiple components in a single JavaScript using the Vue.component() method, in practice it is more common to define each component in its own file. It’s also usually desirable to have component-specific CSS rules without affecting other elements on the page. Vue offers a shorthand for defining per-file components, which is unsurprisingly called single-file components.
/src/Hover.vue
<template>
  <div :class="{ hover: hover }"
       @mouseover="hover = true"
       @mouseleave="hover = false">
      Hover Over Me!
  </div>
</template>

<script>
  export default {
    name: 'hover',
    data () {
      return { hover: false }
    }
  }
</script>

<style scoped>
  .hover {
    background: lightblue;
  }
</style>
A single file component is essentially an HTML file, with three sections:
<template><script><style>
The file extension for these components is .vue.
The <template> contains the HTML template that will be rendered by the component. In the sample above, we are rendering a single <div> tag with a custom class attribute (which we are binding to our hover data property), and two event handlers to mouseOver and mouseLeave.
The event handlers will update the value of hover in our component’s data, causing the hover CSS class to be dynamically added and removed to create a "mouse-over" effect.
Within the <script> tag, we export a JavaScript object as a module. This object will be used as the instance definition and can be populated with all of the options that we’ve looked at in the previous sections.
Note that we are defining our component’s data using a data() function, rather than a plain object, as discussed earlier.
The final section of the single-file-component is the <style> tags. Here you can specify component-specific CSS rules. These rules will be "scoped" to the component’s template and will not affect any other HTML elements.
Once you’ve created a single-file component, you can import that component into other components and use them within templates.
/src/Home.vue
<template>
  <div>
    <hover ></hover>
  </div>
</template>

<script>
  import Hover from './Hover.vue'

  export default {
    name: 'home',
    components: {'hover': Hover}
  }
</script>

<style scoped>
</style>
In the above example, we are importing our Hover single-file component and using it in the template of another component.
Notice that we are including a new property in our instance definition object: components. Because single-file components are not globally registered with Vue.component(), it is necessary to tell Vue that you intend to use the imported component in your template.
The value of component is an object containing the components you intend to use – our Hover component in this example. The keys in this object will be the element name for the component, and the values are the imported component itself.
If you recall, in the Hover.vue example above, we already supplied a name of "hover" in the instance definition object.
/src/Hover.vue
<script>
  export default {
    name: 'hover',
    //..
  }
</script>
This means we don’t actually need to set the name in the components property. Instead, we can simply use the imported component for both key and value:
components: {Hover: Hover}We can now use ES6 shorthand to make this even more concise:
components: {Hover}Single-file components make it easy to define reusable components, importing only the child components that you need without globally registering every component explicitly.
Most of the Vue instances you write will be components, and most of them will likely be single-file components.
Vue-loader
Similarly to Vue’s JSX support, single-file components require a build pipeline that knows how to process these components and generate the actual Vue instances they define.
The official means of doing this transformation is the vue-loader for Webpack. You can configure this loader in your webpack.config.js file, matching all files ending with the .vue file extension.
var path = require('path')
var webpack = require('webpack')

module.exports = {
  entry: './src/main.js',
  output: { /*...*/}
  module: {
    rules: [
      {
        test: /\.vue$/,
        loader: 'vue-loader',
        options: {  /*  vue-loader options go here */  }
      },
    ]
  }
}
You can refer to the vue-loader documentation for details about the various options and related loaders that are available. How you choose to configure these loaders will vary depending on your project.
However, for new Vue apps, it is usually preferable to not write the Webpack configuration from scratch. Instead, you will typically use the Vue-CLI to generate your new Vue project (based on a predefined template), which will preconfigure Webpack to build your .vue components, as well as to process JSX and other Vue-specific features and syntax. We will look at Vue-CLI in the following section.
Ecosystem
Vue's ecosystem is remarkably mature considering the relatively young age of the library.
Several official companion libraries and tools are available, with support from the Vue community, as well as from the core development team. Each of these tools deserves an entire article of its own, so we will just summarize their capabilities in this final section.
Vue-CLI
The Vue-CLI is the preferred way of creating new Vue applications. You can install the CLI using npm:
$ npm install -g vue-cliYou can now create a new Vue project based on a template of your choosing:
$ vue init <template-name> <project-name>The available templates (as of the time of writing) are listed below (descriptions taken from the vue-cli README):
-
webpack– A full-featured Webpack + vue-loader setup with hot reload, linting, testing and css extraction -
webpack-simple– A simple Webpack + vue-loader setup for quick prototyping -
browserify– A full-featured Browserify + vueify setup with hot-reload, linting and unit testing -
browserify-simple– A simple Browserify + vueify setup for quick prototyping -
pwa– PWA template for vue-cli based on the Webpack template -
simple– The simplest possible Vue setup in a single HTML file
Each template includes documentation of its own, which explains the project structure and available scripts/commands to start/build/test your app. Here are some recommendations:
- If you are just playing with Vue.js for the first time, the
simpletemplate is a great place to start. - If you'd like to start writing single-file components and building a more "real-world" app, try the
webpack-simpletemplate. - When you're ready to start a "real" project (which you intend to build to a production environment), use the
webpacktemplate.
You can learn a lot about Vue and the conventions around project structure, testing, and other usages from these templates. It is a great way to learn how to use this library.
Vuex
State-management is a complicated and sometimes controversial topic in modern JavaScript development. Many developers have turned to a Flux pattern to manage their application state, using libraries like Redux to enforce constraints on how and when state is updated and provide access to state from a central store, which is external to components but available when needed.
Vuex is the official "Flux" implementation for Vue. It shares many of the concepts with libraries like Redux but is arguably a bit simpler to implement.
Like Redux, Vuex provides a single store for all of your app state.
You define mutations, which are functions that transform the state based on some input. These mutations are called by actions, which are functions that can be dispatched from your components in order to trigger state changes on their behalf.
Typically, you will configure your store in a single JavaScript file, conventionally located at store/index.js.
/store/index.js
import Vue from 'vue'
import Vuex from 'vuex'

Vue.use(Vuex)

const store = new Vuex.Store({
  state: {
    authors: [],
  },
  mutations: {
    setAuthors (state, {authors}) {
      state.authors = authors
    }
  },
  actions: {
    loadAuthors: function ({commit, state}) {
      fetch(`/author`)
        .then(r => r.json())
        .then(json => commit('setAuthors', {authors: json}))
    }
  }
})

export default store
Vuex leverages features of Vue that you've already seen, like computed properties, to give components access to data from the Vuex store. It also allows components to express what actions they need to take to update the store.
As can be seen in the code example above, mutations are pure functions; they will return the same state given the same arguments without side-effects.
Actions, on the other hand, can be asynchronous and can be used (for example) to make REST calls to a server and then either dispatch another action or commit a mutation to the store with the results of their asynchronous activity.
Vuex is a very capable library, and it is certainly worth learning once you've familiarized yourself with the basics of Vue.js.
However, as with other state-management libraries in other frameworks, it is inadvisable to try to learn Vuex until you have a solid understanding of Vue.js on its own.
Not every Vue app you build will require Vuex, so start simple!
Vue-Router
Routing is a common requirement in modern web apps. Vue-Router is the official routing solution for Vue.js, and it handles almost every possible use case you might have for routes in your application.
By convention, you will configure Vue-Router in a single JavaScript file at router/index.js.
import Vue from 'vue'
import Router from 'vue-router'
import Home from '@/components/Home'
import About from '@/components/About'

Vue.use(Router)

export default new Router({
  routes: [
    {
      path: '/',
      name: 'Home',
      component: Home
    },
    {
      path: '/about',
      name: 'About',
      component: About
    }
  ]
})
To navigate between routes, Vue-Router supplies a <router-link> component, which you can use to create links to routes within your routing system.
<template>
  <div id="app">
    <router-link to="/">Home</router-link>
    <router-link to="/About">About Us</router-link>

    <router-view></router>
  </div>
</template>
The <router-view> component, seen above, represents the portion of the page that will be replaced by the contents of the current router (e.g., the main body of the page, if your routes are completely separate views).
Vue-Router also supports wildcard matching, capturing of URL parameters, redirects, and many other advanced features.
Refer to the Vue-Router documentation to learn more
Vue DevTools
One of the best features in the Vue ecosystem is its excellent DevTools for popular browsers.
Chrome, Firefox, and Safari are currently supported, although Safari requires some workarounds.
Once installed, the DevTools allow you to inspect the instances in your app, giving you access to their data, props, computed properties, and route parameters.
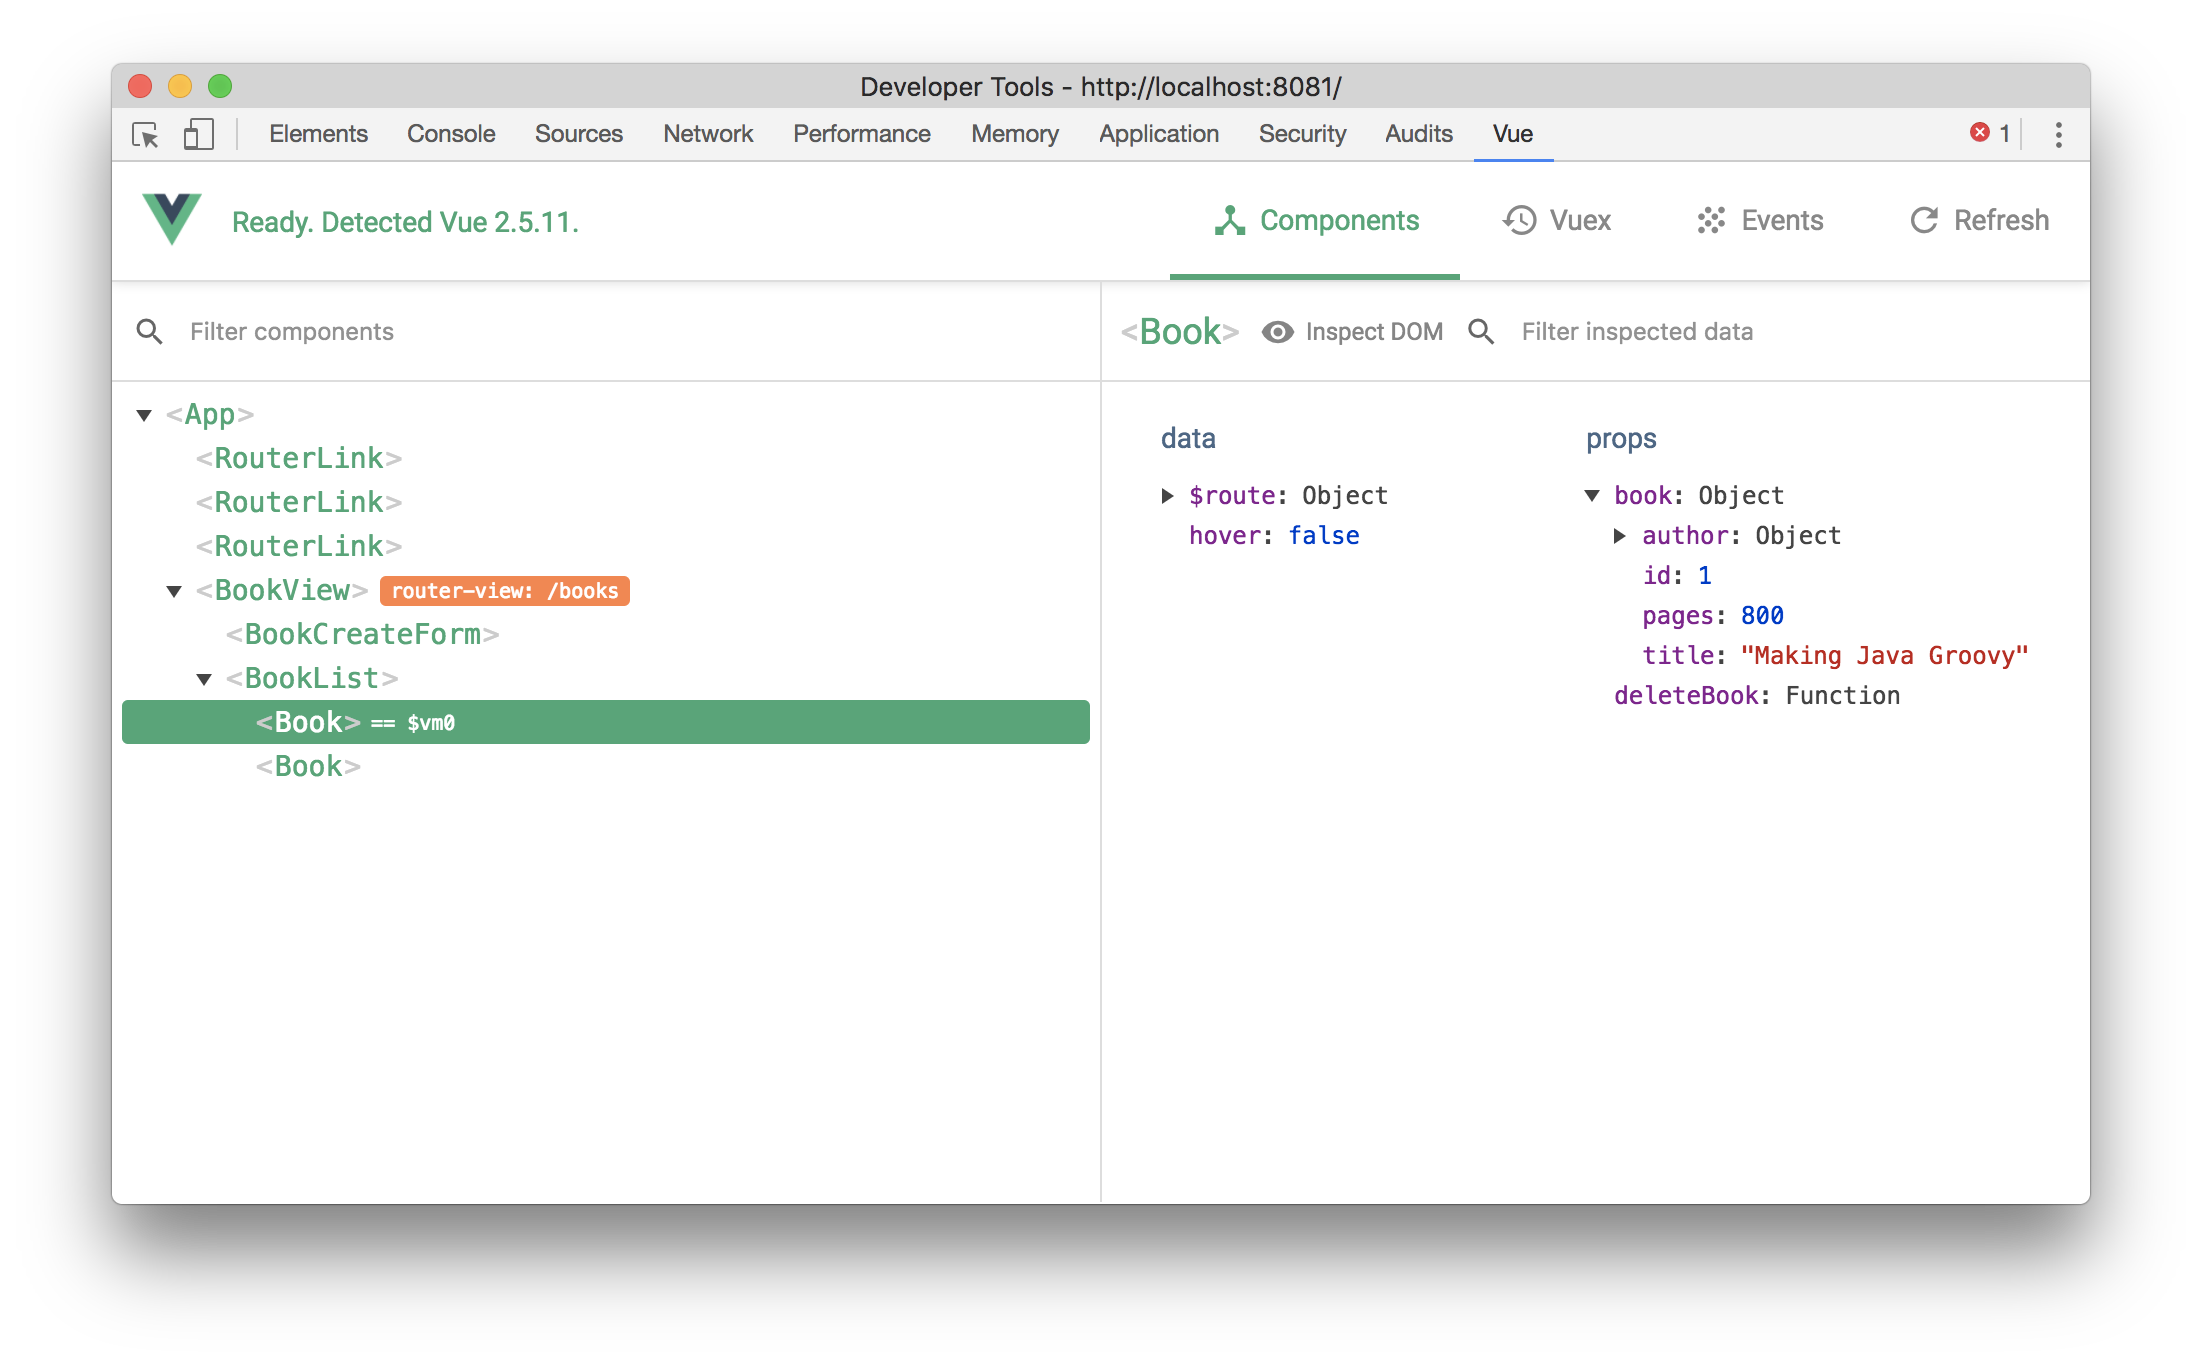
If you are using Vuex, the DevTools will also track changes to your store and allow you to step backwards and forwards through changes in state, while the UI updates to reflect the "time-travel" through the app's state history.

Good developer tools are a huge boost to developer productivity as well as learning the library. Even a simple Vue application can reveal a lot about how the library works, once you open the hood with Vue’s DevTool and see what’s happening for yourself.
Summary
Vue.js has captured a lot of developer interest. The rich API, focused design, excellent documentation, and development tools give it an impressive set of features that compare favorably to any of its better-known competitors.
Vue.js aims for a "sweet spot," balancing developer-friendly features and focused simplicity.
Whether or not it has achieved its aim has yet to be seen, but there’s a lot to like about the library, and there’s no better time to start learning and playing with it than right now. It’s as simple as:
$ npm install -g vue-cli
$ vue init simple my-first-vue-app
In Part 2 in this series, we take what we've learned and apply it to a real project building a simple Vue.js app, backed by a RESTful API, using Vuex and Vue-Router.
In Part 3, we compare Vue.js to its primary rivals, Angular (2 and above) and React, and evaluate how this relative newcomer to the front-end development scene stacks up.
Software Engineering Tech Trends (SETT) is a regular publication featuring emerging trends in software engineering.
