JUnit: Not Just Another Pretty Assert
by Charles Sharp, Principal Software Engineer
March 2014
What's in your JUnit tests?
JUnit 4 was released Feb 16, 2006. With its release came annotations and the ability to write JUnit tests in a more flexible fashion than the setUp, test, and tearDown of 3.8. JUnit 4 took three and a half years to show up after the 3.8.1 release but since then there have been ten more releases -- 4.11 came out in December, 2012 and 4.12 is in the works.
So here we are ten releases and eight years later. And I wonder, how much has changed in the way you use JUnit? Are you using the Hamcrest matchers with assertThat or perhaps assumeThat? Rules? Categories? And how about those parameter-driven tests using Theories, eh?
This article reviews some of JUnit 4's capabilities to refresh your memory and perhaps remind you of some of the advantages to using something, well, besides assert. (You are using asserts, aren't you?)
We start with a quick review of the Assert class and the Hamcrest matchers, then move to the Assume class. After that, there are sections for Categories, Parameterized testing using Parameter and Theory, and we end up with Rules.
The sections are intended to be stand-alone, so feel free to check out the ones that interest you most, but take at look at all of them. They're all good tools.
Getting started
This article assumes that you’re familiar with creating and running JUnit 4 unit tests. That is, you know how to create tests and test suites and how to use the @Before and @After fixtures for them. Of course, you need to know how to run tests from your IDE or the command line.
If those are not correct assumptions, then I would recommend the Getting Started page on the JUnit wiki as a great place to, well, get started.
Or, if you’re still using JUnit 3.8, you might want to take a look at an earlier OCI SETT article on migrating to JUnit 4, Migrating from JUnit 3 to JUnit 4. It's definitely time to be using JUnit 4.
Assert
The Assert class is the workhorse of JUnit and is the class JUnit testers are most familiar with. Most JUnit assert signatures are similar in nature. They consist of an optional message, an expected instance or variable and the actual instance or variable to be compared. Or, in the case of a boolean test like True, False, or Null, there is simply the actual instance to be tested.
The signature with a message simply has an initial parameter with a message string that will be displayed in the event the assert fails:
assert<something>(“Failure Message String”, <condition to be tested>);The form without a message has the same arguments but omits the reason message:
assert<something>(<condition to be tested>);For example, here are two asserts that compare the values of two long variables to each other:
public static void assertEquals(String message, long expected, long actual);
public static void assertEquals(long expected, long actual);
A listing of the available asserts and their details are found in the JUnit Assert Javadoc.
The JUnit site also has a quick guide that shows some of the available asserts in action at JUnit Wiki Assertions page.
An interesting assert that differs from the others is assertThat. It features both a different approach and signature:
assertThat([java.lang.string Reason], T actual, org.hamcrest.matcher <T> matcher)
assertThat(T actual, Matcher<? super T> matcher)
Rather than an expected instance or value, the actual instance of T to be tested comes first and is compared to the assertions contained in the Hamcrest matchers.
Hamcrest matchers, though bundled with JUnit, are a separate project. Hamcrest is a general purpose matching library for Java, Python, Ruby, Objective-C, PHP, and Erlang. Use http://hamcrest.org as the place to start to learn more about the overall Hamcrest project. A great place to start for an understanding of what Hamcrest matchers offer the JUnit tester is The Hamcrest Tutorial. This short tutorial provided by the Hamcrest folk uses JUnit 3.8 but gives a good overview of the categories of matchers available and also shows how to write a custom matcher.
Once you have a good feel for what the Hamcrest matchers provide, Marc Philipp has created an excellent quick reference of the 1.3 matchers which can be found at Hamcrest 1.3 Quick Reference
In JUnit, the Hamcrest matchers provide composability of intent and readability, especially in the error messages. For simple cases, this is not very apparent. Take for example, an assert() failure when comparing two longs:
- long L1 = 93;
- long L2 = 92;
- assertEquals("Off by one again!", L1, L2);
This failure produces:
java.lang.AssertionError: Off by one again! expected:<93> but was:<92>which, as failure indications go, is fine. The stack trace following the error message accurately pinpoints the location of the error.
Here is the same failure using assertThat("Off by one again!", L2, equalTo(L1));
java.lang.AssertionError: Off by one again!
Expected: <93L>
but: was <92L>
It is a bit nicer seeing the data type but it is essentially the same error message as the other assert and required more typing on the tester's part. However. Once the assertions become more complicated, assertThat shows its strength:
- String expected = "Another";
- String actual = "Started well, did One thing, Ended well.";
- assertThat("So it goes", actual,
- allOf(startsWith("Started"), endsWith("well."), containsString(expected)));
When this fails, you receive the message:
java.lang.AssertionError: So it goes
Expected: (a string starting with "Started" and a string ending with "well." and a string containing "Another")
   but: a string containing "Another" was "Started well, did One thing, Ended well."
at org.hamcrest.MatcherAssert.assertThat(MatcherAssert.java:20)
at org.junit.Assert.assertThat(Assert.java:865)
at com.ociweb.AlwaysPassesTest.test(AlwaysPassesTest.java:40)
... <rest of stack omitted>
This is a great description of what part of the Matcher failed and where.
In this case, using asserts to do this is more work. You can either use three asserts, such as:
- assertTrue("So it starts", actual.startsWith("Started"));
- assertTrue("So it ends", actual.endsWith("well."));
- assertTrue("So it goes", actual.contains("Another"));
When the third assert fails, you receive a message to the effect:
java.lang.AssertionError: So it goes
at org.junit.Assert.fail(Assert.java:88)
at org.junit.Assert.assertTrue(Assert.java:41)
at com.ociweb.AlwaysPassesTest.test(AlwaysPassesTest.java:35)
...
This fairly common approach allows you to see which assertion fails but makes for longer tests and more typing. Or, you can combine all the asserts to sort of look like the assertThat version with matchers:
- assertTrue("So it goes",
- actual.startsWith("Started") &&
- actual.endsWith("well.") &&
- actual.contains("Another"));
This produces an error message like:
java.lang.AssertionError: So it goes
  at org.junit.Assert.fail(Assert.java:88)
  at org.junit.Assert.assertTrue(Assert.java:41)
  at com.ociweb.AlwaysPassesTest.test(AlwaysPassesTest.java:37)
  ...
This now seems to be a bad idea since the tester has no idea which condition of the assert actually failed.
While we're composing with matchers, the failing matcher test above can be made to pass in a couple of ways. One would be the anyOf matcher:
- String possible = "One thing";
- String alsoPossible = "or Another";
- String actual = "Started well, One thing, Ended well.";
- assertThat(
- "So it goes", actual,
- allOf(startsWith("Started"), endsWith("well."),
- anyOf(containsString(possible), containsString(alsoPossible))));
The either matcher also works:
- assertThat(
- "So it goes", actual,
- allOf(startsWith("Started"), endsWith("well."),
- either(containsString(possible)).or(containsString(alsoPossible))));
To summarize, when a test is working with a single result and wants to state a single expectation of that result, then plain asserts work fine. But when the test needs to express multiple expectations of that result, matchers are a clear and concise way to do that while maintaining the ability to quickly determine the point of failure should a test fail.
Assumptions
You’ve probably heard that it’s best not to work on assumptions so here is a testing tool JUnit gives you to ensure your tests don’t.
Both Asserts and Assumes stop when a test fails and move on to the next test. The difference is that a failed Assert registers the failure as a failed test while an Assume just moves to the next test. This permits a tester to ensure that conditions, some of which may be external and out of control of the tester, are present as required before a test is run.
There are four varieties of Assumes: one to check a boolean condition, one to check that an exception has not occurred, one to check for null objects, and one that can take a Hamcrest matcher. As seen in the Assert section above, the ability to take a Hamcrest matcher is a gateway to testing flexibility.
The assumeFalse(boolean b) and assumeTrue(boolean b) both work like a boolean assertFalse(boolean b) or assertTrue(boolean b). The assumes check to see if their boolean argument is false or true. If the boolean matches expectations, the test continues. Otherwise the test is halted.
assumeNotNull(Object... objects) does a simple check of the Object arguments to ensure they are not null. If any are null, the test is halted.
assumeNoException(Throwable t) is used to ensure that an exception was not thrown during an operation. This is useful when an operation such as opening a file or connecting to a server could throw an exception. Said another way, you can use this assumption to ensure required resources are successfully obtained prior to testing.
assumeThat(T actual, Matcher matcher) is the version of assume that uses a Hamcrest matcher. This method is similar in form and function with assertThat(T actual, Matcher matcher) and permits a test to concisely check multiple conditions before proceeding with a test. In addition, it is useful for selecting the tests to run when using Theories in parameter-driven testing as shown in the Parameterized Testing section below.
Categories
Categorizing things is a very natural activity and unit tests are no exception. There are regression tests, fast tests, or tests that only pertain to Platform X or Release V. The Category annotation permits a tester to classify their unit tests. The example given in the Categories Javadoc gives an example of fast or slow tests, something any tester can relate to.
Regardless of the categories you use to classify your tests, Categories are used to either specify which group of tests to run or which group of tests to not run. Inclusion is more specific than the case of exclusion. To show this, we'll use the Javadoc example of SlowTests and FastTests. Let’s say you have some methods annotated as follows:
In one class containing tests, there are some SlowTests and some tests that may not be fast, but are not slow:
- ...
- public class BunchOfMostlySlowUnitTests {
-
- @Category(SlowTests.class)
- @Test
- void firstSlowTest() { ... }
-
- @Category(SlowTests.class)
- @Test
- void secondSlowTest() { ... }
-
- @Test
- void firstNotSlowTest() { ... }
- ...
In another test class, we know that all the tests are in the FastTests category so we just decorate the class:
- ...
- @Category(FastTests.class)
- public class BunchOfFastUnitTests {
-
- @Test
- void firstFastTest() { ... }
-
- @Test
- void secondFastTest() { ... }
- }
- ...
Finally, there is a test class with tests that are neither FastTests nor SlowTests:
- ...
- public class BunchOfUnitTests {
- @Test
- void firstNeitherTest() { ... }
- @Test
- void secondNeitherTest() { ... }
- ...
The Category runner extends the Suite runner so the setup to run Category tests looks just like a Suite:
- @RunWith(@Categories.class)
- // @IncludeCategory(SlowTests.class)
- // @ExcludeCategory(FastTests.class)
- @SuiteClasses( { BunchOfMostlySlowUnitTests.class, BunchOfFastUnitTests.class, BunchOfUnitTests.class } )
- public class CategoryTestSuite { }
Finally we’re ready to talk about Including and Excluding tests.
If there are no @IncludeCategory or ExcludeCategory decorations on the @SuiteClasses, all the tests in the suite classes are run -- just like a @Suite. No surprises there.
If you uncomment the @IncludeCategory shown in line 2, only the tests specifically decorated with@Category(SlowTests.class) will run, that is to say, the firstSlowUnitTest() and secondSlowUnitTest() will be executed.
Contrast that to what happens if instead you uncomment the @ExcludeCategory shown in line 3. In this case, all tests but those specifically decorated with @Category(FastTests.class) will run. That means firstSlowUnitTest(),secondSlowUnitTest(), and the two NeitherTests methods will run. All of that to say the use of @ExcludeCategory is more inclusive in practice.
JUnit does not come with any Categories pre-defined. A tester builds them as needed. So how is that done? The element used on the @IncludeCategory, @ExcludeCategory, and @Category annotations is a Java class. The class can be either a class or an interface. An easy and usual approach is to create an empty interface with the name of the desired category. Need a Regression Test category? Use: public interface RegressionTest {}. You're now ready to use@Category(RegressionTest.class). Very easy.
One more thing about the @Category annotation. Its element is actually an array of Java classes. That means you can use the @Category to assign multiple categories to a single test, as in: @Category({ SlowUnitTest.class, RegressionTest.class }) { ... }.
Categories can be very useful. In the realm of Continuous Integration, the need to have the unit tests perform and move on is imperative. On the other hand, sometimes a tester needs to ensure that the Pause method really did. The use of Categories can make these conflicting needs less painful.
Parameterized Testing
JUnit provides two different runners to drive parameterized testing, Parameters and Theory. Which to use? If the tester can easily and completely provide the data needed to test, then testing with Parameters is a good way to go. If, on the other hand, the test automatically generates data or obtains it from a non-deterministic source, Theory works better.
Parameters
To run a Parameterized tests, you need three things: a static method to generate the test data, the tests (of course), and either a constructor to receive and store the data or a set of decorated variables to receive the data.
Here's an example of using the Constructor to store the data:
- package com.ociweb;
- import static org.hamcrest.CoreMatchers.*;
- import static org.junit.Assert.*;
-
- import java.util.Arrays;
- import java.util.Collection;
-
- import org.junit.Test;
- import org.junit.runner.RunWith;
- import org.junit.runners.Parameterized;
- import org.junit.runners.Parameterized.Parameters;
-
- @RunWith(Parameterized.class)
- public class ParameterizedExample {
- private String testData;
- private String expectedResult;
-
- @Parameters
- public static Collection<Object[]> generateData() {
- return Arrays.asList(new Object[][] {
- { "JAVA", "JAVA" },
- { "CLOJURE", "CLOJURE" },
- { "C++", "FUN" } }
- );
- }
-
- // Constructor is invoked once for every element in the Collection
- // annotated with @Parameters
- public ParameterizedExample(String testData, String expectedResult) {
- this.testData = testData;
- this.expectedResult = expectedResult;
- }
-
- @Test
- public void testTheData()
- {
- ClassUnderTest cut = new ClassUnderTest();
- String actualResult = cut.doImportantThingsToBeTested(this.testData);
- assertThat(actualResult, is(expectedResult));
- }
- }
When the test is run, the generateData method(line 19) will supply the data. Note that the reason this happens is the @Parameters annotation on the method. The data supplied by this method will then be iterated over and each iteration will be fed to the constructor (line 29). The constructor in turn uses the data to set the fields to be tested(lines 15 and 16). After the construction is complete, the test or tests are then run with that data. This continues until the end of the data collection is reached.
Here is the same example done without a constructor. In this example, the data values are injected directly into the fields to be used in the test.
- ...
- @RunWith(Parameterized.class)
- public class ParameterizedExample {
- @Parameters
- public static Collection<Object[]> generateData() {
- return Arrays.asList(new Object[][] {
- { "JAVA", "JAVA" },
- { "CLOJURE", "CLOJURE" },
- { "C++", "FUN" } }
- );
- }
-
- @Parameter(value=0)
- public String testData;
- @Parameter(value=1)
- public String expectedResult;
-
- @Test
- public void testTheData()
- {
- ClassUnderTest cut = new ClassUnderTest();
- String actualResult = cut.doImportantThingsToBeTested(this.testData);
- assertThat(actualResult, is(expectedResult));
- }
- }
Here the constructor has been removed. The data generator method is the same. But the fields that receive the data have been decorated with the @Parameter annotation. The value element determines the index of the data to be applied to the variable.
Note Well! The data fields are now public not private like they were in the previous example that used a constructor to set the values.
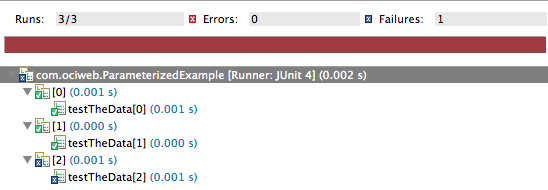
One final thing for Parameters. There is a nice optional element for the @Parameters annotation that allows you to have a nice run title for each run. For example, if the example above is run in Eclipse Kepler, the output will show something like:
But a name element can be added to the Parameters annotation like this:
- @Parameters(name = "DataSet #{index}: testData:{0} expected:{1}")
- public static Collection<Object[]> generateData() {
When the test is run now, the output looks like:
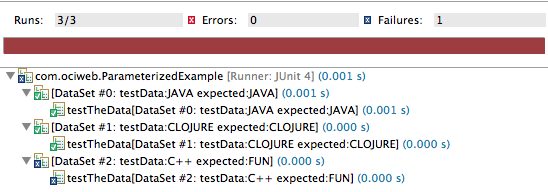
In the name element, {index} refers to the current iterator index in the Collection. The {<N>} entries refer to the parameter values. If no name element is given the default is: (name = {index}) to match previous JUnit releases.
More information and another example can be found at the JUnit wiki Parameterized tests page.
Theories
On the other side of the parameter-driven testing house is Theory. To run parameter-driven tests with Theories, you need two things: data points and theory tests. The data points can be supplied using either a static method that generates test data in an array and is marked with the @DataPoints annotation or there can be fields annotated with@DataPoint or there can be a mixture of both as in the following example. You also need the tests (of course) decorated with the @Theory annotation. The Theories.class runner will exercise all Theory tests that take the same argument type provided by a DataPoint.
In the following example, the DataPoint Strings are sent one-by-one to the test methods taking a String argument. Since a Theory test really doesn't know beforehand what the data will be like, there is an assumeThat done to ensure that this test is to be run on the data. Likewise for the methods taking an int or a long.
- package com.ociweb;
-
- import static org.hamcrest.Matchers.*;
- import static org.junit.Assume.assumeThat;
-
- import org.junit.experimental.theories.DataPoint;
- import org.junit.experimental.theories.DataPoints;
- import org.junit.experimental.theories.Theories;
- import org.junit.experimental.theories.Theory;
- import org.junit.runner.RunWith;
-
- @RunWith(Theories.class)
- public class TheoriesExample {
- @DataPoints
- public static String[] data() {
- return new String[] { "JAVA", "SCALA", "CLAN" };
- }
-
- @DataPoint
- public static int intToNotTest = 0;
-
- @DataPoint
- public static int intToTest = 1;
-
- @DataPoint
- public static long longToNotTest = 19;
-
- @DataPoint
- public static long longToTest = 43; // off by 1, again!
-
- @Theory
- public void hasAnA(String dataToTest) {
- assumeThat(dataToTest, containsString("A"));
- // Perform tests for strings with an "A"
- }
-
- @Theory
- public void needsToContainW(String dataToTest) {
- assumeThat(dataToTest, containsString("W"));
- // Perform tests for strings with a "W"
- }
-
- @Theory
- public void is5CharactersLong(String dataToTest) {
- Integer testStringLength = new Integer(5);
- assumeThat(dataToTest.length(), equalTo(testStringLength));
- // Perform tests for strings five characters long
- }
-
- @Theory
- public void takesAnInteger(int dataToTest) {
- assumeThat(dataToTest, is(not(0)));
- // Perform tests for non-zero integers.
- }
-
- @Theory
- public void takesALong(long dataToTest) {
- long lowerLimit = 20L;
- long upperLimit = 98L;
- assumeThat(dataToTest,
- both(greaterThanOrEqualTo(lowerLimit)).and(lessThanOrEqualTo(upperLimit)));
- // Perform tests needing a long in the [20, 98] range.
- }
- }
When this example is run, Eclipse will generate the following test report:

The report fails the needsToContainW() test because none of the generated data matched the assumeThat matcher. This means that, while a failed assumeThat() will not fail a test, a Theories runner insists that a test is exercised at least once during the test run or it fails that test. Which makes sense and is a nice feature. This permits a tester to know when the data being supplied by the DataPoints is not exercising everything that needs testing.
While a Theories test class is not going to be as quick to write as a Parameters test class, there will be cases -- specifically when test data is generated, rather than known before hand -- when a Theory test will be a better fit than a Parameters test.
More information on Theories and the background behind them can be found at the JUnit wiki page, Theories.
Rules
Originally called Interceptors, Rules allow a tester to insert behavior before and after a test is run. JUnit comes with several very handy Rules. These can be used as is or extended. Or a tester can write their own.
Rules provided by JUnit include:
- ErrorCollector: collects multiple errors in a single test allowing it to continue to find all errors.
- ExpectedException: permits assertions to be made about exceptions thrown during a test.
- ExternalResource: sets up an external resource before a test with a guarantee to tear it down afterwards.
- TemporaryFolder: creates files and folders before a test and guarantees deletion afterwards.
- TestName: grants the tester access to the test name during the test method execution.
- TestWatcher: allows access to test events before and after the test method execution.
- Timeout: causes a test to fail after a set time.
- Verifier: permits a tester to add a final evaluation to a test, possibly failing an otherwise passing test.
The Javadoc for each of the provided Rules has examples of their use. They all implement the TestRule interface and theTestRule Javadoc provides a handy jump point to the documentation for each of the individual rules. In addition, the JUnit Wiki Rules page also illustrates their use.
Rules provide a tester with tremendous control over the execution of tests. To give some idea of this, here's a quick example of writing your own Rule. Three things are necessary: a Test using the Rule, a Rule, and a Statement. The Javadoc for Statement describes the class as representing one or more actions to be taken at runtime. For the purposes of this example, you can think of that as being the test.
In practice, most testers implementing a Rule to control the behavior of their tests will start with a base of TestWatcher, which implements TestRule, rather than implementing the TestRule directly like the following example.
First the Test:
- package com.ociweb;
-
- import org.junit.Rule;
- import org.junit.Test;
- import org.junit.rules.TestName;
-
- public class ANewRuleTest {
- @Rule
- public ANewRule customRule = new ANewRule();
-
- @Rule
- public TestName testName = new TestName();
-
- @Test
- public void firstTestOfCustomRule() {
- System.out.println("Test -> in the test named: " +
- testName.getMethodName());
- }
-
- @Test
- public void secondTestOfCustomRule() {
- System.out.println("Test -> in the test named: " +
- testName.getMethodName());
- }
- }
Now the Rule:
- package com.ociweb;
-
- import org.junit.rules.TestRule;
- import org.junit.runner.Description;
- import org.junit.runners.model.Statement;
-
- public class ANewRule implements TestRule {
- @Override
- public Statement apply(Statement theTest, Description description) {
- System.out.println("Rule -> ready to 'apply' the Statement for "
- + description);
- return new ANewRuleStatement(theTest);
- }
- }
Finally, the Statement:
- package com.ociweb;
-
- import org.junit.runners.model.Statement;
-
- public class ANewRuleStatement extends Statement {
-
- private final Statement theTest;
-
- public ANewRuleStatement(Statement theTest) {
- this.theTest = theTest;
- }
-
- @Override
- public void evaluate() throws Throwable {
- System.out.println("Stmt -> before the test");
- try {
- System.out.println("Stmt -> running the test");
- theTest.evaluate();
- } finally {
- System.out.println("Stmt -> after the test");
- }
- }
- }
Here is the output from running the test:
    Rule -> ready to 'apply' the Statement for secondTestOfCustomRule(com.ociweb.ANewRuleTest)
    Stmt -> before the test
    Stmt -> running the test
    Test -> in the test named: secondTestOfCustomRule
    Stmt -> after the test
    Rule -> ready to 'apply' the Statement for firstTestOfCustomRule(com.ociweb.ANewRuleTest)
    Stmt -> before the test
    Stmt -> running the test
    Test -> in the test named: firstTestOfCustomRule
    Stmt -> after the test
If this sort of control would be useful, take a look at the TestWatcher Rule example on the Rules Wiki page and theTestWatcher Javadoc to see how it provides even more access to test events.
Order of Test Execution
One of the most common questions you encounter about using JUnit is "How do I make my tests run in a certain order?". Since JUnit uses reflection to determine which tests are to be run, the answer until recently is, "You can't.".
Until now.
Starting wth version 4.11, JUnit provides the ability to fix the order of method executions. By annotating your class with the @FixMethodOrder annotation, you can determine the order of the tests. You do this by decorating the test class with@FixMethodOrder(MethodSorters.NAME_ASCENDING) and adopting a naming scheme for your tests that will place them in the order you want the tests to execute in. Please note the names are sorted in lexicographic order to determine the execution order so if you are using numbers in the names, remember that 12 comes before 2, but not before 02. Details on using the @FixMethodOrder are at Text execution order.
Summary
The JUnit team has done an excellent job equipping their users with fine tools. Now that you've reviewed a few, pick one that seems useful to your purposes and put it into play this week. Then try another the week after that. As with most productive tools, before long you'll wonder how you ever lived with just assert.
But please don't quit using asserts.
Annotated References
- [1] JUnit project: Home of the JUnit Framework
http://junit.org - [2] JUnit Javadoc: Once you're familiar with the wiki articles, the Javadoc is your next best stop. They contain many useful usage examples.
http://junit.org/javadoc/latest/ - [3] Java Hamcrest: Home of the Hamcrest matcher library for Java.
http://hamcrest.org/JavaHamcrest - [4] JUnit Wiki pages: The JUnit Usage and Idioms on this page are short, cogent, and informative. This page should be a first stop when figuring out how to use a JUnit feature.
https://github.com/junit-team/junit/wiki - [5] The Hamcrest Tutorial: An excellent short tutorial to help you come up to speed on using and writing Hamcrest matchers.
The Hamcrest Tutorial - [6] Hamcrest 1.3 Quick Reference
http://www.marcphilipp.de/downloads/posts/2013-01-02-hamcrest-quick-reference/Hamcrest-1.3.pdf
Thanks to Marc Philipp for this excellent Quick Reference to the matchers. Very nicely done.
