MiGLayout: The one Java layout manager that does it all
By Chris Hardin, OCI Software Engineer
May 2009
Introduction
Writing complex GUI layouts for Swing applications has always been a somewhat tedious and painful process. Sun provides several layout managers in the JDK, but they are either limited by their simplicity, or they sacrifice ease of use and maintenance for power and flexibility. Other third-party solutions have been created to address these issues, such as the popular JGoodies FormLayout, which was explored in the March 2005 SETT article: Intro to JGoodies Forms. The problem with these third-party layouts is that they continue to be limited in the number of use-cases that they really handle well. As the name implies, FormLayout is excellent at producing grid-based layouts for forms and tables, but loses its simplicity when trying to produce more irregular arrangements.
MiGLayout creator Mikael Grev set out to improve upon FormLayout and the standard layout managers by creating one layout manager that was flexible enough to work for all use-cases while remaining simple to use and maintain. Although other solutions such as FormLayout seem designed as an easier version of Sun's GridBagLayout, MiGLayout seeks to provide and improve upon the best features of all the standard layout managers, including docking layouts and even absolute positioning options. With MiGLayout, you don't have to choose between docking, grid-based, flowing, or absolute styles. You can combine them all into one layout with one layout manager, without resorting to using nested panels to mix layout managers. Later we will see examples of how MiGLayout reproduces and extends the functionality of each of the built-in layout managers.
For those of you not interested in Swing for your GUI development, please note that although this article is Swing focused, MiGLayout is not. It is designed to be a highly extensible and toolkit-agnostic Java layout manager. It is available from Grev in versions for both Swing and SWT development, and it is being ported by others in the open-source community to frameworks such as JavaFX.
Topics
This article introduces the MiGLayout layout manager for Swing applications and shows by example how it addresses different use-cases in comparison with the various JDK built-in layout managers. It also provides a brief discussion about how MiGLayout improves upon the JGoodies FormLayout. For a detailed discussion and code examples for JGoodies FormLayout itself, please refer to the previous SETT article on that topic. The full source code of all examples in this article is available.
- How MiGLayout Works
- Grid-Based Layouts
- Docking Layouts
- Absolute Positioning
- Flowing Layouts
- Some Additional Features
- Comparison With JGoodies FormLayout
1. How MiGLayout Works
MiGLayout was designed to be an outwardly simple implementation of the LayoutManager interface that is configured with String constraints. It requires no special APIs, builder classes, or container types. Simply construct a MiGLayout instance when instantiating your container and then pass in String constraints as you add each component. The advantage of this approach is that it does not add any additional lines of code for layout management, and the configuration for each component is contained in one easy-to-find location. This makes it easy to move components around in the layout simply by changing the order of the add calls.
If String constraints make you uncomfortable, there is also a builder-style API available. This API provides exactly the same functionality as the String constraints but provides the advantages of compile-time error checking and Javadocs. There are also get and set methods provided for manipulating String constraints on the components or the layout manager at any time after the components have been added. However, none of these API options is necessary. Full functionality can be achieved with the optional String constraints passed to the MiGLayout constructor and the container add methods. This article, and the examples provided within it, focus exclusively on this more concise method of configuration. For a short example using the API approach, please refer to the "API Creation of Constraints" section in Grev's Quick Start Guide.
MiGLayout is a grid-based layout underneath, as is FormLayout or GridBagLayout. However, it provides constraints that allow it to be used conceptually as a flowing or docking layout; it even provides absolute positioning of some components. To accomplish this, it abstracts the underlying grid away from the user and handles these details internally, which allows the user to choose whichever paradigm is most appropriate for the current use-case. Because of this, it can be used in place of even the simplest layout managers, such as BorderLayout or FlowLayout—without adding additional coding complexity, and still provide finer control when desired.
Some of the additional features that MiGLayout provides are the ability to control whitespace, set component size, and use platform-specific styles. Most layout managers require the user to add whitespace by adding filler components or filler rows and columns. By default, MiGLayout adds gaps between components and grid cells that are sized based on standards for the current OS; however, it allows the user to override the size of these gaps with simple constraints. It also automatically applies insets to panel edges, eliminating the need to create empty border objects. The size of each component can be specified by a constraint when the component is added. This allows the size to be abstracted from the actual component being set, enabling the user to easily switch out which type of component is being used in that location. In addition, the constraints allow the user to specify one dimension without the other, unlike the Component methods that always require both dimensions to be set together. Platform-specific styles allow the layout to automatically adjust to conventions used on different platforms. For example, Mac OS and Windows have different standards for label alignment and button order. Through the use of special tags, MiGLayout can automatically adjust the layout to conform to the platform on which the application is currently running.
Constraints can be applied at three different levels—the container level, the row or column level, or the component level. Some constraint options exist for all three levels, with those set at the component level overriding those at the row or column levels, and those at the row or column level overriding those at the container level. One layout can have constraints set at any combination of these levels or may have none at all, if the default behavior is sufficient. Most configuration can be done as you add each component. However, individuals who are more familiar with FormLayout may find it easier to use row and column constraints, which let you specify most of the layout upfront and in one location. Another advantage of using row and column constraints is that they allow you to override the default sizing and spacing behavior for the column or row as a whole. Again, constraints can be set at all levels in the same layout, so setting one constraint at the row or column level does not commit you to specifying everything upfront. For a complete list of the constraints available for each level, please refer to the MiGLayout Cheat Sheet.
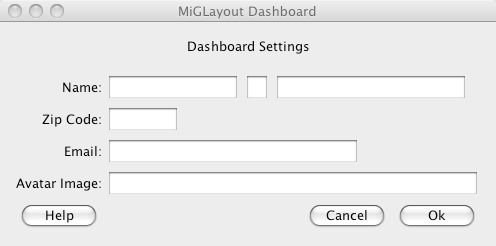
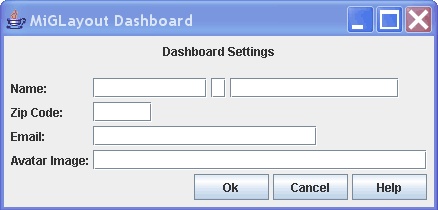
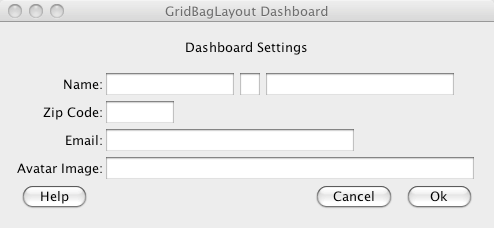
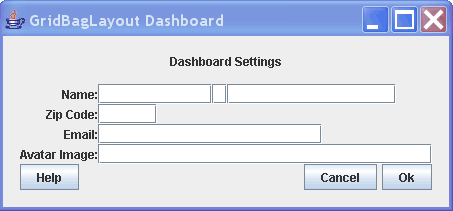
2. Grid-Based Layouts
A data-entry form is typically created using a grid-based approach. The form shown below is complicated by the variability in width and number of fields per line. The top two windows were created using MiGLayout, and the bottom windows were created using GridBagLayout. The code was run without modificaton on both the Mac OS (gray windows) and Windows XP platforms (blue windows). Notice how the two MiGLayout forms differ greatly on each platform, whereas the forms created with GridBagLayout remain the same. MiGLayout automatically adjusts the layout to conform to the UI standards of the platform on which it is running. Specifically, the panel border insets, the space between components, the alignment of the labels, and the order and placement of the buttons have all been automatically adjusted with no code changes required. The GridBagLayout window had to be written explicitly to conform to the UI standards of the Mac OS. When run on Windows, it violates the UI standards, and the components are too close together. This self-adjustment is just one of the advantages of MiGLayout over GridBagLayout. The actual code for each is shown and compared below.
Setting Up the Form Components
Both examples use the same code to initialize all of the labels, fields, and buttons on the forms. These components have been minimally configured in their initialization. The code is provided here for clarity, though it is not part of the comparison discussion.
- JLabel settingsLabel = new JLabel("Dashboard Settings");
- JLabel nameLabel = new JLabel("Name:");
- JLabel zipLabel = new JLabel("Zip Code:");
- JLabel emailLabel = new JLabel("Email:");
- JLabel avatarLabel = new JLabel("Avatar Image:");
- JTextField fNameField = new JTextField(10);
- JTextField mNameField = new JTextField(1);
- JTextField lNameField = new JTextField(15);
- JTextField zipField = new JTextField(5);
- JTextField emailField = new JTextField(20);
- JTextField avatarField = new JTextField(30);
- JButton okBttn = new JButton("Ok");
- JButton cancelBttn = new JButton("Cancel");
- JButton helpBttn = new JButton("Help");
Building the Layout With GridBadLayout
- private JPanel buildStandardDashboard() {
- JPanel panel = new JPanel();
- panel.setLayout(new GridBagLayout());
- buildGridBagForm(panel);
- return panel;
- }
-
- private void buildGridBagForm(JPanel panel) {
-
- //explicitly setting insets using an empty border
- panel.setBorder(BorderFactory.createEmptyBorder(17,17,17,17));
-
- GridBagConstraints constraints = new GridBagConstraints();
- constraints.gridx = 0;
- constraints.gridy = 0;
- constraints.gridwidth = 4;
- constraints.insets = new Insets(0,0,15,0);
- panel.add(settingsLabel, constraints);
-
- constraints.insets = new Insets(0,0,0,0);
- constraints.gridy++;
- constraints.gridwidth = 1;
- //alignment for each label must be explicitly set
- constraints.anchor = GridBagConstraints.EAST;
- panel.add(nameLabel, constraints);
-
- constraints.gridx = GridBagConstraints.RELATIVE;
- constraints.anchor = GridBagConstraints.WEST;
- panel.add(fNameField, constraints);
- panel.add(mNameField, constraints);
- panel.add(lNameField, constraints);
-
- constraints.gridy++;
- constraints.anchor = GridBagConstraints.EAST;
- panel.add(zipLabel, constraints);
-
- constraints.anchor = GridBagConstraints.WEST;
- panel.add(zipField, constraints);
-
- constraints.gridy++;
- constraints.anchor = GridBagConstraints.EAST;
- panel.add(emailLabel,constraints);
-
- constraints.anchor = GridBagConstraints.WEST;
- constraints.gridwidth = 3;
- panel.add(emailField, constraints);
-
- constraints.gridwidth = 1;
- constraints.gridy++;
- constraints.anchor = GridBagConstraints.EAST;
- panel.add(avatarLabel, constraints);
-
- constraints.gridwidth = 3;
- constraints.anchor = GridBagConstraints.WEST;
- panel.add(avatarField, constraints);
-
- constraints.gridy++;
- constraints.gridwidth = 3;
- panel.add(helpBttn, constraints);
-
- //nesting a panel to achieve desired button grouping
- constraints.anchor = GridBagConstraints.EAST;
- Box buttonBox = Box.createHorizontalBox();
- buttonBox.add(cancelBttn);
- buttonBox.add(Box.createHorizontalStrut(5));
- buttonBox.add(okBttn);
- panel.add(buttonBox, constraints);
- }
Building the Layout With MiGLayout
- private JPanel buildMiGDashboard() {
- JPanel panel = new JPanel();
- panel.setLayout(new MigLayout());
- buildMiGForm(panel);
- return panel;
- }
-
- private void buildMiGForm(JPanel panel) {
- panel.add(settingsLabel, "span, center, gapbottom 15");
- panel.add(nameLabel, "align label");
- panel.add(fNameField);
- panel.add(mNameField);
-
- //wrap keyword starts a new row
- panel.add(lNameField, "wrap");
-
- //align label triggers platform-specific label alignment
- panel.add(zipLabel, "align label");
- panel.add(zipField, "wrap");
- panel.add(emailLabel,"align label");
-
- //span keyword lets emailField use the rest of the row
- panel.add(emailField, "span");
- panel.add(avatarLabel, "align label");
- panel.add(avatarField, "span");
-
- //tag identifies the type of button
- panel.add(okBttn, "tag ok, span, split 3, sizegroup bttn");
-
- //sizegroups set all members to the size of the biggest member
- panel.add(cancelBttn, "tag cancel, sizegroup bttn");
- panel.add(helpBttn, "tag help, sizegroup bttn");
- }
Code Comparison
The layout code using MiGLayout is less than half the length of the same layout code using GridBagLayout. The constraints for each component are neatly contained in the line that adds the component to the container. In the GridBagLayout example, an extra line is added for each constraint that needs to be changed between add calls. This clutters up the code, making it difficult to read and maintain. Furthermore, one has to keep track of the current row or column position to keep gridx and gridy properly set. With MiGLayout, the occasional wrap keyword is enough to specify grid position.
Take a close look at the code for the button bar at the end of each example. The MiGLayout example uses the span and split keywords to put all of the buttons together in one grid cell and uses the tag keyword to identify the purpose of each button. This is what allows MiGLayout to automatically arrange the buttons in a platform-specific way. In the GridBagLayout example, the exact placement and order of the buttons have to be explicitly set through rigid constraints and do not adjust to platform changes. Also, a nested panel had to be used so that the buttons could be put in the same grid cell. Another difference is that the buttons in the MiGLayout example are all set to a uniform size by using the sizegroup keyword. There is no easy way to achieve this using GridBagConstraints.
The panel border is another item that had to be explicitly specified in one example and not the other. When using GridBagLayout, an empty border with hard-coded insets was created and set on the panel; this was unnecessary with MiGLayout. MiGLayout automatically adds insets to the outer panel, based on platform-specific defaults. Notice the difference in the insets in the Mac OS screenshot versus the Windows screenshot. This default behavior, like most other settings, can be easily overridden when necessary.
3. Docking Layouts
Docking layouts are useful for sticking components to the edges of a panel. Both MiGLayout and the JDK-provided BorderLayout offer this ability by using constraints to specify the North, South, East, and West edges of the panel. BorderLayout also provides a center constraint to specify the middle of the panel. A center constraint is not needed with MiGLayout, because the center always contains the main grid, to which you can add as many components as you choose. You can also dock as many components as needed on any side. BorderLayout, however, simply divides the panel into five sections into which you may add one component each.
As an example, the Dashboard Settings form will now be surrounded by docked components. A header and footer component will be added to the North and South positions, and three widget components will be added to the East and West positions. These widgets are really just JLabels, but they are meant to represent self-contained modules that you might find on a dashboard-type application.
Docking With MiGLayout
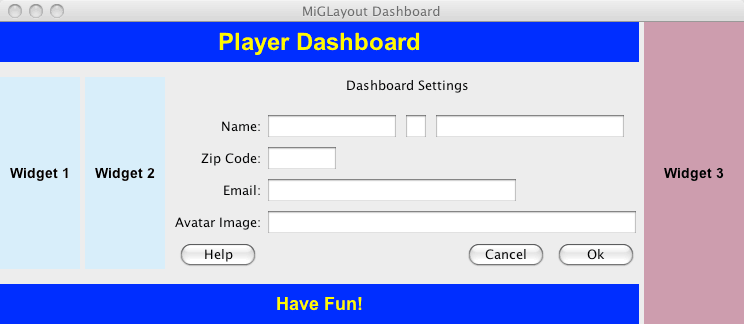
Below is a screenshot of the dashboard created using MiGLayout as well as the code listing. The existing buildMiGDashboard() method was modified by adding five lines of code, that add the docking components to the correct sides of the panel. Notice that two components were added to the West side and these components do not extend past the header and footer, whereas the Widget 3 component extends the full height of the panel. With MiGLayout, the order in which docked components are added controls how they are positioned relative to each other. Widget 3 was added first, so it gets the full East side. The header and footer labels were added next, so they take up the rest of the space left on the North and South sides. Widget 1 was then added to the West, where it took up the remaining space. Widget 2 was added last and is positioned inside of Widget 1. This dependent positioning is unique to MiGLayout. As we will see in the next example, BorderLayout can't directly recreate this layout, because it has rigid rules for how it divides the space. Also note how the height or width of the components and the gap space are easily specified as component constraints in the code below.
- private JPanel buildMiGDashboard() {
- JPanel panel = new JPanel();
- panel.setLayout(new MigLayout());
-
- //This calls the same form building code shown previously
- buildMiGForm(panel);
-
- //add docked components
- //specify width and not height
- panel.add(widget3, "east, gapleft 5, w 100");
- //specify height and not width
- panel.add(headerLabel, "north, gapbottom 15, h 40");
- panel.add(footerLabel, "south, gaptop 15, h 40");
-
- //Only MiGLayout docks multiple items per side
- panel.add(widget1, "west, gapright 5, w 80");
- panel.add(widget2, "west, gapright 10, w 80");
-
- return panel;
- }
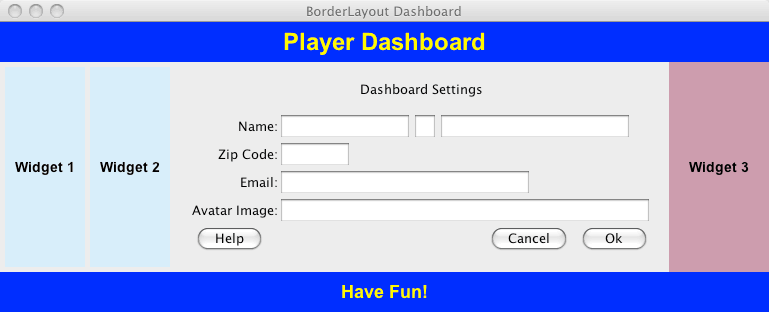
Docking With BorderLayout
The screen shown below was created using BorderLayout. The code listing below the screen image shows the modified buildStandardDashboard() method. To say it was created using BorderLayout is not entirely accurate, however. In order to achieve the same layout as above, it was necessary to use three panels, each with its own layout manager. The original panel containing the GridBagLayout-created form was nested inside of an outer panel using BorderLayout, at position Center. Then to achieve the effect of having two components docked on the West side, it was necessary to put Widget 1 and Widget 2 inside of their own panel, which was then placed at position West in the outer panel. For the West panel, the default of FormLayout was used.
Notice that this layout doesn't exactly match the one created with MiGLayout. Below, Widget 3 is cut off by the header and footer labels. With BorderLayout, there is no way to control this behavior. The North and South sides are always given preference over the East and West when dividing the space. Getting Widget 3 to extend all the way up and down would involve even more nesting of panels and creative use of multiple layout managers.
Also note that there is no way to add gaps between the docked components or control the sizing of the components using BorderLayout constraints. For this example, it was necessary to call the setPreferredSize(Dimension) method on each JLabel directly. Aside from adding lines of code, this is undesirable because it requires both height and width to be specified. The MiGLayout constraints allow height and width to be specified individually as needed.
- private JPanel buildStandardDashboard() {
- JPanel panel = new JPanel();
- panel.setLayout(new GridBagLayout());
-
- //This calls the same form building code shown previously
- buildGridBagForm(panel);
-
- JPanel outerPanel = new JPanel();
-
- //We have to use a different layout manager
- outerPanel.setLayout(new BorderLayout());
-
- //We have to nest the form panel
- outerPanel.add(panel, BorderLayout.CENTER);
-
- //Need additional lines to size components
- //Have to set both width and height together
- headerLabel.setPreferredSize(new Dimension(500,40));
- widget1.setPreferredSize(new Dimension(80, 200));
- widget2.setPreferredSize(new Dimension(80, 200));
- widget3.setPreferredSize(new Dimension(100,210));
- footerLabel.setPreferredSize(new Dimension(500,40));
-
- //This part is as easy as MiGLayout
- outerPanel.add(widget3, BorderLayout.EAST);
- outerPanel.add(headerLabel, BorderLayout.NORTH);
- outerPanel.add(footerLabel, BorderLayout.SOUTH);
-
- //Nesting another JPanel, using default FlowLayout
- JPanel westPanel = new JPanel();
-
- //BorderLayout will not dock multiple components on one side
- westPanel.add(widget1);
- westPanel.add(widget2);
- outerPanel.add(westPanel, BorderLayout.WEST);
-
- //We change this to return outerPanel
- return outerPanel;
- }
4. Absolute Positioning
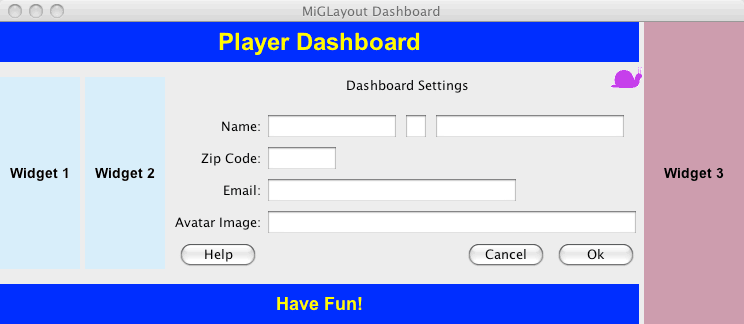
Another great and unique feature of MiGLayout is its ability to adjust the position of a component by explicitly specifying coordinates in the constraints. In the example below, the player's avatar image (purple snail) was positioned relative to the header label. This required two adjustments to the existing buildMiGDashboard() method. First, it was necessary to add an id label to the constraints for the headerLabel component. This made it possible to reference properties of that component in a constraint expression. Then avatarImage was added to the panel with the pos constraint specified, which takes an x and a y value. These x and y values were derived from expressions that reference the x2 and y2 coordinates of the headerLabel component. The x2 andy2 coordinates provide the location of the bottom right corner of the component. When the pos constraint is used, the component exists outside of the grid and does not affect the flow of components in the grid. In the screen image below, notice how the snail's head is actually off the grid and in the gap space created by the Widget 3 docked component. Absolute coordinates can place an item anywhere in the panel, independent of grid boundaries or whitespace settings.
Absolute positioning can also be used to make adjustments to the location of components that are placed in the grid. If you want a component to occupy a cell as part of the normal flow of components in the grid, you can use the x and y constraints to specify absolute coordinates instead of the pos constraint. The x and y constraints each take a coordinate value, which can be a simple number or an expression such as the one used in the pos example. When using absolute positioning, the component is first placed in whatever grid cell it would normally occupy, then it is moved to the absolute coordinates after the complete grid has been laid out. When the component is moved to the absolute coordinates, the existing layout is not affected.
- private JPanel buildMiGDashboard() {
- JPanel panel = new JPanel();
- panel.setLayout(new MigLayout());
- buildMiGForm(panel);
-
- //Add docked components
- panel.add(widget3, "east, gapleft 5, w 100");
-
- //Add an id label to this component
- panel.add(headerLabel, "north, gapbottom 15, h 40, id headerLabel");
-
- panel.add(footerLabel, "south, gaptop 15, h 40");
- panel.add(widget1, "west, gapright 5, w 80");
- panel.add(widget2, "west, gapright 10, w 80");
-
- //Use expressions to position relative to headerLabel
- panel.add(avatarImage, "pos (headerLabel.x2 - 28) (headerLabel.y2 + 5)");
-
- return panel;
- }
5. Flowing Layouts
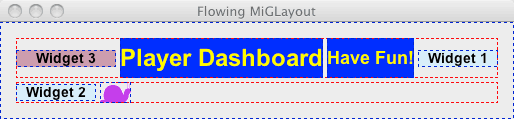
MiGLayout can be made to simulate a flow layout by passing the nogrid constraint to the MiGLayout constructor. This essentially causes MiGLayout to place all components into the same row for a vertical flow or the same column for a horizontal flow. Unlike the built-in FlowLayout, MiGLayout provides a flowy constraint to make the components flow vertically instead of horizontally; the wrap constraint can be used to force the next component to flow to a new row or column. For this example, the debug constraint has also been passed to the MiGLayout constructor to turn on debug mode and make the gridlines visible. Other layout managers may also provide this feature, but they often require a special debug panel to be used in place of your main panel. This can be problematic if you are trying to use some type of custom panel.
The screenshots below show what occurs when components are added to a MiGLayout in flowing mode. The first screen is a vertical flow, and the second is a horizontal flow. The red dashed lines show the grid cell boundaries. As you can see, all components are simply added into the same cell until a wrap constraint causes a new row or column to be started. The code listing below shows the flowy constraint being passed to achieve the vertical layout.
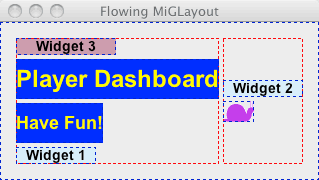
- private JPanel buildMiGFlowLayout() {
- JPanel panel = new JPanel();
-
- //set to vertical flow, also run in debug mode
- panel.setLayout(new MigLayout("nogrid, flowy, debug"));
-
- //add flowing components
- panel.add(widget3, "w 100");
- panel.add(headerLabel, "h 40");
- panel.add(footerLabel, "h 40");
- panel.add(widget1, "w 80, wrap");
- panel.add(widget2, "w 80");
- panel.add(avatarImage);
-
- return panel;
- }
6. Some Additional Features
Below are a few more useful features that MiGLayout provides, which are not demonstrated in the examples above.
- Hide mode. If the layout contains components that are only visible some of the time,
hidemodeconstraints control how the layout manager treats these invisible components. MiGLayout provides fourhidemodeconstraint options that can be applied. - Logical pixels. High-definition monitors will result in very small pixels. MiGLayout uses the concept of logical pixels to allow it to automatically scale up the size of layouts when running on high-definition monitors, so that application users aren't suddenly peering at very tiny windows.
- External keyword. The
externalconstraint designates that the layout manager is not responsible for setting the bounds of the component. This allows the application code to control the component's size directly, without interference from the layout manager. - Layout callbacks. By implementing the
LayoutCallbackinterface, you can plug additional component-sizing and placement logic into the MiGLayout manager for more customized control.
7. Comparison With JGoodies FormLayout
In the March 2005 SETT article, Lance Finney showed how JGoodies FormLayout provides more functionality and ease of use than GridBagLayout. It is indeed a powerful replacement for GridBagLayout and offers many of the same extra features and advantages as MigLayout. When creating complex forms that lend themselves well to a grid-based layout concept, which one you prefer is arguably a matter of personal style. However, there are many use-cases that don't fit into that category. As demonstrated in the examples above, MigLayout allows you to choose whichever layout concept best fits the current need. It holds up equally well against many types of layout managers for layouts that are big or small, simple or complex. This allows the developer to use one tool for every problem, without unnecessarily bloating or obfuscating the code. The same cannot be said for FormLayout, primarily because it can not abstract its rigid grid-based structure from the user.
Considerations
Java Versions Supported
The MiGLayout versions for Swing and SWT available from miglayout.com are currently compatible with Sun Java 1.4, 5.0, and 6.0, as well as IBM Java 1.4+. Mikael Grev is currently campaigning for the inclusion of MiGLayout in Sun Java 7.
Version
This article is based on version 3.6.3 of MiGLayout, released on 2009-01-16. MiGLayout is currently under active development, and the website is updated frequently with new releases containing bug fixes and enhancements.
License
BSD
Summary
As we have seen, MiGLayout can be easily applied in place of any of the very different layout managers we have discussed. It allows the developer to learn one layout manager and apply it to most use-cases, making applications simpler to code and maintain. The examples above emphasize simplicity and attempt to keep the MiGLayout code as lean as possible. It is usually not necessary to explicitly specify every detail of the layout because MiGLayout provides very good default behavior. For those times when you do want very fine control of every detail, MiGLayout gives you all the constraints you need to do just that. It is a layout manager that is as simple or complex as you need it to be, making it very powerful and flexible, without sacrificing usability. If you want to explore more features of MiGLayout, the MiGLayout White Paper is the best place to start.
References
- [1] Official MiGLayout website
http://www.miglayout.com - [2] MiGLayout white paper
http://migcalendar.com/miglayout/whitepaper.html - [3] Screencast from the JavaOne session by Mikael Grev
http://developers.sun.com/learning/javaoneonline/sessions/2008/watch/TS-4928/index.html - [4] Article by Mikael Grev on creating MiGLayout
http://www.javalobby.org/articles/miglayout/ - [5] Article by James Weaver on porting MiGLayout for use with JavaFx
http://learnjavafx.typepad.com/weblog/2009/02/miglayout-comes-to-javafx.html - [6] SETT Article (March 2005): Intro to JGoodies FormLayout
- [7] Full source code for above scenarios
May2009_source.txt
