Build a RESTful Web Service Using Spring 3, XML Optional
By Chris Hardin, OCI Software Engineer
November 2010
Introduction
The concept of Representational State Transfer (REST) and its application to writing Web services has gained popularity in recent years as an alternative to SOAP-based Web services. Unlike SOAP, REST is an architecture and not a protocol. A RESTful Web service can be built using existing Web standards such as HTTP, URL, and XML. Writing a RESTful Web service in Java generally involves writing a servlet that handles HTTP POST, GET, PUT, and DELETE requests to create, retrieve, update, and delete resources. Spring is now one of several frameworks that provides support for writing and consuming these types of services.
Spring 3 was released for production in December 2009 and introduced many new features while repackaging some existing ones. The examples presented below use some of these new features, including the REST support added to Spring MVC (Spring's Model View Controller Web framework), the object-to-XML mapping tools (OXM) that are now included in the main Spring framework, and the new Java-based container configuration.
When they think of Spring, many developers envision an extensive XML configuration that is difficult to write, debug, and maintain. With the release of Spring 3, there are now three options for configuring a Spring application—XML, annotations, and Java-based configuration. The employee application presented here uses the new Java-based configuration to illustrate how Spring 3 can be used to quickly set up a REST service and a client with minimal configuration and almost no XML.
The following examples will build a complete web application with a RESTful service and then show the creation of a simple client application. The client application will use the service to create, read, update, and delete employee data. The code and configuration for the data layer of the Web application are not shown but are included in the attached source code available in the References section at the end of this article.
Build the Service
Add Spring MVC to the Web Application
Because REST support is built into Spring MVC, the first step is to configure the application for Spring MVC. Adding Spring MVC to a web application is as simple as adding a special servlet to the web.xml file and mapping URLs to it. The XML below maps all requests starting with service/ to the Spring MVC dispatcher servlet.
<servlet>
    <servlet-name>employee</servlet-name>
    <servlet-class>org.springframework.web.servlet.DispatcherServlet</servlet-class>
    <load-on-startup>1</load-on-startup>
</servlet>

<servlet-mapping>
    <servlet-name>employee</servlet-name>
    <url-pattern>/service/*</url-pattern>
</servlet-mapping>
The next step is to add an XML file named "employee-servlet.xml" to the application in the WEB-INF directory. The dispatcher servlet configured above automatically detects the file if the naming convention of "servletName-servlet.xml" is followed. Because this example is using as little XML as possible, this file only has two elements. The import element loads the Spring configuration for the data layer of the application—Data-Access Objects and the service classes that wrap them. That configuration is not relevant to setting up the Web service and will not be shown, but please note that the data layer does not have to be configured using XML or even using Spring. The context:component-scan element configures Spring to scan the provided package looking for all classes with annotations marking them as Spring beans (all Spring-managed objects are referred to as beans).
<?xml version="1.0" encoding="UTF-8"?>
<beans xmlns="http://www.springframework.org/schema/beans"
         xmlns:context="http://www.springframework.org/schema/context"
         xmlns:xsi="http://www.w3.org/2001/XMLSchema-instance"
         xsi:schemaLocation="
                     http://www.springframework.org/schema/beans
                     http://www.springframework.org/schema/beans/spring-beans.xsd
                     http://www.springframework.org/schema/context
                     http://www.springframework.org/schema/context/spring-context.xsd">

    <import resource="classpath:/spring/employee-service.xml"></import>

    <context:component-scan
        base-package="com.ociweb.corespring.examples.employee.web.controller"></context:component>

</beans>
Java-based configuration is one of the new features included in Spring 3. It moves the traditional XML bean configuration into Java code. If you are familiar with Spring XML bean configurations, you will notice that each @Bean annotated method in the example below directly corresponds to an XML bean element. The advantage of writing the bean definitions in code is that you get compile-time checking and don't need XML tool support to get content-assistance and validation of your finished configuration.
The RESTConfig class below contains all of the bean configurations necessary to set up the Web application for Spring MVC and RESTful services. The configuration class itself is also a Spring-managed bean and the @Configuration annotation marks it as both a bean and a configuration source for other beans.
import org.springframework.beans.factory.annotation.Autowired;
import org.springframework.context.ApplicationContext;
import org.springframework.context.annotation.Bean;
import org.springframework.context.annotation.Configuration;
import org.springframework.core.io.Resource;
import org.springframework.http.converter.HttpMessageConverter;
import org.springframework.http.converter.xml.MarshallingHttpMessageConverter;
import org.springframework.oxm.castor.CastorMarshaller;
import org.springframework.web.servlet.HandlerAdapter;
import org.springframework.web.servlet.HandlerMapping;
import org.springframework.web.servlet.ViewResolver;
import org.springframework.web.servlet.mvc.annotation.AnnotationMethodHandlerAdapter;
import org.springframework.web.servlet.mvc.annotation.DefaultAnnotationHandlerMapping;
import org.springframework.web.servlet.view.InternalResourceView;
import org.springframework.web.servlet.view.InternalResourceViewResolver;

@Configuration
public class RESTConfig {

    @Autowired
    private ApplicationContext ctx;

    @Bean
    public CastorMarshaller castorMarshaller(){
        CastorMarshaller marshaller = new CastorMarshaller();
        marshaller.setMappingLocations(new Resource[]{
            ctx.getResource("classpath:/castor/employee.xml"),
            ctx.getResource("classpath:/castor/resultMessage.xml")});
        return marshaller;
    }

    @Bean
    public HttpMessageConverter<Object> marshallingMessageConverter(){
        CastorMarshaller marshaller = castorMarshaller();
        return new MarshallingHttpMessageConverter(marshaller, marshaller);
    }

    @Bean
    public HandlerMapping handlerMapping(){
        return new DefaultAnnotationHandlerMapping();
    }

    @Bean
    public HandlerAdapter handlerAdapter(){
        AnnotationMethodHandlerAdapter adapter =
            new AnnotationMethodHandlerAdapter();
        adapter.setMessageConverters(
            new HttpMessageConverter[]{marshallingMessageConverter()});
        return adapter;
    }

    @Bean
    public ViewResolver viewResolver(){
        InternalResourceViewResolver viewResolver =
            new InternalResourceViewResolver();
        viewResolver.setViewClass(InternalResourceView.class);
        return viewResolver;
    }
} ctx- This field is a reference to the Spring container and is automatically injected using the@Autowiredannotation. It is used in some of the bean methods to load classpath resources needed to configure the beans.castorMarshaller()- The Springoxmpackage provides marshaller implementations for several OXM tools. This example uses Castor to translate the XML sent to the Web service into objects and then translate the response back into XML. ThecastorMarshallerbean is configured here with Castor mapping files and will be injected into a message-converter bean.marshallingMessageConverter()- This bean is a message converter that is injected with the Castor marshaller configured above it. It is responsible for marshalling and unmarshalling objects to and from XML that is sent across HTTP.handlerMapping()- This bean configures Spring MVC to look for annotations on bean classes and methods when trying to map a requested URL to a method that can handle the request. These annotations will be shown in theEmployeeRESTControllerclass listed below.handlerAdapter()- This adapter bean is how themarshallingMessageConvertergets plugged in so that the incoming XML gets converted to a domain object before a method is invoked to handle the request. It is also how the outgoing response gets converted from an object to XML.viewResolver()- This view resolver allows the application to perform an internal redirect. In this example, it is used to allow the REST service to return an error message from a special error-handling method whenever an exception occurs. This will be illustrated in theEmployeeRESTControllerclass listed below.
Write a RESTful Web Service
The Web application is now fully configured to provide RESTful Web services using Spring MVC. The following example builds a simple service that provides create, read, update, and delete (CRUD) operations for an employee entity. The first code listing below shows a complete implementation that provides a read operation.
A Read-Only Web Service
import org.apache.commons.lang.StringUtils;

import org.springframework.beans.factory.annotation.Autowired;
import org.springframework.http.HttpStatus;
import org.springframework.http.ResponseEntity;
import org.springframework.stereotype.Controller;
import org.springframework.web.bind.annotation.ExceptionHandler;
import org.springframework.web.bind.annotation.PathVariable;
import org.springframework.web.bind.annotation.RequestBody;
import org.springframework.web.bind.annotation.RequestMapping;
import org.springframework.web.bind.annotation.RequestMethod;

import com.ociweb.corespring.examples.employee.domain.Employee;
import com.ociweb.corespring.examples.employee.service.EmployeeService;

@Controller
@RequestMapping("/registration")
public class EmployeeRESTController {

    @Autowired
    private EmployeeService employeeService;

    @RequestMapping(value="/{id}", method = RequestMethod.GET)
    public ResponseEntity<?> readEmployee(@PathVariable("id") long id) {
        Employee emp = employeeService.getEmployee(id);
        if(emp != null){
            return new ResponseEntity<Employee>(emp, HttpStatus.OK);
        } else {
            ResultMessage resultMessage =
                new ResultMessage(20, "Employee with id: " + id + " not found.");
            return new ResponseEntity<ResultMessage>(
                resultMessage, HttpStatus.NOT_FOUND);
        }
    }
} @Controller- This annotation marks this class as both a Spring bean and a Spring MVC controller. A controller is a class that can handle incoming Web requests.@RequestMapping("/registration")- This annotation maps Web requests to this class. Because the web.xml is already mapping URLs starting with/serviceto Spring MVC, any requests with URLs matching/service/registration/*will be handled by this class.employeeService- A business service layer bean is automatically injected using@Autowiredso that this class can operate on employee data persisted in the application's database.readEmployee- This method handles incoming HTTP GET requests that match the URL template/service/registration/{id},whereidis the ID number of the employee to be retrieved. For example,/service/registration/5would request employee number 5. URL templating is a new feature in Spring MVC 3. Using the@PathVariableannotation, the ID value is automatically passed in to the method as a parameter of typelong.ResponseEntity- This return type is a Spring class that allows the method to return a result object and an HTTP status code. ThereadEmployeemethod will return anEmployeeobject and a status ofOK(200) when a matching employee can be found. If no employee with the supplied ID exists, then a status ofNOT_FOUND(404) and aResultMessageobject explaining the error are returned.ResultMessage- This is not a Spring class. This is a simple class that the employee application uses to wrap an error message and an application-specific error code. It is not required, but is a good practice for RESTful Web services to return meaningful application error messages and codes in addition to setting the correct HTTP status when an application error occurs. This allows consumers of the service to take different actions based on the type of error.
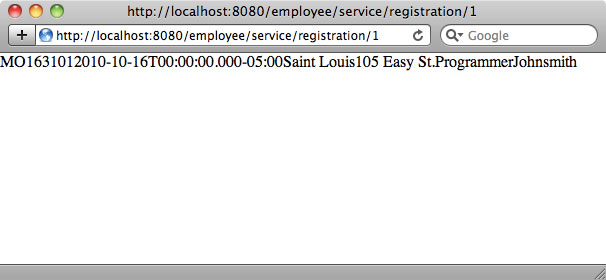
Browser view of an employee returned by the service:
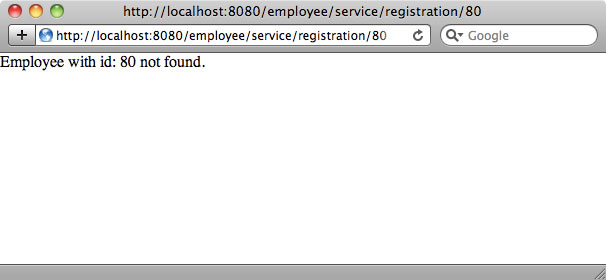
Browser view of the error returned when employee number 80 is not found:
Add Exception Handling
    @ExceptionHandler
    public String exceptionHandler(Exception e){
        return "serviceError";
    }

    @RequestMapping("/serviceError")
    public ResponseEntity<ResultMessage> serverError(){
        ResultMessage resultMessage = new ResultMessage(50,
                "An internal error occurred while processing your request.");
        return new ResponseEntity<ResultMessage>(
            resultMessage, HttpStatus.INTERNAL_SERVER_ERROR);
} @ExceptionHandler- This annotation marks theexceptionHandlermethod as the error handler to be called whenever an exception is thrown while this class is processing a request. This eliminates the need to surround all of the request processing code intry-catchblocks to institute good error handling. TheexceptionHandlermethod in this example simply returns a view name that Spring MVC will try to resolve. The view resolver that was configured in theRESTConfigclass will take this view name and cause a redirect to the internal URLservice/registration/serverError.@RequestMapping("/serverError")- This annotation maps the URL/service/registration/serverErrorto theserverErrormethod. When an exception occurs, theexceptionHandlermethod will cause a redirect to this method, which will return aResultMessageobject containing an error message and code to the consumer of the Web service.
Add a Create Operation
    @RequestMapping(method=RequestMethod.POST)
    public ResponseEntity<?> createEmployee(@RequestBody Employee employee){
        ResponseEntity<ResultMessage> errorResponse = validateEmployee(employee);

        if(errorResponse != null){
            return errorResponse;
        }

        employeeService.addEmployee(employee);
        return new ResponseEntity<Employee>(employee, HttpStatus.OK);
    }

    private ResponseEntity<ResultMessage> validateEmployee(Employee emp){
        if(StringUtils.isBlank(emp.getFirstName())){
            ResultMessage rm =
                new ResultMessage(30, "Employee name is a required field.");
            return new ResponseEntity<ResultMessage>(rm, HttpStatus.BAD_REQUEST);
        }
        return null;
} @RequestMapping(method=RequestMethod.POST)- This maps HTTP POST requests to thecreateEmployeemethod.@RequestBody- This annotation causes the XML body of the request to be unmarshalled into anEmployeeobject and passed into thecreateEmployeemethod as theemployeeparameter.createEmployee- This method takes in anEmployeeobject from the request body. If validation succeeds, then a new employee entry is created in the database. The method then returns either theEmployeeobject that has been updated with an ID value or aResultMessageobject that contains validation errors back to the requestor.validateEmployee- This method performs a trivial validation of anEmployeeobject. If a validation error is found, the method returns aResponseEntitycontaining aResultMessagethat describes the validation errors and an HTTP status ofBAD_REQUEST(400). In a real application, a more complete validation should be performed using a Spring validator or another validation framework.
Add an Update Operation
    @RequestMapping(method = RequestMethod.PUT)
    public ResponseEntity<ResultMessage> updateEmployee(
                @RequestBody Employee employee){

        ResponseEntity<ResultMessage> errorResponse = validateEmployee(employee);
        if(errorResponse != null){
            return errorResponse;
        }

        employeeService.updateEmployee(employee);
        ResultMessage rm = new ResultMessage(0, "Employee update successful.");
        return new ResponseEntity<ResultMessage>(rm, HttpStatus.OK);
    }
The updateEmployee method handles incoming HTTP PUT requests in much the same way as the createEmployee method handles POST requests. The only difference is that the updateEmployee method updates an existing employee entry in the database and does not create a new one.
Add a Delete Operation
    @RequestMapping(value="/{id}", method=RequestMethod.DELETE)
    public ResponseEntity<ResultMessage> deleteEmployee(
                @PathVariable("id") long id){

        Employee emp = employeeService.getEmployee(id);
        if(emp == null){
            ResultMessage resultMessage =
                new ResultMessage(20, "Employee with id: " + id + " not found.");
            return new ResponseEntity<ResultMessage>(
                resultMessage, HttpStatus.NOT_FOUND);
        }

        employeeService.deleteEmployee(emp);
        ResultMessage rm = new ResultMessage(0, "Employee delete successful.");
        return new ResponseEntity<ResultMessage>(rm, HttpStatus.OK);
    }
The deleteEmployee method handles incoming HTTP DELETE requests containing an ID number at the end of the URL. As with the readEmployee method, the ID number is stripped off the URL and passed in as the id parameter to the deleteEmployee method. The method attempts to find and delete the employee and returns a ResultMessage indicating success or failure.
The Completed EmployeeRESTController Class
import org.apache.commons.lang.StringUtils;

import org.springframework.beans.factory.annotation.Autowired;
import org.springframework.http.HttpStatus;
import org.springframework.http.ResponseEntity;
import org.springframework.stereotype.Controller;
import org.springframework.web.bind.annotation.ExceptionHandler;
import org.springframework.web.bind.annotation.PathVariable;
import org.springframework.web.bind.annotation.RequestBody;
import org.springframework.web.bind.annotation.RequestMapping;
import org.springframework.web.bind.annotation.RequestMethod;

import com.ociweb.corespring.examples.employee.domain.Employee;
import com.ociweb.corespring.examples.employee.service.EmployeeService;

@Controller
@RequestMapping("/registration")
public class EmployeeRESTController {

    @Autowired
    private EmployeeService employeeService;

    @RequestMapping(method=RequestMethod.POST)
    public ResponseEntity<?> createEmployee(@RequestBody Employee employee){
        ResponseEntity<ResultMessage> errorResponse = validateEmployee(employee);

        if(errorResponse != null){
            return errorResponse;
        }

        employeeService.addEmployee(employee);
        return new ResponseEntity<Employee>(employee, HttpStatus.OK);
    }

    @RequestMapping(value="/{id}", method = RequestMethod.GET)
    public ResponseEntity<?> readEmployee(@PathVariable("id") long id) {
        Employee emp = employeeService.getEmployee(id);
        if(emp != null){
            return new ResponseEntity<Employee>(emp, HttpStatus.OK);
        } else {
            ResultMessage resultMessage =
                new ResultMessage(20, "Employee with id: " + id + " not found.");
            return new ResponseEntity<ResultMessage>(
                resultMessage, HttpStatus.NOT_FOUND);
        }
    }

    @RequestMapping(method = RequestMethod.PUT)
    public ResponseEntity<ResultMessage> updateEmployee(
                @RequestBody Employee employee){

        ResponseEntity<ResultMessage> errorResponse = validateEmployee(employee);
        if(errorResponse != null){
            return errorResponse;
        }

        employeeService.updateEmployee(employee);
        ResultMessage rm = new ResultMessage(0, "Employee update successful.");
        return new ResponseEntity<ResultMessage>(rm, HttpStatus.OK);
    }

    @RequestMapping(value="/{id}", method=RequestMethod.DELETE)
    public ResponseEntity<ResultMessage> deleteEmployee(
                @PathVariable("id") long id){

        Employee emp = employeeService.getEmployee(id);
        if(emp == null){
            ResultMessage resultMessage =
                new ResultMessage(20, "Employee with id: " + id + " not found.");
            return new ResponseEntity<ResultMessage>(
                resultMessage, HttpStatus.NOT_FOUND);
        }

        employeeService.deleteEmployee(emp);
        ResultMessage rm = new ResultMessage(0, "Employee delete successful.");
        return new ResponseEntity<ResultMessage>(rm, HttpStatus.OK);
    }

    @RequestMapping("/serviceError")
    public ResponseEntity<ResultMessage> serverError(){
        ResultMessage resultMessage = new ResultMessage(50,
                "An internal error occurred while processing your request.");
        return new ResponseEntity<ResultMessage>(
            resultMessage, HttpStatus.INTERNAL_SERVER_ERROR);
    }

    @ExceptionHandler
    public String exceptionHandler(Exception e){
        return "serviceError";
    }

    private ResponseEntity<ResultMessage> validateEmployee(Employee emp){
        if(StringUtils.isBlank(emp.getFirstName())){
            ResultMessage rm =
                new ResultMessage(30, "Employee name is a required field.");
            return new ResponseEntity<ResultMessage>(rm, HttpStatus.BAD_REQUEST);
        }
        return null;
    }
}
The Web service is now complete and the web application is configured and ready to start processing requests.
Build a Client
It is also simple to use Spring 3 to build a client application that consumes a RESTful Web Service. Spring 3 provides a RestTemplate class that handles the details of this interaction. The following example builds a simple client application with a main method that performs each of the CRUD operations on an Employee object.
Configure Spring Beans
The client application is configured using a RESTConfig class that has some similarities to the one in the Web application. Notice that the castorMarshaller and marshallingMessageConverter bean definitions are identical to those in the Web application.
import java.util.ArrayList;
import java.util.List;

import org.springframework.beans.factory.annotation.Autowired;
import org.springframework.context.ApplicationContext;
import org.springframework.context.annotation.Bean;
import org.springframework.context.annotation.Configuration;
import org.springframework.core.io.Resource;
import org.springframework.http.converter.HttpMessageConverter;
import org.springframework.http.converter.xml.MarshallingHttpMessageConverter;
import org.springframework.oxm.castor.CastorMarshaller;
import org.springframework.web.client.RestTemplate;

@Configuration
public class RESTConfig {

    private String serviceBaseURL =
        "http://localhost:8080/employee/service/registration/";

    @Autowired
    private ApplicationContext ctx;

    @Bean
    public CastorMarshaller castorMarshaller(){
        CastorMarshaller marshaller = new CastorMarshaller();
        marshaller.setMappingLocations(new Resource[]{
                ctx.getResource("classpath:/castor/employee.xml"),
                ctx.getResource("classpath:/castor/resultMessage.xml")});
        return marshaller;
    }

    @Bean
    public MarshallingHttpMessageConverter marshallingMessageConverter(){
        CastorMarshaller marshaller = castorMarshaller();
        return new MarshallingHttpMessageConverter(marshaller, marshaller);
    }

    @Bean
    public RestTemplate restTemplate() {
        RestTemplate restTemplate = new RestTemplate();
        List<HttpMessageConverter<?>> converters =
            new ArrayList<HttpMessageConverter<?>>();
        converters.add(marshallingMessageConverter());
        restTemplate.setMessageConverters(converters);
        return restTemplate;
    }

    @Bean
    public RestTemplate restTemplateNoError() {
        RestTemplate restTemplate = new RestTemplate();
        List<HttpMessageConverter<?>> converters =
            new ArrayList<HttpMessageConverter<?>>();
        converters.add(marshallingMessageConverter());
        restTemplate.setMessageConverters(converters);
        restTemplate.setErrorHandler(new NoOpResponseErrorHandler());
        return restTemplate;
    }

    @Bean
    public EmployeeRegistrationService employeeService() {
        return new EmployeeRegistrationService(serviceBaseURL, restTemplate(),
                restTemplateNoError());
    }
} serviceBaseURL- This is the URL of the Web service, without any template parameters.restTemplate- This method configures aRestTemplatebean that uses default error handling and themarshallingMessageConverter.restTemplateNoError- This method configures aRestTemplatebean that uses a custom error handler (shown below) and themarshallingMessageConverter.employeeService- This method constructs anEmployeeRegistrationServicebean and injects it with the service URL and bothRestTemplatebeans. TheEmployeeRegistrationServiceis a client application class that encapsulates all interaction with theRestTemplate. The code for this class is shown later.
import java.io.IOException;

import org.springframework.http.client.ClientHttpResponse;
import org.springframework.web.client.ResponseErrorHandler;

public class NoOpResponseErrorHandler implements ResponseErrorHandler {

    public void handleError(ClientHttpResponse response) throws IOException {
        //do nothing
    }

    public boolean hasError(ClientHttpResponse response) throws IOException {
        return false;
    }
}
By default, whenever the RestTemplate receives anything other than an OK status from the Web service, it throws an exception. This behavior is fine if the client is not concerned about inspecting application-specific error messages and codes returned from the Web service. However, because the employee Web service does return application error objects for any error condition (ResultMessage), the NoOpResponseErrorHandler prevents the RestTemplate from handling the error so that the EmployeeRegistrationService (the caller) has the opportunity to inspect the ResultMessage and handle the error more gracefully. The EmployeeRegistrationService is injected with two RestTemplate beans in order to illustrate both types of error handling.
Write a Service Class to Interact With the Web Service
The service class uses the methods provided in RestTemplate to interact with the remote Web service. RestTemplate provides a set of convenience methods that follow a naming convention wherein the first part of the name represents the HTTP protocol and the second part of the name represents what the method will return. For example, getForObject will issue a GET request and then unmarshall the response into an object that it returns to the caller. RestTemplate also contains more general methods that require the caller to pass in more information, such as the protocol, but give the caller more control over the request being made.
In the example below, the first four methods use a RestTemplate instance, template, that has not been configured with any custom error handling. If the Web service returns an error status or there is a problem unmarshalling the response, the method called on template will throw an exception. The service methods below catch the exception and return null or false to the caller. With this default behavior, there is no way to view any application-specific error messages that were returned by the Web service. The last method in this example, createEmployee2, shows an alternative way of calling the Web service that allows the caller to inspect the application error object, ResultMessage, returned by the Web service when the request fails. To accomplish this, createEmployee2 uses a different RestTemplate instance that is configured to ignore errors. It then uses the exchange method, which gives it more control over the request and returns more information about the response.
import org.springframework.http.HttpEntity;
import org.springframework.http.HttpMethod;
import org.springframework.http.HttpStatus;
import org.springframework.http.ResponseEntity;
import org.springframework.web.client.RestTemplate;

import com.ociweb.corespring.examples.employee.domain.Employee;

public class EmployeeRegistrationService {
    private final String SERVICE_URL;
    private final String SERVICE_URL_TEMPLATE;

    private final RestTemplate template;
    private final RestTemplate templateNoErrorHandling;

    public EmployeeRegistrationService(String serviceURL, RestTemplate template,
            RestTemplate templateNoErrorHandling) {
        SERVICE_URL = serviceURL;
        SERVICE_URL_TEMPLATE = SERVICE_URL + "{id}";
        this.template = template;
        this.templateNoErrorHandling = templateNoErrorHandling;
    }


    public Employee getEmployee(long id){
        try {
            return template.getForObject(SERVICE_URL_TEMPLATE, Employee.class, id);

        } catch(Exception e){
            e.printStackTrace();
            return null;
        }
    }

    public Employee createEmployee(Employee emp){
        try {
            return template.postForObject(SERVICE_URL, emp, Employee.class);

        } catch(Exception e){
            e.printStackTrace();
            return null;
        }
    }

    public boolean updateEmployee(Employee emp) {
        try {
            template.put(SERVICE_URL_TEMPLATE, emp, emp.getId());
            return true;

        } catch(Exception e){
            e.printStackTrace();
            return false;
        }
    }

    public boolean deleteEmployee(long id){
        try {
            template.delete(SERVICE_URL_TEMPLATE, id);
            return true;

        } catch(Exception e){
            e.printStackTrace();
            return false;
        }
    }

    public Employee createEmployee2(Employee emp){
        HttpEntity<Employee> requestEntity = new HttpEntity<Employee>(emp);
        ResponseEntity<Object> response =
            templateNoErrorHandling.exchange(SERVICE_URL, HttpMethod.POST,
                    requestEntity, Object.class);
        if(response.getStatusCode() == HttpStatus.OK){
            return  (Employee)response.getBody();
        }

        ResultMessage rm = (ResultMessage) response.getBody();
        System.out.println(rm.getMessage());
        return null;
    }
}getEmployee- This method uses thegetForObjectmethod inRestTemplateto retrieve information for the employee with the given ID. ThegetForObjectmethod takes a URL, the class of the object to be returned, and a variable number of template parameters to be plugged into the URL. In this example, the URL contains the template{id}, so theidvalue passed in will replace{id}in the URL before the request is made.createEmployee- This method uses thepostForObjectmethod inRestTemplateto send information about a new employee to the Web service. The Web service will create a new employee record in its database and return the employee's information back with the addition of a populatedidfield. ThepostForObjectmethod takes a URL, the object to be marshalled and sent, and the class of the object to be returned.updateEmployee- This method uses theputmethod inRestTemplateto update information about an existing employee. The Web service will find the employee record in its database with a matching ID and update the information with the new information sent in the request. Theputmethod takes a URL, an object to marshall and send, and a variable number of template parameters to be plugged into the URL. It has avoidreturn type and the caller assumes success unless an exception is thrown.deleteEmployee- This method uses thedeletemethod inRestTemplate. The Web service will look for an employee record in its database with a matching ID and then delete it. Thedeletemethod takes a URL and a variable number of template parameters, in this case, the employee's ID number. Like theputmethod, thedeletemethod has avoidreturn type, and success is assumed unless an exception is thrown.createEmployee2- This method uses theexchangemethod inRestTemplateto send information about a new employee to the Web service. Theexchangemethod takes a URL, the HTTP protocol to use, anHttpEntityobject, and the class of the object to be returned. To be able to receive either anEmployeeobject or aResultMessageobject (in case of an error),Objectis passed in as the type to be returned. TheHttpEntityobject wraps theEmployeethat will be sent to the Web service. TheHttpEntitycan also be used to set request header information. Theexchangemethod returns aResponseEntityobject, which contains the unmarshalled response object, HTTP status, and header information. BecausecreateEmployee2is using the template that was configured to ignore errors, it must check the status code inresponse. If the status isOK, then the result body can be cast to anEmployeeand returned. Otherwise, the result is cast to aResultMessage. In a real application, the error message could then be logged or special action taken to handle the error, based on the contents of the message or error code.
Use the Service
The configuration and code to use the Web service is now complete and can be pulled into any application that works with Employee objects and needs to interact with the Web service. The ClientDemo class below contains a simple main method that will illustrate the use of the methods in the EmployeeRegistrationService class to create, retrieve, update, and delete Employee objects.
Create and Read an Employee
import java.util.Date;

import org.springframework.context.ApplicationContext;
import org.springframework.context.annotation.AnnotationConfigApplicationContext;

import com.ociweb.corespring.examples.employee.domain.Employee;

public class ClientDemo {

    public static void main(String[] args) {
        ApplicationContext ac =
            new AnnotationConfigApplicationContext(RESTConfig.class);

        EmployeeRegistrationService service =
            ac.getBean(EmployeeRegistrationService.class);

        Employee e1 = new Employee();
        e1.setFirstName("John");
        e1.setLastName("smith");
        e1.setAddress("105 Easy St.");
        e1.setCity("Saint Louis");
        e1.setJobTitle("Programmer");
        e1.setHireDate(new Date());
        e1.setState("MO");
        e1.setZip("63101");

        e1 = service.createEmployee2(e1);

        Employee emp = service.getEmployee(e1.getId());
    }
}
The first thing ClientDemo has to do is load the Spring container. Because this is not a Web application and there is no XML configuration, ClientDemo uses the AnnotationConfigApplicationContext implementation of ApplicationContext to load the Spring container from the configuration found in the RESTConfig class. Next, the EmployeeRegistrationService bean is retrieved from the container and stored in the local variable service, which is then used to send a new Employee object to the Web service. The Employee object returned by createEmployee2 contains a valid identifier that can be used later to retrieve the same employee information from the service. It is important to note that this example assumes the employee will be successfully created. If it is not, then a NullPointerException will get thrown when getId is called on e1.
Update the Employee
        emp.setFirstName("Jim");
        service.updateEmployee(emp);
Delete the Employee
service.deleteEmployee(emp.getId());Handle Errors
System.out.println("UNHAPPY PATH 1:");
emp = new Employee();
emp = service.createEmployee(emp);
if(emp == null){
System.out.println("employee not created\n");
}
System.out.println("UNHAPPY PATH 2:");
emp = new Employee();
emp = service.createEmployee2(emp);
if(emp == null){
System.out.println("employee not created\n");
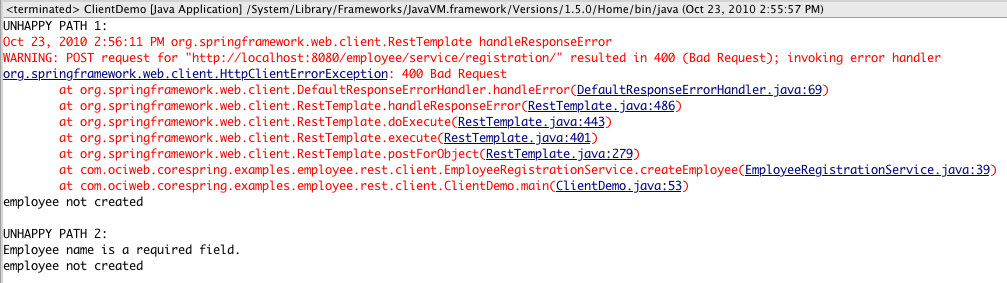
}The example above shows two attempts to create an employee record by passing an unpopulated Employee to the service. In both cases, the Web service's response contains an HTTP status of 400 (bad request) and a ResultMessage containing the application-specific validation error, "Employee name is a required field." However, notice the difference in output shown in the image below. The first attempt uses the createEmployee method, which uses the RestTemplate with the default error handling. This RestTemplate sees the 400 status and throws an exception without giving the application an opportunity to inspect the contents of the response, the ResultMessage. The second attempt uses the createEmployee2 method, which uses the RestTemplate that has been configured to ignore errors. This allows the application to inspect the response body and print the validation error that was returned from the Web service.
Security
The one glaring omission in these examples is security. As shown, the ClientDemo application is able to cause the modification of the Web service's database without supplying any authentication credentials. In a production application, the URL for the Web service would be secured by the Web application, typically by using a filter that checks the request headers for authentication information. The use of Spring to implement the Web service does not dictate how security must be implemented. However, Spring does provide a security framework that can be used, if desired.
The issue that needs to be addressed in these examples is how to send authentication information with the request. This is harder than it should be and is one area in which the immaturity of this new feature shows. When using the convenient protocol-specific methods in RestTemplate, there is currently no way to configure authentication credentials or modify the request headers directly to insert them. There is currently an open request (SPR_7497) to provide this capability by adding an interceptor mechanism that can be used with RestTemplate. Until that issue is resolved, the simplest way to add authentication is to use the exchange method in RestTemplate for all calls that require authentication. The exchange method takes an HttpEntity parameter, which can be populated with any request headers that need to be sent. In the EmployeeRegistrationService shown previously, the createEmployee2 method illustrates the use of the exchange method, though it does not actually set any request headers in this example.
Summary
Whether you are already using Spring or are thinking about adding Spring to an existing application, Spring 3 provides some useful new features and simplified configuration options. Setting up a new Spring configuration to support a feature, such as a Web service, can be quick and relatively painless. If previous Spring versions have sent you running away with visions of endless XML and dependencies on massive jar files, give Spring 3 another look. Its new configuration options and restructured code-base, in addition to its ever-expanding feature set, may change your mind.
Version
This article is based on features present in version 3.0.4 of the Spring framework.
References
- [1] Source code for all examples
source code - [2] Wiki article on REST
http://en.wikipedia.org/wiki/Representational_State_Transfer - [3] Spring 3.x Reference Documentation
http://static.springsource.org/spring/docs/3.0.x/spring-framework-reference/html/ - [4] Spring 3.x API
http://static.springsource.org/spring/docs/3.0.x/javadoc-api/index.html - [5] Spring release downloads
http://www.springsource.org/download - [6] Reported Spring issue discussing security options on RestTemplate
https://jira.springframework.org/browse/SPR-5866 - [7] Reported Spring issue requesting addition of interceptor capability for RestTemplate
https://jira.springsource.org/browse/SPR-7494 - [8] Spring Security
http://static.springsource.org/spring-security/site/index.html
