Mobile Application Development with Sencha Touch
By Michael Kimberlin, OCI Senior Software Engineer
October 2010
Contents
- Introduction
- But Is It For Me?
- Getting Started
- Basic Components
- Custom Components
- Events and Handlers
- Templating
- Data Stores
- The Take Away
- References
Introduction
Interest in mobile application development has increased significantly in recent years. This young industry has generated a tremendous amount of activity in both open and closed source projects. Many developers see an opportunity to reap the benefits of their efforts more directly than they have previously. Making the leap into mobile development can seem daunting, as it often involves learning new languages and technologies. If the siren call of "App Store" purchases penetrates your defenses and awakens your inner entrepreneur, how do you decide what devices to target? With iPhone and iPad application sales running into the billions of dollars yearly, it seems silly to ignore them. However, one certainly should not completely discount the growing Android market. Targeting the diverse array of devices available today can be difficult and typically results in divergent code bases. Native application development for Apple devices requires investment in Apple hardware beyond the devices themselves, and there are licensing costs as well. These considerations can bring a quick end to the aspirations of a would-be mobile developer. To ease the transition, Sencha has released a mobile application framework that is based on standard web technologies and allows developers to leverage their existing skill sets. Before getting too excited, you should understand that Sencha is free only if you are building Free and Open Source Software. If you are hoping to get rich, you will need to pay the (relatively) affordable license fee. In either case, Sencha Touch presents an easy way to get your feet wet with mobile application development.
But Is It For Me?
There are some downsides to development with Sencha Touch, the most obvious being the lack of access to most native APIs. Whether or not this is a hindrance depends strongly on the type of application that you intend to write. If you have the next blockbuster game in mind, then you likely want to move beyond Sencha Touch and focus your efforts on native development. However, if your application does not require tight integration with the device, Sencha may be more than enough to fill your needs.
Sencha applications are web applications. As such, they are built entirely on HTML, JavaScript and CSS. This means they are not "App Store Ready" out of the gate. Combining Sencha Touch with a framework like PhoneGap can enable you to bring your application to market. Alternatively, Sencha Touch applications can be delivered directly via the web from your existing site. This cuts out the middleman, but leaves any monetization up to you and restricts your exposure in this crowded market. However, if your goal is a mobile extension of your site then this is a simple and natural way to deploy.
Getting Started
Setting up a Sencha Touch project is easy. The Sencha Touch source can be downloaded from the product page. Extract the Sencha Touch development JavaScript source and CSS to the desired location in your project. Then construct a simple HTML file that references both of these files as well as any application CSS files that you might have and the JavaScript source file that you will use. Be sure to include the HTML5 document type as the first line in the file. The source for such a page should look something like this:
- <!DOCTYPE html>
- <html>
- <head>
- <meta http-equiv="content-type" content="text/html; charset=UTF-8">
- <title>My First App</title>
-
- <!-- Sencha Touch CSS -->
- <link rel="stylesheet" href="css/ext-touch.css" type="text/css">
-
- <!-- Your Application CSS -->
- <link rel="stylesheet" href="css/myfirstapp.css" type="text/css">
-
- <!-- If you intend to use the map APIs, you will need the Google Maps JavaScript -->
- <script type="text/javascript" src="http://maps.google.com/maps/api/js?sensor=true"></script>
-
- <!-- Sencha Touch JS -->
- <script type="text/javascript" src="js/ext-touch-debug.js"></script>
-
- <!-- Your Application JS -->
- <script type="text/javascript" src="js/myfirstapp.js"></script>
- </head>
- <body></body>
- </html>
Once the application HTML is in place, development of your mobile application can begin in earnest. Since Sencha Touch is built upon the Ext JS library, an application must start by instructing Ext JS to create any namespaces used in the application and calling the Ext.setup method with the application configuration.
- Ext.namespace('MyApp');
-
- Ext.setup({
- tabletStartupScreen: 'images/tablet_startup.png',
- phoneStartupScreen: 'images/phone_startup.png',
- icon: 'images/icon.png',
- glossOnIcon: true,
-
- onReady: function() {
- var app = new MyApp.App();
- }
- });
On the iPhone, this will produce a glossed icon from the provided image and assign a splash screen for display when the application is loading:

Basic Components
Sencha provides a number of visual components out-of-the-box. Creating instances of these components can be done either by making calls to their constructors or declaratively by "xtype". The xtype is a key used for specifying the component class to be constructed. Here is a definition for MyApp.App that makes use of components both by xtype as well as via their constructors:
- // MyApp extends TabPanel, but you can use Panel or Container or whatever else floats your boat.
- MyApp.App = Ext.extend(Ext.TabPanel, {
- cls: 'myapp',
- fullscreen: true,
- layout: 'card',
- activeItem: 0,
- items: [{
- title: 'Yoda',
- html: 'Do or do not. There is no try.',
- cls: 'card1'
- }, {
- xtype: 'map',
- title: 'Map',
- getLocation: true
- }, {
- title: 'Boom',
- html: 'Boom goes the dynamite.',
- cls: 'card3'
- }, {
- xtype: 'form',
- title: 'Form',
- items: [{
- xtype: 'textfield',
- name : 'first',
- label: 'First name'
- }, {
- xtype: 'textfield',
- name : 'last',
- label: 'Last name'
- }, {
- xtype: 'numberfield',
- name : 'age',
- label: 'Age'
- }, {
- xtype: 'urlfield',
- name : 'url',
- label: 'Website'
- },{
- xtype: 'slider',
- name: 'slide',
- label: 'Whee!'
- }]
- }],
- initComponent: function() {
- this.booklist = new MyApp.BookList();
- MyApp.App.superclass.initComponent.call(this);
- this.booklist.on('bookSelect', this.showBook, this);
- this.detail = new MyApp.BookDetail();
- this.add(this.booklist);
- this.add(this.detail);
- },
- showBook: function(title){
- var index = MyApp.bookstore.find('title', title);
- this.setCard(this.detail, MyApp.defaultAnim);
- this.detail.update(MyApp.bookstore.getAt(index).data);
- }
- });
The application above creates a number of tabs inside of a Tab panel including some simple text, a map and a basic form. Here is one of the simple tab definitions:
- {
- title: 'Yoda',
- html: 'Do or do not. There is no try.',
- cls: 'card1'
- }
This produces a tab like this:

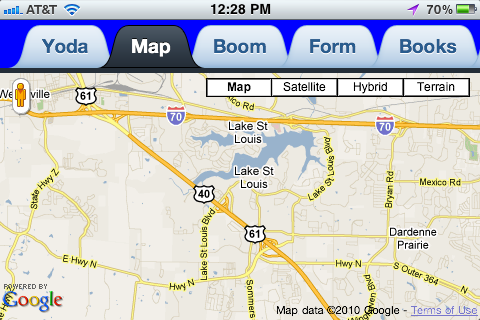
Here is a map tab that automatically requests the current location and centers on it:
- {
- xtype: 'map',
- title: 'Map',
- getLocation: true
- }
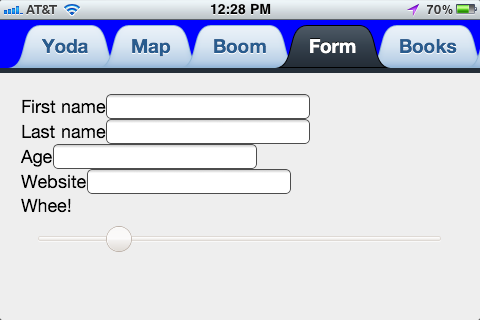
The form panel makes use of a number of other components:
- {
- xtype: 'form',
- title: 'Form',
- items: [{
- xtype: 'textfield',
- name : 'first',
- label: 'First name'
- }, {
- xtype: 'textfield',
- name : 'last',
- label: 'Last name'
- }, {
- xtype: 'numberfield',
- name : 'age',
- label: 'Age'
- }, {
- xtype: 'urlfield',
- name : 'url',
- label: 'Website'
- },{
- xtype: 'slider',
- name: 'slide',
- label: 'Whee!'
- }]
- }
As you can see, the declarative method of component definition is relatively concise and allows us to avoid unnecessary object construction code where possible, leaving it to the framework to manage the lifecycle of those objects. To determine the xtype to use for a particular class of component, reference the Sencha Touch API Documentation for that class. Here is a (incomplete) list of some of the more common component xtypes:
xtype            Class
-------------    ------------------

Basic Components
---------------------------------------
button           Ext.Button
component        Ext.Component
container        Ext.Container
dataview         Ext.DataView
panel            Ext.Panel
toolbar          Ext.Toolbar
spacer           Ext.Spacer
tabpanel         Ext.TabPanel

Form Components
---------------------------------------
form             Ext.form.FormPanel
checkbox         Ext.form.Checkbox
select           Ext.form.Select
field            Ext.form.Field
fieldset         Ext.form.FieldSet
hidden           Ext.form.Hidden
numberfield      Ext.form.NumberField
radio            Ext.form.Radio
slider           Ext.form.Slider
textarea         Ext.form.TextArea
textfield        Ext.form.TextField

Data Stores
---------------------------------------
store            Ext.data.Store
arraystore       Ext.data.ArrayStore
jsonstore        Ext.data.JsonStore
xmlstore         Ext.data.XmlStore
Custom Components
While the components provided by Sencha Touch provide a great starting point, you will eventually need to define components with custom behavior and presentation. This can be done using Ext.extend() to extend any subclass of Ext.Component, which acts as a superclass for all Sencha Touch components. Ext.DataView is frequently extended in this way when working with multiple data items as it provides automatic synchronization with a data store as well as a number of common events and a built in selection model. The implementation of MyApp.App above makes use of this mechanism to customize the behavior of Ext.TabPanel. It is also possible to define the HTML for a component via the "html" configuration option. Sencha provides a tutorial that details some pitfalls and best practices to consider when developing custom components.
Events and Handlers
Providing custom behaviors is typically done by writing event handlers. Most Sencha Touch components provide a number of events to signal various state or lifecycle changes. Registering handlers for these events is as simple as a method call.
- MyApp.BookList = Ext.extend(Ext.List, {
- title: 'Books',
- itemSelector: 'li.book-item',
- singleSelect: true,
-
- initComponent: function() {
- this.tpl = Ext.XTemplate.from('recent');
- this.store = MyApp.bookstore;
-
- //Register an event handler for the 'itemtap' event
- this.on('itemtap', this.onItemTap, this);
- MyApp.BookList.superclass.initComponent.call(this);
- },
-
- onItemTap: function(item, index) {
- var book = MyApp.bookstore.getAt(index);
- //Fire a custom 'bookSelect' event and provide the book title to any handlers
- this.fireEvent('bookSelect', book.get('title'));
- }
- });
Here you can see that the onItemTap is registered to handle the 'itemtap' event on this extension of Ext.List. In turn, it fires a custom event and provides the title of the selected book to any registered handlers. The arguments provided to the handlers of any given event may vary. You can find information on the events for a particular component in the Sencha Touch API documentation.
Templating
When creating custom components, you will inevitably come across the need to define custom HTML for your components. Traditionally, doing this in JavaScript could get messy, involving a lot of unwieldy string concatenation. This is especially true when data values need to be embedded into the resulting HTML. To address this, Sencha Touch provides a templating mechanism that goes a long way to keeping your components as clean as possible. Templates can be created directly with a constructor call. Take note of the fact that the API will handle the piecing your template strings together. This little bit of syntactic sugar makes the lack of multi-line strings less annoying than it otherwise might be.
- var tpl = new Ext.XTemplate(
- '<p>Title: {title}</p>',
- '<p>Authors: ',
- '<tpl for="authors">',
- '{[values.lastName + ", " + values.firstName]}',
- '</tpl></p>',
- '<p>Episodes: ',
- '<tpl for="episodes">',
- '<div class="{[xindex % 2 === 0 ? "even" : "odd"]}">',
- '{title} - {description}',
- '</div>',
- '</tpl></p>'
- );
- tpl.overwrite(panel.body, data);
More frequently, templates will be utilized declaratively rather than via the constructor as above. Sencha Touch takes an interesting approach to removing HTML templates from the code. Since the templating tags are not valid HTML, the templates cannot be embedded as hidden DIV tags inside the HTML file. Instead, text areas are used to contain the templates and are then hidden with CSS.
- <textarea id="recent" class="x-hidden-display">
- <tpl for=".">
- <li class="book-item">{title}
- <tpl if="lastUpdated !== undefined">
- <br/><span class="updateDate">Updated On: {lastUpdated}</span>
- </tpl>
- </li>
- </tpl>
A template based on this definition can then be constructed with a call to Ext.XTemplate.from(). This is generally done during component initialization and before the call to the superclass' initComponent method. It cannot be assigned directly to the tpl configuration parameter when done like this, as the DOM has not been initialized at the point that the definition is processed. Delaying this call until the component is being initialized will ensure that the document is ready. This can be seen in the implementation of initComponent found in MyApp.BookList:
- initComponent: function() {
- this.tpl = Ext.XTemplate.from('recent');
- this.store = MyApp.bookstore;
- this.on('itemtap', this.onItemTap, this);
- MyApp.BookList.superclass.initComponent.call(this);
- }
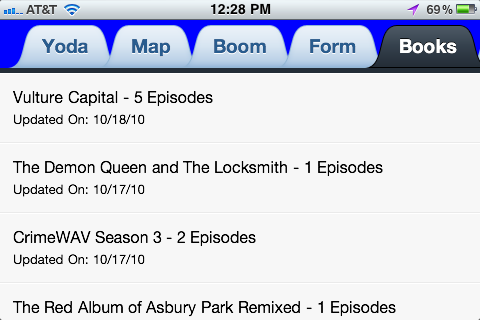
Either of these approaches gives a list with customized item formatting and behavior:
Data Stores
Most of the time, you will not be working with static data sets. Sencha Touch provides a CRUD-based abstraction for data stores in Ext.data.Store. Sencha comes with implementations of HTML5-based local and session storage backed data stores as well as array and JSON-based implementations. Data stores access their data via Ext.data.Proxy implementations. Sencha comes with proxies for accessing data via RESTful web services, generic AJAX calls, local or session storage. Both JSON and XML are supported as transmission formats and other formats can be accomplished by implementing custom marshaling logic. The MyApp.bookstore data store used by the example application is a JSON backed store that retrieves its data via a RESTful web service.
- MyApp.bookstore = new Ext.data.JsonStore({
- autoDestroy: true,
- autoLoad: true,
- storeId: 'bookStore',
- proxy: {
- type: 'rest',
- url: '/resources/books',
- reader: {
- type: 'json',
- root: 'books'
- }
- },
-
- fields: ['title', 'description', 'imageUrl', 'feedUrl', 'url', 'lastUpdated', 'authors', 'categories', 'copyright']
- });
It is then used to provide data to the MyApp.BookList component in its initComponent method:
- initComponent: function() {
- this.tpl = Ext.XTemplate.from('recent');
- this.store = MyApp.bookstore;
-
- //Register an event handler for the 'itemtap' event
- this.on('itemtap', this.onItemTap, this);
- MyApp.BookList.superclass.initComponent.call(this);
- }
Different data stores can share a common model as well, enabling the simple implementation of locally cached data that is refreshed from the server when possible or appropriate. Changes to data stores can be synchronized to their source automatically, on request or in batch mode. Template-based components are data store aware and automatically update their presentation based on changes to their data source.
The Take Away
Mobile application development based on HTML5, JavaScript and CSS is a viable alternative for many types of applications. Frameworks like Sencha Touch make this an even more attractive option. Standard web technologies can be used to implement mobile applications that are pleasant to use, fully featured and functional on or off-line. The web-based mobile application space is still heating up. With frameworks like the just announced jQuery Mobile on the horizon and Jonathan Stark's adoption of the jQTouch framework, there are sure to be a wealth of options and a healthy competition going forward. Sencha Touch is tackling an ambitious goal with encouraging results. While there are a few rough points in the API, the project is still in beta and there are sure to be further improvements to come.
The example code used in this article is available here.
References
- [1] Sencha -
http://www.sencha.com - [2] PhoneGap -
http://www.phonegap.com - [3] Sencha Touch -
http://www.sencha.com/products/touch - [4] Ext JS -
http://www.sencha.com/products/js - [5] Sencha Touch API -
http://dev.sencha.com/deploy/touch/docs - [6] Creating New UI Controls Using Ext JS -
http://www.sencha.com/learn/Tutorial:Creating_new_UI_controls - [7] jQuery Mobile -
http://jquerymobile.com - [8] jQTouch -
http://jqtouch.com - [9] Example Application -
http://touchexperiments.appspot.com - [10] Example Code -
source code
Thanks to Brian Gilstrap, Mark Volkmann and Dan Troesser for taking the time to review this article on short notice and to Lance Finney for his unending patience.
