The Mobile Media API
By Mark Balbes, Ph.D., OCI Principal Software Engineer
September 2004
Introduction
For the last several years, OCI has published a series of articles describing the basic features of the Java 2 Micro Edition (J2ME) including the Connnected Limited Device Configuration (CLDC) and Mobile Information Device Profile (MIDP). At the time, J2ME and CLDC/MIDP were, for all practical purposes, synonymous. Although many new features of J2ME were in the Java Community Process (JCP) pipeline, including a much-desired and now never-to-be PDA Profile, they were slow to materialize.
At last, J2ME is maturing at the same rate as the rest of Java. The JCP, which defines the new features that will become part of the Java platform, now features 62 specifications relating to features for J2ME. Of these, two of the most important are the Wireless Messaging API (WMA) and the Mobile Media API (MMAPI). WMA was discussed in a previous SETT article. In this article, we focus on the Mobile Media API and provide examples for audio and video playback.
MMAPI provides a generic mechanism to play back and record time-based media such as audio and video. An arbitrary number of formats can be supported, limited only by the capabilities of the device. The API is designed in such a way as to be extensible to new formats as they become available while at the same time supporting devices with limited abilities.
Many of the ideas for MMAPI are taken from the Java Media Framework (JMF) but MMAPI is not a subset of JMF. Whereas JMF targets full-featured Java 2 Standard Edition (J2SE) systems, MMAPI is aimed at the much more limited CLDC environment. MMAPI can support others configurations including the Connected Device Configuration (CDC) but the goal is to enable a rich audio and video experience on mobile devices. Therefore, memory efficiency and performance are two key design goals of the MMAPI expert group.
In other words, MMAPI allows us to develop software for mobile phones, pagers, and PDAs that can play and record both audio and video. In addition, cameras are supported so that a photograph can be captured and used within a custom application. In reality, MMAPI-enabled devices are still new on the market and since the API is targeted at limited devices, not all functionality is required. For example, it appears to be quite common now for mobile phones to support still-image capture but not full motion video.
There are several devices on the market that already include support for MMAPI. For a listing, see the J2ME Devices page.
General Concepts
MMAPI provides functionality through two basic abstractions. The first abstraction is the notion of a data source while the second abstraction is that of a media player.
A data source can be anything that provides media data, including files, resources in the classpath, or a network connection that provides streaming data. The specific formats that are supported are determined by the device that you use. MMAPI specifies Java properties that list which formats are available. The properties are audio.encodings and video.encodings. Each contains a space-separated list of supported formats.
Although MMAPI contains an abstract DataSource class, you do not create it directly. Instead, you must specify a valid URL that points to the data. See Table 1 for examples of valid data source URLs.
In addition to a data source, MMAPI provides access to one or more appropriate players. These players provide general functionality like starting and stopping playback, and can indicate the duration of the recording.
MMAPI is also capable of recording audio and video as well as capturing images from a camera. Example URLs for audio and video playback and capture are listed in Table 1.
Table 1: Examples of Data Source URLs
| Audio playback: | http://webserver/music.mp3 |
| Video playback: | http://webserver/movie.mpg |
| Audio capture: | capture://audio |
| Video capture: | capture://video |
The API
The Mobile Media API provides a limited set of classes and interfaces. In fact, only 4 classes are defined along with 18 interfaces. As is becoming common with Java APIs, the specific implementations of the interfaces are provided by the device manufacturer. Table 2 provides a brief description of each class and Table 3 describes each interface. The more important classes and interfaces are in bold.
Table 2: MMAPI Classes
| Class | Description |
|---|---|
ContentDescriptor |
Describes the content type for the media. |
DataSource |
Used in conjunction with one or more source streams to provide data for a player. |
Manager* |
Entry point into MMAPI. The Manager creates a Player that can be use to play back or record media. |
MediaException* |
Thrown by various methods to indicate an error condition. |
| * = included in MIDP 2.0 | |
Table 3: MMAPI Interfaces
| Interface | Description |
|---|---|
Control* |
Marker interface for a class that provides specific functionality to manipulate the medium. For example, a VolumeControl can be used to raise or lower the volume on audio or video playback. |
Controllable* |
Implemented by any class that can be controlled. Player is a Controllable because it can provide, for example, a VolumeControl and a GUIControl. |
FramePositioningControl |
Allows for precise frame positioning of video, for example by seeking to a frame number |
GUIControl |
Provides a GUI interface to a Player. |
MetaDataControl |
Provides access to metadata for media, for example, the author and date. |
MIDIControl |
Provides advanced sound control. The inclusion of a MIDIControl is optional. |
PitchControl |
Raises or lowers the playback pitch without altering the speed or volume. |
Player* |
Defines the lifecycle for media playback and provides access to appropriate controls. |
PlayerListener* |
Receives asynchronous progress events from Players. |
RateControl |
Changes the playback rate. |
RecordControl |
Record output from a player. |
SourceStream |
Used with a DataSource to provide more control than is available from a simple InputStream. |
StopTimeControl |
Stops the media playback at a preset time. |
TempoControl |
Controls the tempo of playback in millibeats per second, typically for MIDI players. |
TimeBase |
Measures the progress of time. Multiple players can be synced to the same time base. |
ToneControl* |
Provides a means to generate a sequence of monotonic tones. |
VideoControl |
Controls video playback and provides an appropriate display. |
VolumeControl* |
Changes the output volume. |
| * = included in MIDP 2.0 | |
MIDP 2.0 Media API
When the members of the MIDP 2.0 expert group (JSR 118) decided to include audio support, they made sure that it was provided as a subset of the Mobile Media API. To do otherwise would fracture the Java platform, requiring similarly-featured software to be written differently depending on the platform it was to be run on.
The audio support in MIDP 2.0 includes most of the basic audio functionality discussed in this article. In fact, the audio examples in this article will run under MIDP 2.0. There is no support for video. Tables 2 and 3 indicate which MMAPI classes are supported in MIDP 2.0.
Audio Playback
Players and data sources are created by a Manager factory class. Creating a player for a given source is quite easy, even in a MIDP environment.
- public class PlayRecordedSoundFromWebMIDlet extends MIDlet {
- protected void pauseApp() {}
- protected void destroyApp(boolean unconditional){}
- protected void startApp() {
- try {
- Player player = Manager.createPlayer("http://localhost/bark.wav");
- player.start();
- } catch (MediaException e) {
- e.printStackTrace();
- } catch (IOException e) {
- e.printStackTrace();
- }
- }
- }
It is also possible to play a resource in the classpath, as the following example shows.
- public class PlayRecordedSoundMIDlet extends MIDlet {
- protected void pauseApp() {}
- protected void destroyApp(boolean unconditional){}
- protected void startApp() {
- try {
- String type = "audio/x-wav";
- InputStream is = getClass().getResourceAsStream("/audio/bark.wav");
- Player player = Manager.createPlayer(is, type);
- player.start();
- } catch (MediaException e) {
- e.printStackTrace();
- } catch (IOException e) {
- e.printStackTrace();
- }
- }
- }
Audio Tone Generation
In addition to playing prerecorded sounds, MMAPI-enabled devices can also generate tones dynamically. This means that we can now write applications that generate sound. For example, it would be relatively straight-forward to create a music composer application.
Tone generation can be accomplished in one of two ways. For simple situations, the Manager.playTone(int note, int duration, int volume) method is used. For more fine-grained control or to play a sequence of tones, a ToneControl must be created from a Player.
Here is a simple MIDlet that generates a single tone. Notice that the MIDlet destroys itself after playing the tone so that it can be invoked multiple times.
- import javax.microedition.media.*;
- import javax.microedition.midlet.MIDlet;
-
- public class SimpleToneMIDlet extends MIDlet {
- protected void startApp() {
- try {
- Manager.playTone(50, 500, 100);
- this.notifyDestroyed();
- } catch (MediaException e) {
- e.printStackTrace();
- }
- }
-
- protected void pauseApp() {}
- protected void destroyApp(boolean unconditional){}
- }
A tone sequence must be defined following the format specified in the MMAPI. Unfortunately, once a player is realized, the tone sequence cannot be changed. In the example below, we play the same tones 5 times, each time at a slightly lower volume. Click here to see the full source code.
First we must create the tone sequence. Since the sequence has the volume embedded in it, we must recreate the sequence with the new volume each time we play it. Before creating the sequence, however, we'll define some useful constants corresponding to some of the notes on the scale.
- private byte TEMPO = 30;
- private byte volume = 100;
- private byte d = 8; // eighth note
- private byte C = ToneControl.C4;
- private byte D = (byte) (C + 2);
- private byte E = (byte) (C + 4);
-
- private byte[] createSequence() {
- byte[] sequence = {
- ToneControl.VERSION, 1, // always 1
- ToneControl.TEMPO, TEMPO, // set the tempo; in WTK 2.1 only a value of 30 seems to work
- ToneControl.SET_VOLUME, volume, // Set the new volume
- ToneControl.BLOCK_START, 0, // define block 0
- C, d, D, d, E, d, // define repeatable block of 3 eighth notes
- ToneControl.BLOCK_END, 0, // end block 0
- ToneControl.PLAY_BLOCK, 0, // play block 0
- ToneControl.SILENCE, d, E, d, D, d, C, d, // play some other notes
- ToneControl.PLAY_BLOCK, 0, // play block 0 again
- };
- return sequence;
- }
-
To play the sequence, we must do a little more work than to play a simple tone. Instead, a tone player is used to create a ToneControl. The tone sequence must then be defined in this control before the Player enters the prefetched or started state. That is, the player cannot acquired all of its resources before the tone sequence is defined.
In the example code below we have added a PlayerListener to the player. This notifies the listener as the player transitions through its states.
- private void play() throws IOException, MediaException {
- form.append("Quiet!");
- p = Manager.createPlayer(Manager.TONE_DEVICE_LOCATOR);
- p.addPlayerListener(this);
- p.realize();
- c = (ToneControl) p.getControl("ToneControl");
- c.setSequence(createSequence());
- p.start();
- }
The PlayerListener interface requires a playerUpdate method to be defined. In this example, the method uses the END_OF_MEDIA event to trigger the creation of another player with a tone sequence set with a lower volume. It would have been nice to be able to reuse the same Playerwith the different sequences. However, the lifecycle of a Player does not permit this. Once a Player has entered the prefetched or started state, it cannot transition back to a state earlier than prefetched. In other words, a Player can only be used to play one data source. It can replay the same source but it cannot be reused with a different source.
- public void playerUpdate(Player player, String event, Object eventData) {
- p.close(); // release the resources
- if (event == PlayerListener.END_OF_MEDIA && volume > 10) {
- try {
- volume /= 2;
- play(volume);
- } catch (IOException e1) {
- e1.printStackTrace();
- } catch (MediaException e) {
- e.printStackTrace();
- }
- } else if (volume < 10) {
- notifyDestroyed();
- }
- }
Video Playback
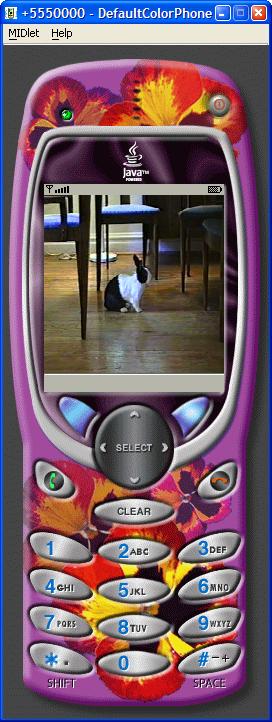
It is relatively straight-forward to play video using similar techniques as for audio. The following code snippet shows how to display full-screen video. (To view the code for the entire application, click here.) Figure 1 shows a full screen display in the J2ME Wireless Toolkit. We must provide a Canvas for the video to be drawn in. Since Canvas is abstract, we define a concrete subclass which does not do anything. The application constructs a player by specifying a valid URL. It then adds a PlayerListener to the player. This listener will be informed of state changes in the player including when the video clip has reached the end of the media.
Before proceeding with the time consuming task of realizing the player, the application first displays a busy screen to the user. Once the player has been realized, meaning that the necessary resources have been allocated and fetched, the application asks the player for a video control that is appropriate for the platform on which it is running. We specify that the video is to be displayed in full-screen mode on the Canvas using VideoControl.initDisplayMode().
- private void showFullScreenDisplay() {
- Canvas canvas = new Canvas() {
- protected void paint(Graphics g) {
- // We won't draw anything ourselves
- }
- };
- Display.getDisplay(this).setCurrent(canvas);
- try {
- videoPlayer = Manager.createPlayer("http://localhost/Rabbit2004.mpg");
- videoPlayer.addPlayerListener(this);
- Display.getDisplay(this).setCurrent(busyForm);
- videoPlayer.realize();
- VideoControl videoControl = (VideoControl)videoPlayer.getControl("VideoControl");
- videoControl.initDisplayMode(VideoControl.USE_DIRECT_VIDEO, canvas);
- videoControl.setVisible(true);
- videoPlayer.start();
- } catch (IOException e) {
- e.printStackTrace();
- } catch (MediaException e) {
- e.printStackTrace();
- }
- }
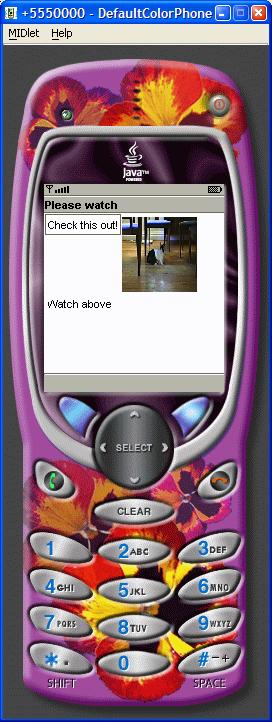
In addition to full-screen video, we can display video on a portion of the screen as part of a more feature-rich user interface. Figure 1 shows an embedded video display in the J2ME Wireless Toolkit. The example below is only slightly different from the full-screen example. Here, the VideoControl.initDisplayMode() method creates an Item which can be placed on a Form for display. The Item class is a GUI component defined in the javax.microedition.lcdui MIDP GUI package. Because this example runs only in a MIDP environment, the second parameter to VideoControl.initDisplayMode() can be null. In an AWT environment, the returned display would be a java.awt.Component. In a mixed environment where both AWT and lcdui are supported, the second parameter must specify either "java.awt.Component"; or "javax.microedition.lcdui.Item".
- private void showDisplayInWindow() {
- Form videoForm = new Form("Please watch");
- videoForm.append("Check this out!");
- try {
- videoPlayer = Manager.createPlayer("http://localhost/Rabbit2004.mpg");
- videoPlayer.addPlayerListener(this);
- Display.getDisplay(this).setCurrent(busyForm);
- videoPlayer.realize();
- VideoControl videoControl = (VideoControl)videoPlayer.getControl("VideoControl");
- if (videoControl != null) {
- Item videoItem =(Item)videoControl.initDisplayMode(VideoControl.USE_GUI_PRIMITIVE, null);
- videoControl.setDisplaySize(75, 75);
- videoForm.append(videoItem);
- videoForm.append("Watch above");
- Display.getDisplay(this).setCurrent(videoForm);
- }
-
- videoPlayer.start();
- } catch (IOException e) {
- e.printStackTrace();
- } catch (MediaException e) {
- e.printStackTrace();
- }
- }
Figure 1: Examples of full-screen and embedded video
Wireless Toolkit Support
Now that you have whetted your appetite with this article, you will no doubt want to start programming with the Mobile Media API. One easy way to do this is to use the Sun J2ME Wireless Toolkit 2.1. This latest version has support for many J2ME optional packages including MMAPI as well as support for MIDP 2.0. The toolkit is configurable so that J2ME applications can be tested in a MIDP 1.0 or MIDP 2.0 environment, with or without MMAPI.
To run the examples used in this article, download the source code. Unzip the source code to C:\WTK21\apps (where WTK21 is the installation directory for the wireless toolkit). Place the Rabbit2004.mpg and bark.wav files onto your local web server. If your web server is running on a different machine, you will have to modify the example code to point to it. Start the wireless toolkit KToolbar and open either the MMAPIAudioDemo or MMAPIVideoDemo project. Then build and run the demos.
Conclusion
The Mobile Media API provides software developers with tremendous opportunities to enhance applications with sound and video never before available on small devices. This opens the door to creating a much richer experience for the end user, whether it be for gaming, business, productivity or other, more specialized applications.
As always, when dealing with J2ME across many different devices with different form factors from multiple vendors, it is always important to test your application on the targeted deployment device. Since much of MMAPI is optional and media formats may or may not be supported, it becomes especially important to test under real deployment conditions.
References
- [1] JSR 135 Mobile Media API
http://www.jcp.org/en/jsr/detail?id=135 - [2] JSR 118 MIDP 2.0
http://www.jcp.org/en/jsr/detail?id=118 - [3] J2ME Wireless Toolkit 2.1
http://java.sun.com/products/j2mewtoolkit/download-2_1.html
Software Engineering Tech Trends (SETT) is a regular publication featuring emerging trends in software engineering.
