Building A Complete NetBeans Platform Application
By Tom Wheeler, OCI Senior Software Engineer
October 2005
Last month I wrote an introduction to the NetBeans platform that explained what the platform is as well as its advantages and disadvantages. I concluded with an example of how you could reuse existing components to create a file browser with support for viewing image files.
This month I'll show how to create several modules that together form a complete application. My goal is to give you a concise but complete overview of what's required and point you to existing documentation that explains things in greater detail. Specifically, I will discuss the source and configuration files common to all modules, how to separate interface from implementation for greater flexibility, and how to "brand" the platform to use your own menus, labels and graphics. I'll conclude with information on troubleshooting problems and links to several helpful Web sites.
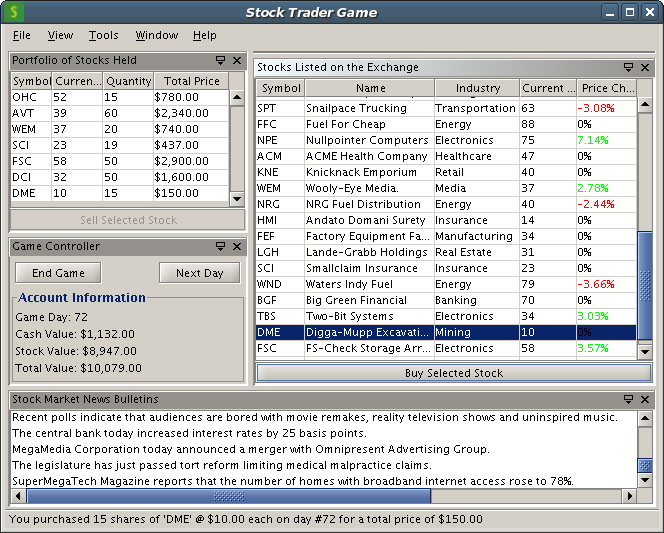
I created a simple stock trading game to provide examples of the concepts I want to cover. When you begin playing the game, you're given a limited amount of money and the goal is to buy low and sell high in order to build your fortune. News stories affect the price of stock and are published at the beginning of each trading day. The following screenshot will help you to better understand the game.
Figure 1: Screenshot of the Stock Trader Game
This article covers the following topics:
- How to Start and Play the Stock Trader Game
- A Quick Look at the Stock Trader Game
- Separating Interface from Implementation
- Porting a Java Swing Application to the NetBeans Platform
- Inside a NetBeans Module
- How to Set a Custom Look and Feel
- Configuring and Launching the Cluster
- In Conclusion
How to Start and Play the Stock Trader Game
In order to follow along with my examples, I encourage you to download the source code for the stock trader game, which includes all the source code and a copy of the cluster build harness needed to compile and launch the program. Incidentally, the cluster build harness previously had a bug that prevented it from working with version 1.6.5 of Ant, but I've fixed this in the included copy.
You'll need to perform the following steps to run the game. Please refer to my previous article for more details including information about the versions used and the links to download them.
- Install the Java Development Kit (JDK)
- Install Ant
- Download and unpack the NetBeans platform binary, version 4.1
- Set the
NETBEANS_HOMEenvironment variable to point to the directory created when you unpacked the NetBeans Platform binary in the previous step. If you set it correctly, you'll see a directory namedplatform5when you list the contents of the directory pointed to by theNETBEANS_HOMEvariable. - Unpack the stock trader game source code and change to the
cluster_build_harness/nbbuildsubdirectory that it created - Run the
ant trymecommand to launch the application
If you performed all the steps correctly, you'll see the NetBeans platform launch. The fonts and colors in yours will probably differ from those one in my screenshot, but I will cover how to improve the default settings near the end of the article. Once the platform is started, click the View menu and select each of the first four menu items to display the game's components. They'll all show up on the left side of the screen, so you'll have an opportunity to practice moving them around to emulate the layout shown in the screenshot.
Start a new game by clicking the Start Game button in the Game Controller component, which will open the stock market for trading. The Game Controller component also shows that you have some money to use for purchasing stocks, which you can do by selecting a stock in the Exchange Listing component and then clicking theBuy Selected Stock button just below that table. You'll be prompted for the number of shares to purchase and see that the stocks have been added to your portfolio after confirming the trade. After you've finished buying stocks for the day, you can click the Next Day button on the Game Controller to begin the next trading day, after which the stock prices will fluctuate in response to the news stories that have just been published. If you think you've made — or lost — enough money on any stock in your portfolio, you may sell it by selecting it in the Portfolio component and then clicking the Sell Selected Stock button below the table. This will remove the specified number of shares from your portfolio and credit your cash balance shown in the Game Controller. Click the End Game button to finish playing and view your score.
A Quick Look at the Stock Trader Game
As illustrated in the previous screenshot, there are four main visual components in the stock trader game:
The Game Controller
The game controller component is visible in the center of the left side of the screenshot. It has buttons for starting, stopping and advancing the game, and also displays statistics about the current game.
The Exchange Listing
The exchange listing is shown in the upper-right in the screenshot. It shows all stocks available for purchase on the exchange and also contains a button at the bottom that, when clicked, prompts you to purchase the stock you've selected in its table.
The Portfolio
The portfolio can be seen in the upper-left of the screenshot. It is similar to the exchange listing, except that it shows information only about the stocks that you own. It contains a button that prompts you to sell the selected stock when clicked.
The Market News
The market news component is visible near the bottom of the screenshot. It displays all the news stories that affect stock prices.
The NetBeans platform, along with these four items, make up the entire user interface for the game. However, there are two very important pieces that you don't see: the game API and the game engine.
Separating Interface from Implementation
One of the benefits of object-oriented programming is the ability to generalize a type so that you can substitute alternative implementations. In Java, this is primarily done through interfaces, which specify the behavior of a class but don't enforce how that behavior is realized.
When I designed the stock trader application, I started by creating a series of interfaces that define the most important objects used in the game, like Stock, StockExchange, StockAccount and Game. I also wrote a handful of related classes that specify how components could be notified of important events such as when stocks are bought and sold. These source files make up the game's API.
Though the API specifies how the game works at an abstract level, it doesn't contain the logic for actually playing the game. For that I created another module that I call the game engine. The game engine contains a class that implements each interface defined in the API. This module contains, for example, the source code that calculates what news stories will be published on any given day and how this will affect stock prices.
This approach allowed me to create the visual components that depend only on the API module. So long as I don't violate the contract of the API, I can later substitute an improved game engine without requiring a change in any other module. You'll see in a little while how the NetBeans platform lets you find all classes based on a given interface.
Porting a Java Swing Application to the NetBeans Platform
Before I continue, I have to confess that I didn't initially write the stocktrader game as a set of NetBeans modules. Instead, I created it as a regular Java Swing application and then "ported" it to the NetBeans platform so that I could give you an idea of the effort and benefits involved. In my case, it took about four hours not including the time it took to brand the platform. For this small amount of effort, I gained the following benefits:
Declarative User Interface Configuration
I can add, remove and change menus, keyboard shortcuts and toolbars in seconds by editing a configuration file. Also, users can set up their own menus and keyboard shortcuts from within the application.
Modular Application
I can easily distribute new or updated modules to users, even after the application is deployed.
Window Management
The user can open, close, rearrange or resize the layout of top-level components, and the platform remembers these settings the next time the application is launched.
Window Management
The platform provides a splash screen that displays a logo and progress meter to show the user that the application is starting.
Flexible build system
Writing build.xml files isn't particularly difficult but it can take some time to identify all the libraries that need to be in your classpath in order to compile and run the application. By reusing the cluster build harness, which I discussed in greater detail last month, the Ant build scripts for each module were each only a few lines long. I was also able to think about dependencies at a higher level by referencing other modules instead of all the JAR files that they might contain.
More importantly, porting to the NetBeans platform allowed me to eliminate a fair amount of code from my application, such as the status bar and convenience methods for positioning dialog boxes. The platform provides both of these and its implementations have been tested under more conditions than I would be able to provide.
To summarize, I would be able to create a better application in less time using the NetBeans platform than if I created it from scratch using only Swing. However, experience helps a great deal in this regard, since your first few attempts at using a new framework can be a challenge. I hope that this article can help you whether you decide to convert existing applications or create new ones for the NetBeans platform. Here are a few tips for porting existing applications:
Don't have a main(String[]) method
The platform itself contains everything needed to launch the application. Your components will be displayed based on configuration files included with your modules.
Don't create instances of java.awt.Window or its descendants
The individual "windows" that appear within the platform's frame are instances of a NetBeans class called TopComponent . Additionally, NetBeans provides methods for creating and positioning dialog boxes.
Porting is what you make it
NetBeans provides a better way of doing many things that you'd commonly do in Swing. Unlike some frameworks, the regular Swing methods generally still work, though doing things "the NetBeans way" will create a better, more consistent application. As I wrote earlier, I was able to eliminate some existing Swing code in the stocktrader game and instead use the NetBeans counterparts. In order to keep the code relatively clear (and because of time constraints), I avoided doing this in other places but hope to improve this in the future.
An application built on the NetBeans platform usually consists of several modules that each provide some capability. Let's briefly look at the parts common to any module. For more information, I recommend reading Tim Boudreau's Basic NetBeans File and Project Layout tutorial.
Inside a NetBeans Module
A NetBeans module typically represents a single feature of an application. The term is used somewhat interchangeably to refer to the file or files that are installed into the NetBeans platform (i.e. the product of the build) as well as the source code, configuration and related files that are used to create it (i.e. the input for the build). Since we're going to look at a module from the perspective of a developer, I'll use the latter definition in this article.
A NetBeans module that relies on the cluster build harness has a structure that's very similar to most other simple Java projects. For example, you have a src directory and an Ant build.xml file. As I mentioned earlier, the build.xml file is very simple since it really just imports much more complex logic from the nbbuild/cluster-scripts/projectized.xml file in the build harness. The most common types of modules include Java source code that you've written, but you can also create a library module that makes a JAR file available to other modules. This is useful when you have several modules that each depend on a common library such as the Xerces XML parser. I'll discuss source code modules in this article, but you can find examples of library modules in Rich Unger's NetBeans 4.x FeedReader tutorial.
The module's root directory will contain a file named manifest.mf. This is used to provide information necessary to install the module into the platform. Here's an example from the stock trader user interface module:
Manifest-Version: 1.0
OpenIDE-Module: com.tomwheeler.stocktrader.ui/1
OpenIDE-Module-Specification-Version: 1.0
OpenIDE-Module-Layer: com/tomwheeler/stocktrader/ui/resources/layer.xml
OpenIDE-Module-Localizing-Bundle: com/tomwheeler/stocktrader/ui/Bundle.properties
The OpenIDE-Module attribute specifies the name of the module while the OpenIDE-Module-Specification-Version attribute declares the fine-grained version number of this module. The other two values specify the location of some configuration files that I'll explain in a moment.
A module also has an nbproject directory which contains two files used by the build process. The first is project.properties, which allows the module to override global properties for the build, though in practice it is seldom used. The second file is named project.xml and is far more important. Here's the project.xml from the Stock Trader game's user interface module.
<?xml version="1.0" encoding="UTF-8"?>
<project xmlns="http://www.netbeans.org/ns/project/1">
  <type>org.netbeans.modules.apisupport.project</type>
  <configuration>
      <data xmlns="http://www.netbeans.org/ns/nb-module-project/1">
           <code-name-base>com.tomwheeler.stocktrader.ui</code-name-base>
           <path>stocktraderui</path>

           <module-dependencies>
              <dependency>
              <code-name-base>org.openide</code-name-base>
                  <build-prerequisite></build>
                  <compile-dependency></compile>
                  <run-dependency>
                     <release-version>1</release-version>
                     <specification-version>4.41</specification-version>
                  </run-dependency>
                </dependency>
                <dependency>
                   <code-name-base>com.tomwheeler.stocktrader.api</code-name-base>
                   <build-prerequisite></build>
                   <compile-dependency></compile>
                   <run-dependency>
                       <release-version>1</release-version>
                       <specification-version>1.0</specification-version>
                   </run-dependency>
                </dependency>
           </module-dependencies>

           <public-packages>
           </public-packages>
      </data>
  </configuration>
</project>
The first important item in this file is the code-name-base element which is used to uniquely identify this module. The path element specifies the path to the module, relative to the nbbuild directory of the cluster build harness.
The next section is used to specify dependencies on other modules and is necessary any time that your module uses classes outside of those provided by itself and the J2SE class libraries. The first dependency I have declared requires version 4.41 or higher of the org.openide module. This module provides the core libraries of the NetBeans platform, so you will always need to declare a dependency on it. Note that in future releases of the NetBeans platform, the large org.openide module will be split into several smaller ones for increased flexibility, so you may need to adjust your dependencies if you use platform version 5 or higher. I have also declared that I need at least version 1.0 of the com.tomwheeler.stocktrader.api module. The existence of the empty build-prerequisite and compile-prerequisite elements states that I will need the classes provided by the module in order to compile and use the module. Sometimes your code will not rely on classes at build time but simply needs them at runtime, as might be the case with database drivers that are indirectly instantiated. In those cases you can eliminate the build-prerequisite and compile-prerequisite elements.
By default, the classes and interfaces in your module are not visible to others even if the source code declares them as public. This seems strange at first, but is actually a good idea since it gives you the flexibility to make significant changes to your code without breaking other modules. If you do want to make certain classes and interfaces as available to other modules, you'll list their packages in the public-packages element, as shown in this excerpt from my stock trader game's API module:
<public-packages>
    <package>com.tomwheeler.stocktrader.api</package>
    <package>com.tomwheeler.stocktrader.api.events</package>
</public-packages>
In this example, I have made all classes and interfaces in the com.tomwheeler.stocktrader.api and com.tomwheeler.stocktrader.api.events packages available for other modules to use. The stock trader user interface module does this (as shown earlier) and so it declares a dependency on the API module. New developers are often tempted to declare all packages as public, but doing so is a bad idea since it will severely limit your ability to make future changes without breaking other modules. You should strive to provide the least amount of visibility for your code to still work as intended.
The src directory will have the same structure and contents that you use for any Java project but also contains two configuration files whose location was specified in manifest.mf.
The first is an "XML layer file" and is typically named layer.xml or mf-layer.xml. This file merges the configuration in your module with the internal configuration of the NetBeans platform, which is called the system filesystem . You can think of the system filesystem as roughly analogous to the registry in Microsoft Windows or the /etc directory on UNIX systems. Modules can interact with it to change virtually any aspect of the system but most modules simply use it to add, remove or modify available actions and user interface elements.
The other file was referenced in the Localizing-Bundle attribute in manifest.mf. This file is a resource bundle that includes information that usually contains at least four properties used to show the user information about which modules are installed. Here's an example from the stock trader user interface module:
OpenIDE-Module-Name: Stocktrader UI
OpenIDE-Module-Short-Description: StockTrader Game UI
OpenIDE-Module-Long-Description: Provides the visual components for the stocktrader game
OpenIDE-Module-Display-Category: Games
By convention, this resource bundle is typically named Bundle.properties and is located in the lowest common subdirectory of the module. For example, a module with the code name base of com.tomwheeler.modules.calculator would include this file at src/com/tomwheeler/modules/calculator/Bundle.properties.
You will likely have other values in the resource bundle in addition to those I just mentioned. The Bundle.properties file is also used to externalize strings so that they're easier to change and so that your application is more easily translated into other languages. You can look up values using the NbBundle class.
The NetBeans platform supports internationalization and localization using the normal J2SE approach. For example, to make your application available in Spanish you just need to copy the Bundle.properties, translate its values and rename it as Bundle_es.properties. A localized bundle for Spanish speakers in Mexico would identify the country code and would thus be named Bundle_es_MX.properties.
The files described above make up the core of any NetBeans module. Now that you understand them a little more, let's look at the modules for the stock trader game.
The Stock Trader Game API Module
This module is extremely simple, as its sole purpose is to expose the API to other modules. Since it does not have any user interface components or any other need to interact with the NetBeans filesystem, it does not need a layer.xml file. It also does not have dependencies on anything outside the core Java J2SE class library, so the only dependency that must be accounted for in the nbproject/project.xml file is the org.openide module that all modules must declare. As I said before, the nbproject/project.xml file does make all classes in the com.tomwheeler.stocktrader.api and com.tomwheeler.stocktrader.api.events packages available to other modules. This is necesary since the game engine and user interface modules rely on the API rather than any specific implementations. This is also the only module in the stocktrader game that does make packages available to other modules.
Next, let's look at the stock trader engine module, which provides an implementation of these APIs we can use to play our game.
The Stock Trader Game Engine Module
This module provides an implementation of the game APIs, which is necessary for a game that we can actually play. In addition to the standard dependency on the org.openide module, the nbproject/project.xml file declares that it needs types from the com.tomwheeler.stocktrader.api module. Again, since there are no public APIs declared here, we don't need — or even want — to expose our packages to other modules.
Like the game API module, the game engine does not have a need to interact with the system filesystem, so it doesn't require an XML layer file. However, it does contain a directory hierarchy named META-INF/services/ beneath the root of the source tree that contains several short text files. This is an example of using the JAR provider extension mechanism in order to declare that you are providing an implementation of some API. Each text file is named after the specific interface from the game's API module, and the text of the file is the fully-qualified name of the class in this module that implements it. When this module is installed, the NetBeans platform will register this information so these classes can be looked up at runtime. I'll describe how to look up classes in the following section.
The Stock Trader Game User Interface Module
The UI module provides all visual components for the stocktrader game. It doesn't contain any business logic, except that which is necessary to control the game. This module has the same general structure as the previous ones. Note that the nbproject/project.xml declares a dependency only on the API module — not on the game engine itself. Again, this allows us the flexibility to replace our current game engine with a different one and have our UI continue to work without problems. Like the engine module, this module doesn't declare any public APIs here since we don't want to want to make our classes available to others.
For the sake of brevity and simplicty, I put all four visual components (game controller, market news, exchange listing and portfolio) in this single module. A better approach for a real-life application would be to make each a separate module so that they could be loaded or updated independently. To make it easier to see what's related to each component, I placed the code for each component into its own package. Let's start by looking at the source code for the game controller component, which is defined in the stocktraderui/src/com/tomwheeler/stocktrader/ui/gamectrl/ directory beneath the cluster build harness.
The GameControllerTopComponent class extends ;org.openide.windows.TopComponent . TopComponents represent "windows" that can be moved around or resized in the NetBeans platform. Since I originally wrote the stocktrader game as a Swing application, my TopComponents are very basic. The actual user interface elements such as buttons and labels are in the GameComponent class, which contains virtually no NetBeans-specific code.
In order to make my examples more consistent, I coded all my TopComponents to appear in the explorer mode which means that they show up on the left side of the application when first opened. You can manually drag them around and resize them to fit your needs and the NetBeans platform will remember your preferences, at least as long as the preferences in your NetBeans user directory remain intact. When using the cluster build harness, your user directory will be deleted if you run the real-clean target from Ant. It's possible to include window system configuration files with your module to specify the default size and position for each component when it's opened for the first time, but I avoided doing that for now to keep the article simple.
This component requires access to the Game so that it can display statistics and to control game play. Since the UI module listed a dependency only on the API, you might wonder how it gets access to the concrete classes of the Game provided by the game engine module. I mentioned earlier how the files in the META-INF/services directory were used to register the classes with NetBeans, so now I'll show you how to access them using Lookup API. Since we know that there is only one set of classes that implement the Game APIs, it's sufficient for us to use the first one returned from the lookup. This is done with the following two lines of code in the GameController constructor:
Lookup lookup = Lookup.getDefault();
Game game = (Game)lookup.lookup(Game.class);
It's a good idea to check that the returned instance is not null as I did in my class. If you were to get a null instance, which would likely only happen if the game engine classes were not properly registered, then you could log an exception with the NetBeans ErrorManager as I did in the GameControllerTopComponent. It's worth noting that the lookup mechanism provides extra sophistication if you need it, including the ability to get a collection of all available implementations so that you can select the desired one.
The next file to examine is DisplayGameControllerAction, which is a subclass of org.openide.util.actions.CallableSystemAction . The most important part of this class is the performAction() method, which is called whenever the action is invoked, typically from a menu item, toolbar button or keyboard shortcut. In our case, the performAction() method simply opens or activates the GameControllerTopComponent.
There are a few other methods in the action class to mention. Since it doesn't make sense to show more than one instance of the game controller, I overrode the isEnabled() method in order to return false if one is already displayed. I also set the action's icon in the initialize() method and overrode the getName() method to return a value from the resource bundle. Finally, I overrode the asynchronous() method to return false which means that the code in performAction() will always be called from the AWT event dispatch thread. I also encourage you to look at how NotifyDescriptor.Input is used to solicit user input in the PortfolioComponent and ExchangeListingComponent classes.
The last file is the Bundle.properties file that contains all the externalized strings used by classes in this package. You can see that these do not contain the OpenIDE-Module-Name and similar values; those are only needed once per module and are located in the resource bundle referenced by the manifest file.
Now we have the action and components, but we need to provide a way for the user to call them. We'll do that by creating a layer.xml file so that we can interact with the NetBeans system filesystem and define some new items under the View menu. The following layer file illustrates how we can define a new menu item for showing the game controller:
<?xml version="1.0" encoding="UTF-8"?>

<!DOCTYPE filesystem
  PUBLIC "-//NetBeans//DTD Filesystem 1.1//EN"
         "http://www.netbeans.org/dtds/filesystem-1_1.dtd">
<filesystem>
    <folder name="Actions">
        <folder name="View">
            <file name="com-tomwheeler-stocktrader-ui-gamectrl-DisplayGameControllerAction.instance"></file>
        </folder>
    </folder>
    <folder name="Menu">
        <folder name="View">
              <file name="com-tomwheeler-stocktrader-ui-gamectrl-DisplayGameControllerAction.shadow">
                  <attr name="originalFile"
                   stringvalue="Actions/View/com-tomwheeler-stocktrader-ui-gamectrl-DisplayGameControllerAction.instance"></attr>
              </file>
        </folder>
    </folder>
</filesystem>
I have included a reference to the CallableSystemAction in the Actions element. You'll notice that the format is a bit unusual, but it's actually just the fully-qualified classname in which the dots are replaced with minus signs and .instance is appended to the end. The instance file is one of the keys to how the NetBeans platform uses memory efficiently — it can parse this file and see what actions are available without actually having to load the classes.
The Menu element is where NetBeans menu system configuration is stored. The .shadow file is similar to a symbolic link on a UNIX filesystem or a shortcut on Microsoft Windows; it allows me to potentially create several references to the .instance I defined earlier. It's not strictly necessary in this example, but doing it this way from the start will allow me to easily make the action available in multiple ways such as a toolbar button or keyboard shortcut in addition to the menu item I have created here. The text for the menu item comes from the getName() method in the action class.
The other three components in the UI module are very similar in concept to the game controller, so I encourage you to look at them on your own. Now I'll explain how we can further customize the appearance of the NetBeans platform.
The Stock Trader Branding Module
The stock trader game is now complete and functional, but it still uses the graphics, labels and menus for the NetBeans platform. In order to provide a more polished program to our customers, we need to replace those with ones customized for our game. This is done by branding the application and basically involves adding, removing or changing items in the NetBeans filesystem to meet your needs.
Finding exactly which items to add or modify is not particularly obvious or well documented. Version 5 of the NetBeans IDE will provide a much simpler wizard-based approach (which you can see in the new FeedReader tutorial), but for version 4.2 you just have to hunt through the NetBeans platform source code and find where things are defined. To save you that effort, the stock trader game includes a fairly extensive branding module named gamebranding that you can use as a starting point for your own applications. Most of what you want to look at is beneath the core and core-windows directories. The source tree also contains a layer file that I used to disable menus and toolbars that weren't appropriate for my game.
To create a branding module, you first have to come up with a short identifier to reference it. I chose stg, which stands for "stock trading game." All the files that you override in your branding module must contain an underscore and your identifier just before the file extension. Since the image used for the splash screen is located at core/org/netbeans/core/resources/splash.gif, I included my own splash screen graphic named core/org/netbeans/core/resources/splash_stg.gif. The new splash screen is shown below and will be used whenever a cluster is launched with this branding module.
Figure 2: Screenshot of the Stock Trader Game's Customized Splash Screen

Similarly, the Bundle.properties files that contain values you want to override must be renamed to include the branding identifier. The value of the CTL_MainWindow_Title key in the core-windows/org/netbeans/core/windows/view/ui/Bundle.properties file is used to specify the title of the main NetBeans platform window. Since I wanted it to read StockTrader Game rather than NetBeans, I created a file named core-windows/org/netbeans/core/windows/view/ui/Bundle_stg.properties to set the desired value for this property. This will be displayed whenever the stg branding module is used.
You might wonder how we tell the platform to use the branding we've created. This is specified in the --branding argument to the NetBeans executable when starting the application. Since we're launching the platform using the tryme target in the Ant build script, I have modified the nbbuild/cluster-scripts/cluster.xml to support passing in this value based on the branding property set in the nbbuild/user.build.properties file.
How to Set a Custom Look and Feel
NetBeans also allows you to further customize the user interface using theme.xml files, but I find that using a good look and feel library is enough to significantly improve your application. I personally like the JGoodies Looks library, which provides several classes that look great on Microsoft Windows and UNIX platforms. The screenshot shown at the beginning of the article used the JGoodies Plastic3DLookAndFeel class with the DesertBluer theme. I have further modified the nbbuild/cluster-scripts/cluster.xml script to support passing in the desired look-and-feel class by specifying its value in branding property set in the nbbuild/user.build.properties file. If you're using one of JGoodies' Plastic look and feel classes, you can also specify the theme in the jgoodies.plastic.theme value of the properties file. Since the look and feel library is needed before any modules are loaded, you'll need to copy its JAR file to the platform5/lib directory beneath your NetBeans installation so that it is available when the platform launches.
Configuring and Launching the Cluster
In last month's article, I discussed how to edit the nbbuild/modules.xml file to specify details about our modules. The following excerpt shows the new elements I have added to the file:
<module>
    <path>stocktraderapi</path>
    <cnb>com.tomwheeler.stocktrader.api</cnb>
</module>
<module>
    <path>stocktraderengine</path>
    <cnb>com.tomwheeler.stocktrader.engine</cnb>
</module>
<module>
    <path>stocktraderui</path>
    <cnb>com.tomwheeler.stocktrader.ui</cnb>
</module>
<module>
    <path>gamebranding</path>
    <cnb>com.tomwheeler.stocktrader.gamebranding</cnb>
</module>
Of course, we also have to edit the nbbuild/user.cluster.properties file to add our modules to the cluster. Since a NetBeans installation is capable of launching different clusters independently, I left the mycluster1 cluster in the file and chose to add a new one named stocktradergame1. The changes I made in the user.cluster.properties file are shown below in blue:
# declare a name for your cluster
# (should match the name in user.build.properties)
user.cluster=cluster.tradergame1

# the directory under ${netbeans.home} containing your cluster
cluster.mycluster1.dir=mycluster1

# the list of modules (the names of the directories containing
# the modules, rooted at nbbuild/..)
cluster.mycluster1= snipe, \
                    image, \
                    diskexplorer

cluster.tradergame1.dir=tradergame1
cluster.tradergame1=stocktraderapi, \
                    stocktraderengine, \
                    stocktraderui, \
                    gamebranding
Finally, I changed the user.build.properties to include properties for the look and feel, theme, and branding, as described earlier. I also changed the value of the clustername property to stocktradergame1 so that the stock trader game would be launched by default. That's everything we need, so you can now launch the stocktrader game by opening a prompt to the cluster_build_harness/nbbuild directory and typing ant tryme. Don't forget to make sure that your NETBEANS_HOME environment variable is set correctly — it should point to the directory that contains a subdirectory named platform5. Again, you'll need to select items from the Viewmenu to display the components and then manually move and resize them according to your preferences.
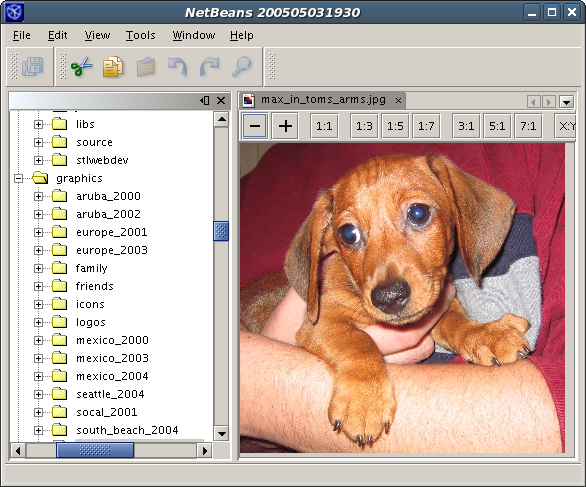
After you are able to launch the stock trader game, I encourage you to change the value of the clustername from tradergame1 to mycluster1 in the nbbuild/user.build.properties. After you do this, running the tryme target from Ant will launch the file viewer from last month's article instead of the stock trader game, as shown in the following screenshot.
Figure 3: Screenshot of the Disk Explorer/Image Viewer Application
In Conclusion
This article explained how to create an entire customized application on the NetBeans platform. In addition to action and TopComponent classes, I described the Lookup API and how to brand the platform to better fit your application. As I said before, you can get an application to work in the NetBeans platform with a relatively simple porting effort, but your application can benefit from doing things "The NetBeans Way." I hope to improve the stock trader game in the future. Please check the NetBeans section of my Web site for the latest versions. In the meantime, I have compiled a list of other Web sites that I think you'll find useful, along with some information about troubleshooting your applications. Good luck.
Resources for More Information
- [1] NetBeans Tutorial Site
This site contains several tutorials that give in-depth examples of many concepts and APIs. However, it's worth noting that many of the newer tutorials are aimed at creating modules using the NetBeans IDE rather than the more generic approach that I have taken. Still, most of the information applies no matter what IDE you use and you'll also get an idea of how easy it is to create modules using the NetBeans Version 5 IDE (which is available as a beta release at that the time of this writing). - [2] NetBeans Developer FAQ
This FAQ is provided in Wiki format and answers questions that are commonly asked on the mailing list. The information is current, and like this article, provides links to pages that elaborate on the information provided. - [3] Geertjan Wielenga's Blog
Geertjan is a member of the NetBeans documentation team and maintains an active blog that discusses both the NetBeans platform and the IDE. - [4] NetBeans Platform Mailing Lists
This site hosts a searchable archive of the NetBeans mailing lists as well as information about how to subscribe to them. - [5] Contributed NetBeans Modules
The "contrib" site contains modules and documents that have been contributed to the project by other authors. Since it contains some outdated files, it is a good idea to look at the date and status columns to make sure that you're getting a recent version of anything you download. - [6] NetBeans Source Code
Since the IDE is built on the platform, it can provides some very good examples of how to implement your own modules.
Troubleshooting A NetBeans Platform Application
The following are some things to check when things don't work as expected:
Error Manager
Whenever the platform encounters a serious problem such as missing libraries or an invalid configuration file, you'll see the Error Manager indicator appear as a red circular button on the far right of the status bar. Clicking it will bring up a dialog box telling you more about the problem.
NetBeans log file
Information pertaining to a single user's NetBeans installation is contained in the NetBeans user directory, the path to which is specified in userdir argument to the NetBeans executable. When using the tryme Ant target in the cluster build harness, the default value is testuserdir beneath the cluster harness' nbbuild directory. The user directory contains a file var/log/messages (not to be confused with the administrative message log on UNIX systems) that logs errors, warnings and other important information. This file is very helpful when trying to debug, since the messages often give URLs that explain problems in greater detail.
Nathan Fiedler's System Filesystem Viewer
Nathan Fiedler created a helpful module called the SysFS Viewer that allows you to browse NetBeans' internal configuration. This can help you to better understand the system, but is particularly useful when something you've defined in a layer file does not work as expected. It's not necessary to install the SysFS Viewer if you're using version 5 of the NetBeans IDE since a similar feature is available by viewing the layer file "in context" inside the project window.
Tom Wheeler would like to thank Ruth Kusterer, Geertjan Wielenga, Dean Wette and Jeff Brown for their help in reviewing this article.
Software Engineering Tech Trends (SETT) is a regular publication featuring emerging trends in software engineering.
