Getting Started with the NetBeans Platform
By Tom Wheeler, OCI Senior Software Engineer
September 2005
Introduction
When developers think of NetBeans, they typically think of the popular open-source IDE. I want to be clear from the beginning: this is not an article about how to use the IDE. Instead, I'll explain how to get a head start towards creating desktop applications by reusing the infrastructure on which the IDE itself is built. This will allow you to spend more time on the business logic and less time on the infrastructure development common to any GUI application. This article introduces the NetBeans platform and shows you how you can get started by reusing existing components. Next month, I'll follow up with another article that describes how to create a custom application using your own code.
You don't have to use the NetBeans IDE to benefit from the platform, in fact I generally use Eclipse. Ironically, the two most recent production versions of the NetBeans IDE don't even offer support for creating platform modules, though the latest development release does. By the end of this article you'll be able to use existing components to construct a file browser capable of copying, deleting and renaming files as well editing any text-based file. The browser will be able to display PNG, JPEG and GIF image files and you can use any IDE — or even none at all — to create it. This article describes how to create a simple application using version 4.1 of NetBeans platform. Version 5.0 of NetBeans IDE will include improved support for creating applications on the NetBeans platform.
Think about the last few desktop applications you've created. They probably had at least some facilities for window management, online help and file editing. More complex applications may have required a "plugin" architecture in which components could locate and use services provided by other components, an approach that can quickly become complex when you try manage compile-time and run-time dependencies between modules. Though each implementation is remarkably similar, these features are often rewritten from scratch for each project. Isn't code reuse supposed to be one of the ideals of object-oriented development?
A few years ago, the NetBeans developers realized that the IDE represented an incredibly sophisticated Java application (though arguably performance was lacking at the time, I assure you that it is now much improved). They saw that parts of it could be factored out into a "generic" desktop application that could be extended to create other applications, and the NetBeans Platform was born. A page on the NetBeans Web site lists a few applications that have been created on the platform, but the mailing lists show that many more people are using it to create applications for internal use.
Advantages
The NetBeans platform represents an extremely minimal set of components from the IDE. Even though the compressed binary package is about four megabytes, it offers an impressive set of features:
- Modular Development:
You can create your application now and add new features later, without having to redistribute your entire application. Modules can be installed or updated from a special type of ZIP file called an NBM either locally or over the network. As I'll soon explain, it's easy to add new modules into your application's main build, and you can create different builds of your application that contain different sets of modules. You can reuse modules provided by others, and the NetBeans platforms can handle versioning and dependency management. - Flexible User Interface
The platform allows you to add, delete and change menus, toolbars or keyboard shortcuts through an XML file called a layer file distributed with your application. You can also override the existing labels and graphics and apply a new look-and-feel such as JGoodies Looks to further customize your application. - Window Management
The platform handles managing "windows," which are simply top-level panels within the larger NetBeans frame. Users can reposition, resize, open or close these windows, and the platform retains the state and position of each the next time the application is launched. - Extensible File System Implementation
The NetBeans platform offers an abstraction of the typical java.io.File class called FileObject. Like the java.io.File, FileObjects can represent a physical file on a disk or available at some URL. However, FileObjects can also represent data from other sources, such as a version control system, ZIP file entries or records in a database. - Truly Cross-Platform
Since I'm an Eclipse user, you might wonder why I didn't write about the Rich Client Platform, a similar framework provided by the Eclipse Foundation. The main reason is that it uses SWT, which is a native library with a different API than Swing. While SWT implementations are available for many systems, others, most notably Silicon Graphics IRIX, OpenVMS and Tru64 UNIX, don't exist. Those systems may be uncommon these days, but they're still used in engineering, medical and scientific environments — the same places that tend to use custom Java applications. Even on supported architectures like Linux and Mac OS X, SWT performance lags behind the Win32 SWT implementation. SWT has finally added the ability to embed Swing components inside SWT, but only on certain platforms and even then only under Java 5, further hindering efforts to reuse existing components. Conversely, the NetBeans platform is written entirely in Java and it works consistently everywhere I've ever tried it, including:- Microsoft Windows 2000 and XP
- Linux
- Mac OS X
- Many versions of UNIX (Solaris, AIX, IRIX and HP/UX)
- Free and Open Source
It's licensed under the Sun Public License (SPL), which is virtually identical to the one used by the Mozilla Foundation. The SPL is approved by the Open Source Initiative, and essentially says that you can download, use and distribute the platform source code at no cost so long as you include a copy of the SPL. If you modify SPL-licensed source, you're required to include the text of Section A from the license in each modified source file, and then contribute your changes back to the NetBeans project. However, you're free to create new modules that extend the platform, as opposed to modifying existing NetBeans code, without a legal requirement to distribute them under the SPL or contribute them back to the project. As always, you should seek qualified legal counsel for details on software licensing. - Active Developer Community
The NetBeans mailing lists are pretty active and I've found that the more experienced members are usually happy to answer intelligent questions posed by newer developers. Also, since the IDE is essentially built on the platform, its source code is an excellent source of examples.
Disadvantages
I've explained several benefits of the NetBeans platform, but in order to give an accurate picture, I want to list some of the problems I've had:
- Ongoing API Changes
I started developing with the NetBeans platform shortly after version 4.0 was released and discovered that many of the APIs from the previous version (3.6) were now deprecated or even missing altogether, sometimes with no obvious replacement. However, the upgrade to version 4.1 was almost transparent and I have now found that the list of APIs gives some insight into which APIs are likely to be changed in the future. - Finding Current Documentation is Difficult
It's hard to find clear, concise examples aimed at those who are just getting started with platform development. The main book on the topic is only three years old, but five new versions of the platform have been released since then. Once you get past the API changes, the book does provide some really good information. Some good beginner-level documentation is finally starting to appear, such as the NetBeans Developer FAQ and Rich Unger's FeedReader tutorial, but the NetBeans Web site is being reorganized so it's not always easy to find them. I hope that my article can help by providing a solid foundation for the beginner and linking together existing documentation for those who want to learn more.
Terminology
Now that I've discussed the platform and its merits, I want to briefly define a few terms before we begin building our file browser application. Tim Boudreau's POV-Ray Tutorial covers many of the main classes and concepts, so I'll focus on the terms related to building an application on the NetBeans platform:
- Module
A module usually represents a single feature in your application. It's typically self-contained, though modules can rely on classes, interfaces or services provided by other modules. For example, one module might offer support for loading a new type of file, while other modules might declare a dependency on it in order to provide an editor or viewer for this file type. In order to offer the greatest flexibility in your application, you should strive to make modules as small as possible. - Cluster
A cluster is a group of modules. They are usually closely related as in the example of a loader, editor and viewer for a specific file format, but can also be a group of unrelated modules that together form a complete application which you can distribute to your users. This relieves you from having to distribute the platform to those who already have a copy, which is similar to how applications are often distributed without a copy of the JRE. The cluster build harness we'll soon use to construct our file browser creates a cluster from the snipe, image and diskexplorer modules. - Installation
An installation refers to the NetBeans platform binary on your machine. It can be used to launch different clusters, which means that you can have several unrelated applications that each share the same copy of the platform. - Code Name Base
The code name base uniquely identifies a NetBeans module. By convention, it is typically the name of the base package, such ascom.tomwheeler.nbmodules.myexample. - Scrambled JARs
Due to licensing restrictions associated with certain libraries such as JavaHelp and Crimson, some JAR files distributed with, but not part of, the NetBeans platform are "scrambled." During the initial build process, they are transformed into regular JAR files following your acceptance of their licenses (via a barrage of annoying dialog boxes). This process is mandated by Sun Microsystem's legal department and it's rumored that it may no longer be required in the future.
Required Tools
In order to create the file browser, you'll need to install the following tools:
- Java Development Kit
I used version 1.4.2 to test this application and recommend that you do the same. However, it is possible to use Java 5 by making minor changes to the build scripts. - Apache Ant
I used version 1.6.2, but any newer version should work equally well. - NetBeans Platform
You should download the binary for version 4.1, which is the latest production release at the time of this writing. There is no installation script for the platform; you just need to unpack the file into some directory on your system and then set theNETBEANS_HOMEenvironment variable to point to this new directory. Be sure to restart or reinitialize any command prompts afterwards so that they'll pick up the change. - The Cluster Build Harness (modified by Tom Wheeler)
I have made minor changes to the Rich Unger's cluster build harness (originally downloaded from http://contrib.netbeans.org/files/documents/130/269/cluster_build_harness.zip) in order to support the version 4.1 of the platform. I am contributing these changes back to the NetBeans project for future releases, but in the meantime, you should download my version of the file.
Installing the Cluster Build Harness
The build harness is simply a set of files that help you to build modules into a cluster, plus two example modules to help get you started. To install it, you just unpack the cluster harness to some directory on your computer. I'll refer to the path of the directory it creates as CLUSTER_PATH, though you don't need to set an environment variable to point to it.
After unpacking the cluster harness, you should see the three subdirectories described below:
| Directory | Description |
|---|---|
nbbuild |
this contains the core build scripts and properties files |
snipe |
a module that shows a simple example of file type support |
image |
a module that shows a more complex example of file type support |
Testing the Installation
The cluster harness is already configured to include the snipe and image modules. The tryme target in the Ant script will build the modules and launch the platform with this cluster, so change to the nbbuild directory and issue the following command:
ant tryme
As I mentioned before, you'll have to agree to the licenses in order to unscramble the JARs. Afterwards, the platform should launch. If not, back up and retrace your steps.
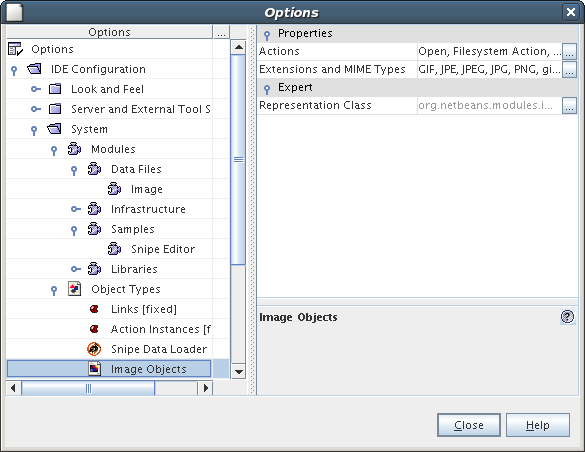
You can verify that the modules are correctly installed by going to the Tools menu, selecting Options and then expanding the System -> Modules node. You should see a Samples section that lists the Snipe module when opened, and a Data Files section that contains the Image module. Also, if you expand the Object Types tree in the same section, you can see that loaders are configured for both snipe and image files, as shown in figure 1.
Figure 1: Screenshot of the options dialog after a successful cluster build

The snipe module enables the NetBeans platform to recognize files with a .snipe extension. This gives a very simple example that you could extend to enable importing, viewing or other operations on the file formats you need to support in your application. The image module illustrates how to implement such a viewer.
If you examine the File menu, you'll see that there is no menu item for opening a file. As I wrote earlier, the NB platform represents the most basic components from the IDE sources, so we'll add a module that allows you to browse and open files.
The apisupport/cluster_harness/diskexplorer/ directory on the NetBeans CVS server contains a module called diskexplorer that displays a tree view of the local filesystem similar to the one built into many operating systems. I have modified this code slightly to add a build.xml file and to avoid calling the component from the AWT event dispatching thread. Again, I am contributing the changes back to the NetBeans project, but for now, you should download my modified version. Here are the steps to take to add it to the cluster:
1. Unzip the diskexplorer module source to the CLUSTER_PATH directory. It should be parallel with the snipe and nbbuild directories.
2. Edit the nbbuild/user.cluster.properties file and add diskexplorer to the list of modules in your cluster. Values in the module list are comma-delimited and backslashes are used to span lines. It should look like this when you're done:
cluster.mycluster1= snipe, \
                    image, \
                    diskexplorer
3. Edit nbbuild/modules.xml and add the diskexplorer section (blue text) after the snipe module element, as shown below:
- <module>
- <path>snipe</path>
- <cnb>org.netbeans.modules.snipe</cnb>
- </module>
-
- <module>
- <path>diskexplorer</path>
- <cnb>org.netbeans.modules.diskexplorer</cnb>
- </module>
The path element contains the directory name that contains this module, while the cnb element specifies the "code name base" that uniquely identifies the module. You don't need to add a section for the image module; since it's part of NetBeans it already has a listing in modules.xml file.
Before you can see how the platform treats .snipe files, you'll have to make one. Just create an empty text file named example.snipe somewhere on your system, and then run ant tryme to rebuild and start the cluster. You'll see some compiler warnings for the disk explorer module's calls to deprecated APIs, but they can safely be ignored.
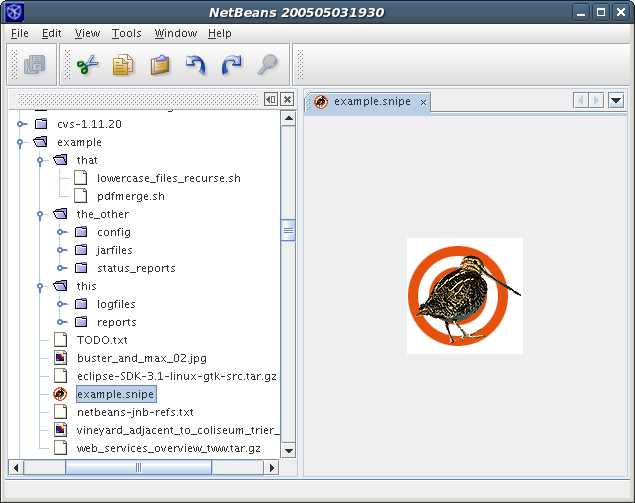
Once the platform starts, click the View menu and choose the item named Disk Explorer. A new window should appear on the left side of the main frame. This section of the window is called the explorer mode. Browse to your example.snipe file using the disk explorer and you'll see that it has a special icon. You can open the file for viewing by double-clicking its icon. The default viewer for this type of file is the simplest possible — it just shows a larger version of the icon regardless of the file's contents, as shown here:
Figure 2: Screenshot of an opened snipe file

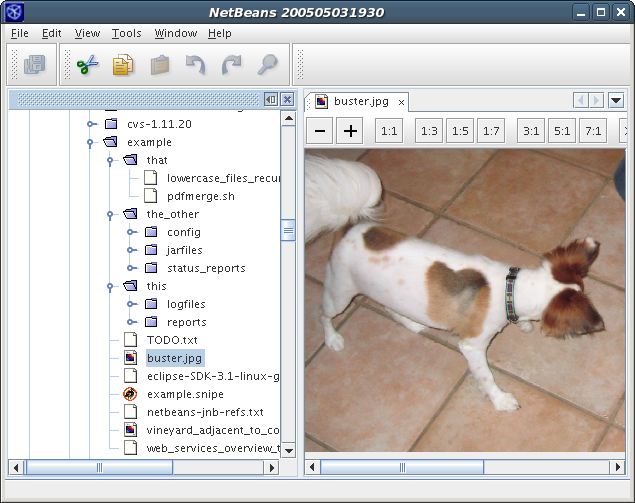
The image module is a more complex example of a file viewer. It allows you to zoom in, zoom out and add gridlines on any supported image type. To see it in action, browse to a directory on your system that has an image file in GIF, JPEG or PNG format. You should see a special icon denoting it as an image file. Double-clicking it will display the image in the main part of the window, as shown in figure 3.
Figure 3: Screenshot of the displayed image file

Now try opening a few more files, then close the platform and run ant tryme again. You should see that the windows you had open are retained after the platform starts. Finally, right-click (Ctrl + click for Mac OS X) on any file in the disk explorer and you'll see that the module provides support for cutting, copying, pasting, deleting and renaming any type of file. You can also open and edit any text file just by double-clicking on it.
For an even more sophisticated example of creating a new module to support a new file type, check out Tim Boudreau's tutorial in which he explains how to add support for POV-Ray scene files.
Now that you're able to build a simple application on the NetBeans platform, I encourage you to learn more by exploring some of the links I've provided in this article. Next month, I will conclude my discussion of the NetBeans platform by showing you how to build a stock trading simulation game from scratch.
Tom Wheeler would like to thank Rich Unger and Jeff Brown for their help in reviewing this article
Software Engineering Tech Trends (SETT) is a regular publication featuring emerging trends in software engineering.
