Node.js and Socket.IO
By Mark Volkmann, OCI Partner
October 2012
Introduction
This article provides an overview of Node.js. It also explores a particular Node module, Socket.IO, and demonstrates using it to build a simple chat application. You'll be amazed by how little code it takes to do this!
Node.js
Node.js (officially just "Node") is an excellent platform for building scalable network applications. It is a full programming environment that can be used to build any kind of application. However, it shines for applications that benefit from performing I/O in an asynchronous manner and are I/O intensive rather than compute intensive.
Node is built on the Google Chrome V8 JavaScript engine. It is implemented in C++ and JavaScript. Node applications can be implemented in JavaScript and C++. Typically most of the code is written in JavaScript. This allows using the same programming language on the client-side (browser) and server-side. Node runs on many operating systems including Linux, Mac OS X, and Windows.
Many functions in Node are asynchronous. A large number of these utilize the OS to perform some kind of I/O. They take a callback function as an argument. When an asynchronous function is called, its callback function is marked as pending. When the asynchronous operation completes, the callback function is no longer pending and is added to the event queue. Calls in the event queue are processed one at a time. A Node application ends when there are no pending callbacks, the event queue is empty, and there are no open network connections (so there is no possibility of additional requests being received).
There are two important conventions that should be followed when using callback functions. First, asynchronous functions that take a single callback function should take it as their last parameter. Second, callback functions should take an error description as their first parameter. If these callback conventions are not followed then certain modules (such as the flow control module "async") cannot be used.
Node is event-based rather than thread-based. This frees developers from having to manage the possibility of concurrent modification of shared state that plagues developers in languages that support multithreading. EventEmitters handle registration of listeners and emitting of events.
Functionality in Node can be found in three places. First, anything supported by the V8 JavaScript engine can be used. This includes everything in the ECMAScript 5 specification. Second, anything in the Node "core" modules can be used. These are documented at http://nodejs.org/docs/latest/api/. Third, anything in third-party (a.k.a. userland) modules can be used. Most of these are in GitHub. The easiest way to find them is to search the Node Package Manager (NPM) Registry at https://npmjs.org/. Of course if functionality not found in these places is needed, it can be written in JavaScript which can optionally call custom C++ code.
Node uses multithreading internally to simulate non-blocking file I/O. Developers can also use multithreading in their own applications by using userland modules such as "Threads A GoGo". However, it is more common to use multiple, cooperating processes. These can be created by using the core modules "child_process" and "cluster".
Streams are a special kind of event emitter. They emit a predefined set of events including "open", "data", "error", "end" and "close. One of their main benefits is that they allow large amounts of data to be processed without holding all of it in memory at once.
Node provides several global variables that are important to understand. These include console, process, require and Buffer. See http://nodejs.org/docs/latest/api/globals.html for details.
Node "modules" are defined by a single JavaScript source file. Top-level variables and functions are scoped to the module. These are variables and functions whose definition is not nested inside a function. They are not global as in client-side JavaScript.
A modules makes values accessible outside itself by exporting them. module.exports is initially set to an empty object in each module. The automatically set local variable exports points to the same empty object. Modules can add the properties they wish to export to this object. Some modules choose to export a single value, typically a function. This is done by changing module.exports to refer to the function which replaces the reference to the initially empty object.
To use a module, add a statement of the form var name = require('name'); near the top of the using module. The value returned by the call to require can be any kind of value. Often it is an object with many properties, but it can be a function, array or even a primitive value. Read the documentation of the module being required or examine it's source code to determine this.
Node automatically caches modules. Requiring the same module multiple times in an application does not cause the module source file to be read and evaluated multiple times.
There you have it ... a brief overview of Node.js! Of course there is much more to learn. Probably the best way to learn is to look at example code. We'll do that next by demonstrating the usage of a popular userland module, Socket.IO.
Socket.IO
Socket.IO supports realtime messaging between Node and all browsers. It does not support messaging between two Node processes, but that can be done using the socket.io-client userland module. Also, the core "net" module can be used for that.
Socket.IO can emit an event to a specific browser client. It can also broadcast events from the server to multiple browser clients.
Socket.IO is capable of using many transport mechanisms. This is the key to supporting all web browsers. The supported transports include WebSockets, Flash, Ajax long polling, Ajax multipart streaming, Forever Iframe, and JSONP polling. The transports allowed and the order in which they will be attempted can be customized. To do this, modify the "transports" option whose value is an array of transport names.
Socket.IO enhances WebSockets by providing built-in multiplexing, horizontal scalability (adding more nodes to help with performing some task), automatic JSON encoding/decoding, and more.
Strata
Strata is a streaming HTTP server for Node.js. It is based on WSGI and Rack.
It supports many features including request routing and AOP-like middleware (performing actions before and after a request is processed). The only feature we need for the chat example is serving of static files.
Chat Example
Let's build a simple chat web app. This uses three Node userland modules, Strata, Socket.IO, and socket.io-client.
To install the userland modules, enter these commands:
npm install socket.io
npm install socket.io-client
npm install strata
In this chat implementation, users join the chat by browsing http://localhost:1982 from any browser. Messages sent by users are received by all users that have joined. Chatting with a specific user is not supported. This feature could be added fairly easily, though.
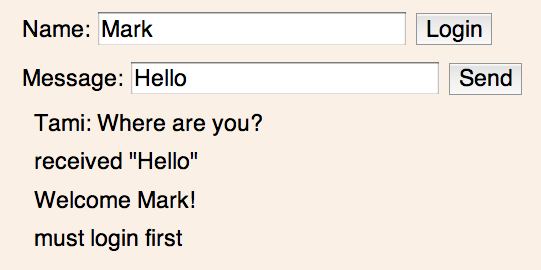
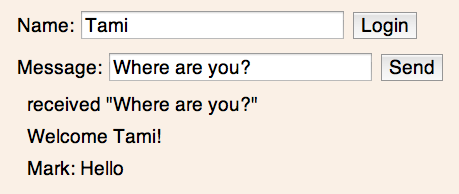
Below are two chat windows. The first is running in Chrome and the second is running in Safari.
Here is the order of the steps that were performed:
- Mark enters his name and the message "Hello".
- Mark clicks the Send button and sees "must login first".
- Mark clicks the Login button and sees "Welcome Mark!".
- Mark clicks the Send button and sees 'received "Hello"'.
- Tami sees "Mark: Hello".
- Tami enters her name.
- Tami clicks the Login button and sees "Welcome Tami!".
- Tami enters the message "Where are you?".
- Tami clicks the Send button and sees 'received "Where are you?"'.
- Mark sees "Tami: Where are you?".
index.html
- <html>
- <head>
- <title>Chat App</title>
- <link rel="stylesheet" href="demo.css"/>
- <!-- socket.io.js is automatically served up by our server code. -->
- <script src="/socket.io/socket.io.js"></script>
- <script src="http://code.jquery.com/jquery-latest.min.js"></script>
- <script src="demo.js"></script>
- </head>
- <body>
- <div>
- Name: <input id="name" type="text"/>
- <button id="login">Login</button><br/>
- </div>
- <div>
- Message: <input id="message" type="text"/>
- <button id="send">Send</button>
- </div>
- <!-- Messages are prepended to this by the demo.js log function. -->
- <div id="log"></div>
- </body>
- </html>
demo.css
- * {
- font-family: sans-serif;
- font-size: 14pt;
- }
-
- body {
- background-color: linen;
- }
-
- div {
- margin: 10px;
- }
demo.js
- /**
- * Prepends a message to the div with id "log" using jQuery.
- */
- function log(msg) {
- $('#log').prepend('<div>' + msg + '<div>');
- }
-
- // Using jQuery to execute a function after index.html has loaded.
- $(document).ready(function () {
- // Get a Socket.IO connection to the server.
- var socket = io.connect();
-
- // When messages with the name "message" are received,
- // pass their data to the log function.
- socket.on('message', log);
-
- // When the user clicks the "Login" button ...
- $('#login').click(function () {
-
- // Send a "login" event to the server with the value of the Name field.
- // The last argument, "log", is an optional acknowledge callback.
- // In server.js below, both calls to "socket.on(...)" (lines 20 and 31)
- // are passed a callback function that takes the argument "cb".
- // The "log" function here is passed whatever that passes to cb.
- socket.emit('login', $('#name').val(), log);
- });
-
- // When the user clicks the "Send" button ...
- $('#send').click(function () {
-
- // Send a "message" event to the server with the value of the Message field.
- // The last argument, "log", is an optional acknowledge callback.
- socket.emit('message', $('#message').val(), log);
-
- });
- });
server.js
- var sio = require('socket.io');
- var strata = require('strata');
-
- // Configure Strata middleware for serving static files from the subdirectory "public".
- // If a path is not provided, use index.html as the default.
- strata.use(strata.file, 'public', 'index.html');
-
- // Start the Strata server.
- var server = strata.run();
-
- // Listen for Socket.IO connections.
- var io = sio.listen(server);
-
- // Reduce the amount of logging output from Socket.IO from its verbose default.
- io.set('log level', 1);
-
- // When a client connects
- ...
- io.sockets.on('connection', function (socket) {
- // When that client sends a "login" message ...
- socket.on('login', function (name, cb) {
-
- // Store their name on their socket object (a convenient place to keep it).
- socket.name = name;
-
- // Emit a message only to that client welcoming them.
- // Either of the following approaches can be used.
- //socket.emit('message', 'Welcome ' + name + '!');
- cb('Welcome' + name + '!');
- });
-
- // When that client sends a "message" message ...
- socket.on('message', function (msg, cb) {
-
- // If that client has already logged in ...
- if (socket.name) {
- // Send their message to all other connected clients.
- socket.broadcast.emit('message', socket.name + ': ' + msg);
-
- // Return message to that client acknowledging that their message was received.
- cb('received "' + msg + '"');
- } else {
- // Send a message to that client telling them that they must login
- // before they can send messages to other connected clients.
-
- cb('must login first');
- }
- });
- });
To run this code, enter node server. It will output a message that starts with ">> Listening on 0.0.0.0:1982". Once that is displayed, browse http://localhost:1982 from multiple browsers.
client.js
This demonstrates communicating with the server from another Node process instead of from a browser client.
- var io = require('socket.io-client');
-
- function log(msg) {
- console.log(msg);
- }
-
- var socket = io.connect('http://localhost:1982');
- socket.on('message', log);
-
- socket.emit('login', 'Mark', log);
- socket.emit('message', 'Hello, World!', log);
To run this code, enter node client. The output is:
Welcome Mark!
received "Hello, World!"
Final Thoughts
Node.js is cool!
Socket.IO is easy to use!
Go learn more!
References
- [1] Node.js
http://nodejs.org - [2] Socket.IO
http://socket.io - [3] socket.io-client
https://github.com/LearnBoost/socket.io-client - [4] Strata
http://stratajs.org
Software Engineering Tech Trends (SETT) is a regular publication featuring emerging trends in software engineering.
