Getting Groovy with Google Home
By Ryan Vanderwerf, OCI Software Engineer
SEPTEMBER 2017
Introduction
Google Home is Google’s entry into the smart home personal assistant market. Google has made the strongest competitor to Amazon’s Alexa to date. It features an excellent built-in system of conversation interaction that is arguably more advanced than Amazon’s. With built-in smart home and Chromecast integration, it’s a pretty powerful device that can help automate your home or office.
In this guide, you are going to learn how to create a Grails application to host a Google Action for your Google Home device to interact with. We will build, deploy, and set up everything necessary to facilitate this on Google App Engine Flexible and Google APIs.
We will be using the early access unofficial Java SDK to build actions. This is because the only official SDK is built with node. The first part will mostly consist of the Grails guide currently at http://guides.grails.org.
The second part of the article covers making actions that interface to Google’s API.AI service and Grails. We will use a Grails plugin to help us accomplish this through their Webhooks and Data Service API.
Please keep in mind that these APIs worked at the time of this writing – however, Google is famous for changing things at any time that may break functionality and force you, the developer, to update things to keep up! Keep in touch on Twitter or the Grails or Groovy slack communities if you encounter any of these issues, and I’ll do my best to keep things current or help you out.
What You Need
- Some time on your hands
- A decent text editor or IDE such as IntelliJ
- A Google account
- A Google Cloud account
- curl command to help debugging
- Java JDK 1.8 or better
- Recent Grails SDK (install via SDKman or manually)
How to Complete the Samples
To get started do the following:
- Download and unzip the source
or
- Clone the Git repository:
The Grails guides repositories contain two folders:
initial. Initial project. Often a simple Grails app with some additional code to give you a head-start.complete. A completed example. The result of working through the steps presented by the guide and applying those changes to the initial folder.
To complete the guide, go to the initial folder
cdintograils-guides/grails-google-home/initial
and follow the instructions in the next sections.
Note: You can go right to the completed example if youcdintograils-guides/grails-google-home/complete
The initial project is a Grails application built with the web profile where we removed the asset-pipeline and hibernate dependencies.
Although you can go right to the completed example, in order to deploy the app you need to complete several configuration steps in Google Cloud Settings.
You need to edit the file src/main/resources/action.json to point to your Google App Engine Flexible deployment urls.
Google Cloud Settings
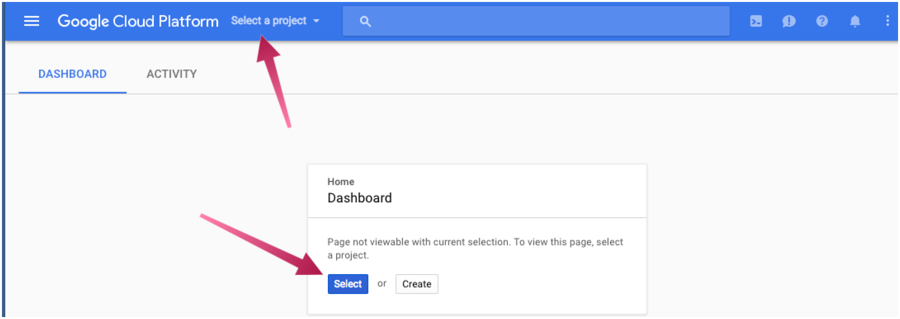
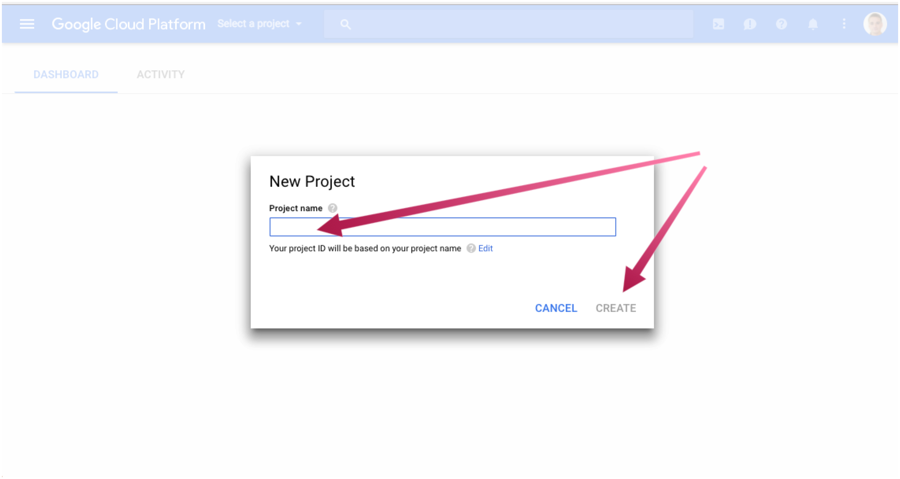
Sign up for Google Cloud Platform and create a new project:
Install Cloud SDK for your operating system.
After you have installed the SDK, run the init command in your terminal:
$ gcloud init
It will prompt you to select the Google account and the project that you want to use.
Install gactions CLI
We will use gactions CLI to test our app.
Go to gactions CLI and download it:
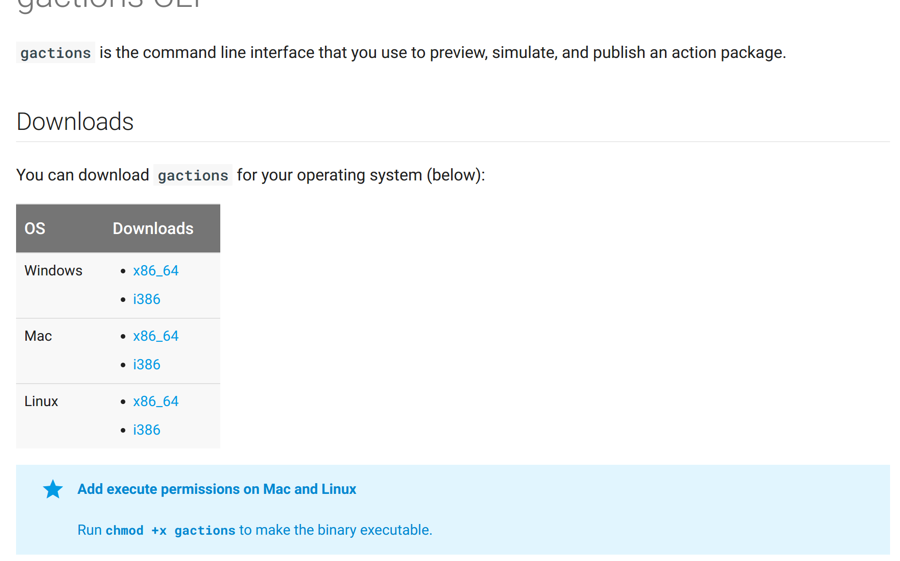
Make the gactions binary executable (chmod +x on linux and OSX).
After you have installed gactions, run the init command in your terminal:
$ gactions init --force
Other commands you can run: preview, update, deploy, test, and list.
Configure Google Actions
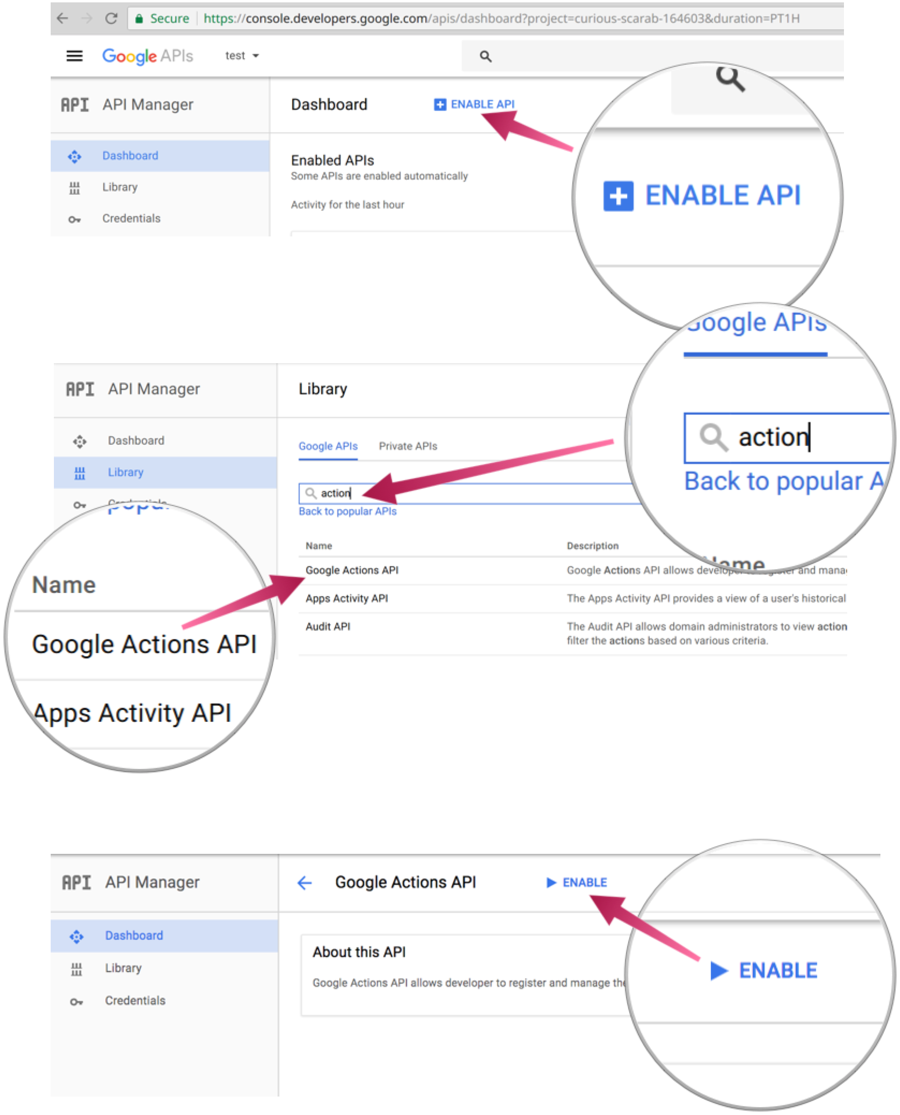
Enable Google Actions API
Go to Google API Manager Console and enable Google Actions API.
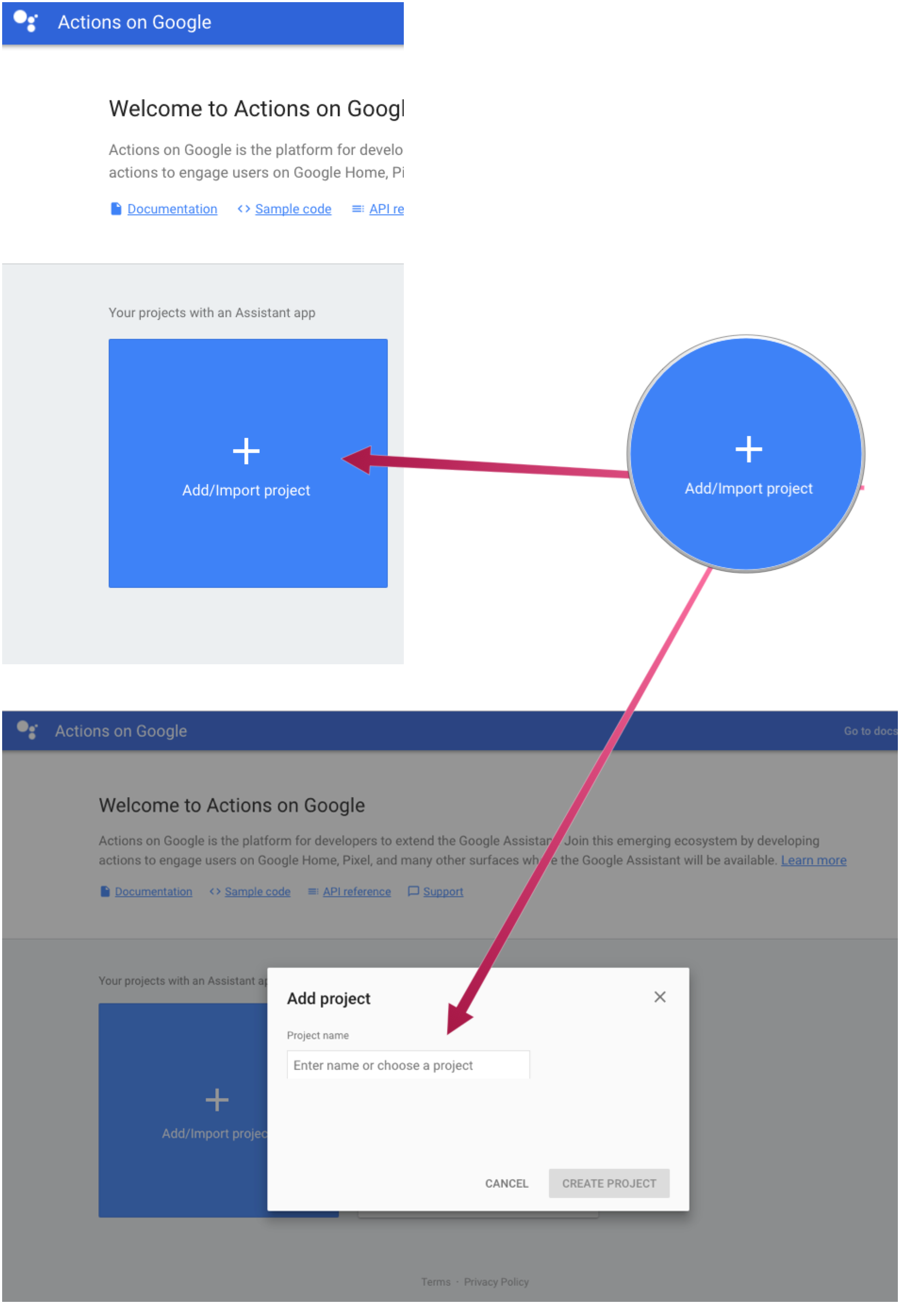
Import your Project to the Google Actions Console
Go to the new Google Actions Console and import the project your previously created:
Configure your project ID in action.json
action.json is a metadata file which we use to inform the Google Cloud Actions Console about the actions supported by our application.
Here you can also control:
- sample queries to help Google understand which action to call
- intent to call
src/main/resources/action.json
- {
- "actions": [
- {
- "description": "Default Welcome Intent",
- "name": "MAIN",
- "fulfillment": {
- "conversationName": "color-finder-echo"
- },
- "intent": {
- "name": "actions.intent.MAIN"
- }
-
- },
- {
- "description": "Deep link that finds brighter colors",
- "name":"color.intent",
- "fulfillment": {
- "conversationName": "color.intent"
- },
- "intent": {
- "name": "color.intent",
- "parameters": [{
- "name": "color",
- "type": "SchemaOrg_Color"
- }],
- "trigger": {
- "queryPatterns": [
- "find a brighter color for $SchemaOrg_Color:color"
- ]
- }
- }
- }
- ],
- "conversations": {
- "color-finder-echo": {
- "name": "color-finder-echo",
- "url": "https://grails-color-finder.appspot.com/assistantAction/index"
- },
- "color.intent": {
- "name": "color.intent",
- "url": "https://grails-color-finder.appspot.com/assistantAction/color"
- }
- }
- }
As shown above, our app supports two actions. We explain those actions with more detail in the next sections of this guide.
We will need to modify the httpExecution items to match your deployed application endpoints.
src/main/resources/action.json
"url": "https://PROJECT_ID.appspot.com/assistantAction/index"
Add Actions to your assistant app
The first time you select a project in the Google Cloud Actions Console, you will need to supply the action package JSON via the gactions tool like so:
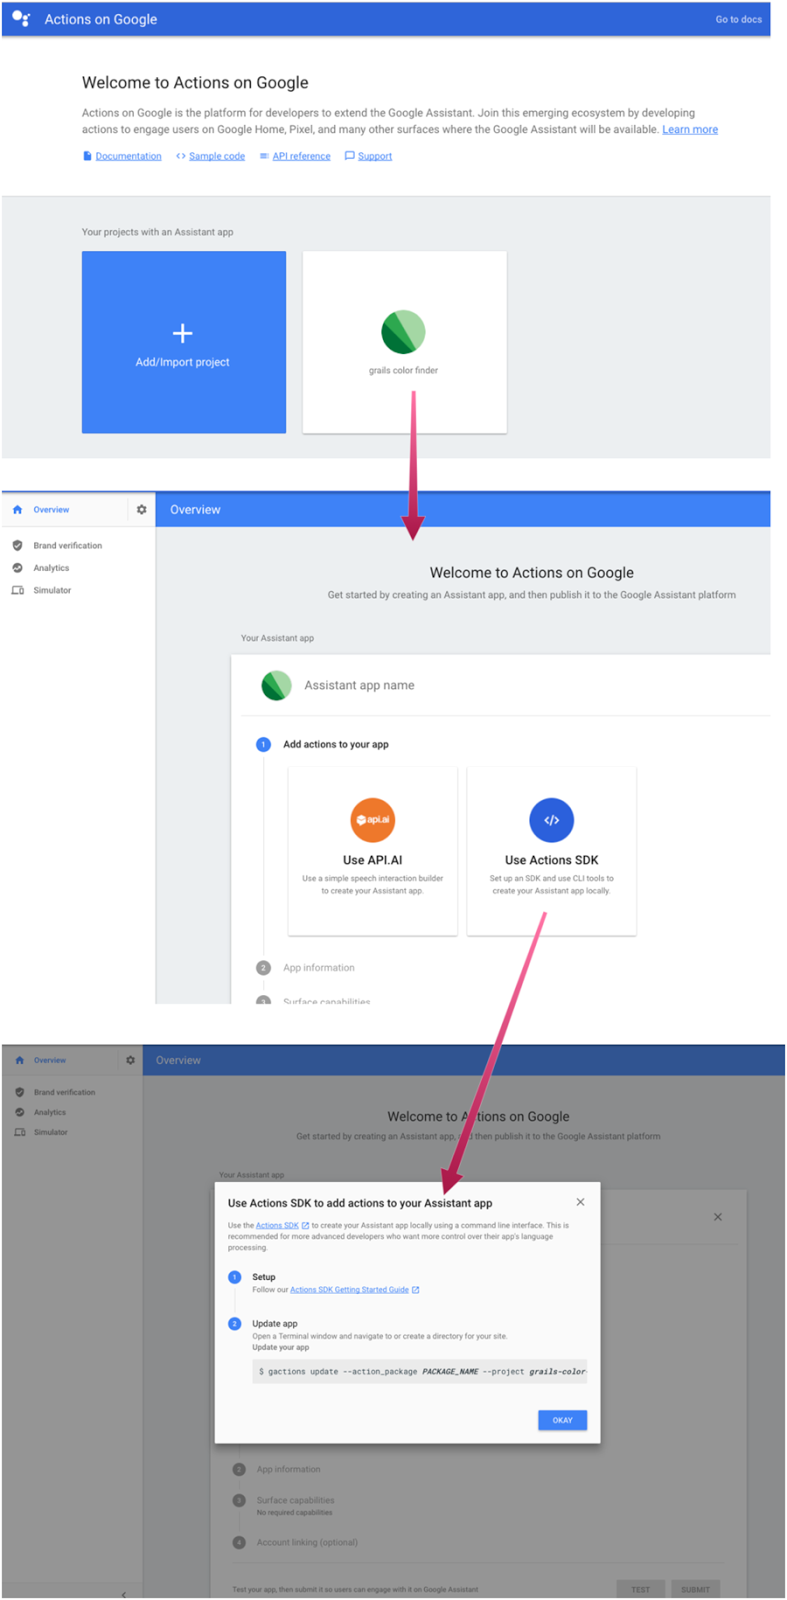
gactions update --action_package src/main/resources/action.json --project PROJECT_ID
Follow the instructions prompted by the above command. It involves an authorization process.
At the end you will see an output similar to:
Your app for the Assistant for project PROJECT_ID was successfully updated with your actions. Visit the Actions on Google console to finish registering your app and submit it for review at https://console.actions.google.com/project/PROJECT_ID/overview
Add App Information
After you actions package has been validated, you will be able to enter directory information such as images, privacy policy, and descriptions. Here you can also pick the voice of the speaker in your skill.
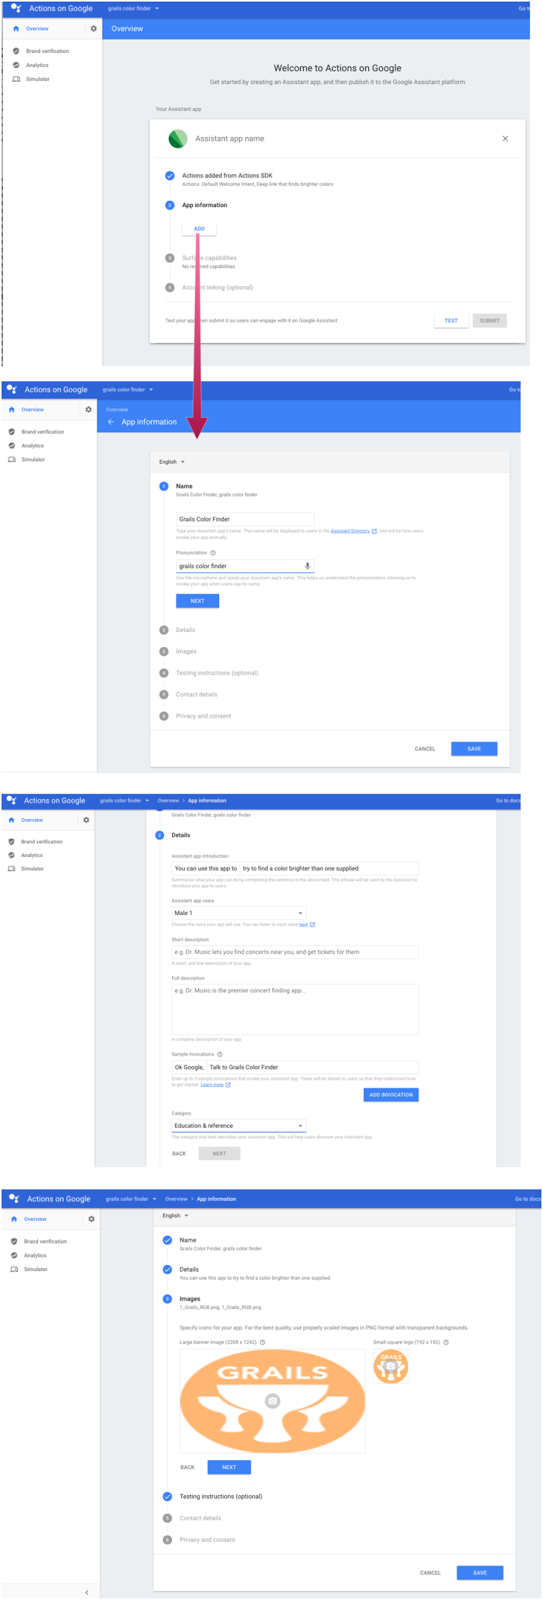
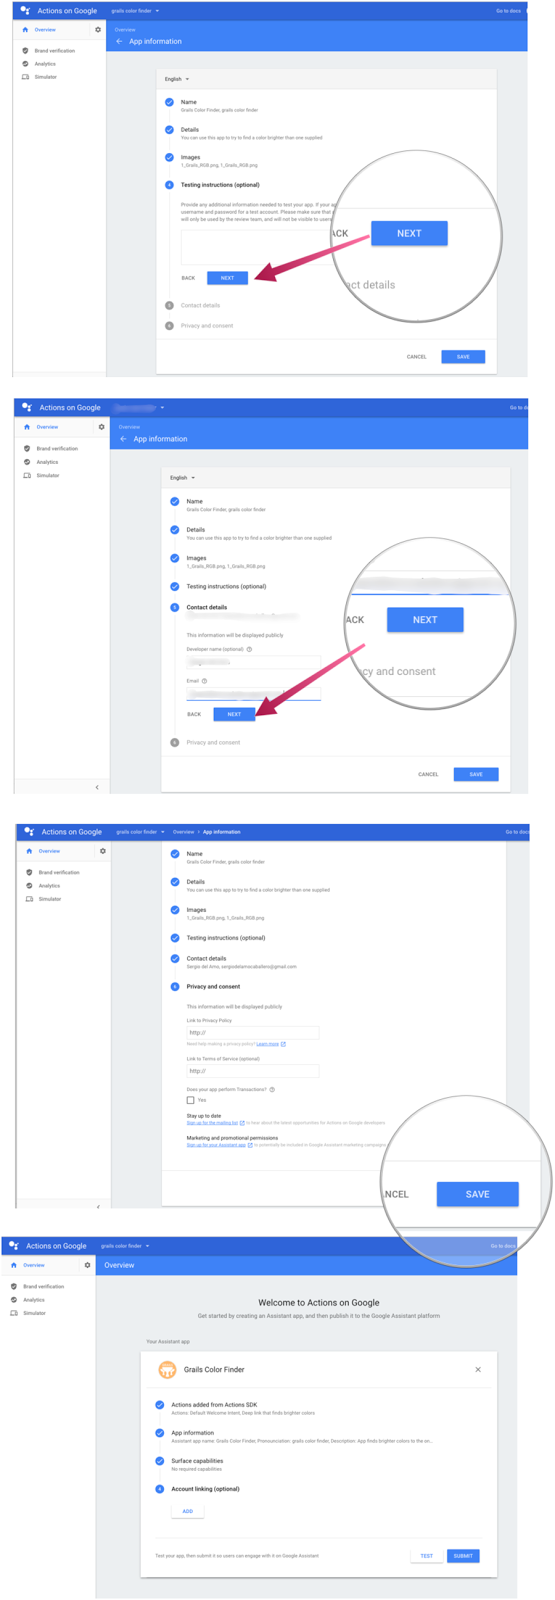
The previous screenshots display two buttons. Test and Submit. We will click theTestin the previous screenshots once we have deployed our app to Google App Engine Flexible and we are ready to test our actions.
Google App Engine
We are going to deploy the Grails application developed in this guide to the Google App Engine Flexible Environment:
App Engine allows developers to focus on doing what they do best: writing code. Based on Google Compute Engine, the App Engine flexible environment automatically scales your app up and down while balancing the load. Microservices, authorization, SQL and NoSQL databases, traffic splitting, logging, versioning, security scanning, and content delivery networks are all supported natively.
Run the command:
$ gcloud app create
to initialize an App Engine application within the current Google Cloud project.
Writing The Application
Handle Request from Google in Grails
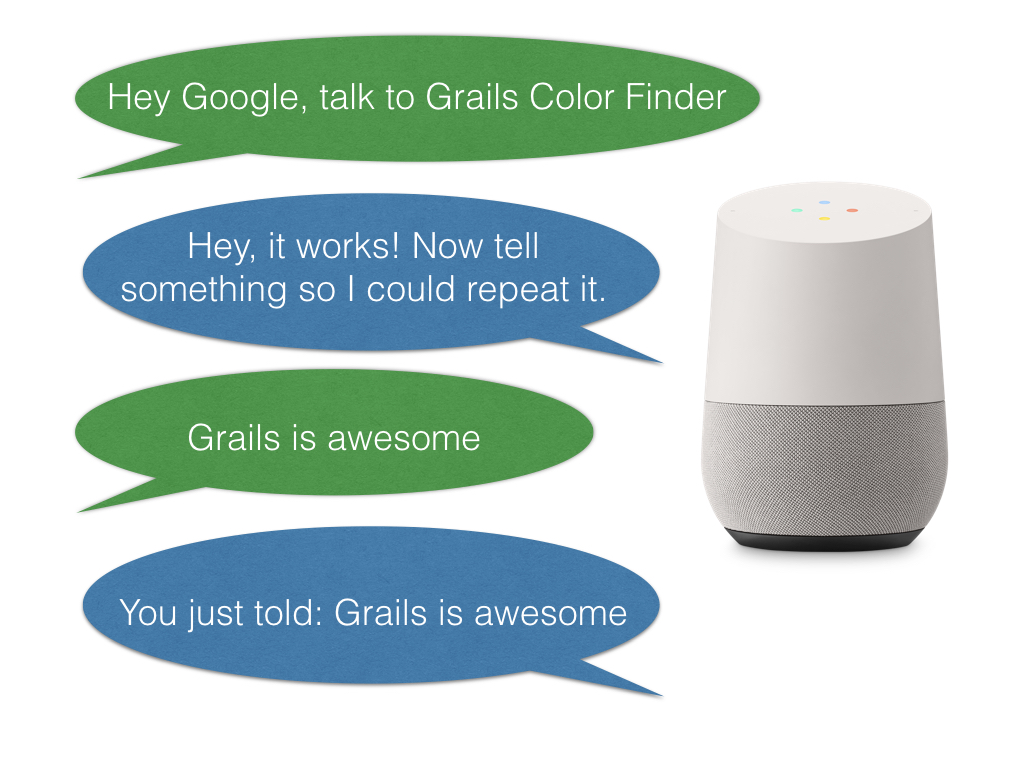
We name our app color finder. We want to achieve the scenario pictured below:
First, we are going to add a dependency to Google Actions Java SDK
/build.gradle
compile 'com.frogermcs.gactions:gactions:0.1.1'
The illustrated conversation is managed with the handlers. We instantiate the handlers with factories. Add the next classes to your app:
/src/main/groovy/demo/MainRequestHandlerFactory.groovy
- package demo
-
- import com.frogermcs.gactions.api.RequestHandler
- import com.frogermcs.gactions.api.request.RootRequest
- import groovy.transform.CompileStatic
-
- @CompileStatic
- class MainRequestHandlerFactory extends RequestHandler.Factory {
- @Override
- RequestHandler create(RootRequest rootRequest) {
- new MainRequestHandler(rootRequest)
- }
- }
/src/main/groovy/demo/MainRequestHandler.groovy
- package demo
-
- import com.frogermcs.gactions.ResponseBuilder
- import com.frogermcs.gactions.api.RequestHandler
- import com.frogermcs.gactions.api.request.RootRequest
- import com.frogermcs.gactions.api.response.RootResponse
- import groovy.transform.CompileStatic
-
- @CompileStatic
- class MainRequestHandler extends RequestHandler {
- protected MainRequestHandler(RootRequest rootRequest) {
- super(rootRequest)
- }
-
- @Override
- RootResponse getResponse() {
- ResponseBuilder.askResponse('Hey, it works! Now tell something so I could repeat it.')
- }
- }
/src/main/groovy/demo/TextRequestHandlerFactory.groovy
- package demo
-
- import com.frogermcs.gactions.api.RequestHandler
- import com.frogermcs.gactions.api.request.RootRequest
- import groovy.transform.CompileStatic
-
- @CompileStatic
- class TextRequestHandlerFactory extends RequestHandler.Factory {
- @Override
- RequestHandler create(RootRequest rootRequest) {
- new TextRequestHandler(rootRequest)
- }
- }
/src/main/groovy/demo/TextRequestHandler.groovy
- package demo
-
- import com.frogermcs.gactions.ResponseBuilder
- import com.frogermcs.gactions.api.RequestHandler
- import com.frogermcs.gactions.api.request.RootRequest
- import com.frogermcs.gactions.api.response.RootResponse
- import groovy.transform.CompileStatic
-
- @CompileStatic
- class TextRequestHandler extends RequestHandler {
- protected TextRequestHandler(RootRequest rootRequest) {
- super(rootRequest)
- }
-
- @Override
- RootResponse getResponse() {
- ResponseBuilder.tellResponse("You just told: ${rootRequest.inputs.get(0).raw_inputs.get(0).query}")
- }
- }
We are going to handle the request that comes from Google in a Grails Controller:
A controller fulfills the C in the Model View Controller (MVC) pattern and is responsible for handling web requests. In Grails, a controller is a class with a name that ends in the convention "Controller" and lives in the grails-app/controllers directory.
The Grails Controller, in turn, will delegate to Actions SDK.
/grails-app/controllers/demo/AssistantActionController.groovy
- package demo
-
- import com.frogermcs.gactions.AssistantActions
- import com.frogermcs.gactions.api.StandardIntents
- import com.frogermcs.gactions.api.request.RootRequest
- import com.google.gson.Gson
- import com.google.gson.stream.JsonReader
- import javax.servlet.http.HttpServletRequest
- import groovy.transform.CompileStatic
-
- @CompileStatic
- class AssistantActionController {
- def index() {
- AssistantActions assistantActions =
- new AssistantActions.Builder(new GrailsResponseHandler(response))
- .addRequestHandlerFactory(StandardIntents.MAIN, new MainRequestHandlerFactory())
- .addRequestHandlerFactory(StandardIntents.TEXT, new TextRequestHandlerFactory())
- .build()
- RootRequest rootRequest = parseActionRequest(request)
- assistantActions.handleRequest(rootRequest)
- null
- }
- private RootRequest parseActionRequest(HttpServletRequest request) throws IOException {
- JsonReader jsonReader = new JsonReader(request.reader)
- new Gson().fromJson(jsonReader, RootRequest)
- }
We can chain handlers.
Grails action delegates to Actions SDK to handle requests that come from Google.
We do not want to return a grails view. The handlers manage the response.
Add GrailsResponseHandler to your project. As illustrated above, it allows us to use a controller to process the incoming requests.
/src/main/groovy/demo/GrailsResponseHandler.groovy
- package demo
-
- import com.frogermcs.gactions.ResponseHandler
- import com.frogermcs.gactions.api.response.RootResponse
- import com.google.gson.Gson
- import groovy.transform.CompileStatic
- import javax.servlet.http.HttpServletResponse
- import groovy.util.logging.Slf4j
-
- /**
- * This is a handler for the SDK to make it work with Grails properly
- */
- @CompileStatic
- @Slf4j
- class GrailsResponseHandler implements ResponseHandler {
- private final HttpServletResponse httpServletResponse
- private final Gson gson
-
- GrailsResponseHandler(HttpServletResponse httpServletResponse) {
- this(httpServletResponse, new Gson())
- }
-
- GrailsResponseHandler(HttpServletResponse httpServletResponse, Gson gson) {
- this.httpServletResponse = httpServletResponse
- this.gson = gson
- }
-
- @Override
- void onPrepareContentType(String contentType) {
- httpServletResponse.setContentType(contentType)
- }
-
- @Override
- void onPrepareResponseHeaders(Map<String, String> headers) {
- for (String headerName : headers.keySet()) {
- httpServletResponse.addHeader(headerName, headers.get(headerName))
- }
- }
-
- @Override
- void onResponse(RootResponse rootResponse) {
- try {
- gson.toJson(rootResponse, httpServletResponse.writer)
- httpServletResponse.flushBuffer()
- } catch (IOException e) {
- log.error('Error writing response', e)
- }
- }
-
- String getResponse(RootResponse rootResponse) {
-
- try {
- gson.toJson(rootResponse)
- } catch (IOException e) {
- log.error('Error getting response', e)
- }
- }
- }
ColorHandler
To honor our app’s name we want to handle the next scenario as well:
scenarioB
Similar to the previous example, we need a handler and a factory to instantiate the handler.
This handler demonstrates passing a verbal parameter into the intent. When the user asks for a brighter color for X, it will try to find a brighter color with a name and say it to the user.
/src/main/groovy/demo/ColorRequestHandlerFactory.groovy
- package demo
-
- import com.frogermcs.gactions.api.RequestHandler
- import com.frogermcs.gactions.api.request.RootRequest
- import groovy.transform.CompileStatic
-
- @CompileStatic
- class ColorRequestHandlerFactory extends RequestHandler.Factory {
- @Override
- RequestHandler create(RootRequest rootRequest) {
- new ColorRequestHandler(rootRequest)
- }
-
- }
- /src/main/groovy/demo/ColorRequestHandler.groovy
- package demo
-
- import com.frogermcs.gactions.ResponseBuilder
- import com.frogermcs.gactions.api.RequestHandler
- import com.frogermcs.gactions.api.request.RootRequest
- import com.frogermcs.gactions.api.response.RootResponse
- import demo.util.ColorUtils
- import java.awt.Color
- import java.lang.reflect.Field
- import groovy.transform.CompileStatic
- import groovy.util.logging.Slf4j
-
- /**
- * take a color name input and returns a brighter color name in return if possible
- */
- @CompileStatic
- @Slf4j
- class ColorRequestHandler extends RequestHandler {
-
- protected ColorRequestHandler(RootRequest rootRequest) {
- super(rootRequest)
- }
-
- @Override
- RootResponse getResponse() {
- log.debug("Inputs=${rootRequest.inputs.toListString()}")
- String color = rootRequest.inputs[0].arguments[0].raw_text.toLowerCase()
-
- Color parsedColor = null
- try {
- Field field = Class.forName('java.awt.Color').getField(color)
- parsedColor = (Color)field.get(null)
- } catch (NoSuchFieldException ne) {
- return colorNotFound(color)
- }
- if (parsedColor) {
- ColorUtils colorUtils = new ColorUtils()
- String brighter = colorUtils.findBrighterNameForColor(parsedColor).toLowerCase()
- String answer = "Sorry I can't find a brighter color for ${color}."
- if (brighter != color) {
- answer = "The brighter color for ${color} is ${brighter} "
- }
- return ResponseBuilder.tellResponse(answer)
- }
- colorNotFound(color)
- }
-
- private RootResponse colorNotFound(String color) {
- ResponseBuilder.tellResponse("Sorry I don't understand the color ${color}.")
- }
- }
We are going to handle the request that comes from Google in another action of our controller:
/grails-app/controllers/demo/AssistantActionController.groovy
- package demo
-
- import com.frogermcs.gactions.AssistantActions
- import com.frogermcs.gactions.api.StandardIntents
- import com.frogermcs.gactions.api.request.RootRequest
- import com.google.gson.Gson
- import com.google.gson.stream.JsonReader
- import javax.servlet.http.HttpServletRequest
- import groovy.transform.CompileStatic
-
- @CompileStatic
- class AssistantActionController {
- def color() {
- AssistantActions assistantActions =
- new AssistantActions.Builder(new GrailsResponseHandler(response))
- .addRequestHandlerFactory('color.intent', new ColorRequestHandlerFactory())
- .build()
- RootRequest rootRequest = parseActionRequest(request)
- assistantActions.handleRequest(rootRequest)
- null
- }
- private RootRequest parseActionRequest(HttpServletRequest request) throws IOException {
- JsonReader jsonReader = new JsonReader(request.reader)
- new Gson().fromJson(jsonReader, RootRequest)
- }
Instantiate the handler with the help of the factory
Grails action delegates to Actions SDK to handle requests that come from Google.
We do not want to return a Grails view. The handlers manage the response.
Let’s use a simple utility class to make our action do something interesting. This will help us map a given java.awt.Color to give us an English name for it.
/src/main/groovy/demo/util/ColorUtils.java
- package demo.util;
-
- import java.awt.*;
- import java.util.ArrayList;
-
- /**
- * Java Code to get a color name from rgb/hex value/awt color
- *
- * The part of looking up a color name from the rgb values is edited from
- * https://gist.github.com/nightlark/6482130#file-gistfile1-java (that has some errors) by Ryan Mast (nightlark)
- *
- * @author Xiaoxiao Li
- *
- */
- public class ColorUtils {
-
- /**
- * Initialize the color list that we have.
- */
- private ArrayList<ColorName> initColorList() {
- ArrayList<ColorName> colorList = new ArrayList<ColorName>();
- colorList.add(new ColorName("AliceBlue", 0xF0, 0xF8, 0xFF));
- colorList.add(new ColorName("AntiqueWhite", 0xFA, 0xEB, 0xD7));
- colorList.add(new ColorName("Aqua", 0x00, 0xFF, 0xFF));
- colorList.add(new ColorName("Aquamarine", 0x7F, 0xFF, 0xD4));
- colorList.add(new ColorName("Azure", 0xF0, 0xFF, 0xFF));
- colorList.add(new ColorName("Beige", 0xF5, 0xF5, 0xDC));
- colorList.add(new ColorName("Bisque", 0xFF, 0xE4, 0xC4));
- colorList.add(new ColorName("Black", 0x00, 0x00, 0x00));
- colorList.add(new ColorName("BlanchedAlmond", 0xFF, 0xEB, 0xCD));
- colorList.add(new ColorName("Blue", 0x00, 0x00, 0xFF));
- colorList.add(new ColorName("BlueViolet", 0x8A, 0x2B, 0xE2));
- colorList.add(new ColorName("Brown", 0xA5, 0x2A, 0x2A));
- colorList.add(new ColorName("BurlyWood", 0xDE, 0xB8, 0x87));
- colorList.add(new ColorName("CadetBlue", 0x5F, 0x9E, 0xA0));
- colorList.add(new ColorName("Chartreuse", 0x7F, 0xFF, 0x00));
- colorList.add(new ColorName("Chocolate", 0xD2, 0x69, 0x1E));
- colorList.add(new ColorName("Coral", 0xFF, 0x7F, 0x50));
- colorList.add(new ColorName("CornflowerBlue", 0x64, 0x95, 0xED));
- colorList.add(new ColorName("Cornsilk", 0xFF, 0xF8, 0xDC));
- colorList.add(new ColorName("Crimson", 0xDC, 0x14, 0x3C));
- colorList.add(new ColorName("Cyan", 0x00, 0xFF, 0xFF));
- colorList.add(new ColorName("DarkBlue", 0x00, 0x00, 0x8B));
- colorList.add(new ColorName("DarkCyan", 0x00, 0x8B, 0x8B));
- colorList.add(new ColorName("DarkGoldenRod", 0xB8, 0x86, 0x0B));
- colorList.add(new ColorName("DarkGray", 0xA9, 0xA9, 0xA9));
- colorList.add(new ColorName("DarkGreen", 0x00, 0x64, 0x00));
- colorList.add(new ColorName("DarkKhaki", 0xBD, 0xB7, 0x6B));
- colorList.add(new ColorName("DarkMagenta", 0x8B, 0x00, 0x8B));
- colorList.add(new ColorName("DarkOliveGreen", 0x55, 0x6B, 0x2F));
- colorList.add(new ColorName("DarkOrange", 0xFF, 0x8C, 0x00));
- colorList.add(new ColorName("DarkOrchid", 0x99, 0x32, 0xCC));
- colorList.add(new ColorName("DarkRed", 0x8B, 0x00, 0x00));
- colorList.add(new ColorName("DarkSalmon", 0xE9, 0x96, 0x7A));
- colorList.add(new ColorName("DarkSeaGreen", 0x8F, 0xBC, 0x8F));
- colorList.add(new ColorName("DarkSlateBlue", 0x48, 0x3D, 0x8B));
- colorList.add(new ColorName("DarkSlateGray", 0x2F, 0x4F, 0x4F));
- colorList.add(new ColorName("DarkTurquoise", 0x00, 0xCE, 0xD1));
- colorList.add(new ColorName("DarkViolet", 0x94, 0x00, 0xD3));
- colorList.add(new ColorName("DeepPink", 0xFF, 0x14, 0x93));
- colorList.add(new ColorName("DeepSkyBlue", 0x00, 0xBF, 0xFF));
- colorList.add(new ColorName("DimGray", 0x69, 0x69, 0x69));
- colorList.add(new ColorName("DodgerBlue", 0x1E, 0x90, 0xFF));
- colorList.add(new ColorName("FireBrick", 0xB2, 0x22, 0x22));
- colorList.add(new ColorName("FloralWhite", 0xFF, 0xFA, 0xF0));
- colorList.add(new ColorName("ForestGreen", 0x22, 0x8B, 0x22));
- colorList.add(new ColorName("Fuchsia", 0xFF, 0x00, 0xFF));
- colorList.add(new ColorName("Gainsboro", 0xDC, 0xDC, 0xDC));
- colorList.add(new ColorName("GhostWhite", 0xF8, 0xF8, 0xFF));
- colorList.add(new ColorName("Gold", 0xFF, 0xD7, 0x00));
- colorList.add(new ColorName("GoldenRod", 0xDA, 0xA5, 0x20));
- colorList.add(new ColorName("Gray", 0x80, 0x80, 0x80));
- colorList.add(new ColorName("Green", 0x00, 0x80, 0x00));
- colorList.add(new ColorName("GreenYellow", 0xAD, 0xFF, 0x2F));
- colorList.add(new ColorName("HoneyDew", 0xF0, 0xFF, 0xF0));
- colorList.add(new ColorName("HotPink", 0xFF, 0x69, 0xB4));
- colorList.add(new ColorName("IndianRed", 0xCD, 0x5C, 0x5C));
- colorList.add(new ColorName("Indigo", 0x4B, 0x00, 0x82));
- colorList.add(new ColorName("Ivory", 0xFF, 0xFF, 0xF0));
- colorList.add(new ColorName("Khaki", 0xF0, 0xE6, 0x8C));
- colorList.add(new ColorName("Lavender", 0xE6, 0xE6, 0xFA));
- colorList.add(new ColorName("LavenderBlush", 0xFF, 0xF0, 0xF5));
- colorList.add(new ColorName("LawnGreen", 0x7C, 0xFC, 0x00));
- colorList.add(new ColorName("LemonChiffon", 0xFF, 0xFA, 0xCD));
- colorList.add(new ColorName("LightBlue", 0xAD, 0xD8, 0xE6));
- colorList.add(new ColorName("LightCoral", 0xF0, 0x80, 0x80));
- colorList.add(new ColorName("LightCyan", 0xE0, 0xFF, 0xFF));
- colorList.add(new ColorName("LightGoldenRodYellow", 0xFA, 0xFA, 0xD2));
- colorList.add(new ColorName("LightGray", 0xD3, 0xD3, 0xD3));
- colorList.add(new ColorName("LightGreen", 0x90, 0xEE, 0x90));
- colorList.add(new ColorName("LightPink", 0xFF, 0xB6, 0xC1));
- colorList.add(new ColorName("LightSalmon", 0xFF, 0xA0, 0x7A));
- colorList.add(new ColorName("LightSeaGreen", 0x20, 0xB2, 0xAA));
- colorList.add(new ColorName("LightSkyBlue", 0x87, 0xCE, 0xFA));
- colorList.add(new ColorName("LightSlateGray", 0x77, 0x88, 0x99));
- colorList.add(new ColorName("LightSteelBlue", 0xB0, 0xC4, 0xDE));
- colorList.add(new ColorName("LightYellow", 0xFF, 0xFF, 0xE0));
- colorList.add(new ColorName("Lime", 0x00, 0xFF, 0x00));
- colorList.add(new ColorName("LimeGreen", 0x32, 0xCD, 0x32));
- colorList.add(new ColorName("Linen", 0xFA, 0xF0, 0xE6));
- colorList.add(new ColorName("Magenta", 0xFF, 0x00, 0xFF));
- colorList.add(new ColorName("Maroon", 0x80, 0x00, 0x00));
- colorList.add(new ColorName("MediumAquaMarine", 0x66, 0xCD, 0xAA));
- colorList.add(new ColorName("MediumBlue", 0x00, 0x00, 0xCD));
- colorList.add(new ColorName("MediumOrchid", 0xBA, 0x55, 0xD3));
- colorList.add(new ColorName("MediumPurple", 0x93, 0x70, 0xDB));
- colorList.add(new ColorName("MediumSeaGreen", 0x3C, 0xB3, 0x71));
- colorList.add(new ColorName("MediumSlateBlue", 0x7B, 0x68, 0xEE));
- colorList.add(new ColorName("MediumSpringGreen", 0x00, 0xFA, 0x9A));
- colorList.add(new ColorName("MediumTurquoise", 0x48, 0xD1, 0xCC));
- colorList.add(new ColorName("MediumVioletRed", 0xC7, 0x15, 0x85));
- colorList.add(new ColorName("MidnightBlue", 0x19, 0x19, 0x70));
- colorList.add(new ColorName("MintCream", 0xF5, 0xFF, 0xFA));
- colorList.add(new ColorName("MistyRose", 0xFF, 0xE4, 0xE1));
- colorList.add(new ColorName("Moccasin", 0xFF, 0xE4, 0xB5));
- colorList.add(new ColorName("NavajoWhite", 0xFF, 0xDE, 0xAD));
- colorList.add(new ColorName("Navy", 0x00, 0x00, 0x80));
- colorList.add(new ColorName("OldLace", 0xFD, 0xF5, 0xE6));
- colorList.add(new ColorName("Olive", 0x80, 0x80, 0x00));
- colorList.add(new ColorName("OliveDrab", 0x6B, 0x8E, 0x23));
- colorList.add(new ColorName("Orange", 0xFF, 0xA5, 0x00));
- colorList.add(new ColorName("OrangeRed", 0xFF, 0x45, 0x00));
- colorList.add(new ColorName("Orchid", 0xDA, 0x70, 0xD6));
- colorList.add(new ColorName("PaleGoldenRod", 0xEE, 0xE8, 0xAA));
- colorList.add(new ColorName("PaleGreen", 0x98, 0xFB, 0x98));
- colorList.add(new ColorName("PaleTurquoise", 0xAF, 0xEE, 0xEE));
- colorList.add(new ColorName("PaleVioletRed", 0xDB, 0x70, 0x93));
- colorList.add(new ColorName("PapayaWhip", 0xFF, 0xEF, 0xD5));
- colorList.add(new ColorName("PeachPuff", 0xFF, 0xDA, 0xB9));
- colorList.add(new ColorName("Peru", 0xCD, 0x85, 0x3F));
- colorList.add(new ColorName("Pink", 0xFF, 0xC0, 0xCB));
- colorList.add(new ColorName("Plum", 0xDD, 0xA0, 0xDD));
- colorList.add(new ColorName("PowderBlue", 0xB0, 0xE0, 0xE6));
- colorList.add(new ColorName("Purple", 0x80, 0x00, 0x80));
- colorList.add(new ColorName("Red", 0xFF, 0x00, 0x00));
- colorList.add(new ColorName("RosyBrown", 0xBC, 0x8F, 0x8F));
- colorList.add(new ColorName("RoyalBlue", 0x41, 0x69, 0xE1));
- colorList.add(new ColorName("SaddleBrown", 0x8B, 0x45, 0x13));
- colorList.add(new ColorName("Salmon", 0xFA, 0x80, 0x72));
- colorList.add(new ColorName("SandyBrown", 0xF4, 0xA4, 0x60));
- colorList.add(new ColorName("SeaGreen", 0x2E, 0x8B, 0x57));
- colorList.add(new ColorName("SeaShell", 0xFF, 0xF5, 0xEE));
- colorList.add(new ColorName("Sienna", 0xA0, 0x52, 0x2D));
- colorList.add(new ColorName("Silver", 0xC0, 0xC0, 0xC0));
- colorList.add(new ColorName("SkyBlue", 0x87, 0xCE, 0xEB));
- colorList.add(new ColorName("SlateBlue", 0x6A, 0x5A, 0xCD));
- colorList.add(new ColorName("SlateGray", 0x70, 0x80, 0x90));
- colorList.add(new ColorName("Snow", 0xFF, 0xFA, 0xFA));
- colorList.add(new ColorName("SpringGreen", 0x00, 0xFF, 0x7F));
- colorList.add(new ColorName("SteelBlue", 0x46, 0x82, 0xB4));
- colorList.add(new ColorName("Tan", 0xD2, 0xB4, 0x8C));
- colorList.add(new ColorName("Teal", 0x00, 0x80, 0x80));
- colorList.add(new ColorName("Thistle", 0xD8, 0xBF, 0xD8));
- colorList.add(new ColorName("Tomato", 0xFF, 0x63, 0x47));
- colorList.add(new ColorName("Turquoise", 0x40, 0xE0, 0xD0));
- colorList.add(new ColorName("Violet", 0xEE, 0x82, 0xEE));
- colorList.add(new ColorName("Wheat", 0xF5, 0xDE, 0xB3));
- colorList.add(new ColorName("White", 0xFF, 0xFF, 0xFF));
- colorList.add(new ColorName("WhiteSmoke", 0xF5, 0xF5, 0xF5));
- colorList.add(new ColorName("Yellow", 0xFF, 0xFF, 0x00));
- colorList.add(new ColorName("YellowGreen", 0x9A, 0xCD, 0x32));
- return colorList;
- }
-
- /**
- * Get the closest color name from our list
- *
- * @param r
- * @param g
- * @param b
- * @return
- */
- public String getColorNameFromRgb(int r, int g, int b) {
- ArrayList<ColorName> colorList = initColorList();
- ColorName closestMatch = null;
- int minMSE = Integer.MAX_VALUE;
- int mse;
- for (ColorName c : colorList) {
- mse = c.computeMSE(r, g, b);
- if (mse < minMSE) {
- minMSE = mse;
- closestMatch = c;
- }
- }
-
- if (closestMatch != null) {
- return closestMatch.getName();
- } else {
- return "No matched color name.";
- }
- }
-
- /**
- * Convert hexColor to rgb, then call getColorNameFromRgb(r, g, b)
- *
- * @param hexColor
- * @return
- */
- public String getColorNameFromHex(int hexColor) {
- int r = (hexColor & 0xFF0000) >> 16;
- int g = (hexColor & 0xFF00) >> 8;
- int b = (hexColor & 0xFF);
- return getColorNameFromRgb(r, g, b);
- }
-
- public int colorToHex(Color c) {
- return Integer.decode("0x"
- + Integer.toHexString(c.getRGB()).substring(2));
- }
-
- public String getColorNameFromColor(Color color) {
- return getColorNameFromRgb(color.getRed(), color.getGreen(),
- color.getBlue());
- }
-
- public String findBrighterNameForColor(Color color) {
- String name = getColorNameFromColor(color);
- String nextColorName = name;
- int colorCount = 0;
- while (name.equals(nextColorName) && colorCount < 100) {
- color = color.brighter();
- nextColorName = getColorNameFromColor(color);
- colorCount++;
- }
- return nextColorName;
-
-
-
- }
-
- public String findDarkerNameForColor(Color color) {
- String name = getColorNameFromColor(color);
- String nextColorName = name;
- int colorCount = 0;
- while (name.equals(nextColorName) && colorCount < 100) {
- color = color.darker();
- nextColorName = getColorNameFromColor(color);
- colorCount++;
- }
- return nextColorName;
-
-
-
- }
-
- /**
- * SubClass of ColorUtils. In order to lookup color name
- *
- * @author Xiaoxiao Li
- *
- */
- public class ColorName {
- public int r, g, b;
- public String name;
-
- public ColorName(String name, int r, int g, int b) {
- this.r = r;
- this.g = g;
- this.b = b;
- this.name = name;
- }
-
- public int computeMSE(int pixR, int pixG, int pixB) {
- return (int) (((pixR - r) * (pixR - r) + (pixG - g) * (pixG - g) + (pixB - b)
- * (pixB - b)) / 3);
- }
-
- public int getR() {
- return r;
- }
-
- public int getG() {
- return g;
- }
-
- public int getB() {
- return b;
- }
-
- public String getName() {
- return name;
- }
- }
- }
The previous class is a Java Class. Grails allows us to mix Groovy and Java code seamlessly.
Unofficial Google Actions Java SDK
The SDK is at https://github.com/frogermcs/Google-Actions-Java-SDK however all we need to do is edit our build.gradle to include the library.
/build.gradle
compile 'com.frogermcs.gactions:gactions:0.1.1'
Google App Engine Gradle Plugin
To deploy to App Engine, we are going to use the Google App Engine Gradle Plugin.
We need to modify build.gradle, add the plugin as a buildscript dependency and apply the plugin:
build.gradle
- buildscript {
- repositories {
- mavenLocal()
- maven { url "https://repo.grails.org/grails/core" }
- }
- dependencies {
- classpath "org.grails:grails-gradle-plugin:$grailsVersion"
- classpath 'com.google.cloud.tools:appengine-gradle-plugin:1.1.1'
- }
- }
- ...
- apply plugin: 'com.google.cloud.tools.appengine'
Application Deployment Configuration
To deploy to Google App Engine, we need to add the file src/main/appengine/app.yaml
It describes the application's deployment configuration:
/src/main/appengine/app.yaml
- runtime: java
- env: flex
-
- runtime_config:
- jdk: openjdk8
- server: jetty9
-
- health_check:
- enable_health_check: False
-
- resources:
- cpu: 1
- memory_gb: 2.3
-
- manual_scaling:
- instances: 1
Here, app.yaml specifies the runtime used by the app, and sets env: flex, specifying that the app uses the flexible environment.
The minimal
app.yamlapplication configuration file shown above is sufficient for a simple Grails application. Depending on the size, complexity, and features that your application uses, you may need to change and extend this basic configuration file. For more information on what can be configured viaapp.yaml, please see the Configuring Your App with app.yaml guide.
For more information on how the Java runtime works, see Java 8 / Jetty 9.3 Runtime.
SpringBoot Jetty
As shown in the previous app engine configuration file, we are using Jetty.
Following SpringBoot’s documentation, we need to do the following changes to deploy to Jetty instead of Tomcat.
Replace tomcat:
app/build.gradle
provided 'org.springframework.boot:spring-boot-starter-tomcat'
with jetty:
/build.gradle
provided "org.springframework.boot:spring-boot-starter-jetty"
We need to exclude the tomcat-juli dependency as well. Add:
/build.gradle
- configurations {
- compile.exclude module: "tomcat-juli"
- }
Deploying the App
To deploy the app to Google App Engine run:
$ ./gradlew appengineDeploy
Initial deployment may take a while. When finished, you will be able to access your app.
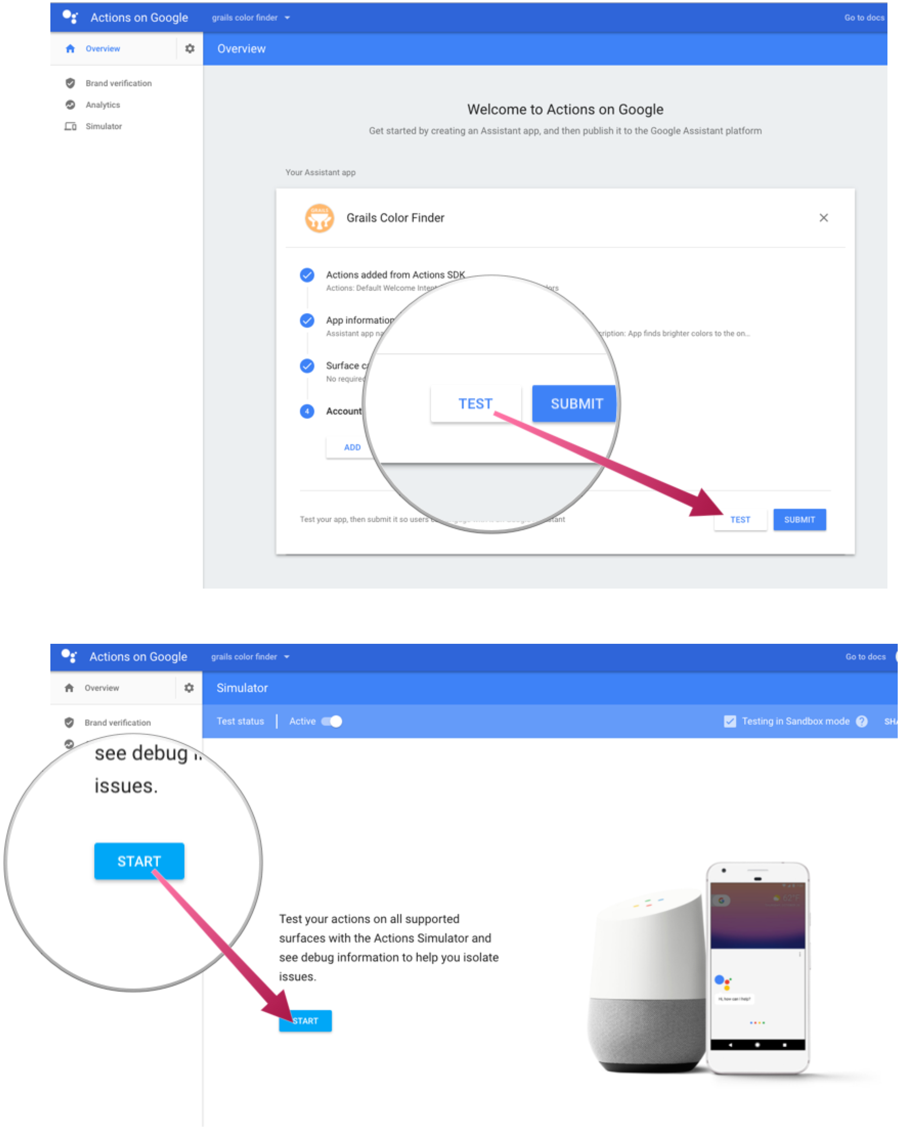
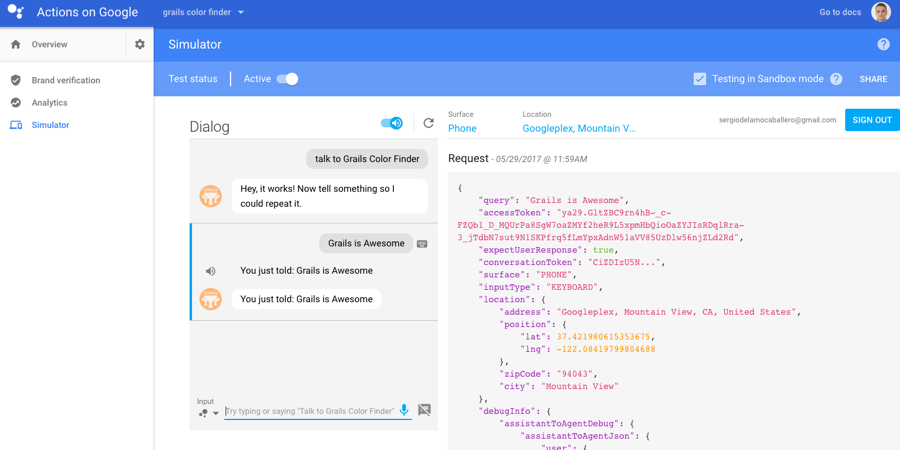
Test
Test and interact with your Google Action
Once your app is deployed in Google App Engine Flexible, you can test it.
Go back to the Google Actions Console and click test.
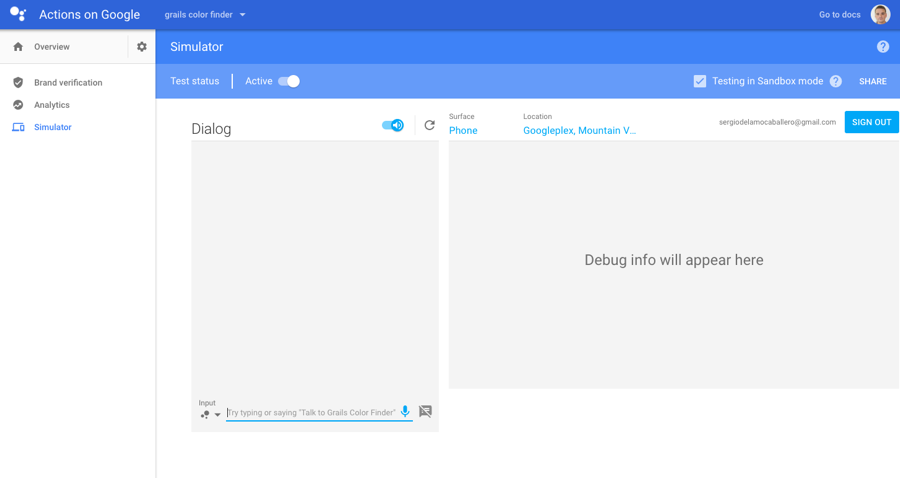
Try to test out your actions with the following phrases:
"Ask Grails Color Finder to find a brighter color for magenta"
You should see the response:
"Sure, here is the test version of Grails Color Finder The brighter color for magenta is fuchsia"

Let’s try another:
Talk to Grails Color Finder
You’ll see:
Sure, here is the test version of Grails Color Finder Hey, it works! Now tell something so I could repeat it
Now respond with something:
Grails is awesome
You should see it echo back what you entered:
You just told: Grails is awesome
Now you can make a more rich skill, and when you are ready to go to the Google API dashboard, fill in the directory listing and submit it for testing.
Next, let’s look at a more advanced example here that we use at our booth demo of a Star Wars Quiz port from an Alexa skill: https://github.com/vanderfox/grails-google-actions-demo
Let’s start here: https://github.com/vanderfox/grails-google-actions-demo/blob/master/grails-app/controllers/grails/google/actions/demo/AssistantActionController.groovy
Here is the code for the action in the controller:
- def startStarWarsQuiz() {
-
- AssistantActions assistantActions =
- new AssistantActions.Builder(new GrailsResponseHandler(response))
- .addRequestHandlerFactory("start.quiz.intent", new StarWarsQuizHandlerFactory())
- .addRequestHandlerFactory(StandardIntents.TEXT, new StarWarsQuizHandlerFactory())
- And .build()
- RootRequest rootRequest = parseActionRequest(request)
- // log to file for debugging
- Writer writer = new FileWriter("/tmp/google-action-request-startstarwarzquiz-${System.currentTimeMillis()}-debug.json")
- Gson gson = new GsonBuilder().create()
- gson.toJson(rootRequest, writer)
- writer.flush()
- writer.close()
- assistantActions.handleRequest(rootRequest)
- null // we dont want to return a grails view here the handlers do this
-
-
-
- }
This simple action created a Handler called StarWarsQuizRequestHandler and StarWarsQuizRequestHandlerFactory to do everything.
Let’s look here at StarWarsQuizRequestHandler:
- @Override
- public RootResponse getResponse() {
- log.debug("Inputs=${rootRequest.inputs.toListString()}")
- Conversation conversation = getConversationService().getConversation(rootRequest.conversation.conversation_id)
- log.debug("Conversation id=${rootRequest.conversation.conversation_id}")
- if (!conversation) {
- log.debug("No current conversation - starting a new one")
- conversation = conversationService.startConversation(rootRequest.conversation.conversation_id,[:])
- }
- Map conversationMap = conversationService.getConversationMap(conversation.conversationValueMap)
- String intent = rootRequest.inputs.get(0).intent
- switch (intent) {
- case "start.quiz.intent":
- conversationMap.put(CURRENT_QUESTION,1)
- return startQuiz(rootRequest,conversation,conversationMap)
- break
- case StandardIntents.TEXT: // actions sdk on google's end requires all response types to be hard coded to text (lame!)
- return answerQuestion(rootRequest,conversation,conversationMap)
- break
- case "ask.question":
- return askNextQuestion("",rootRequest,conversation,conversationMap)
- default:
- break
- }
- }
- Add Comment
The switch statement decides what we are doing based on our action.json schema intent name passed in. So here is the catch - you can map an intent from the start of the action running, but if the user responds with an answer, you can only use the StandardIntents.TEXT intent or it will not work. From there it’s up to you to decide what action to take. If you don’t know this up front you will get frustrated. It gets worse, because you can’t make a TYPE to that intent, and it’s up to you to parse a natural language response. So if you look in the class when you answer a question with 1,2,3, or 4, you have to make your own mapping to the English version of the numeric word to the answer from the database. This really limits what you can do with user responses. This is why Google is steering everyone to use the newer API.AI interface - don’t worry though we have some examples and a Grails plugin to help you with that too! We will talk about that later.
So that leaves us with 3 main methods to handle everything for the quiz - startQuiz, answerQuestion, and askNextQuestion.
So here is the natural order of the flow that happens when the user takes the quiz. We start with startQuiz which gives a initial greeting message and asks the first question. Then the TEXT intent maps to answerQuestion. After you answer the question correctly or not, we ask the next question with askNextQuestion. When looking at the code you can see we are pulling the data from not Google but Amazon’s DynamoDB. This isn’t a requirement though; you can use any relational database or many noSQL stores like Google’s BigTable service. Feel free to adapt this code to use whatever data store you want to use to store your quiz data.
Now let’s move on to API.AI support to make actions.
API.AI Support
What is API.AI? This was a platform agnostic service built for conversational AI that Google acquired shortly after releasing Google Home. Because Amazon’s Alexa had such a head start over Google they needed something to get them on par as quick as possible and API.AI was their answer. It has a nice web UI to build conversations in a way without a lot of coding - but they thought ahead and created SDK’s for several platforms like Java. We use that Java SDK for enabling Webooks and Data Services to build a Grails plugin to make this easy.
Grails Plugin
The Grails plugin uses a simple Trait to enhance a Controller object to plug in to make Webhooks for actions linked to your API.AI project (and Data Services, we’ll get to that later).
First, we need to add the repository to your Gradle project to access the plugin:
- repositories {
- maven {
- url "http://dl.bintray.com/vanderfox/grails-api-ai"
- }
- }
Next, we include the plugin itself in the dependencies{} block:
'org.grails.plugins:grails-api-ai:0.1.2'
Now let’s check out an example Controller called WeatherWebhookController here: https://github.com/vanderfox/grails-google-actions-demo/blob/master/grails-app/controllers/grails/google/actions/demo/WeatherWebhookController.groovy
To use the plugin simply implement the Trait:
class WeatherWebhookController implements AiWebhookController {This will add an index{} action to handle the plumbing to handle talking to the the API.AI service. If you generate a controller that has an index{} action simply delete it and add override doWebhook:
@Override
    void doWebhook(AIWebhookServlet.AIWebhookRequest input, Fulfillment output) {}
Here is where you will put your logic to handle the conversational response to API.AI. Here is the rest of the code that talks to Yahoo weather service and formulates a response:
- @Override
- void doWebhook(AIWebhookServlet.AIWebhookRequest input, Fulfillment output) {
-
- String baseurl = 'https://query.yahooapis.com/v1/public/yql?q='
- String city = input.result.parameters.'geo-city'
- String yqlQuery = 'select * from weather.forecast where woeid in ' +
- "(select woeid from geo.places(1) where text=\'${city}\')"
- String yqlUrl = baseurl + URLEncoder.encode(yqlQuery, 'UTF-8') + '&format=json'
- String yqlResponse = yqlUrl.toURL().text
- JSONElement channel = JSON.parse(yqlResponse).query.results.channel
- JSONElement forecast = channel.item.forecast[0] // this is day 1 of a 7 day forecast
- def weather = "The weather in ${channel.location.city} for " +
- "${forecast.date} is a high of ${forecast.high} and a low " +
- "of ${forecast.low} and it will be ${forecast.text}" // units are in F
- output.setSpeech(weather)
- output.setDisplayText(weather)
- //output.contextOut = [] // these are not needed because conversation ends at this point
- //output.data = [:] // these are not needed because conversation ends at this point
- output.source = 'grails-yahoo-weather'
-
- }
Now let’s go the API.AI web UI to see the other part of what we need to fill in.
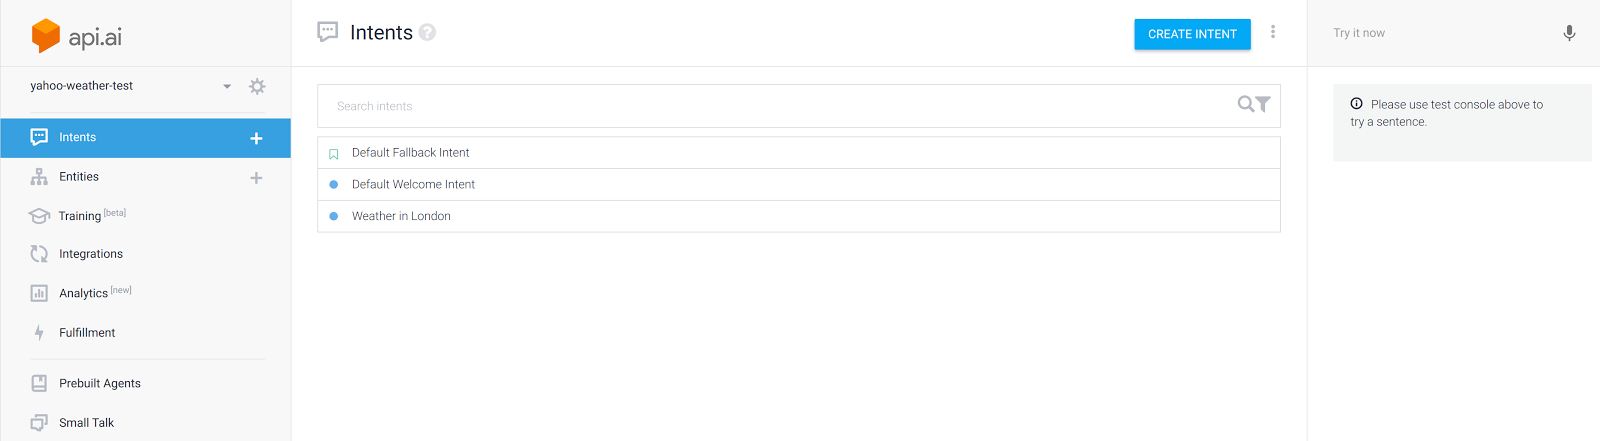
Let's add an intent that looks like this:
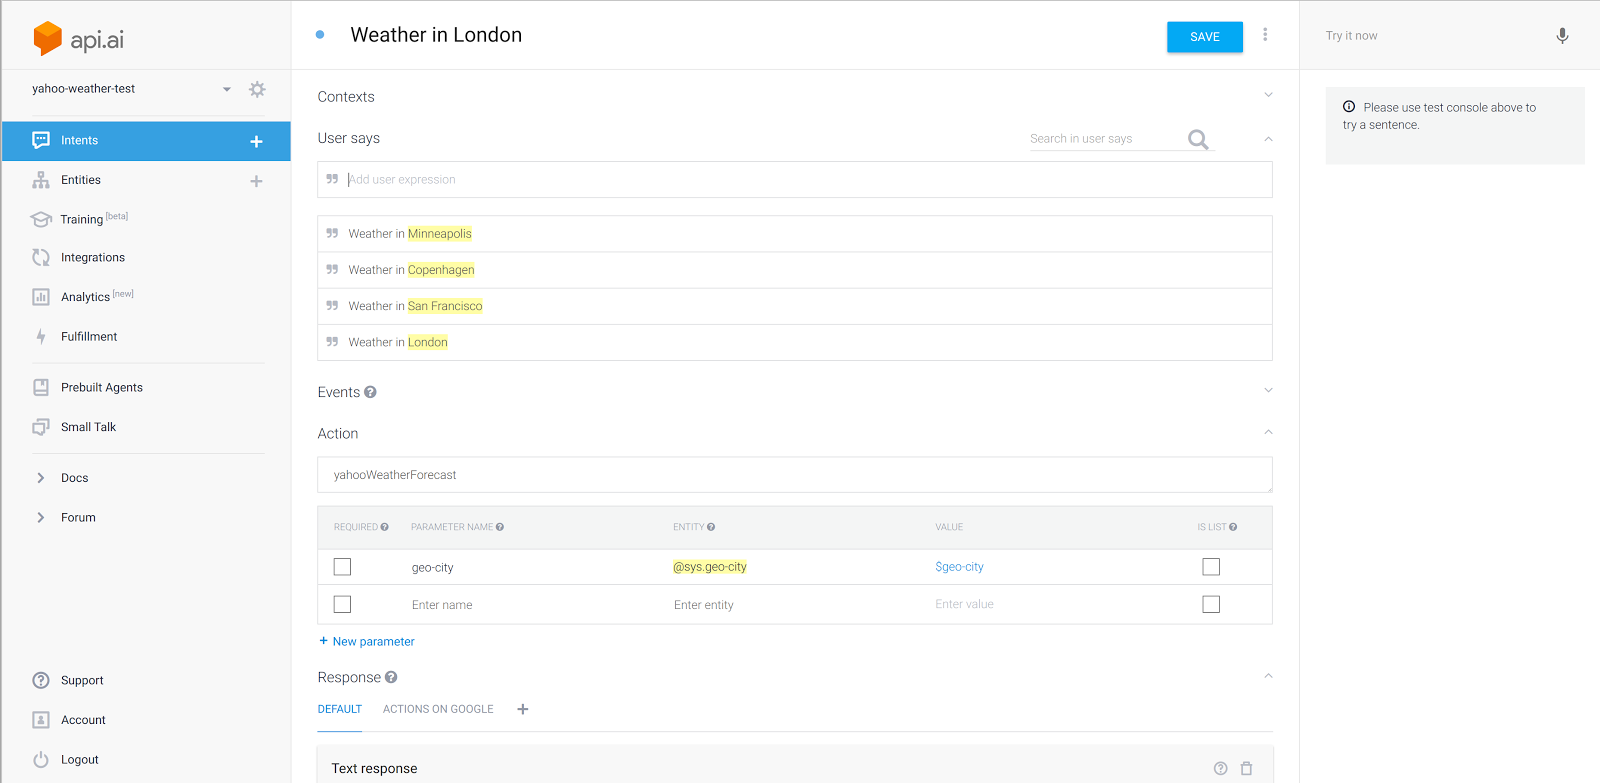
Note the highlighted areas with city names. The web UI will recognize the city name as a parameter type called ‘geo-city’. This will be passed into your webhook so you can find the city the user wants the weather for.
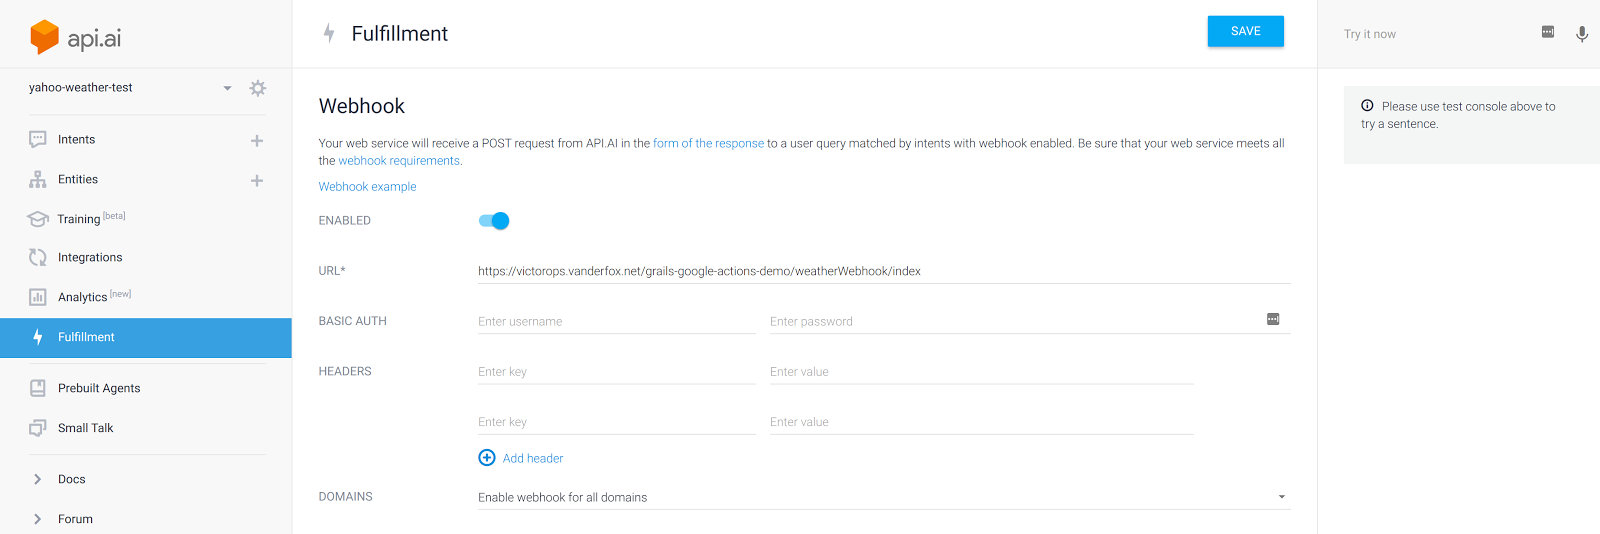
Next, let’s click on the fulfillment tab on the left. Here we will enter the URL of our Grails app controller and action that responds to the webhook. You can also add a response it will say if it can’t contact your webhook.
Now let’s test out under ‘Try now’. Type in ‘weather in London’ and take a look at the response:
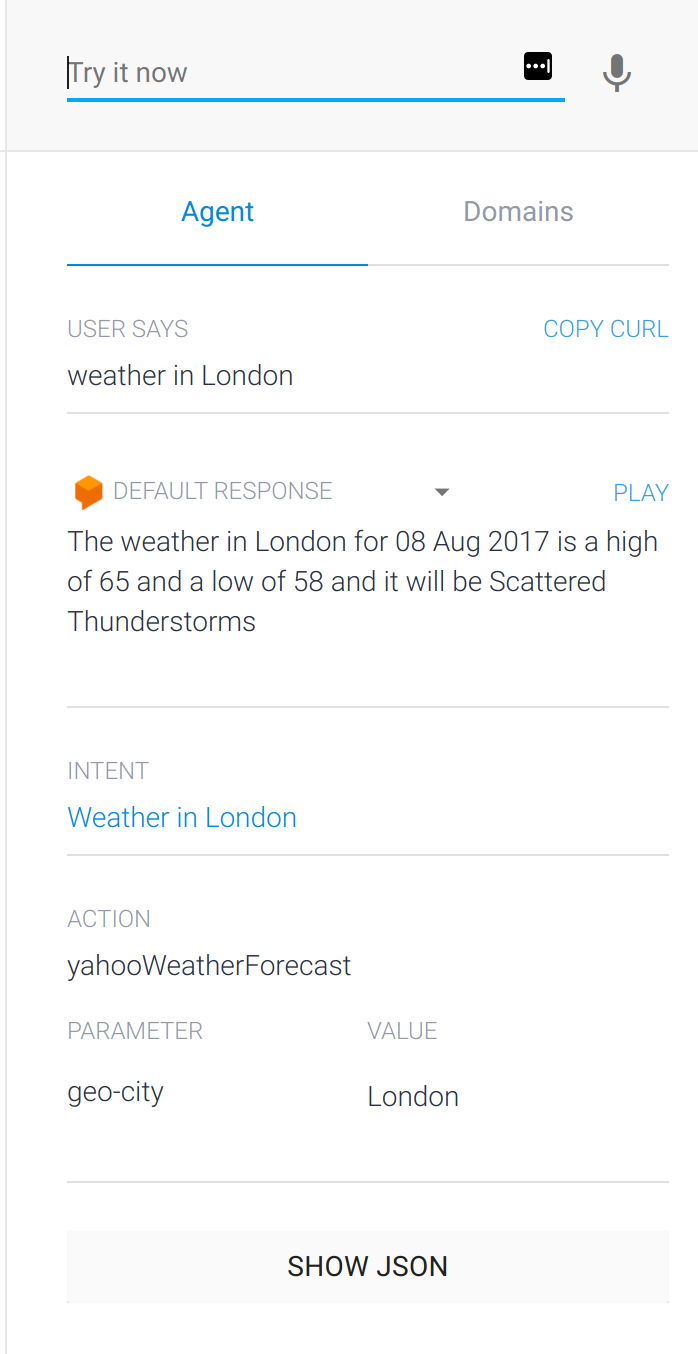
Now we have a fully working webhook!
Data Services
Let’s look at one more thing the plugin helps you with on API.AI and it has a sort of reverse use case. Let’s talk about that for a second - say you want to integrate some sort of AI ability to your application and leverage actions you’ve assembled in API.AI. You can pass in text as a query to an action programmatically and return a decision it made based on input. For example, maybe you want to give suggestions in your application about the weather in a location while they are booking a hotel on a given date. Maybe you want to find out what recipes you can make with given ingredients while someone is shopping. The possibilities are endless! Here’s how we do it - let’s hook into our Yahoo weather action and webhook to show you how it works.
AiDataController
- import ai.api.AIServiceException
- import ai.api.model.AIResponse
- import org.grails.apiai.AiServiceController
-
-
- class AiDataController implements AiServiceController {
-
-
- def index() {
- try {
- AIResponse aiResponse = request(request.getParameter("query"), request.getSession())
- response.setContentType("text/plain")
-
- response.getWriter().append(aiResponse.getResult().getFulfillment().getSpeech())
- } catch (AIServiceException e) {
- log.error("Error talking to remote service: ${e.message}",e)
- }
-
-
- }
- }
Conclusion
That’s all you have to do to implement the trait AiServiceController. Now you are ready to make lots of advanced Google Home Actions! Don’t forget these also work via mobile and the latest versions of Android Wear. Feel free to contact me if you are stuck and need some help on Twitter or Grails or Groovy Slack communities.
I'd like to give special thanks to Sergio del Amo for helping me out with publishing the Google Home Grails Guide which much of this content came from! Also to Lee Fox for helping me test out, code and debug this research! Also, thanks to Matthew Moss and Sergio for the Google compute guide which some of this material on bootstrapping Grails with Google comes from.
Software Engineering Tech Trends (SETT) is a regular publication featuring emerging trends in software engineering.
