Room with a Vue Part 2: Building an App with Vue.js
by Zachary Klein, OCI Software Engineer
June 2018

Introduction
In Part 1 in this series, we learned about the basic concepts and features of the Vue.js library. Now it is time to put that knowledge to use and build an application.
Our goal is to build a simple library app for managing books and authors. We will also use the "official" extensions for Vue: Vuex for state-management and Vue Router for client-side routing.
While this project will necessarily be quite simplistic, we will also include a RESTful backend to persist and retrieve our data, as would be typical in real-world projects.
Our backend happens to be written in Grails, but you could substitute an app using your preferred framework if you wish, as long as the API endpoints match (we will see what the API looks like shortly). The backend application will be downloaded from Github, so no knowledge or experience with Grails is required to follow along with this article.
Requirements
You will need Java 7 or later in order to run the backend project (Grails does not need to be installed).
You should also have npm installed and available on your machine; if you don’t have npm installed, nvm is a useful utility to install and manage Node/npm versions.
Set Up the Project
Clone (or download) the project directory from the following Github repo: https://github.com/ZacharyKlein/sett-room-with-a-vue-demo
~ git clone git@github.com:ZacharyKlein/sett-room-with-a-vue-demo.gitThe server directory contains the backend application.
Don’t worry about the code, just follow the following instructions to start up the server:
~ cd server
~ ./grailsw run-app
The server will start up and be available at http://localhost:8080. Browse to that URL and verify that the backend is running.
Using npm, install the Vue CLI:
~ npm install -g vue-cliNow you can generate our project.
In the top-level directory from the Github repo (above the server directory), run the following command:
~ vue init webpack client

  Target directory exists. Continue? Yes
  Project name? client
  Project description? A Vue.js project
  ...
You will be prompted several times for various options that the template supports. Accept the defaults in each case.
Once complete, this command line will generate a project named "client," using the Webpack template, which is one of the full-featured project templates provided by Vue-CLI.
Let’s take a look at the generated project layout.
Please refer to the Vue CLI and Webpack template documentation for more details on this project structure. We will focus only on the elements that are relevant to our project.
.
├── build/                      # Webpack config
├── config/                     # App config
├── src/
│   ├── main.js                 # Entry file
│   ├── App.vue                 # Main App component
│   ├── components/             # Other Components/source files
│   └── assets/                 # Assets (processed/available in components)
|   └── router/                 # Vue Router config
│       └── ...
├── static/                     # Static assets (not processed)
├── test/                       # Unit and e2e ("end to end") tests
├── index.html                  # Index page
├── package.json                # Dependencies & build scripts
└── README.md                   # README file
The package.json file includes a number of scripts for running, testing, and building the app. You can run these scripts using either npm or yarn.
~ npm test   # runs tests
~ npm build  # creates deployable (static) build
~ npm start  # starts the app
Go ahead and run the app using npm start.
The Webpack dev server is configured to reload the app whenever changes are made to the source files, so you can leave the app running while you work, and the changes will automatically be loaded in the browser. The only time you will need to restart the Vue app is when you install a new dependency (e.g., with npm install)
Port Conflict
If you’ve already started up the backend server (which runs on port 8080), the Vue app will probably run on port 8081. This is because the app is configured to default to port 8080, and then to increment the port number to avoid conflicts.
Let’s change this default to avoid this behavior and ensure a consistent port.
Stop the client app and edit the file config/index.js. Find the reference to port 8080 (usually around line 17) and change it to 3000.
'use strict'
// Template version: 1.3.1
// see http://vuejs-templates.github.io/webpack for documentation.

const path = require('path')

module.exports = {
  dev: {

    // Paths
    assetsSubDirectory: 'static',
    assetsPublicPath: '/',
    proxyTable: {},

    // Various Dev Server settings
    host: 'localhost', // can be overwritten by process.env.HOST
    port: 3000, //CHANGE: Change port 8080 to 3000

    //... omitted
  }
}
Now restart the app using npm start. It should start up on http://localhost:3000.
Simple Beginnings
Our first step will be to remove the default content from the Welcome template and begin building our app’s UI.
Naturally, displaying a list of books will be central to our UI, so we’ll start by creating two components: one to represent a "book," and another to render a list of books.
As discussed above, we will be using Vue’s Single File Components throughout this article.
The Book component will be simple – it will take a "prop" named book and render out the fields into a element (which will eventually be part of our book list).
Create a new file under src/components named Book.vue, and add the following content:
client/src/components/Book.vue
<template>
    <tr class="book-row">
      <!-- Note the "mustache" brackets, which render dynamic content into the HTML template -->
      <td class="title">{{book.title}}</td>
      <td class="pages">{{book.pages}}</td>
      <td class="author">{{book.author.name}}</td>
    </tr>
</template>

<script>
export default {
  name: 'Book',

  //We declare a "prop" named "book", which represents our book object
  props: ['book']
}
</script>

<style scoped>
  /* The CSS in this block will be "scoped" to the template of our component,
  meaning it will not affect any other components */
  .book-row {
    padding: 15px;
    border: 1px solid lightblue;
  }

  .title {
    font-weight: bold;
  }

  .pages {
    font-style: italic;
  }

  .author {
    text-decoration: underline;
  }
</style>
The next component will be BookList, which does what you’d expect – it accepts a list of book objects and renders a element using the component we just created to render out rows for each book.
Create a new file under src/components named BookList.vue, and add the following content:
client/src/components/BookList.vue
<template>
  <table class="book-list">
    <thead>
      <td>Title</td>
      <td>Pages</td>
      <td>Author</td>
    </thead>
    <tbody>
      <!--  Iterate over 'books' prop, using the book.id as a "key",
      and rendering an instance of the Book component with the current book bound as a prop -->
      <book v-for="book in books" :key="book.id" :book="book" />
    </tbody>
  </table>
</template>
<script>
import Book from './Book.vue'

export default {
  name: 'BookList',
  props: ['books'],
  //In addition to importing the Book component, we must declare which components
  //we use in our templates within the `components` object:
  components: {
    //The "keys" in this object are arbitrary - you can use this to avoid name conflicts
    //by "renaming" an imported component: { myBook: Book }
    book: Book
  }
}
</script>

<style scoped>
  .book-list {
    min-width: 1000px
  }
</style>
Now we’ll replace the existing HelloWorld component with our own "home" page.
This component will eventually be responsible for retrieving data from our REST API, although we’ll be hardcoding some data initially.
Create a new file under src/components named Home.vue, and add the following content:
client/src/components/Home.vue
<template>
  <div class="hello">
    <h1>{{ msg }}</h1>

    <!-- Using our BookList component and binding the "books" array to the "books" prop -->
    <book-list :books="books" />

  </div>
</template>

<script>
import BookList from './BookList.vue'

export default {
  name: 'Home',
  //Note that our "data" object is returned from a function call;
  //this is required to ensure every instance has its own "data" object which can be managed independently
  data () {
    return {
      msg: 'Welcome to the Library',
      //Eventually this hardcoded list will be replaced with data from our REST API
      books: [
        {id: 1, title: 'Book 1', pages: 100, author: {name: 'Author 1'}},
        {id: 2, title: 'Book 2', pages: 300, author: {name: 'Author 2'}},
        {id: 3, title: 'Book 3', pages: 200, author: {name: 'Author 3'}}
      ]
    }
  },
  components: {
    'book-list': BookList
  }
}
</script>

<style scoped>
  .hello {
    width: 1000px;
    margin: 0 auto;
  }

  h1, h2 {
    font-weight: normal;
  }

  ul {
    list-style-type: none;
    padding: 0;
  }

  li {
    display: inline-block;
    margin: 0 10px;
  }

  a {
    color: #42b983;
  }
</style>
We need to edit one more file from the project template to use our new Home component. Edit the index.js file under src/router/, as shown below:
client/src/router/index.js
import Vue from 'vue'
import Router from 'vue-router'
import Home from '@/components/Home' //CHANGE: change this line to import our Home component

Vue.use(Router)

export default new Router({
  routes: [
    {
      path: '/',
      name: 'Home', //CHANGE: set the name to 'Home'
      component: Home //CHANGE: set the component to 'Home'
    }
  ]
})
We’ll learn more about Vue Router later on in this article, but for now you can see that we’ve replaced references to the original HelloWorld component with our new Home component.
If you haven't already started the app by now, go ahead and do so:
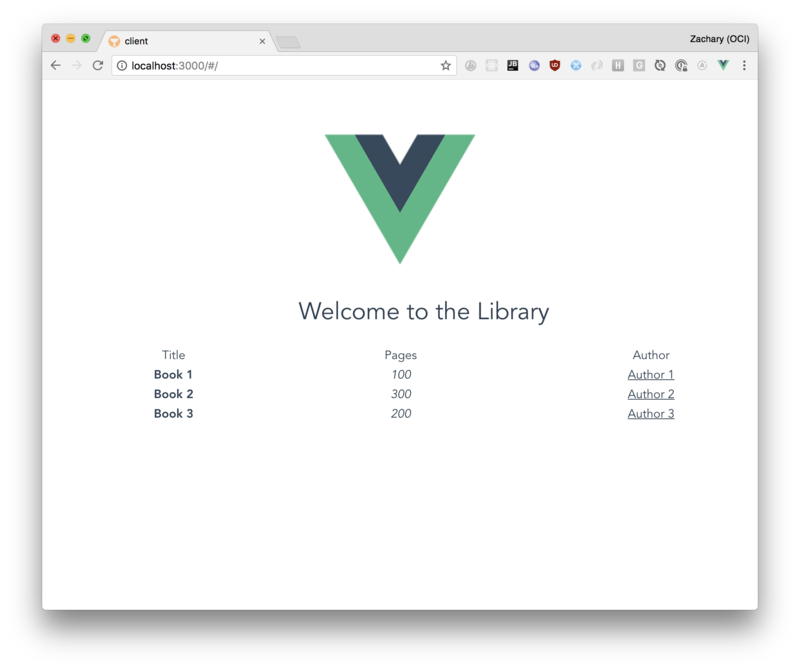
~ npm startBrowse to http://localhost:3000, and you should see a simple home page with a list of books:
Getting Dynamic
At this point there’s not really any dynamic behavior in our app. We’ll be adding some more interesting features shortly, but first, let’s add a simple "hover" mouseover effect to the rows in our book list. We will use Vue’s shorthand syntax for adding event handlers to elements, which was discussed in the last article.
To recap, the shorthand uses the @ symbol together with the name of the event being targeted as an attribute. The value of the attribute can be a function call or even simple manipulation of the component’s data, as shown in the following example.
Edit the Book component as shown below:
client/src/components/Book.vue
<template>
  <!-- CHANGE: Dynamically bind the "hover" CSS class to the class attribute of the element:
   if data.hover evaluates to 'true', then the hover class will be applied -->
  <tr :class="{ hover: hover, 'book-row': true }"
       @mouseover="hover = true"
       @mouseleave="hover = false">
       <!-- CHANGE: add event handlers using the `@` shorthand syntax -->

      <td class="title">{{book.title}}</td>
      <td class="pages">{{book.pages}}</td>
      <td class="author">{{book.author.name}}</td>
    </tr>
</template>

<script>
export default {
  name: 'Book',
  props: ['book'],
  data () {
    return {
      hover: false //CHANGE: Set our default `hover` state to 'false'
    }
  }
}
</script>

<style scoped>
  /* existing rules omitted */

  .hover {
    background: lightblue;
  }
</style>
Connecting to the API
Now that we’ve gotten our basic table UI working with hardcoded data, it’s time to plug into our backend and retrieve books directly from our API.
Vue doesn’t provide a mechanism for making REST calls (although there are helpers that add this functionality), but we can use any library for this purpose; Vue doesn’t mind which one we choose.
In this app, we will use the fetch API to make our REST calls.
As is the case in many frontend frameworks, Vue provides lifecycle hooks, which allow the developer to specify behavior that should happen at certain points in the "life" of a component (or an app). One of these hooks is the created method. Any code in this method will be executed when the component is instantiated, which makes it an ideal place to make our REST call to obtain our list of books.
Edit the <script> section of the Home component, as shown below.
client/src/components/Home.vue
<script>
import BookList from './BookList.vue'

export default {
  name: 'Home',
  data () { /* omitted */},

  //CHANGE: We are implementing a `created` lifecycle hook
  //which uses `fetch` to retrieve data from our API
  created: function () {
    fetch(`http://localhost:8080/book`)
      .then(r => r.json())
      .then(json => {
        this.books = json
      })
      .catch(e => console.warn(e))
  },
  components: {/* omitted */}
}
</script>
Deleting Books
Now it’s time to add some interactivity to our app. We want our users to be able to delete books from our list, as well as create new entries.
We could do this visually in the UI by simply removing or adding new rows to the table, but we’re going to take things a step further and make DELETE and POST requests to our API, so that our changes will be persisted to the database.
This interaction with the API will be done using methods on our component.
Methods are arbitrary functions that can be added to a Vue instance and executed (or passed around as references) from templates or from other methods. Methods have access to the instance’s data, as well.
Let’s add a removeBook method first, as it will be the simplest to implement in our UI.
Edit the Home component as shown below:
client/src/components/Home.vue
<template>
  <div class="hello">
    <h1>{{ msg }}</h1>

    <!-- Bind a new prop to the `BookList` component: removeBook -->
    <book-list :books="books" :removeBook="removeBook"  />

  </div>
</template>

<script>
import BookList from './BookList.vue'

export default {
  name: 'Home',
  data () { /* omitted */ },
  created: function () { /* omitted */ },

  //CHANGE: Methods are contained in a `methods` object, where the key is a method name, and the value is a function
  methods: {
    removeBook: function (id) {
      //Use the fetch API to make a 'delete' request to our API
      fetch(`http://localhost:8080/book/${id}`, {method: 'delete'})
        .then(r => {
          //CHANGE: If the delete was successful, update the 'books' data variable to remove the deleted book
          if (r.status === 204) {
            this.books = this.books.filter(b => b.id !== id)
          }
        })
    }
  },
  components: { /* omitted */ }
}
</script>

<style scoped>/* omitted */</style>
Edit the BookList component next as shown below:
client/src/components/BookList.vue
<template>
  <table class="book-list">
    <thead>
      <td>Title</td>
      <td>Pages</td>
      <td>Author</td>
      <td></td> <!-- CHANGE: Add a new <td> to create a column for the delete button -->
    </thead>
    <tbody>

      <!-- CHANGE: Pass-through the `removeBook` prop into the `Book` component -->
      <book :book="book" :removeBook="removeBook" :key="book.id" v-for="book in books" />
    </tbody>
  </table>
</template>

<script>
import Book from './Book.vue'

export default {
  name: 'BookList',

  //CHANGE: Add the 'removeBook' prop
  props: ['books', 'removeBook'],
  components: { /* omitted */ }
}
</script>

<style scoped>/* omitted*/</style>
Finally, edit the Book component as shown below:
client/src/components/Book.vue
<template>
  <tr :class="...">
      <!-- omitted -->

      <!-- CHANGE: Add a new `<td>` element
      CHANGE: Bind the `removeBook` function to the 'click' event of the button -->
      <td><button @click="removeBook(book.id)">X</button></td>
    </tr>
</template>

<script>
export default {
  name: 'book',
  props: ['book', 'removeBook'], //CHANGE: Add the 'removeBook' prop
  data () { /* omitted */ }
}
</script>

<style scoped>/* omitted*/</style>
At this point, if the app is running, you should see a simple 'X' button on each item in the list of books. Click that button, and the book will be removed from the table. Refresh the page to reload the data from the API – sure enough, the book is deleted!
(Note: you can restore the list of books by restarting the server app; the database will be recreated on each startup.)
Creating Books
We will create a simple form for creating new entries in our book table. Again, we will make use of our REST API by making a POST request to add the new book and then insert the new book in our list.
In addition, since books have a relationship with authors, we will also need to query our API for a list of authors, which can be selected in the form.
Forms are a common place where two-way binding is preferred by many developers, as it reduces the tediousness of explicitly binding event handlers and values to form elements.
Two-way binding allows the developer to specify the relationship between an element and a "model" object, allowing the framework to take care of "syncing" the state on both sides of the relationship. However, two-way binding has its downsides, as it reduces visibility and the developer’s control of state changes within the app.
Libraries like React have emphasized explicit one-way binding for its simplicity and predictability, and other frameworks have taken similar cues.
Vue makes it a point to support both binding approaches. We've already seen one-way binding (using directives like :book or @click), and now we'll make use of Vue's two-way binding with the v-model directive.
Create a new component named BookCreateForm under src/components and add the following content:
client/src/components/BookCreateForm.vue
<template>
  <div class="form">
    <div class="title cell">
      <label>Title</label>
      <input v-model="book.title" type="text"/>
    </div>
    <div class="pages cell">
      <label>Pages</label>
      <input v-model="book.pages" type="number"/>
    </div>
    <div class="author cell">
      <label>Author</label>

      <select v-model="book.author">
        <option disabled selected value="">Choose Author</option>
        <option :key="author.id" :value="{ id: author.id }" v-for="author in authors">{{author.name}}</option>
      </select>
    </div>
    <div class="save cell">
      <button @click="addBook(book)">Add Book</button>
    </div>
  </div>
</template>

<script>
export default {
  name: 'BookCreateForm',
  props: ['addBook', 'authors'],
  data () {
    return {
      book: {
        title: '',
        pages: null,
        author: null
      }
    }
  }
}
</script>

<style scoped>

  .cell {
    width: 250px;
    float: left
  }

</style>
As noted above, the v-model directive will cause Vue to update the values in our state based on the inputs on the form. We then call our addBook function prop when the submit button is clicked, passing our book state as an argument.
Back in our Home component, we have a few things to change. Edit the file as shown below:
client/src/components/Home.vue
<template>
  <div class="hello">
    <h1>{{ msg }}</h1>

    <!-- CHANGE: Add the book-create-form component, binding the authors array and addBook() method as props-->
    <book-create-form :authors="authors" :addBook="addBook"  />
    <br/><hr/>
    <book-list :books="books" :removeBook="removeBook"  />

  </div>
</template>

<script>
import BookList from './BookList.vue'
import BookCreateForm from './BookCreateForm' //CHANGE: Import the new `BookCreateForm` component

export default {
  name: 'Welcome',
  data () {
    return {
      msg: 'Welcome to the Library',
      books: [],
      authors: [] //CHANGE: Add an `authors` array to the data object
    }
  },
  created: function () {
    fetch(`http://localhost:8080/book`)
    // omitted

    //CHANGE: Add a fetch call to retrieve authors from our API
    fetch(`http://localhost:8080/author`)
      .then(r => r.json())
      .then(json => {
        this.authors = json
      })
      .catch(e => console.warn(e))
  },
  methods: {
    //CHANGE: Add an addBook method, which will make a POST request to our API
    //to persist a new book in the database - if the request was successful,
    //return the JSON response and insert the new book into our data object
    addBook: function (book) {
      fetch(`http://localhost:8080/book/`,
        {method: 'POST',
          headers: { 'Content-Type': 'application/json' },
          body: JSON.stringify(book)})
        .then(r => {
          if (r.status === 201) {
            return r.json()
          } else {
            throw Error('Could not save book')
          }
        })
        .then(json => {
          this.books.push(json)
        })
        .catch(e => console.error(e))
    },
    removeBook: function (id) { /* omitted */ }
  },
  components: {
    'book-list': BookList,
    'book-create-form': BookCreateForm //CHANGE: Add `BookCreateForm` to our components
  }
}
</script>

<style scoped>/* omitted*/</style>
Code Organization
We’re going to be writing a new batch of components for managing authors, but before we do so, let’s do some housekeeping in our codebase.
Create a new directory under src/components named book. Then move the three "book" components we’ve created so far – Book, BookList, and BookCreateForm – into the new subdirectory.
~ mkdir src/components/book
~ mv src/components/Book*.vue src/components/book/
Now we need to edit the imports in the Home component. While doing so, we’re going to use a bit of shorthand provided by the Webpack config in Vue CLI.
Rather than explicitly referring to src/components in all of our imports, we can use a shorthand to refer to any files under the components directory.
client/src/components/Home.vue
<script>
import BookList from '@/components/book/BookList'
import BookCreateForm from '@/components/book/BookCreateForm'

export default { /* omitted */ }
</script>
Authors
The new components we create will be very similar to the Book, BookList, and BookCreateForm, but this time we’ll be working with "authors".
Create a new directory named author under src/components and create the following three components in the new directory:
- Author
- AuthorList
- AuthorCreateForm
Author
client/src/components/author/Author.vue
<template>
  <tr  :class="{ hover: hover, 'author-row': true }"
       @mouseover="hover = true"
       @mouseleave="hover = false">
    <td class="name">{{author.name}}</td>
    <td class="books">{{author.books}}</td>
    <td><button @click="removeAuthor(author.id)">X</button></td>
  </tr>
</template>

<script>
export default {
  data () {
    return {
      hover: false
    }
  },
  props: ['author', 'removeAuthor']
}
</script>

<style scoped>
  .author-row {
    padding: 15px;
    border: 1px solid lightblue;
  }

  .hover {
    background: lightblue;
  }

  .name {
    font-weight: bold;
  }

  .books {
    font-style: italic;
  }
</style>
AuthorList
client/src/components/author/AuthorList.vue
<template>
  <table class="author-list">
    <thead>
    <td>Name</td>
    <td>Books</td>
    <td></td>
    </thead>
    <tbody>
    <author v-for="author in authors" v-bind="{author, removeAuthor}" :key="author.id" />
    </tbody>
  </table>
</template>
<script>
import Author from './Author.vue'

export default {
  name: 'author-list',
  props: ['authors', 'removeAuthor'],
  components: {'author': Author}
}
</script>

<style scoped>
  .author-list {
    clear: both;
    min-width: 1000px
  }
</style>
AuthorCreateForm
client/src/components/author/AuthorCreateForm.vue
<template>
  <div class="form">
    <div class="title cell">
      <label>Name</label>
      <input v-model="author.name" type="text"/>
    </div>

    <div class="save cell">
      <button @click="addAuthor(author)">Add Author</button>
    </div>
  </div>
</template>

<script>
export default {
  props: ['addAuthor'],
  data () {
    return {
      author: {
        name: ''
      }
    }
  }
}
</script>

<style scoped>
  .cell {
    width: 250px;
    float: left
  }
</style>
Home
Edit the Home component now to provide the required REST calls for saving/deleting authors via our API. Then add the new AuthorList and AuthorCreateForm to our template.
client/src/components/Home.vue
<template>
<div class="hello">
<h1>{{ msg }}</h1>
<book-create-form :authors="authors" :addBook="addBook" />
<br/><hr/>
<book-list :books="books" :removeBook="removeBook" />
<br/><hr/>
<!-- CHANGE: `author-create-form` element -->
<author-create-form :addAuthor="addAuthor" />
<br/><hr/>
<!-- CHANGE: `author-list element -->
<author-list :authors="authors" :removeAuthor="removeAuthor" />
</div>
</template>
<script>
import BookList from '@/components/book/BookList'
import BookCreateForm from '@/components/book/BookCreateForm'
import AuthorList from '@/components/author/AuthorList' //CHANGE: Import `AuthorList`
import AuthorCreateForm from '@/components/author/AuthorCreateForm' //CHANGE: Import `AuthorCreateForm`
export default {
data () {
return {
msg: 'Welcome to the Library',
books: [],
authors: []
}
},
created: function () { /* omitted */ },
methods: {
addBook: function (book) { /* omitted */ },
removeBook: function (id) { /* omitted */ },
addAuthor: function (author) { //CHANGE: addAuthor method to POST new author to API
fetch(`http://localhost:8080/author/`,
{ method: 'POST',
headers: { 'Content-Type': 'application/json' },
body: JSON.stringify(author)})
.then(r => {
if (r.status === 201) return r.json()
else throw Error('Could not save author')
})
.then(json => this.authors.push(json))
.catch(e => console.error(e))
},
removeAuthor: function (id) { //CHANGE: removeAuthor method to delete author from API
fetch(`http://localhost:8080/author/${id}`, {method: 'delete'})
.then(r => {
if (r.status === 204) this.authors = this.authors.filter(b => b.id !== id)
})
}
},
components: {
'book-list': BookList,
'book-create-form': BookCreateForm,
'author-list': AuthorList, //CHANGE: `AuthorList` component
'author-create-form': AuthorCreateForm //CHANGE: `AuthorCreateForm` component
}
}
</script>
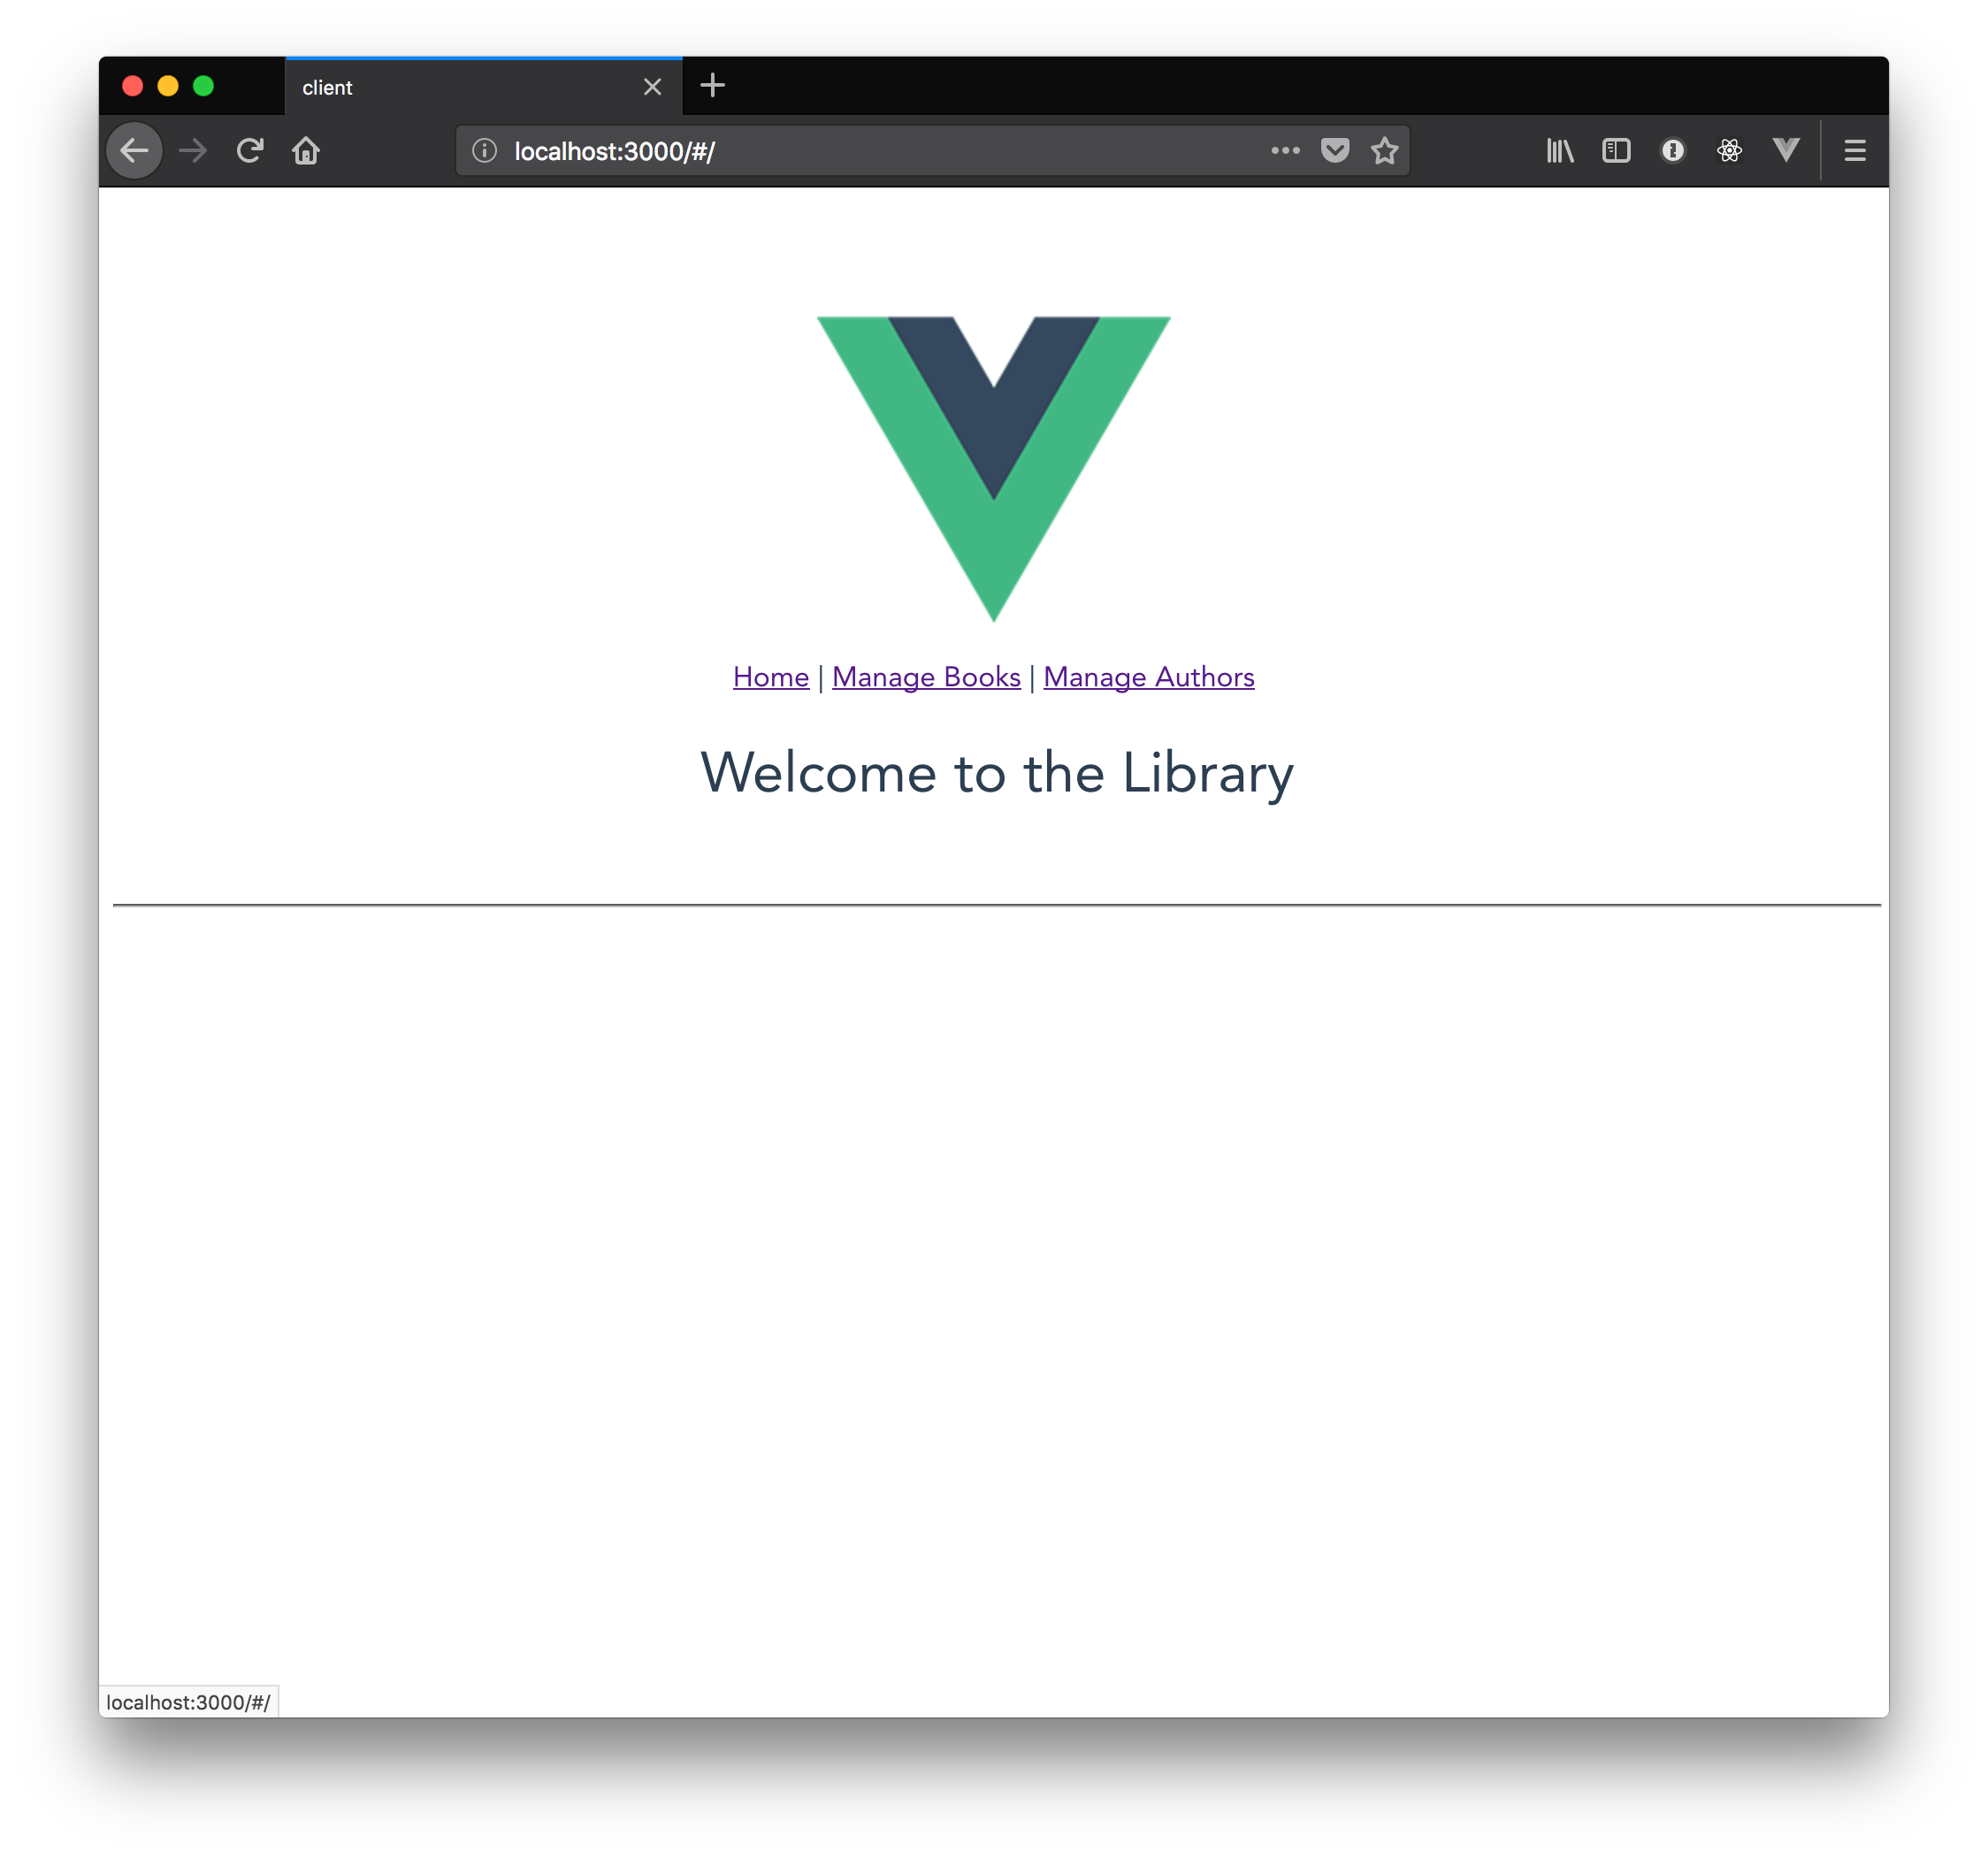
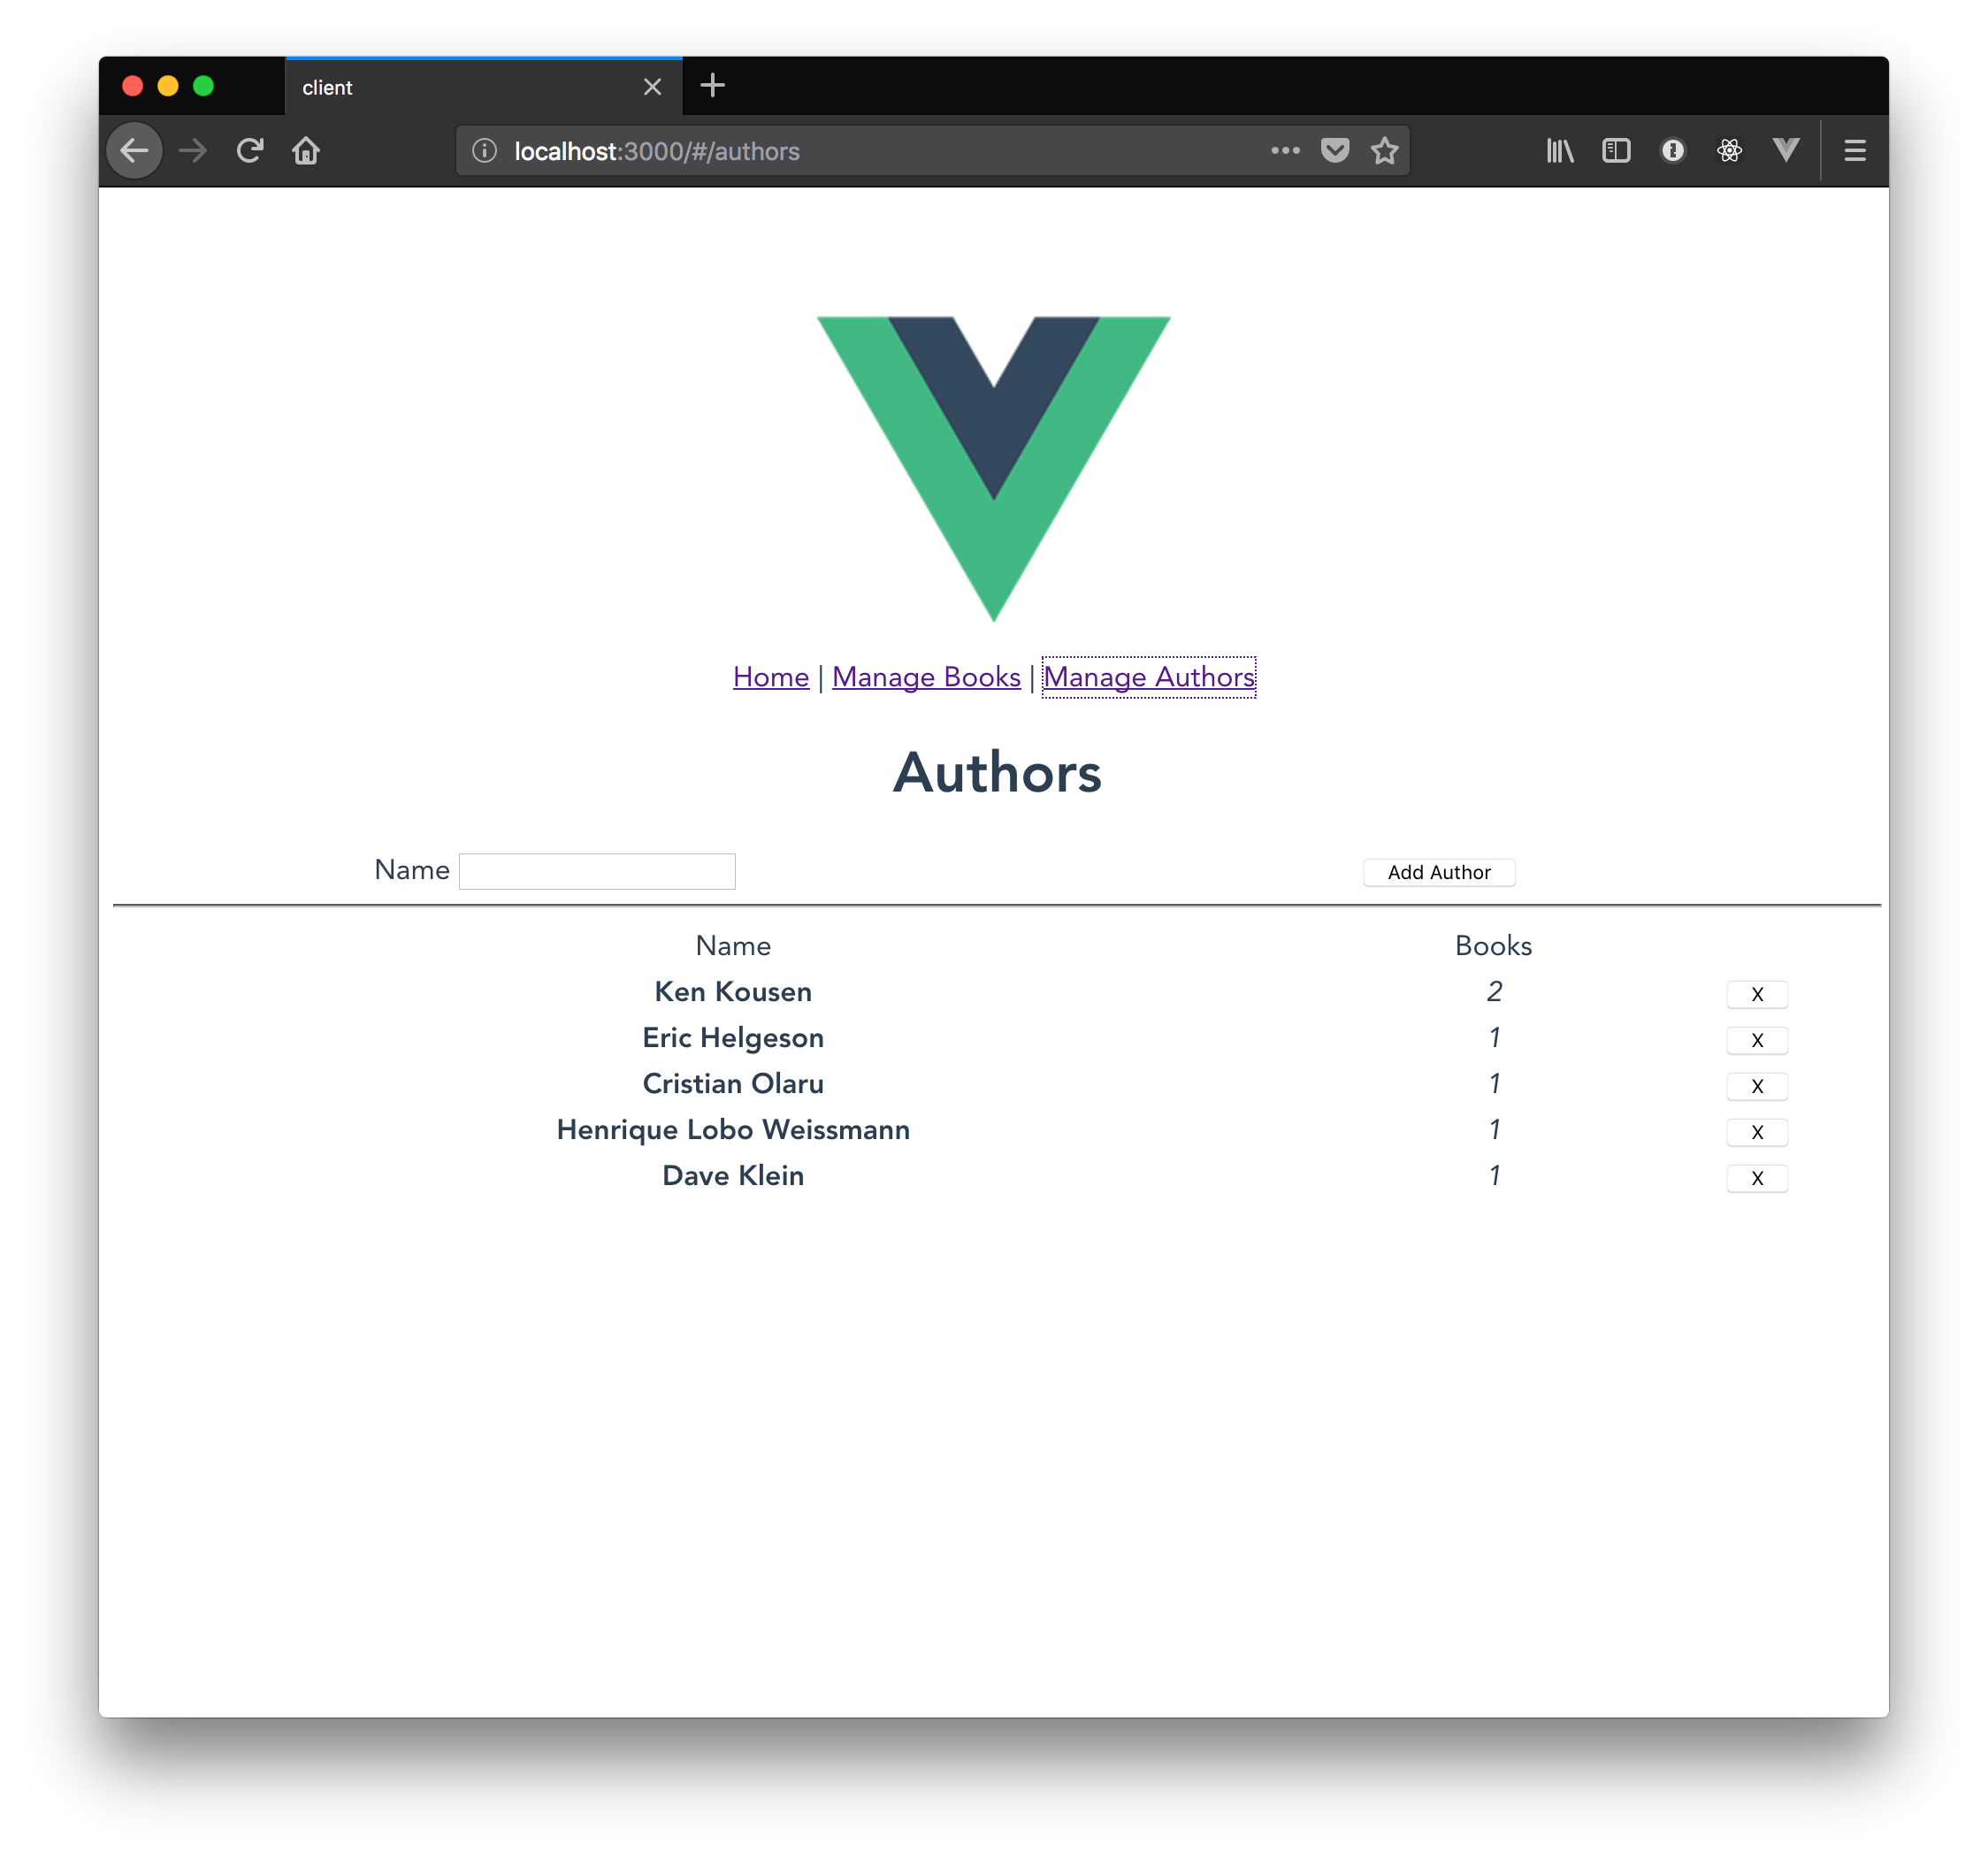
<style scoped>/* omitted */</style>In the browser, you should now see the new form and table listing authors in the database.
You can add a new author via the form; notice that the new author is also added to the authors element in the BookCreateForm.
Usability Improvements
We’ve now implemented the basic functionality of our app (creating/deleting books and authors).
There are still a number of improvements we can make, of course, and these will allow us to see a few more features of Vue in action.
Clear & Focus Forms
After adding a new book or author, the form inputs still contain the values they had when the form was submitted. In addition, the focus remains on the "save" button, rather than returning to the first input element as a user typically would expect.
Edit the BookCreateForm component:
client/src/components/book/BookCreateForm.vue
<template>
  <div class="form">
    <div class="title cell">
      <label>Title</label><!-- CHANGE: Add `ref` attribute-->
      <input v-model="book.title" type="text" ref="bookTitle"/>
    </div>
    <div class="pages cell">
      <label>Pages</label>
      <input v-model="book.pages" type="number"/>
    </div>
    <div class="author cell">
      <label>Author</label>

      <select v-model="book.author">
        <option disabled selected value="">Choose Author</option>
        <option :key="author.id" :value="{ id: author.id }" v-for="author in authors">{{author.name}}</option>
      </select>
    </div>
    <div class="save cell"><!-- CHANGE: change @click event handler to `submitNewBook()`-->
      <button @click="submitNewBook()">Add Book</button>
    </div>
  </div>
</template>

<script>
export default {
  name: 'BookCreateForm',
  props: ['addBook', 'authors'],
  data () { /* omitted */},
  methods: {
    submitNewBook: function () {  //CHANGE: Add `submitNewBook()` method
      this.addBook(this.book)     //Call `addBook()` function from within method
      this.book = {title: '', pages: null, author: {}} //Reset `book` to an empty object
      this.$refs.bookTitle.focus()//Set browser focus to `bookTitle` ref
    }
  }
}
</script>

<style scoped>/* omitted */</style>
Edit the AuthorCreateForm component and make the same changes:
client/src/components/author/AuthorCreateForm.vue
<template>
  <div class="form">
    <div class="title cell">
      <label>Name</label><!-- CHANGE: Add `ref` attribute-->
      <input v-model="author.name" type="text" ref="authorName">
    </div>

    <div class="save cell"><!-- CHANGE: change @click event handler to `submitNewAuthor()`-->
      <button @click="submitNewAuthor()">Add Author</button>
    </div>
  </div>
</template>

<script>
export default {
  props: ['addAuthor'],
  data () { /* omitted */},
  methods: {
    submitNewAuthor: function () { //CHANGE: Add `submitNewAuthor()` method
      this.addAuthor(this.author)  //Call `addAuthor()` function from within method
      this.author = {name: ''}     //Reset `author` to an empty object
      this.$refs.authorName.focus()//Set browser focus to `authorName` ref
    }
  }
}
</script>

<style scoped>/* omitted */</style>
Deleting an Author's books
Our backend server is configured to perform cascading deletes, meaning that if an author is deleted, all books "belonging" to that author are also deleted. However, currently our UI does not reflect the deleted books; until you refresh the page (and fresh data is retrieved from the API), the "orphaned" books remain in the list.
Let’s correct this behavior.
Edit the removeAuthor method in the Home component:
client/src/components/Home.vue
removeAuthor: function (id) {
  fetch(`http://localhost:8080/author/${id}`, {method: 'delete'})
    .then(r => {
      if (r.status === 204) {
        this.authors = this.authors.filter(b => b.id !== id)
        this.books = this.books.filter(b => b.author.id !== id) //CHANGE: Filter out books from the deleted author
      }
    })
}
Managing State with Vuex
As an app grows in complexity, managing its state can become a time-consuming and confusing task. Unless a consistent strategy is followed, code for setting and modifying state can become spread across the codebase, making it difficult to trace bugs and leading to duplication of code.
State-management libraries can help mitigate these problems, and the Vue team has provided an official solution in Vuex.
Here’s how we described Vuex in the previous article in this series:
Like Redux, Vuex provides a single store for all of your app state. You define mutations, which are functions that transform the state based on some input. These mutations are called by actions, which are functions that can be dispatched from your components in order to trigger state changes on their behalf.
Installing Vuex
Install Vuex in your project by running the following command within the project directory (client):
npm install vuexThis will add the dependency for Vuex to the package.json file. It should look something like this:
"dependencies": {
  "vue": "^2.5.2",
  "vue-router": "^3.0.1",
  "vuex": "^3.0.1" //<---
},
Store & Mutations
The first step to using Vuex in our app will be to create the store.
Following the Vue-CLI conventions, create a new directory under client/src named store:
~ mkdir client/src/storeNow create a new JavaScript file named index.js within the store directory.
Within this file, we will instantiate the store, supply it with our initial state, and define a set of methods called mutations to handle changes to the store.
The implementation of the mutation methods will look very similar to the methods we have defined in our Home component already, so you should be able to follow along with the code quite easily by now.
client/src/store/index.js
import Vue from 'vue'
import Vuex from 'vuex'

Vue.use(Vuex) //Loads the Vuex plugin

const store = new Vuex.Store({ //Instantiate the store, passing it a definition object

  //state is an object representing the initial state of the store
  state: {
    authors: [],
    books: []
  },
  //mutations is an object containing functions for mutating (changing) the state of the store
  mutations: {

    //Each mutation receives two arguments: the current state, and a "payload"
    //containing the data needed to make the necessary change/s to thre store
    addBookStore (state, {book}) {
      state.books.push(book)
      //In this method, the payload object contains the new book to be added to the store
    },
    addAuthorStore (state, {author}) {
      state.authors.push(author)
    },
    removeBookStore (state, {id}) {
      state.books = state.books.filter(b => b.id !== id)
    },
    removeAuthorStore (state, {id}) {
      state.authors = state.authors.filter(a => a.id !== id)
      state.books = state.books.filter(b => b.author.id !== id)
    },
    setBooks (state, {books}) {
      state.books = books
    },
    setAuthors (state, {authors}) {
      state.authors = authors
    }
  }
})

export default store
Now that our store is ready, we need to plug it into our Vue app by passing the store into our main Vue instance, which is done in src/main.js.
Edit that file as shown below:
import Vue from 'vue'
import App from './App'
import router from './router'
import store from './store' //CHANGE: Import the store

Vue.config.productionTip = false

/* eslint-disable no-new */
new Vue({
  el: '#app',
  router,
  store, //CHANGE: Add the store to the instance definition object
  components: { App },
  template: '<App/>'
})
With our store instantiated and loaded in our main Vue instance, all of our components can access the store via Vuex’s helpful API helpers.
Let’s start by storing and retrieving our books and authors arrays in the store.
Edit the Home component as shown below:
client/src/components/Home.vue
<template><!-- omitted --></template>

<script>
import BookList from '@/components/book/BookList'
import BookCreateForm from '@/components/book/BookCreateForm'
import AuthorList from '@/components/author/AuthorList'
import AuthorCreateForm from '@/components/author/AuthorCreateForm'
import { mapMutations } from 'vuex' //CHANGE: Import the `mapMutations` helper

export default {
  data () {
    return {
      msg: 'Welcome to the Library'
      //CHANGE: Remove `books` and `authors` array
    }
  },
  computed: { //CHANGE: Add computed block

    books: { //CHANGE: The books computed property will retrieve/set the books property in the Vuex store

      //This function is a "getter" - it retrieves the books from `this.$store.state`
      get () { return this.$store.state.books },
      //This function is a "setter" - it "commits" the `setBooks` mutation and passes the new books array as an argument
      set (books) { this.$store.commit('setBooks', {books}) }
    },
    authors: {//CHANGE: The authors computed property works the same as books
      get () { return this.$store.state.authors },
      set (authors) { this.$store.commit('setAuthors', {authors}) }
    }
  },
  methods: {
    ...mapMutations([ //CHANGE: Use the `mapMutations` method to add the listed mutations as methods
      'addBookStore',
      'addAuthorStore',
      'removeBookStore',
      'removeAuthorStore'
    ]),
    addBook: function (book) {
      fetch(`http://localhost:8080/book/`,
        { method: 'POST',
          headers: { 'Content-Type': 'application/json' },
          body: JSON.stringify(book)})
        .then(r => {
          if (r.status === 201) return r.json()
          else throw Error('Could not save book')
        })
        .then(book => this.addBookStore({book})) //CHANGE: Call the `addBookStore` mutation method
        .catch(e => console.error(e))
    },
    addAuthor: function (author) {
      fetch(`http://localhost:8080/author/`,
        { method: 'POST',
          headers: ,
          body: JSON.stringify(author)})
        .then(r => {
          if (r.status === 201) return r.json()
          else throw Error('Could not save author')
        })
        .then(author => this.addAuthorStore({author})) //CHANGE: Call the `addAuthorStore` mutation method
        .catch(e => console.error(e))
    },
    removeBook: function (id) {
      fetch(`http://localhost:8080/book/${id}`, {method: 'delete'})
        .then(r => {
          if (r.status === 204) this.removeBookStore({id}) //CHANGE: Call the `removeBookStore` mutation method
        })
    },
    removeAuthor: function (id) {
      fetch(`http://localhost:8080/author/${id}`, {method: 'delete'})
        .then(r => {
          if (r.status === 204) this.removeAuthorStore({id}) //CHANGE: Call the `removeAuthorStore` mutation method
        })
    }
  },
  created: function () {
    fetch(`http://localhost:8080/book`)
      .then(r => r.json())
      .then(json => this.books = json) //Notice that we use the computed `books` property exactly as we used the data property before
      .catch(e => console.warn(e))

    fetch(`http://localhost:8080/author`)
      .then(r => r.json())
      .then(json => this.authors = json)
      .catch(e => console.warn(e))
  },
  components: {/* omitted */}
}
</script>

<style scoped>/* omitted */</style>
Go ahead and try out the app in the browser; it should behave just as it did before, as all we’ve done is move the state of our Home component into the Vuex store and add the logic to change that state into mutations.
At this point, it may not seem we’ve gained much readability with our refactored code, but that will change once we complete our Vuex migration.
Actions
In Vuex, similar to Flux/Redux, actions are methods that coordinate the committing of mutations to the store. Unlike mutations, which simply accept incoming data and update the store, actions are able to perform asynchronous operations (such as Ajax calls), dispatch other actions, and potentially call (commit) multiple mutations.
Use of actions is completely optional; as we saw in the previous code change, components can commit mutations directly without using actions. However, actions provide a sensible organization for arbitrary logic that is not directly concerned with updates to the store.
Store (final version)
client/src/store/index
import Vue from 'vue'
import Vuex from 'vuex'

Vue.use(Vuex)

const store = new Vuex.Store({
  state: {/* omitted */},
  mutations: {
    addBook (state, {book}) { //CHANGE: Rename to `addBook`
      state.books.push(book)
    },
    addAuthor (state, {author}) { //CHANGE: Rename to `addAuthor`
      state.authors.push(author)
    },
    removeBook (state, {id}) { //CHANGE: Rename to `removeBook`
      state.books = state.books.filter(b => b.id !== id)
    },
    removeAuthor (state, {id}) { //CHANGE: Rename to `removeAuthor`
      state.authors = state.authors.filter(a => a.id !== id)
      state.books = state.books.filter(b => b.author.id !== id)
    },
    setBooks (state, {books}) {
      state.books = books
    },
    setAuthors (state, {authors}) {
      state.authors = authors
    }
  },
  actions: { //CHANGE: Add `actions` object to contain action methods

    //Each action is a function that accepts an an object called `context`;
    //It contains several useful objects and methods for interacting with the store,
    //including `commit` (helper method to commit mutations), `dispatch`
    //(to dispatch other actions), and the current `state` of the store
    loadAuthors: function ({commit, state}) {
      fetch(`http://localhost:8080/author`)
        .then(r => r.json())
        .then(authors => commit('setAuthors', {authors})) //Use the  `commit` helper to call the `setAuthors` mutation
        .catch(e => console.warn(e))
    },
    loadBooks: function ({commit, state}) {
      fetch(`http://localhost:8080/book`)
        .then(r => r.json())
        .then(books => commit('setBooks', {books})) //Use the  `commit` helper to call the `setBooks` mutation
        .catch(e => console.warn(e))
    },
     //Actions can optionally accept a payload object, for supplying data to the action.
     //Here the `saveBook` action accepts a `payload.book` object (accessed via destructuring shorthand)
    saveBook: function ({commit, state}, {book}) {
      fetch(`http://localhost:8080/book`,
        {
          method: 'POST',
          headers: {'Content-Type': 'application/json'},
          body: JSON.stringify(book)
        })
        .then(r => r.json())
        .then(book => commit('addBook', {book})) //Use the  `commit` helper to call the `addBook` mutation
        .catch(e => console.warn(e))
    },
    saveAuthor: function ({commit, state}, {author}) {
      fetch(`http://localhost:8080/author`,
        {
          method: 'POST',
          headers: {'Content-Type': 'application/json'},
          body: JSON.stringify(author)
        })
        .then(r => r.json())
        .then(author => commit('addAuthor', {author})) //Use the  `commit` helper to call the `addAuthor` mutation
        .catch(e => console.warn(e))
    },
    deleteBook: function ({commit, state}, {id}) {
      fetch(`http://localhost:8080/book/${id}`,
        {
          method: 'DELETE'
        }).then(response => {
        if (response.status === 204) {
          commit('removeBook', {id}) //Use the  `commit` helper to call the `removeBook` mutation
        }
      })
    },
    deleteAuthor: function ({commit, state}, {id}) {
      fetch(`http://localhost:8080/author/${id}`,
        {
          method: 'DELETE'
        }).then(response => {
        if (response.status === 204) {
          commit('removeAuthor', {id}) //Use the  `commit` helper to call the `removeAuthor` mutation
        }
      })
    }
  }
})

export default store
With the logic for Ajax calls moved into Vuex actions, our Home component becomes much simpler.
Edit the file as shown below (entire component shown for completion):
client/src/components/Home.vue
<template>
  <div class="hello">
    <h1>{{ msg }}</h1>

    <book-create-form /> <!-- CHANGE: Remove all attributes -->
    <br/><hr/>
    <book-list  /> <!-- CHANGE: Remove all attributes -->

    <br/><hr/>
    <author-create-form /> <!-- CHANGE: Remove all attributes -->

    <br/><hr/>
    <author-list  /> <!-- CHANGE: Remove all attributes -->

  </div>
</template>

<script>
import BookList from '@/components/book/BookList'
import BookCreateForm from '@/components/book/BookCreateForm'
import AuthorList from '@/components/author/AuthorList'
import AuthorCreateForm from '@/components/author/AuthorCreateForm'
import { mapActions } from 'vuex'

export default {
  data () {
    return {
      msg: 'Welcome to the Library'
    }
  },
  //CHANGE: Remove the `computed` object - we will now access the books and authors
  //from the store from within their respective *List components
  methods: {
    ...mapActions([
      'loadAuthors',
      'loadBooks'
    ])
  }, //CHANGE: Remove all methods, using `mapActions` to add the two "loading" actions
  created: function () {
    this.loadAuthors() //CHANGE: Replace Ajax calls with calls to our actions
    this.loadBooks()
  },
  components: {
    'book-list': BookList,
    'book-create-form': BookCreateForm,
    'author-list': AuthorList,
    'author-create-form': AuthorCreateForm
  }
}
</script>

<style scoped>
  .hello {
    width: 1000px;
    margin: 0 auto;
  }

  h1, h2 {
    font-weight: normal;
  }

  ul {
    list-style-type: none;
    padding: 0;
  }

  li {
    display: inline-block;
    margin: 0 10px;
  }

  a {
    color: #42b983;
  }
</style>
Now we will edit our AuthorList and BookList components to access their respective lists from the store directly.
BookList (final version)
client/src/components/book/BookList.vue
<template>
  <table class="book-list">
    <thead>
      <td>Title</td>
      <td>Pages</td>
      <td>Author</td>
      <td></td>
    </thead>
    <tbody>
    <book :book="book" :deleteBook="deleteBook" :key="book.id" v-for="book in books" />
    </tbody>
  </table>
</template>
<script>
import Book from './Book.vue'
import {mapActions} from 'vuex' //CHANGE: Import the `mapActions` helper

export default {
  name: 'book-list',
  //CHANGE: Remove `props` property
  methods: {
    ...mapActions([ //CHANGE: use `mapActions` to load `deleteBook` action
      'deleteBook'
    ])
  },
  computed: { //CHANGE: Add computed block with getter/setter for books
    books: {
      get () { return this.$store.state.books },
      set (books) { this.$store.commit('setBooks', {books}) }
    }
  },
  components: {
    book: Book
  }
}
</script>

<style scoped>
  .book-list {
    clear:both;
    min-width: 1000px
  }
</style>
AuthorList (final version)
client/src/components/author/AuthorList.vue
<template>
  <table class="author-list">
    <thead>
    <td>Name</td>
    <td>Books</td>
    <td></td>
    </thead>
    <tbody>
    <author v-for="author in authors" v-bind="{author, deleteAuthor}" :key="author.id" />
    </tbody>
  </table>
</template>
<script>
import Author from './Author.vue'
import {mapActions} from 'vuex' //CHANGE: Import the `mapActions` helper

export default {
  name: 'author-list',
  //CHANGE: Remove `props` property
  methods: {
    ...mapActions([ //CHANGE: use `mapActions` to load `deleteAuthor` action
      'deleteAuthor'
    ])
  },
  computed: { //CHANGE: Add computed block with getter/setter for authors
    authors: {
      get () { return this.$store.state.authors },
      set (authors) { this.$store.commit('setAuthors', {authors}) }
    }
  },
  components: {'author': Author}
}
</script>

<style scoped>
  .author-list {
    clear: both;
    min-width: 1000px
  }
</style>
Next, we will update our Book and Author components to use our Vuex actions in place of the original methods.
Author (final version)
client/src/components/author/Author.vue
<template>
  <tr  :class="{ hover: hover, 'author-row': true }"
       @mouseover="hover = true"
       @mouseleave="hover = false">
    <td class="name">{{author.name}}</td>
    <td class="books">{{author.books}}</td>

    <td><button @click="deleteAuthor({id: author.id})">X</button></td>
    <!-- CHANGE: Replace `removeAuthor()` with `deleteAuthor()`, passing in an object containing the author.id -->
  </tr>
</template>

<script>
export default {
  data () {
    return {
      hover: false
    }
  },
  props: ['author', 'deleteAuthor'] <!-- CHANGE: Change name of prop to match `deleteAuthor()` -->
}
</script>

<style scoped>
  .author-row {
    padding: 15px;
    border: 1px solid lightblue;
  }

  .hover {
    background: lightblue;
  }

  .name {
    font-weight: bold;
  }

  .books {
    font-style: italic;
  }

</style>
Book (final version)
client/src/components/book/Book.vue
<template>
  <tr :class="{ hover: hover, 'book-row': true }"
       @mouseover="hover = true"
       @mouseleave="hover = false">
      <td class="title">{{book.title}}</td>
      <td class="pages">{{book.pages}}</td>
      <td class="author">{{book.author.name}}</td>
      <td><button @click="deleteBook({id: book.id})">X</button></td>
      <!-- CHANGE: Replace `removeBook()` with `deleteBook()`, passing in an object containing the book.id -->
    </tr>
</template>

<script>
export default {
  name: 'book',
  props: ['book', 'deleteBook'], <!-- CHANGE: Change name of prop to match `deleteBook()` -->
  data () {
    return {
      hover: false
    }
  }
}
</script>

<style scoped>
  .book-row {
    padding: 15px;
    border: 1px solid lightblue;
  }

  .title {
    font-weight: bold;
  }

  .pages {
    font-style: italic;
  }

  .author {
    text-decoration: underline;
  }

  .hover {
    background: lightblue;
  }
</style>
The final step in our Vuex migration is to connect the form components with the appropriate actions.
BookCreateForm (final version)
client/src/components/book/BookCreateForm.vue
<template>
  <div class="form">
    <div class="title cell">
      <label>Title</label>
      <input v-model="book.title" type="text" ref="bookTitle"/>
    </div>
    <div class="pages cell">
      <label>Pages</label>
      <input v-model="book.pages" type="number"/>
    </div>
    <div class="author cell">
      <label>Author</label>

      <select v-model="book.author">
        <option disabled selected value="">Choose Author</option>
        <option :key="author.id" :value="{ id: author.id }" v-for="author in authors">{{author.name}}</option>
      </select>
    </div>
    <div class="save cell">
      <button @click="submitNewBook()">Add Book</button>
    </div>
  </div>
</template>

<script>
import { mapActions } from 'vuex' //CHANGE: Import the `mapActions` helper

export default {
  name: 'BookCreateForm',
  //CHANGE: Remove `props` property
  data () {
    return {
      book: {
        title: '',
        pages: null,
        author: null
      }
    }
  },
  computed: {  //Add computed block with getter/setter for `authors` from store
    authors: {
      get () { return this.$store.state.authors },
      set (authors) { this.$store.commit('setAuthors', {authors}) }
    }
  },
  methods: {
    ...mapActions([ //Use `mapActions` to load `saveBook` action
      'saveBook'
    ]),
    submitNewBook: function () {
      this.saveBook({book: this.book})
      this.book = {title: '', pages: null, author: {}}
      this.$refs.bookTitle.focus()
    }
  }
}
</script>

<style scoped>
  .cell {
    width: 250px;
    float: left
  }
</style>
AuthorCreateForm (final version)
client/src/components/author/AuthorCreateForm.vue
<template>
  <div class="form">
    <div class="title cell">
      <label>Name</label>
      <input v-model="author.name" type="text" ref="authorName">
    </div>

    <div class="save cell">
      <button @click="submitNewAuthor()">Add Author</button>
    </div>
  </div>
</template>

<script>
import {mapActions} from 'vuex' //CHANGE: Import the `mapActions` helper

export default {
  //CHANGE: Remove `props` property
  data () {
    return {
      author: {
        name: ''
      }
    }
  },
  methods: {
    ...mapActions([ //Use `mapActions` to load `saveAuthor` action
      'saveAuthor'
    ]),
    submitNewAuthor: function () {
      this.saveAuthor({author: this.author})
      this.author = {name: ''}
      this.$refs.authorName.focus()
    }
  }
}
</script>

<style scoped>
  .cell {
    width: 500px;
    float: left
  }
</style>
Routing
Our final step in this article will be to split our book and author components into separate routes using Vue Router.
We’ve already seen Vue Router’s config file, but we haven’t taken advantage of any of its features. Before we can do that, we need to separate our book and author components with their own "view" components, so that each can be rendered independently.
Create a new file named BookView.vue under components/book and edit it as shown below:
BookView (final version)
client/src/components/book/BookView.vue
<template>
  <!-- In our template, we render the `BookCreateForm` and `BookList` elements -->
  <div>
    <h1>Books</h1>
    <book-create-form />
    <br/><hr/>
    <book-list />
  </div>
</template>

<script>
import BookCreateForm from './BookCreateForm'
import BookList from './BookList'
import {mapActions} from 'vuex'

export default {
  name: 'book-view',
  components: {
    BookList, BookCreateForm
  },
  methods: {
    ...mapActions([
      'loadBooks'
    ])
  },
  created: function () {
    //This will ensure the books are retrieved from the API when this route is loaded
    this.loadBooks()
  }
}
</script>

<style scoped>
  div {
    width: 1000px;
    margin: 0 auto;
  }
</style>
Create a new file named AuthorView.vue under components/author:
client/src/components/author/AuthorView.vue
<template>
  <!-- In our template, we render the `AuthorCreateForm` and `AuthorList` elements -->
  <div>
    <h1>Authors</h1>
    <author-create-form />
    <br/><hr/>
    <author-list />
  </div>
</template>

<script>
import AuthorList from './AuthorList'
import AuthorCreateForm from './AuthorCreateForm'
import {mapActions} from 'vuex'

export default {
  name: 'author-view',
  components: {
    AuthorList, AuthorCreateForm
  },
  methods: {
    ...mapActions([
      'loadAuthors'
    ])
  },
  created: function () {
    //This will ensure the authors are retrieved from the API when this route is loaded
    this.loadAuthors()
  }
}
</script>

<style scoped>
  div {
    width: 1000px;
    margin: 0 auto;
  }
</style>
Our Home component will now be stripped down to a simple template and message, as Vue Router will take care of rendering the rest of the views (final file shown below).
Home (final version)
client/src/components/Home.vue
<template>
  <div class="hello">
    <h1>{{ msg }}</h1>
    <br/><hr/>
  </div>
</template>

<script>
export default {
  data () {
    return {
      msg: 'Welcome to the Library'
    }
  }
}
</script>

<style scoped>
  .hello {
    width: 1000px;
    margin: 0 auto;
  }

  h1, h2 {
    font-weight: normal;
  }

  ul {
    list-style-type: none;
    padding: 0;
  }

  li {
    display: inline-block;
    margin: 0 10px;
  }

  a {
    color: #42b983;
  }
</style>
We can now use our three "view" components – Home, BookView, and AuthorView – to set up our routes.
Edit the file src/router/index.js:
Router (final version)
client/src/router/index.js
import Vue from 'vue'
import Router from 'vue-router'
import Home from '@/components/Home'
import BookView from '@/components/book/BookView'
import AuthorView from '@/components/author/AuthorView'
Vue.use(Router)
export default new Router({
routes: [
{
path: '/',
name: 'Home',
component: Home
},
{
path: '/books', //Path for the route
name: 'Books', //Route name
component: BookView //Component to render
},
{
path: '/authors',
name: 'Authors',
component: AuthorView
}
]
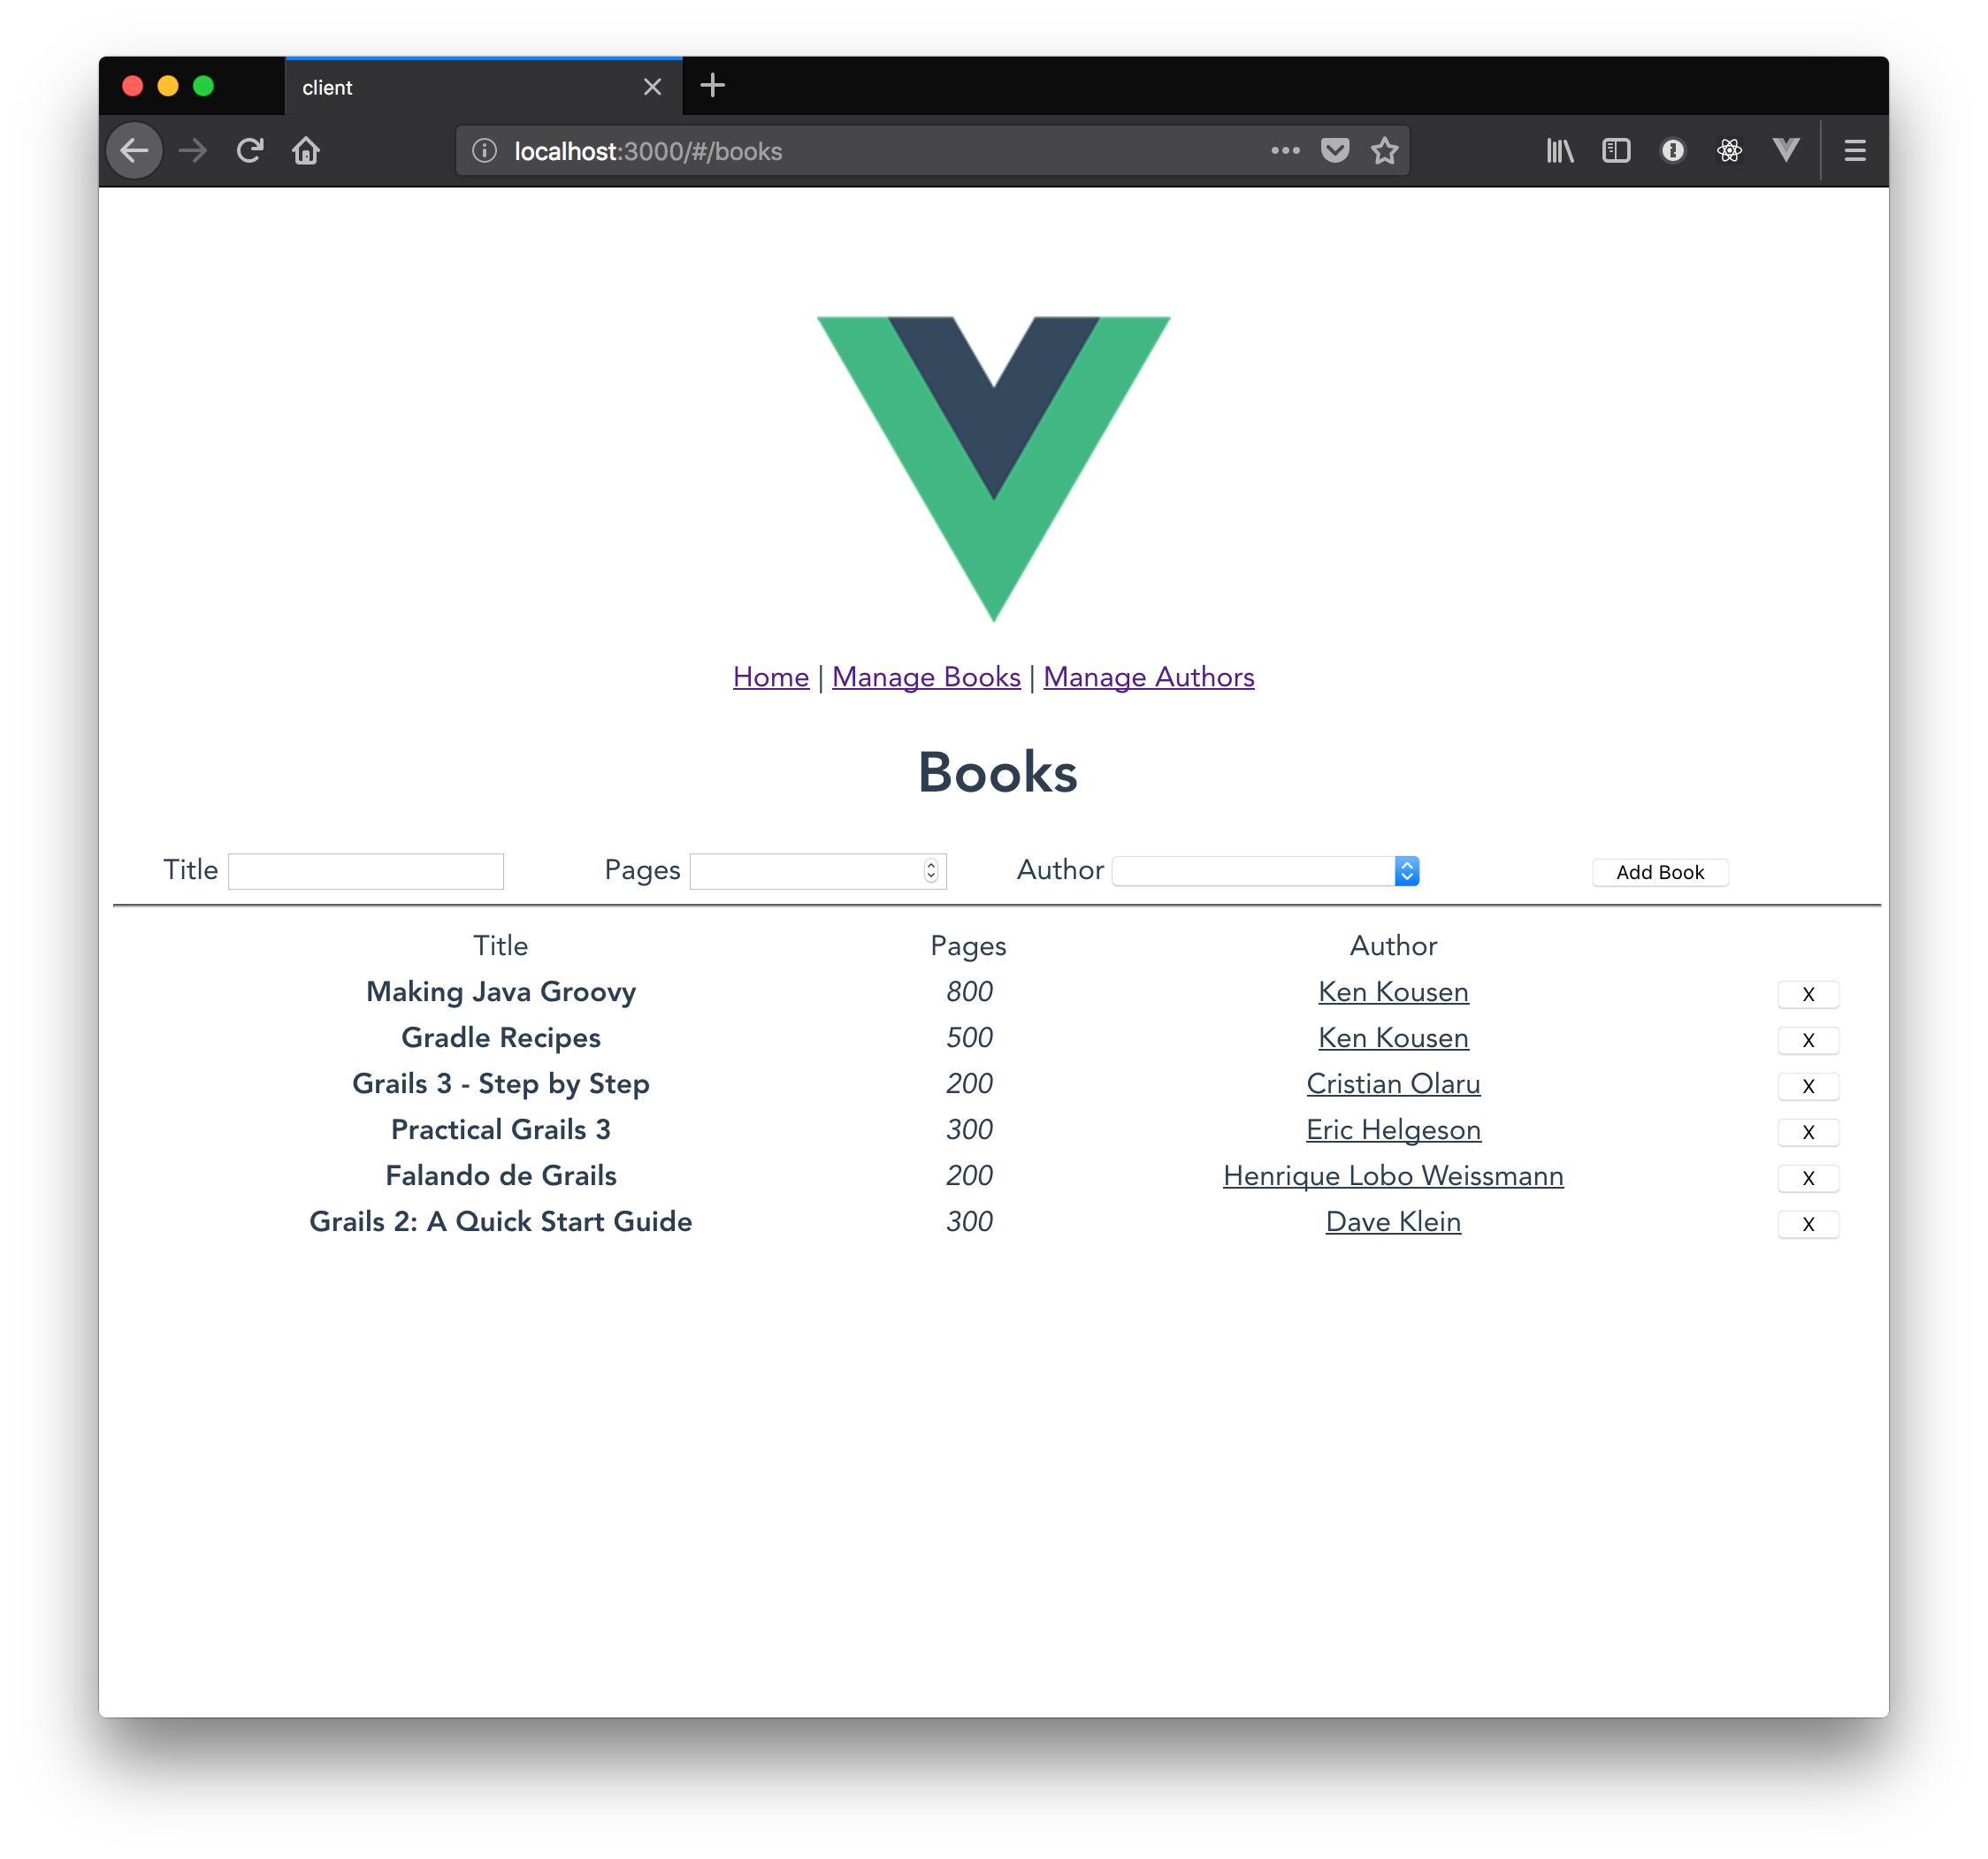
})Finally, we’ll add some navigation links to the App component so that we can switch between routes easily.
Edit the file src/App.vue:
App (final version)
client/src/App.vue
<template>
  <div id="app">
    <img src="./assets/logo.png">
    <br/>
    <!-- CHANGE: Add links using the <router-link> component provided by Vue Router-->
    <router-link to="/">Home</router-link>
    <router-link to="/books">Manage Books</router-link>
    <router-link to="/authors">Manage Authors</router-link>
    <br/>

    <router-view/>
  </div>
</template>

<script>
export default {
  name: 'App'
}
</script>

<style>
#app {
  font-family: 'Avenir', Helvetica, Arial, sans-serif;
  -webkit-font-smoothing: antialiased;
  -moz-osx-font-smoothing: grayscale;
  text-align: center;
  color: #2c3e50;
  margin-top: 60px;
}
</style>
Head back to the browser and play around with the finished product.
Summary
This concludes our tutorial on building an app with Vue.js.
You’ve been able to use a wide range of features, not only of Vue itself, but Vuex and Vue Router.
Of course this is a simplistic example, and we’ve only scratched the surface of what can be done with these libraries, but by this point, you should feel confident enough to continue to experiment and learn on your own or follow along with the many resources available online.
In the meantime, keep learning and have fun coding!
Part 3 in this series compares Vue with its primary competitors, React and Angular, and provides some perspective on what the future holds for Vue and its ecosystem.
Software Engineering Tech Trends (SETT) is a regular publication featuring emerging trends in software engineering.
