Introduction
Many people talk about how easy it is to build web applications using Node.js. However, it's difficult to find resources that cover all the steps. We will do that here. Some details will be omitted. We want to focus on the primary steps.
This article makes specific technology/tool choices. Obviously, the steps may differ if different choices are made. The primary choices made here include Node.js, PostgreSQL, and React. This article was inspired by the Frontend Masters workshop "Zero to Production Node.js on Amazon Web Services", by Kevin Whinnery, where he made different tooling choices.
We will cover many topics including these:
- Node.js
- npm
- Express
- PostgreSQL
- REST services
- CORS
- HTTPS
- authentication with encrypted tokens
- creating SSL certificates
- React and create-react-app
- socket.io for server to client communication
- nodemon
The example application presented in this article is available at https://github.com/mvolkmann/ice-cream-app.
To get the most out of this article, I suggest that you run all the commands and download/create all the files as we walk through the process.
If you are working in Windows, most of the steps will be performed in a Command Prompt window. If you are working in macOS or Linux, most of the steps will be performed in a Terminal window. Throughout the remainder of this article, we'll refer to both as simply a "terminal."
Node.js
Node can be used to develop many kinds of applications, including command-line apps, web apps (with HTTP/HTTPS servers), and desktop apps (see http://electron.atom.io/). The main Node.js website is at https://nodejs.org/. It contains this excellent summary:
"Node.js is a JavaScript runtime built on Chrome's V8 JavaScript engine. Node.js uses an event-driven, non-blocking I/O model that makes it lightweight and efficient."
The "DOCS" link at the top of this page contains excellent documentation. Refer to this later when reading through the implementation of the REST services.
On the main Node.js website, press the large green button that says "Current" to download the current version of Node.js. Double-click the file that is downloaded to run the installer. After the install completes, open a terminal and enter the following to verify that it worked:
- node -v
Installing Node also installs npm, which is the "Node Package Manager" (despite claims that it is not an acronym). npm makes it easy to install code libraries (a.k.a. packages) and tools from the npm repository. To discover the available packages, browse https://www.npmjs.com/. As of the date of this article, the npm repository hosts over 400,000 packages.
Node applications typically have a file named package.json that describes the app, including the packages on which it depends. To create a package.json file for a new app, enter "npm init". To install a dependency for an app and record it in package.json, enter "npm install -Spackage". For dependencies related to development tasks that are not needed when the app runs, use the -D option instead of -S.
Here are the steps to build and run a "Hello World" command-line app. It uses a library named "chalk" (https://www.npmjs.com/package/chalk) in order to demonstrate use of npm packages. Chalk bills itself as "Terminal string styling done right."
- Create a directory for the app and cd to it.
- Run
npm initto createpackage.json. This will ask several questions. It is okay to accept all the defaults. - To install chalk, enter "
npm install -S chalk". - Create the file
index.jsand enter the following code:
- const chalk = require('chalk');
- const name = process.argv[2];
- console.log('Hello, ' + chalk.red.bold(name) + '!');
-
process.argvholds command-line arguments. The first value is the path to thenodeexecutable. The second value is the path to the file being executed. The third value (at index 2) is the first command-line argument. - To run this, enter "
node index.js your-name".
Express
A server is a program that listens for requests and produces responses. The most common is a HTTP server that uses request and response messages with a specific format. It can process requests for files and requests to perform specific operations. Often processing involves interacting with a database to perform CRUD operations. CRUD stands for "Create Retrieve Update Delete", which are the most common tasks performed with data.
Below is a simple example of a Node HTTP server that serves files from a directory named "public" and responds to requests for the current year. It uses the Express package, which is a "fast, unopinionated, minimalist web framework for Node". For more information, see https://github.com/expressjs/express. To install it, enter the following from your app directory: npm install -S express
Place the following code in a file named server.js:
- const express = require('express');
- const app = express();
-
- // __dirname holds the file path to the current directory.
- app.use(express.static(__dirname + '/public'));
-
- app.get('/year', (request, response) => {
- // request is an object that contains details
- // about the request that was received.
- // response is an object that contains methods
- // for populating the response to be sent.
- // These are often abbreviated as "req" and "res"
- // as you'll see in later code.
- // This explicitly passes a string to "send" because if a
- // number is passed it treats it as a response status code.
- response.send(new Date().getFullYear().toString());
- });
-
- const listener = app.listen(1919, () => {
- console.log('browse http://localhost:' + listener.address().port);
- });
To run this, enter "node server.js" and browse localhost:1919/year.
To demonstrate serving files, follow these steps:
- Create a subdirectory named
public. - Create a file named
demo.htmlin that directory. - Add HTML to that file such as:
Serving files works!
- Browse
localhost:1919/demo.html
Database
The sample application uses the very popular, Open Source, relational database PostgreSQL. NoSQL databases are another excellent choice. MongoDB is a NoSQL database that is popular in the Node community.
For help with PostgreSQL, see https://www.postgresql.org/docs/9.6/static/index.html.
For help on using the PostgreSQL psql command, which supports interacting with a database from a terminal, see http://postgresguide.com/utilities/psql.html.
For help with pg, an npm package for interacting with PostgreSQL databases, see https://github.com/brianc/node-postgres and https://github.com/brianc/node-postgres/wiki.
To install PostgreSQL in Windows, see https://www.postgresql.org/download/windows/.
To install PostgreSQL in macOS:
- Install Homebrew by following the instructions at http://brew.sh/.
- Enter the following:
brew install postgresql
To start the database server, enter "pg_ctl -D /usr/local/var/postgres start".
To stop the database server later, enter "pg_ctl -D /usr/local/var/postgres stop -m fast".
We'll create three tables, ice_cream, users, and a table for mapping users to ice flavors named user_ice_creams. We'll also enable the pgcrypo extension so passwords can be encryped. Place the following Data Definition Language (DDL) commands in the file tables.ddl:
- create extension pgcrypto; -- needed to encrypt passwords
-
- create table ice_creams (
- id serial primary key,
- flavor text
- );
-
- create table users (
- username text primary key,
- password text -- encrypted
- );
-
- create table user_ice_creams (
- username text references users(username),
- ice_cream_id integer references ice_creams(id)
- );
Next, we'll write a script that creates the database. It can also be used to recreate it in order to get a fresh start during testing.
- Create the script file.
On Windows, enter "type null > recreatedb.cmd".
On macOS and Linux, enter "touch recreatedb". - Edit the file and add the following lines:
- db=ice_cream
- dropdb $db
- createdb $db
- psql -d $db -f tables.ddl
- On macOS and Linux, make this file executable by entering "
chmod a+x recreatedb" - Execute this file.
On Windows, enter "recreatedb.cmd"
On macOS and Linux, enter "./recreatedb"
Explore the newly created database with the following commands:
- To list the existing databases, enter "
psql -l" - To enter interactive mode for the
ice_creamdatabase, enter "psql -d ice_cream" - To list the tables in the current database, enter "
\d" - To get information about the columns in the ice_creams table, enter "
\d ice_creams" - To get all the rows in the
ice_creamstable, enter "select * from ice_creams;"
Of course, there is nothing to see yet, but try this again after the code adds data. - To exit interactive mode, press ctrl-d.
Node and PostgreSQL
Many projects use Object/Relational Mapping (ORM) libraries to interact with relational databases rather than writing SQL. We forego that option here because SQL is a fairly universal skill and it is not hard to learn or use.
To interact with the PostgreSQL database from Node code, we use the npm package pg. More specifically, we use a set of functions provided by the npm package postgresql-easy that makes using the pg package even easier. Full disclosure, I created postgresql-easy while working on this article. Check it out! The code is fairly short and easy to read. To install it, enter "npm install -S postgresql-easy".
Another similar npm package to consider is pg-promise, which provides a promise-based API. If you aren't yet familiar with promises, you can find what you need to know at https://davidwalsh.name/promises.
Here is an example of performing some common operations on the database. This code uses the async and await keywords, which are being added to JavaScript in ES2017. They can be used now in Node version 7. The await keyword is placed in front of calls to functions that return a promise. It waits for the promise to be resolved before continuing. All functions that use await must be annotated with the async keyword.
- const PgConnection = require('postgresql-easy');
-
- // Configure a connection to the database.
- const pg = new PgConnection({database: 'ice_cream'});
-
- const tableName = 'ice_creams';
-
- async function demo() {
- try {
- // Delete all rows from these tables:
- // user_ice_creams, users, and ice_cream.
- await pg.deleteAll('user_ice_creams');
- await pg.deleteAll('users');
- await pg.deleteAll(tableName);
-
- // Insert three new rows corresponding to three flavors.
- // For each flavor it calls pg-insert which returns a promise.
- // flavors.map returns an array of these three promises.
- // Promise.all returns a promise that resolves when
- // all the promises in the array passed to it resolve.
- const flavors = ['vanilla', 'chocolate', 'strawberry'];
- const results = await Promise.all(
- flavors.map(f => pg.insert(tableName, {flavor: f})));
-
- // Get an array of the ids of the new rows.
- const ids = results.map(result => result.rows[0].id);
- console.log('inserted records with ids', ids);
-
- // Delete the first row (vanilla).
- await pg.deleteById(tableName, ids[0]);
-
- // Change the flavor of the second row (chocolate) to "chocolate chip".
- await pg.updateById(tableName, ids[1], {flavor: 'chocolate chip'});
-
- // Get all the rows in the table.
- const result = await pg.getAll(tableName);
-
- // Output their ids and flavors.
- for (const row of result.rows) {
- console.log(row.id, row.flavor);
- }
-
- // Catch and report any errors that occur in the previous steps.
- } catch (e) {
- throw e;
-
- } finally {
- // Disconnect from the database.
- await pg.disconnect();
- }
- }
-
- demo();
To run this code, enter node demo.js.
REST Services
Now that we have code for interacting with the database, we can implement services to do this and invoke them from a browser.
REST stands for "REpresentational State Transfer". To dig deeper into this, see this Wikipedia page. All you need to know for now is that REST services typically use the HTTP/HTTPS protocol for request and response messages, act on "resources", use carefully selected URLs to identify resources, and map HTTP verbs to CRUD operations. The mapping is as follows:
- POST -> Create
- GET -> Retrieve
- PUT -> Update
- DELETE -> Delete
- POST -> everything else
There is an exception where PUT can be used to create a resource. Also, PATCH can be used for a partial update.
We will implement the REST services using the npm package Express that was described earlier.
These services require authentication. Note how each checks for this with a call to auth.authorize and returns if that returns false. This is implemented by the npm package node-token-auth that is described later.
At first glance, this may seem like a large amount of code. However, I think you'll agree that each piece is fairly small and simple.
- const auth = require('node-token-auth');
- const express = require('express');
- const PgConnection = require('postgresql-easy');
- const server = require('./server'); // described later
-
- // Configure the algorithm and password used to encrypt auth tokens
- // and set the session timeout in minutes.
- const algorithm = 'aes-256-ctr';
- const key = 'V01kmann';
- const timeoutMinutes = 1;
- auth.configure(algorithm, key, timeoutMinutes);
-
- const app = express();
- server.setup(app);
-
- function handleError(res, err) {
- res.statusMessage = `${err.toString()}; ${err.detail}`;
- res.status(500).send();
- }
-
- const pg = new PgConnection({
- database: 'ice_cream' // defaults to username
- //host: 'localhost', // default
- //idleTimeoutMillis: 30000, // before a client is closed (default is 30000)
- //max: 10, // max clients in pool (default is 10)
- //password: '', // not needed in this example
- //port: 5432, // the default
- //user: 'Mark' // not needed in this example
- });
-
- /**
- * Deletes an ice cream flavor from a given user.
- * The URL will look like /ice-cream/some-user/some-flavor-id
- * The "Authorization" request header must be set.
- */
- app.delete('/ice-cream/:username/:id', async (req, res) => {
- if (!auth.authorize(req, res)) return;
-
- // id is the id of the ice cream flavor to be deleted.
- const {id, username} = req.params;
-
- const sql = `
- delete from user_ice_creams
- where username=$1 and ice_cream_id=$2`;
- try {
- await pg.query(sql, username, id);
- res.send();
- } catch (e) {
- handleError(res, e);
- }
- });
-
- /**
- * Retrieves all ice cream ids and flavors
- * associated with a given user.
- * The URL will look like /ice-cream/some-user
- * The "Authorization" request header must be set.
- */
- app.get('/ice-cream/:username', async (req, res) => {
- if (!auth.authorize(req, res)) return;
-
- const {username} = req.params;
- const sql = `
- select ic.id, ic.flavor
- from ice_creams ic, user_ice_creams uic
- where uic.username='${username}'
- and uic.ice_cream_id=ic.id`;
- try {
- const result = await pg.query(sql);
- res.json(result.rows);
- } catch (e) {
- handleError(res, e);
- }
- });
-
- /**
- * Adds an ice cream flavor to a given user.
- * The URL will look like /ice-cream/some-user?flavor=some-flavor
- * The "Authorization" request header must be set.
- * The response will contain the id of newly created user_ice_creams row.
- */
- app.post('/ice-cream/:username', async (req, res) => {
- if (!auth.authorize(req, res)) return;
-
- const {username} = req.params;
- const {flavor} = req.query;
-
- // Creates a row in the user_ice_creams table
- // that associates an ice cream flavor with a user.
- async function associate(username, iceCreamId) {
- const sql = `
- insert into user_ice_creams (username, ice_cream_id)
- values ($1, $2)`;
- try {
- await pg.query(sql, username, iceCreamId);
- res.send(String(iceCreamId));
- } catch (e) {
- handleError(res, e);
- }
- }
-
- // Get the id of the flavor if it already exists.
- let sql = 'select id from ice_creams where flavor=$1';
- try {
- const result = await pg.query(sql, flavor);
- const [row] = result.rows;
- if (row) { // The flavor exists.
- associate(username, row.id);
- } else { // The flavor doesn't exist, so create it.
- sql = 'insert into ice_creams (flavor) values ($1) returning id';
- const result = await pg.query(sql, flavor);
- const [row] = result.rows;
- if (row) {
- associate(username, row.id);
- } else {
- handleError(res, 'failed to create new flavor');
- }
- }
- } catch (e) {
- handleError(res, e);
- }
- });
-
- /**
- * Updates a record in the ice-cream table by id.
- * The URL will look like /ice-cream/some-ice-cream-id?flavor=some-new-flavor
- * The "Authorization" request header must be set.
- */
- app.put('/ice-cream/:id', async (req, res) => {
- if (!auth.authorize(req, res)) return;
-
- const {id} = req.params;
- const {flavor} = req.query;
- try {
- await pg.updateById('ice_creams', id, {flavor});
- res.send();
- } catch (e) {
- handleError(res, e);
- }
- });
-
- /**
- * Logs in a user.
- * The username and password must be in the body
- * and the content type must be "application/json".
- */
- app.post('/login', async (req, res) => {
- const {username, password} = req.body;
- if (!username) {
- res.statusMessage = 'Missing Username';
- return res.status(400).send();
- }
- if (!password) {
- res.statusMessage = 'Missing Password';
- return res.status(400).send();
- }
-
- const sql = `
- select password = crypt('${password}', password) as authenticated
- from users where username='${username}'`;
- try {
- const result = await pg.query(sql);
- const [row] = result.rows;
- if (row) {
- auth.generateToken(username, req, res);
- res.send(row.authenticated);
- } else {
- res.statusMessage = 'Username Not Found';
- res.status(404).send();
- }
- } catch (e) {
- handleError(res, e);
- }
- });
-
- /**
- * Logs out the current user.
- * The "Authorization" request header must be set.
- */
- app.post('/logout', (req, res) => {
- if (!auth.authorize(req, res)) return;
-
- auth.deleteToken(req);
- res.send();
- });
-
- /**
- * Signs up a new user.
- * The username and password must be in the body
- * and the content type must be "application/json".
- */
- app.post('/signup', async (req, res) => {
- const {username, password} = req.body;
- if (!username) {
- res.statusMessage = 'Missing Username';
- return res.status(400).send();
- }
- if (!password) {
- res.statusMessage = 'Missing Password';
- return res.status(400).send();
- }
-
- // Encrypt password using a Blowfish-based ciper (bf)
- // performing 8 iterations.
- const sql = `
- insert into users (username, password)
- values('${username}', crypt('${password}', gen_salt('bf', 8)))`;
-
- try {
- await pg.query(sql);
- auth.generateToken(username, req, res);
- res.send();
- } catch (e) {
- handleError(res, e);
- }
- });
-
- server.start();
What about that "server" part we conveniently skipped over? When the server is hosting REST services and serving files needed by the browser (such as .html, .css, and .js files), it can be very simple. However, if a separate server is used to serve those files then CORS must be configured to allow code in the browser to invoke REST services at a different domain.
CORS stands for "Cross-Origin Resource Sharing". It is needed to allow the client-side of a web app to retrieve resources (including REST service responses) that are hosted at a different domain than the client-side resources (such as HTML, CSS, JavaScript, and media files). A standard security feature in browsers prevents code downloaded from one domain from sending requests to another domain. CORS can selectively enable this. To learn more about CORS, see this page on the Mozilla Developer Network. For now, all you need to know is that the REST server needs to include certain headers in the responses it produces to enable this.
Another feature this server configures is the use of HTTPS instead of HTTP. This uses Transport Layer Security (TLS) to encrypt requests and decrypt responses. The default port for HTTPS is 443. The process that starts the server must have permission to use this port. Another option is to use a non-privileged port for HTTPS.
Here is the code in server.js that configures both CORS and HTTPS:
- const bodyParser = require('body-parser');
- const fs = require('fs');
- const https = require('https');
- const sio = require('socket.io');
-
- let server;
-
- function setup(app) {
- // Suppress the x-powered-by response header
- // so hackers don't get a clue that might help them.
- app.set('x-powered-by', false);
-
- // Enable use of CORS.
- app.use((req, res, next) => {
- // This could be more selective!
- res.header('Access-Control-Allow-Origin', '*');
- res.header('Access-Control-Allow-Headers',
- 'Accept, Authorization, Content-Type, Origin, X-Requested-With');
- res.header('Access-Control-Expose-Headers',
- 'Authorization, Content-Type');
- res.header('Access-Control-Allow-Methods', 'GET,DELETE,POST,PUT');
- next();
- });
-
- // The "extended" option of bodyParser enables parsing of objects and arrays.
- app.use(bodyParser.json({extended: true}));
-
- // Enable use of HTTPS.
- // The two ".pem" files references are described later.
- const options = {
- key: fs.readFileSync('key.pem'),
- cert: fs.readFileSync('cert.pem'),
- passphrase: 'icecream'
- };
- server = https.createServer(options, app);
-
- server.on('error', err => {
- console.error(err.code === 'EACCES' ? 'must use sudo' : err);
- });
- }
-
- function start() {
- const PORT = 443;
- server.listen(PORT, () => console.log('listening on port', PORT));
-
- // Configure Socket.IO to allow the server to communicate with the browser.
- // Our usage supports session timeouts.
- const io = sio.listen(server);
- io.on('connection', socket => global.socket = socket);
- }
-
- module.exports = {setup, start};
Authentication and Authorization
We want to require users to register for an account before using the app. They do this by supplying a username and password of their choosing, after which they are automatically logged in. Login is required for all subsequent sessions.
Both registering a new account and logging into an existing account result in an authentication token being returned to the browser. The client-side code must include this token in all REST calls. This is supported by the npm package node-token-auth at https://www.npmjs.com/package/node-token-auth. The content of the encrypted tokens it creates is explained there. I created node-token-auth for this article. Check it out!
Another popular authentication option for Node is Passport at http://passportjs.org/.
Create a self-signed certificate
We want to use HTTPS for the website rather than HTTP for security reasons. This requires a SSL certificate. For a real website, this may be obtained for free using https://letsencrypt.org/. For testing purposes, an easier approach is to create a self-signed certificate using the openssl command as follows:
$ openssl req -x509 -newkey rsa:4096 -keyout key.pem -out cert.pem -days 365
Generating a 4096 bit RSA private key
.................................++
.................................++
writing new private key to 'key.pem'
Enter PEM pass phrase:
Verifying - Enter PEM pass phrase:
-----
You are about to be asked to enter information that will be incorporated
into your certificate request.
What you are about to enter is what is called a Distinguished Name or a DN.
There are quite a few fields but you can leave some blank
For some fields there will be a default value,
If you enter '.', the field will be left blank.
-----
Country Name (2 letter code) [AU]:{your-country-code}
State or Province Name (full name) [Some-State]:{your-state}
Locality Name (eg, city) []:{your-city}
Organization Name (eg, company) [Internet Widgits Pty Ltd]:{your-company}
Organizational Unit Name (eg, section) []:{your-division}
Common Name (e.g. server FQDN or YOUR name) []:{your-name}
Email Address []:{your-email}
This creates the files cert.pem and key.pem in the current directory.
The standard port to use with SSL is 443. Since this is a protected port, the server must be started with sudo. Otherwise, the following error message will be output.
Error: listen EACCES 0.0.0.0:443
If the passphrase supplied by the client is wrong, the following error will be reported:
Error: error:06065064:digital envelope routines:EVP_DecryptFinal_ex:bad decrypt
When the protocol is https and the default port (443) is used, the port does not need to be specified in URLs.
The curl command can be used test REST services like this:
curl -k https://localhost/{route}
The -k (or --insecure) option allows connections to SSL sites without certificates. This is useful when testing using self-signed certificates.
Running the Sample App
In the next section, we will discuss the implementation of a web UI. It will aid your understanding to install and run the app now. Here are the steps to do that:
- Open a terminal.
- Start the database daemon with "
pg_ctl -D /usr/local/var/postgres start". cdto the directory where you'd like to install the project.- git clone https://github.com/mvolkmann/ice-cream-app.git
- Enter "
cd ice-cream-app/server". - Enter "
npm install".
This installs all the dependencies found inice-cream-app/server/package.json - Start the REST server by entering "
npm start".
Another way to start the REST server is to use nodemon which is described later. - Enter "
cd .." - Enter "
npm install".
This installs all the dependencies found inice-cream-app/package.json. - Configure the use HTTPS by the web server (instead of HTTP) by entering "
export HTTPS=true". - Start the web server by entering "
npm start". - Tell the browser to always trust the self-signed certificate by browsing
https://localhost - In Chrome, click "ADVANCED" and then "Proceed to localhost (unsafe)".
In Firefox, press the "Advanced" button, press the "Add Exception..." button, and press the "Confirm Security Exception" button.
In Safari, press "Show Certificate" button, select "Always Trust" in the "When using this certificate" dropdown, press the "Continue" button, and enter your password to confirm this action. - Browse
https://localhost:3000.
create-react-app
The easiest way to get started with a new React web app is to use create-react-app at https://github.com/facebookincubator/create-react-app.
- To install create-react-app, enter "
npm install -g create-react-app". - To create the web application, enter "
create-react-app ice-cream-app".
Depending on your computer, this will take around one minute. - Enter "
cd ice-cream-app". - To run the generated React app, enter "
npm start".
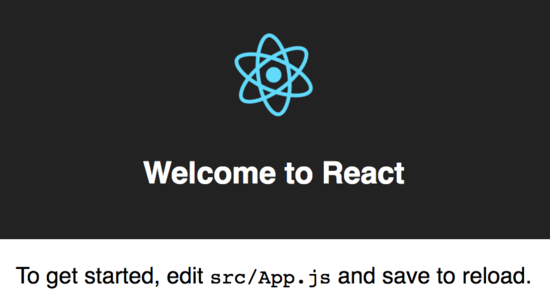
You should see the following in your default web browser:
- Following the instructions on that page, edit
src/App.js. Change the line "Welcome to React" to "Welcome to Ice Cream". - When changes are saved, the browser window will automatically refresh to show the results.
Ice Cream App UI
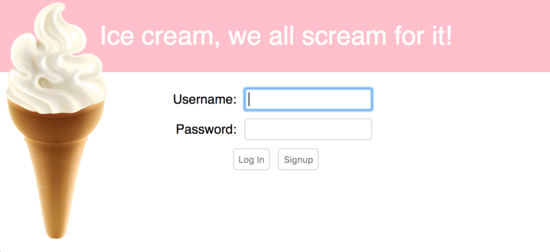
The UI will consist of two pages. The first page is for user registration and login.
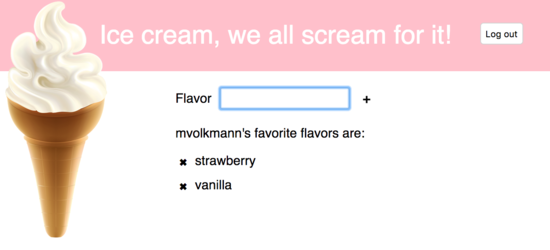
The second page is reached after successful user registration or login. It allows the user to add and delete ice cream flavors. Pressing the "Log out" button in the upper-right corner ends the session and returns the user to the login page.
Going into the details of React is beyond the scope of this article. However, hopefully the code will be readable even for those without React exposure. The code is heavily commented. If you are not particularly interested in learning about React, scan though the code to see where the REST calls are made and how the responses are handled.
public/index.html
This is a slightly modified version of the file generated by create-react-app:
- <!doctype html>
- <html lang="en">
- <head>
- <meta name="viewport" content="width=device-width, initial-scale=1">
-
- <!--
- Notice the use of %PUBLIC_URL% in the tag below.
- It will be replaced with the URL of the `public` folder during the build.
- Only files inside the `public` folder can be referenced from the HTML.
- -->
- <link rel="shortcut icon" href="%PUBLIC_URL%/favicon.ico">
-
- <title>Ice Cream App</title>
- </head>
- <body>
- <!--
- This element is populated by React.
- See the reference to 'root' in src/index.js.
- -->
- <div id="root"></div>
- </body>
- </html>
src/index.js
This file was generated by create-react-app. It is the first JavaScript file that is loaded. The file index.html doesn't include a script tag for this. create-react-app causes this to be loaded. It is specified in node_modules/react-scripts/config/paths.js as appIndexJs and used inwebpack.config.*.js in that same directory. Note that this file imports App.js.
- import React from 'react';
- import ReactDOM from 'react-dom';
- import App from './App';
- import './index.css';
-
- // This creates an instance of the App component and renders it
- // inside the div with an id of "root" in public/index.html.
- ReactDOM.render(
- <App />,
- document.getElementById('root')
- );
src/App.js
This is a heavily modified version of the file generated by create-react-app. See the comments for details.
- import React, {Component} from 'react';
- import Login from './login';
- import Main from './main';
- import 'whatwg-fetch'; // for REST calls
- import './App.css';
-
- // This allows the client to listen to socket.io events
- // emitted from the server. It is used to proactively
- // terminate sessions when the session timeout expires.
- import io from 'socket.io-client';
-
- class App extends Component {
- constructor() {
- super();
-
- // Redux is a popular library for managing state in a React application.
- // This application, being somewhat small, opts for a simpler approach
- // where the top-most component manages all of the state.
- // Placing a bound version of the setState method on the React object
- // allows other components to call it in order to modify state.
- // Each call causes the UI to re-render,
- // using the "Virtual DOM" to make this efficient.
- React.setState = this.setState.bind(this);
-
- // This gets a socket.io connection from the server
- // and registers for "session-timeout" events.
- // If one is received, the user is logged out.
- const socket = io('https://localhost', {secure: true});
- socket.on('session-timeout', () => {
- alert('Your session timed out.');
- this.logout();
- });
- }
-
- // This is the initial state of the application.
- state = {
- authenticated: false,
- error: '',
- flavor: '',
- iceCreamMap: {},
- password: '',
- restUrl: 'https://localhost',
- route: 'login', // controls the current page
- token: '',
- username: ''
- };
-
- /**
- * Sends a logout POST request to the server
- * and goes to the login page.
- */
- logout = async () => {
- const url = `${this.state.restUrl}/logout`;
- const headers = {Authorization: this.state.token};
- try {
- await fetch(url, {method: 'POST', headers});
- React.setState({
- authenticated: false,
- route: 'login',
- password: '',
- username: ''
- });
- } catch (e) {
- React.setState({error: e.toString()});
- }
- };
-
- render() {
- // Use destructuring to extract data from the state object.
- const {
- authenticated, error, flavor, iceCreamMap,
- password, restUrl, route, token, username
- } = this.state;
-
- return (
- <div className="App">
- <header>
- <img className="header-img" src="ice-cream.png" alt="ice cream"/>
- Ice cream, we all scream for it!
- {
- authenticated ?
- <button onClick={this.logout}>Log out</button> :
- null
- }
- </header>
- <div className="App-body">
- {
- // This is an alternative to controlling routing to pages
- // that is far simpler than more full-blown solutions
- // like react-router.
- route === 'login' ?
- <Login
- username={username}
- password={password}
- restUrl={restUrl}
- /> :
- route === 'main' ?
- <Main
- flavor={flavor}
- iceCreamMap={iceCreamMap}
- restUrl={restUrl}
- token={token}
- username={username}
- /> :
- <div>Unknown route {route}</div>
- }
- {
- // If an error has occurred, render it at the bottom of any page.
- error ? <div className="error">{error}</div> : null
- }
- </div>
- </div>
- );
- }
- }
-
- export default App;
src/App.css
All the CSS for this app resides here, with the exception of src/index.css, which is generated by create-react-app and doesn't require modification. It is outside of the scope of this article to cover CSS, but the source may be found in the Github repo.
src/login.js
This component allows new users to signup and existing users to log in.
- import React, {Component, PropTypes as t} from 'react';
- import 'whatwg-fetch';
-
- function onChangePassword(event) {
- React.setState({password: event.target.value});
- }
-
- function onChangeUsername(event) {
- React.setState({username: event.target.value});
- }
-
- class Login extends Component {
-
- static propTypes = {
- password: t.string.isRequired,
- restUrl: t.string.isRequired,
- username: t.string.isRequired
- };
-
- // This is called when the "Log In" button is pressed.
- onLogin = async () => {
- const {password, restUrl, username} = this.props;
- const url = `${restUrl}/login`;
-
- try {
- // Send username and password to login REST service.
- const res = await fetch(url, {
- method: 'POST',
- headers: {'Content-Type': 'application/json'},
- body: JSON.stringify({username, password})
- });
-
- if (res.ok) { // successful login
- const token = res.headers.get('Authorization');
- const text = await res.text(); // returns a promise
- const authenticated = text === 'true';
- React.setState(
- authenticated ?
- {
- authenticated: true,
- error: null, // clear previous error
- route: 'main',
- token
- } :
- {
- error: 'Invalid username or password'
- });
- } else { // unsuccessful login
- const msg = /ECONNREFUSED/.test(res.statusText) ?
- 'Failed to connect to database' :
- res.statusText;
- React.setState({error: msg});
- }
- } catch (e) {
- React.setState({error: `${url}; ${e.message}`});
- }
- }
-
- // This is called when the "Signup" button is pressed.
- onSignup = async () => {
- const {password, restUrl, username} = this.props;
- const url = `${restUrl}/signup`;
-
- try {
- const res = await fetch(url, {
- method: 'POST',
- headers: {'Content-Type': 'application/json'},
- body: JSON.stringify({username, password})
- });
-
- if (res.ok) { // successful signup
- const token = res.headers.get('Authorization');
- React.setState({
- authenticated: true,
- error: null, // clear previous error
- route: 'main',
- token,
- username
- });
- } else { // unsuccessful signup
- let text = res.statusText;
- if (/duplicate key/.test(text)) {
- text = `User ${username} already exists`;
- }
- React.setState({error: text});
- }
- } catch (e) {
- React.setState({error: `${url}; ${e.message}`});
- }
- }
-
- render() {
- const {password, username} = this.props;
- const canSubmit = username && password;
-
- // We are handling sending the username and password
- // to a REST service above, so we don't want
- // the HTML form to submit anything for us.
- // That is the reason for the call to preventDefault.
- return (
- <form className="login-form"
- onSubmit={event => event.preventDefault()}>
- <div className="row">
- <label>Username:</label>
- <input type="text"
- autoFocus
- onChange={onChangeUsername}
- value={username}
- />
- </div>
- <div className="row">
- <label>Password:</label>
- <input type="password"
- onChange={onChangePassword}
- value={password}
- />
- </div>
- <div className="row submit">
- {/* Pressing enter in either input invokes the first button. */}
- <button disabled={!canSubmit} onClick={this.onLogin}>
- Log In
- </button>
- <button disabled={!canSubmit} onClick={this.onSignup}>
- Signup
- </button>
- </div>
- </form>
- );
- }
- }
-
- export default Login;
src/main.js
This is the main page of the app where users can view the ice cream flavors they like, enter new ones, and delete existing ones.
- import IceCreamEntry from './ice-cream-entry';
- import IceCreamList from './ice-cream-list';
- import React, {Component, PropTypes as t} from 'react';
- import 'whatwg-fetch';
-
- function changeFlavor(event) {
- React.setState({flavor: event.target.value});
- }
-
- function handleError(url, res) {
- React.setState(res.status === 440 ?
- {error: 'Session Timeout', route: 'login'} :
- {error: res.message});
- }
-
- async function loadIceCreams(url, headers) {
- let res;
- try {
- res = await fetch(url, {headers});
- if (!res.ok) return handleError(url, res);
-
- const iceCreams = await res.json();
- const iceCreamMap = {};
- for (const iceCream of iceCreams) {
- iceCreamMap[iceCream.id] = iceCream.flavor;
- }
- React.setState({iceCreamMap});
- } catch (e) {
- handleError(url, res);
- }
- }
-
- class Main extends Component {
-
- static propTypes = {
- flavor: t.string.isRequired,
- iceCreamMap: t.object.isRequired,
- restUrl: t.string.isRequired,
- token: t.string.isRequired,
- username: t.string.isRequired
- };
-
- /**
- * Gets the current list of ice cream flavors
- * liked by the current user.
- */
- componentDidMount() {
- const {restUrl, token, username} = this.props;
-
- // This header is used in all REST calls.
- this.headers = {Authorization: token};
-
- const url = `${restUrl}/ice-cream/${username}`;
- loadIceCreams(url, this.headers);
- }
-
- /**
- * Adds an ice cream flavor to the list
- * of those liked by the current user.
- */
- addIceCream = async flavor => {
- const {restUrl, username} = this.props;
- const url = `${restUrl}/ice-cream/${username}?flavor=${flavor}`;
- let res;
- try {
- res = await fetch(url, {method: 'POST', headers: this.headers});
- if (!res.ok) return handleError(url, res);
- let id = await res.text();
- if (!id) return;
-
- // Now that it has been successfully added to the database,
- // add it in the UI.
- id = Number(id);
- const {iceCreamMap} = this.props;
- iceCreamMap[id] = flavor;
- React.setState({flavor: '', iceCreamMap});
- } catch (e) {
- handleError(url, res);
- }
- };
-
- /**
- * Deletes an ice cream flavor from the list
- * of those liked by the current user.
- */
- deleteIceCream = async id => {
- const {restUrl, username} = this.props;
- const url = `${restUrl}/ice-cream/${username}/${id}`;
- let res;
- try {
- res = await fetch(url, {method: 'DELETE', headers: this.headers});
- if (!res.ok) return handleError(url, res);
-
- // Now that it has been successfully deleted from the database,
- // delete it from the UI.
- const {iceCreamMap} = this.props;
- delete iceCreamMap[id];
- React.setState({iceCreamMap});
- } catch (e) {
- handleError(url, res);
- }
- };
-
- render() {
- const {flavor, iceCreamMap, username} = this.props;
- return (
- <div className="main">
- <IceCreamEntry
- addCb={this.addIceCream}
- changeCb={changeFlavor}
- flavor={flavor}
- />
- <label>{username}'s favorite flavors are:</label>
- <IceCreamList
- deleteCb={this.deleteIceCream}
- iceCreamMap={iceCreamMap}
- />
- </div>
- );
- }
- }
-
- export default Main;
src/ice-cream-entry.js
This component renders the components needed to enter new ice cream flavors.
- import React, {PropTypes as t} from 'react';
-
- const IceCreamEntry = ({addCb, changeCb, flavor}) =>
- <form
- className="ice-cream-entry"
- onSubmit={event => event.preventDefault()}
- >
- <label>Flavor</label>
- <input type="text" autoFocus onChange={changeCb} value={flavor}/>
- {/* using unicode heavy plus for button */}
- <button onClick={() => addCb(flavor)}>➕</button>
- </form>;
-
- IceCreamEntry.propTypes = {
- addCb: t.func.isRequired,
- changeCb: t.func.isRequired,
- flavor: t.string.isRequired,
- };
-
- export default IceCreamEntry;
src/ice-cream-list.js
This component renders a sorted list of the ice cream flavors that the user likes and allows them to be deleted.
- import React, {PropTypes as t} from 'react';
- import IceCreamRow from './ice-cream-row';
-
- const IceCreamList = ({deleteCb, iceCreamMap}) => {
- const list = Object.keys(iceCreamMap)
- .map(id => ({id, flavor: iceCreamMap[id]}));
- list.sort((a, b) => a.flavor.localeCompare(b.flavor));
-
- return (
- <ul className="ice-cream-list">
- {
- list.map(iceCream =>
- <IceCreamRow
- deleteCb={deleteCb}
- id={iceCream.id}
- key={iceCream.id}
- flavor={iceCream.flavor}
- />)
- }
- </ul>
- );
- };
-
- IceCreamList.propTypes = {
- deleteCb: t.func.isRequired,
- iceCreamMap: t.object.isRequired
- };
-
- export default IceCreamList;
src/ice-cream-row.js
This component renders a single ice cream flavor that the user likes and allows it to be deleted.
- import React, {PropTypes as t} from 'react';
-
- const IceCreamRow = ({deleteCb, flavor, id}) =>
- <li className="ice-cream-row">
- {/* using unicode heavy x for button */}
- <button onClick={() => deleteCb(id)}>✖</button>
- {flavor}
- </li>;
-
- IceCreamRow.propTypes = {
- deleteCb: t.func.isRequired,
- flavor: t.string,
- id: t.string
- };
-
- export default IceCreamRow;
nodemon
While iteratively making changes to REST service code, it is convenient to have the REST server automatically restart when changes are saved. The npm package nodemon monitors files in and below the current directory for changes. When a change is detected, it restarts running of a specified JavaScript file.
To install it, enter "npm install -D nodemon"
To run it, enter "nodemon file-path"
SSL Certificates
To view SSL certificates from Chrome, select "Chrome ... Preferences...", select "Settings", scroll to the bottom, click "Show advanced settings...", scroll to "HTTPS/SSL", press the "Manage certificates..." button. In MacOS, this opens the "Keychain Access" application that is in Applications/Utilities. Certificates may be deleted from here.
Deploying
Web applications generated by create-react-app can be bundled for production deployment by entering "npm run build". This creates an optimized production build in a "build" directory. The contents of this directory can be deployed to any web server. The file index.html will contain references to one CSS file in the static/css directory and one JavaScript file in the static/js directory.
One option for deploying the finished app is to create a Docker image and deploy it to the cloud so that it runs in a Docker container. That is left as an exercise for the reader. ;-)
Summary
We have covered a lot of ground in this article! You have seen how to use Node.js, use PostgreSQL, implement REST services in Node, configure CORS, configure HTTPS, implement authentication and authorization, create self-signed SSL certificates, use create-react-app to create a React-based web UI, and implement common features in a React app.
Hopefully, you can apply some of the things learned here in building your own web applications, perhaps with different technologies choices, to achieve similar goals.
Please send feedback on this article to mark@objectcomputing.com.
Software Engineering Tech Trends (SETT) is a regular publication featuring emerging trends in software engineering.
