Mastering D3 Basics: Step-By-Step Bar Chart
By Mark Volkmann, OCI Partner and Principal Software Engineer
AUGUST 2020
Introduction
D3 (https://d3js.org) stands for Data-Driven Documents. It is a JavaScript library that renders, and re-renders, HTML elements (including svg) in a web browser based on data and changes to the data.
D3 is primarily used for data visualizations such as bar charts, pie charts, line charts, scatter plots, geographic maps, and more. But as you will see, it has quite a bit of overlap with jQuery and can be used for many kinds of DOM manipulations that are not related to data visualization.
So why should I write about D3 now? After all, it has been around since February 2011. Many tutorial articles already exist. But many of those describe older versions of D3, and each major version included breaking changes. Version 5 of D3 was released in January, 2018. So this is my chance to write an up-to-date D3 tutorial and try to make it easy to understand. Of course, you will be the judge of whether I am successful.
JavaScript has been my primary programming language for the entirety of the life of D3. I have known of the existence of D3 for quite a while but have ignored it because I was more focused on other JavaScript-based topics, including jQuery, Angular, React, Vue, Svelte, and TypeScript. It was time for me to stop ignoring D3 and dig in.
D3 was created by Mike Bostock, along with other contributors. It is open source and uses a BSD license.
D3 uses HTML, CSS, JavaScript, the DOM, and SVG, so knowledge of those topics is helpful.
There are three levels of D3 usage:
- Using higher-level libraries. An example of a library that uses D3 is C3 (https://c3js.org/). C3 uses D3 under the hood to render many kinds of charts. These charts are customizable, but not to the extent that can be achieved when coding from scratch. However, charts can be implemented quickly using C3, and the requirement to have deep knowledge of D3 is removed. C3 charts respond well to changes in data by default, including transitions from old to new values.
- Copying and modifying D3 examples. There are many sites that provide examples of charts implemented with D3. Perhaps you can find an example that renders almost exactly what you want. Copying and customizing the code will often require far less time than implementing a chart from scratch.
- Coding from scratch. My hope is that by the time you finish reading this article, you will know enough about D3 to enable the final option, which is implementing an entire chart from scratch. This provides the most flexibility but requires the most effort.
The D3 JavaScript API uses CSS selectors to find elements in the DOM that it modifies. It also provides methods to append elements and text nodes, set attributes, and modify text content. In this respect it has overlap with jQuery functionality.
The functionality of D3 is divided into modules. The default build of D3 includes all of the modules. Custom builds can omit unneeded modules in order to minimize the amount of code that must be downloaded to browsers.
The D3 modules include:
- Arrays
- Axes
- Brushes
- Chords
- Collections (Objects, Maps, Sets, Nests)
- Colors
- Color Schemes
- Contours
- Dispatches
- Dragging
- Delimiter-separated Values
- Easings
- Fetches
- Forces
- Number Formats
- Geographies
- Hierarchies
- Interpolators
- Paths
- Polygons
- Quadtrees
- Random Numbers
- Scales
- Selections
- Shapes
- Time Formats
- Time Intervals
- Timers
- Transitions
- Voronoi Diagrams
- Zooming
Let's learn D3 by example.
Many D3 tutorials start with a bar chart and so will this one. But ours will include more features than are typically shown in tutorials in order to introduce more D3 concepts.
You are encouraged to copy the code in the article and try it in a web browser!
SVG Basics
SVG stands for Scalable Vector Graphics. It is an XML-based syntax for specifying vector graphics. SVG is supported by all modern web browsers, even back to IE9.
SVG elements include svg, line, polygon, rect, circle, path, text, image, g (for group), and many more. For our bar chart will will only need svg, g, rect, and text.
Let's start by drawing a rectangle and placing text on it as shown below.
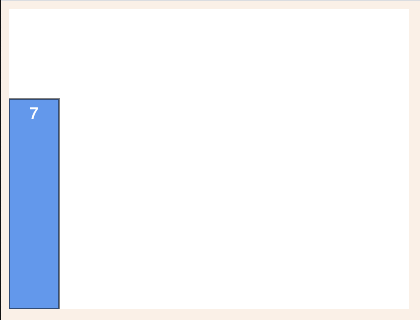
We will implement this with separate HTML, CSS, and JavaScript files, but all of this could be combined into one HTML file if that's your style.
svg-demo.html
This HTML includes all the bells and whistles to give a good Lighthouse score, including a DOCTYPE, language specification, and meta tags. To learn about Lighthouse, see https://developers.google.com/web/tools/lighthouse.
- <!DOCTYPE html>
- <html lang="en">
- <head>
- <title>D3 SVG Demo</title>
- <meta charset="utf-8" />
- <meta name="description" content="D3 SVG Demo" />
- <meta name="viewport" content="width=device-width, initial-scale=1" />
-
- <link rel="stylesheet" href="./svg-demo.css" />
-
- <script src="https://d3js.org/d3.v5.min.js"></script>
- <script src="./svg-demo.js" defer></script>
- </head>
- <body>
- <svg id="chart"></svg>
- </body>
- </html>
svg-demo.css
- body {
- background-color: linen;
- font-family: sans-serif;
- }
-
- .bar > rect {
- stroke: black;
- stroke-width: 1;
- }
-
- .bar > text {
- fill: white;
- text-anchor: middle; /* horizontally centers */
- }
-
- #chart {
- background-color: white;
- }
svg-demo.js
- const HEIGHT = 300;
- const WIDTH = 400;
- const score = 7; // out of 10
- const barHeight = HEIGHT * (score / 10);
- const barWidth = 50;
-
- // Find the DOM element with an id of "chart" and set its width and height.
- // This happens to be an svg element.
- const svg = d3.select('#chart').attr('width', WIDTH).attr('height', HEIGHT);
-
- // Append a group element to the svg and add a CSS class of "bar".
- const group = svg.append('g').attr('class', 'bar');
-
- // Append a rect element to the group and set its properties.
- // The background color of an SVG element is set using the "fill" property.
- group
- .append('rect')
- .attr('height', barHeight)
- .attr('width', barWidth)
- .attr('x', 0)
- .attr('y', HEIGHT - barHeight)
- .attr('fill', 'cornflowerblue');
-
- // Append a text element to the group and set its properties.
- group
- .append('text')
- .text(score)
- .attr('x', barWidth / 2) // center horizontally in bar
- .attr('y', HEIGHT - barHeight + 20); // just below top
That's the very basics of working with SVG. But it's all you need to know to draw additional bars in a bar chart later.
D3 Selection Objects
A D3 selection object encapsulates a set of DOM elements, similar to a jQuery object. To create one, use the d3 methods select and selectAll.
For example, d3.select('.bar') returns a selection object that encapsulates the first element in the DOM with a CSS class of "bar". d3.selectAll('.bar') is similar, but the returned selection object encapsulates all matching DOM elements.
The select and selectAll methods can also be called on a selection to find elements that are descendants of the elements in the selection within the DOM tree.
Here is an example that demonstrates using the select and selectAll methods.
- <html>
- <head>
- <title>D3 Selections</title>
- <script src="https://d3js.org/d3.v5.min.js"></script>
- </head>
- <body>
- <div class="chart" id="chart1">
- <div class="bar">Bar #1</div>
- <div class="bar">Bar #2</div>
- <div class="bar">Bar #3</div>
- </div>
-
- <div class="chart" id="chart2">
- <div class="bar">Bar #4</div>
- <div class="bar">Bar #5</div>
- </div>
-
- <script>
- // Select all elements with a CSS class of "bar".
- const bars1 = d3.selectAll('.bar');
- console.log('bars1 =', bars1);
-
- // Select all elements with a CSS class of "bar" that are
- // descendants of the element with an id of "chart1".
- const chart1 = d3.select('#chart1');
- const bars2 = chart1.selectAll('.bar');
- console.log('bars2 =', bars2);
-
- // Select all elements with a CSS class of "bar" that are
- // descendants of any element with a CSS class of "chart".
- const charts = d3.selectAll('.chart');
- const bars3 = charts.selectAll('.bar');
- console.log('bars3 =', bars3);
- </script>
- </body>
- </html>
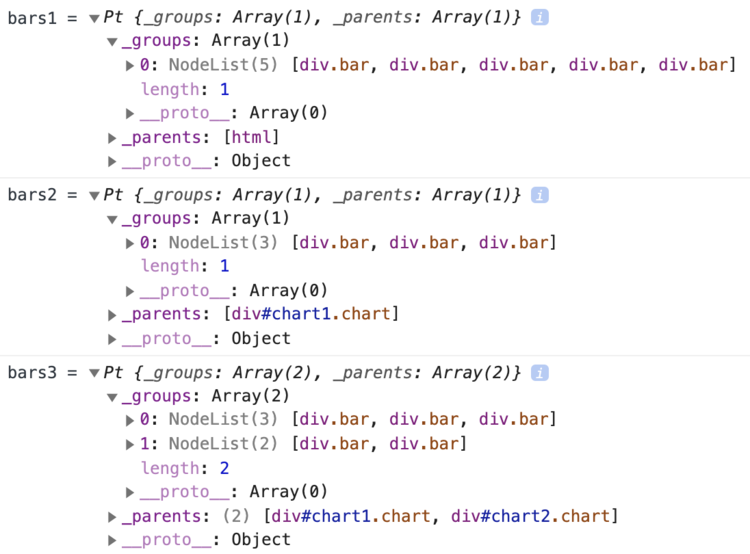
Here is the output from the console.log calls found in the browser DevTools console.
Each selection object has the following properties:
_parents- This is an array of the DOM elements that were searched. When the
selectandselectAllmethods are called on thed3object, this array will contain only thehtmlelement of the current document. When these methods are called on an existing selection, this array will contain all the DOM elements in that selection. _groups- This is an array of DOM
NodeListobjects, one per element in_parents. TheseNodeListobjects contain the matching DOM elements.
In the bars1 selection:
_parentscontains only thehtmlelement, indicating that the entire document was searched._groupsholds a singleNodeListthat contains every DOM element with a CSS class of "bar."
In the bars2 selection:
_parentscontains only the element with an id of "chart1." This happens because the search was performed on a selection that contains only that element._groupsholds a singleNodeListthat contains only the DOM elements with a CSS class of "bar" that are descendants of the element with an id of "chart1."
In the bars3 selection:
_parentscontains the two elements with a CSS class of "chart" because the search was performed on a selection that contains only these elements._groupsholds twoNodeListobjects, one for each parent element. Each of these contains the DOM elements with a CSS class of "bar" that are descendants of their respective parent elements.
The data method
Selection objects have a data method that associates data in an array with the DOM elements in the selection. It does this by adding a __data__ property to them.
Here is an example that demonstrates calling the data method on a selection.
- <html>
- <head>
- <title>D3 data method</title>
- <script src="https://d3js.org/d3.v5.min.js"></script>
- </head>
- <body>
- <script>
- const values = [7, 13, 2];
- const bars = d3.selectAll('.bar').data(values);
- console.log('bars =', bars);
- </script>
- </body>
- </html>
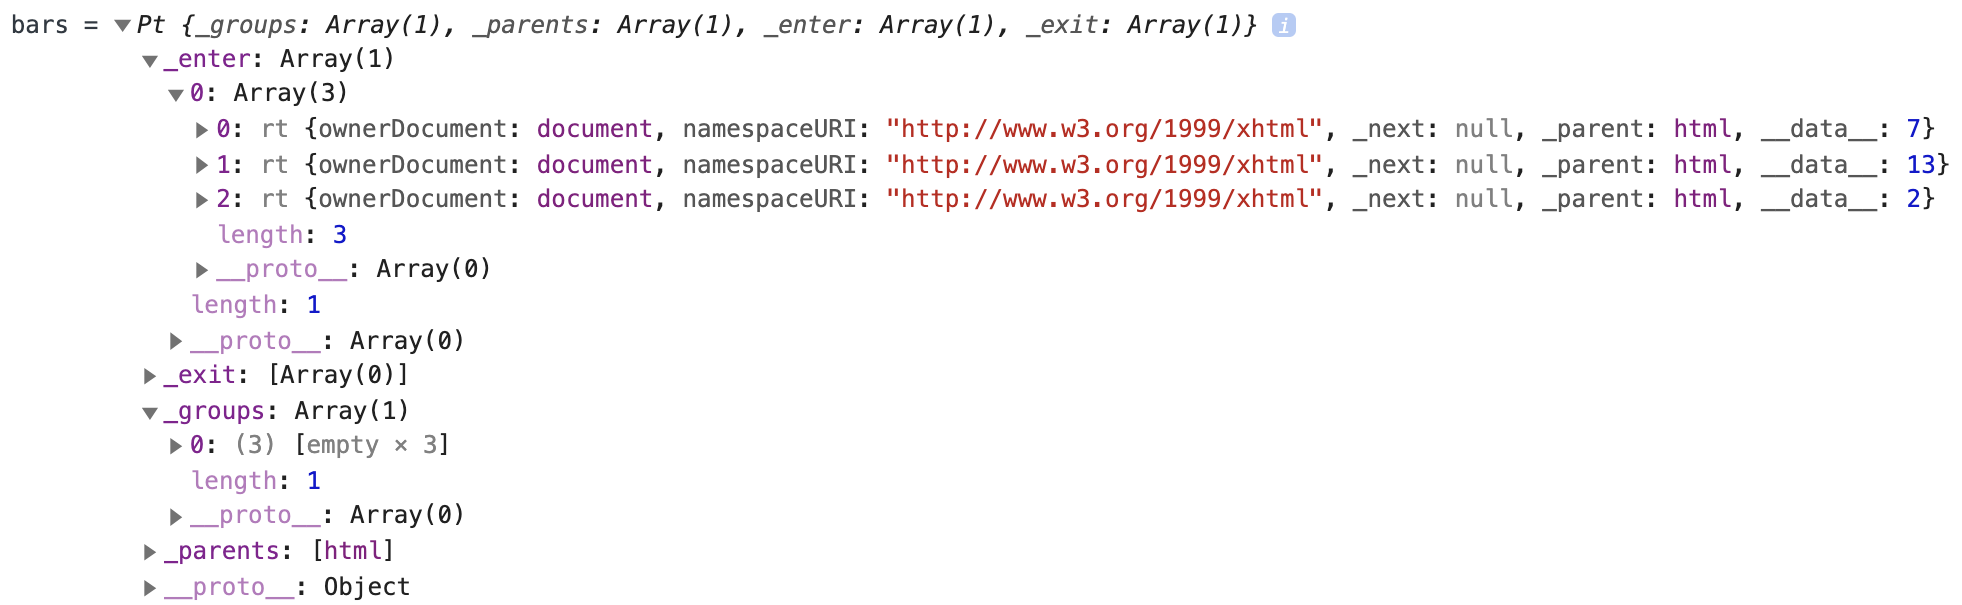
Here is the output from the console.log call found in the browser DevTools console.
If the values in the array passed to the data method are objects, a second argument which is a function can be passed. This is responsible for extracting or computing a value from each object in the array.
For example, suppose you have an array in a variable named paintings that contains objects that describe paintings and they have the properties paintingName, width, and height. You can use the area of each painting as the values as follows:
someSelection.data(paintings, p => p.width * p.height);The data method returns a new selection that contains three sub-selections referred to as "update," "enter," and "exit."
The update sub-selection is held in the _groups property and contains all the DOM elements in the selection that can be updated with a data value.
The enter sub-selection is held in the _enter property and contains a placeholder for each DOM element that must be created in order to associate a data value. These elements will enter the DOM. Note the __data__ property values in each of these placeholder objects.
The exit sub-selection is held in the _exit property and contains all the DOM elements in the selection for which no data will be assigned. Typically these elements exit the DOM by being removed.
There are three scenarios to consider.
- There are no DOM elements in the selection.
- There are DOM elements in the selection but fewer than the number of data values.
- There are DOM elements in the selection but more than the number of data values.
You have already seen the first scenario in the previous code example where there were three data values and no elements with a CSS class of "bar."
To see the second scenario, add the following to that HTML.
<div class="bar"></div>
<div class="bar"></div>
Reloading the page in the browser, you will see that the update sub-selection holds these two elements with the values 7 and 13. The enter sub-selection now contains a single placeholder with the value 2. The exit sub-selection is empty.
To see the third scenario, add three more div elements with a class of "bar," so there are a total of five. Reloading the page in the browser, you will see that the update sub-selection holds three elements with the values 7, 13, and 2. The enter sub-selection is empty. The exit sub-selection holds two elements that can be removed.
In order to support changing data, both values and the number of values, you need to handle all three sub-selections. This means you need a way to iterate over the elements in each.
To iterate over all the elements in the update sub-selection, call methods such as text directly on the selection object.
To process the enter sub-selection, obtain a new selection by calling the enter method, and then call methods on that selection.
To process the exit sub-selection, obtain a new selection by calling the exit method, and then call methods on that selection.
The following example demonstrates each of these. It generates an array containing a random number of random integers. These are used to display values in div elements that have a CSS class of "bar." Their text indicates whether the element was updated or just entered the DOM. Each time the "Update" button is pressed, the process repeats, and previously created div elements are reused.
Selection objects support many methods, some of which act on all the DOM elements they encapsulate. They do this by iterating over the elements in the NodeList values found in their _groups array. Examples include the attr, style, and text methods, two of which are used below.
These methods take a function that is invoked once for each encapsulated DOM element. The function is passed the value of the __data__ property value and the index of the DOM element within the selection. Inside these functions, the current element can be accessed using the this keyword. In order to use this, the function must not be an arrow function.
Just like in jQuery, it is not an error to call such a method on a selection that is empty, meaning it doesn't encapsulate any DOM elements.
Selection objects are immutable, meaning the set of DOM elements they encapsulate cannot be changed. However, there are many methods on selection objects that return a new selection, including filter, merge, select, and selectAll.
This example demonstrates processing the sub-selections in a selection. It simply renders div elements that indicate whether they were just added to the DOM or they already existed and merely had their text updated. Note that SVG is not used in this example.
- <html>
- <head>
- <title>D3 data method</title>
- <script src="https://d3js.org/d3.v5.min.js"></script>
- </head>
- <body>
- <button onclick="update()">Update</button>
-
- <div id="chart"></div>
-
- <script>
- // Gets a random integer between 1 and max inclusive.
- const randomInt = max => Math.floor(Math.random() * max) + 1;
-
- // Generates an array containing a random number of random integers.
- function getValues() {
- const count = randomInt(7);
- const values = [];
- for (let i = 0; i < count; i++) {
- values.push(randomInt(10));
- }
- return values;
- }
-
- function update() {
- const values = getValues();
- console.log('values =', values);
-
- // Create a D3 selection representing the bars
- // which are div elements with a CSS class of "bar",
- // and associate data values with them.
- const bars = d3.select('#chart').selectAll('.bar').data(values);
-
- // Update the text of bar elements that are already in the DOM.
- bars.text(d => 'update ' + d);
-
- // Create new bar elements that need to enter the DOM
- // and set their text.
- bars
- .enter()
- .append('div')
- .attr('class', 'bar')
- .text(d => 'enter ' + d);
-
- // Remove bar elements that need to exit the DOM.
- bars.exit().remove();
- }
-
- update(); // initial call
- </script>
- </body>
- </html>
This is a common D3 pattern referred to as the "general update pattern." It can be simplified in a couple of ways.
The first simplification is to use the merge method. This is called after appending elements to the enter sub-selection. It creates a new selection by combining elements in the selection on which it is called (the enter sub-selection in this case) with the selection passed to it (the update sub-selection in this case). The call that follows this operates on the new selection. This approach allows us to replace the "Update" and "Create" sections above with the following:
bars
  .enter() // returns the enter sub-selection
  .append('div') // returns the enter sub-selection
  .attr('class', 'bar') // returns the enter sub-selection
  .merge(bars) // returns a new selection
  .text(d => 'value ' + d);
We have lost the ability to specify different text for updated and entered elements, but that is not typically needed.
THE join METHOD
A second simplification that can be made to the code above is to use the join method. This takes up to three functions, one to handle each sub-selection. They must be in the order enter, update, and exit.
Using this approach, the code above, including the code for handling the exit sub-selection, can be replaced by the following.
bars.join(
  enter =>
    enter
      .append('div')
      .attr('class', 'bar')
      .text(d => 'enter ' + d),
  update => update.text(d => 'update ' + d),
  // This is the default behavior for the exit sub-selection
  // and can be omitted.
  exit => exit.remove()
);
This regains the ability to have different text for updated and entered elements. But if that is not needed, you can shorten the code even more by passing the name of the element to be created to the join method as follows. This handles:
- The enter sub-selection by creating new
divelements with a class of "bar" - Both the enter and update sub-selections by setting the text of those elements
- The exit sub-selection by removing those elements from the DOM
bars
  .join('div')
  .attr('class', 'bar')
  .text(d => 'value ' + d);
If you're feeling somewhat comfortable now with the notion of selection objects, their three sub-selections, and the general update pattern, you are ready to put that knowledge to use for creating your first chart.
Drawing Bars
Earlier you learned how to draw a single bar. Let's combine that with what you have learned about selections to draw one bar for each piece of data in an array.
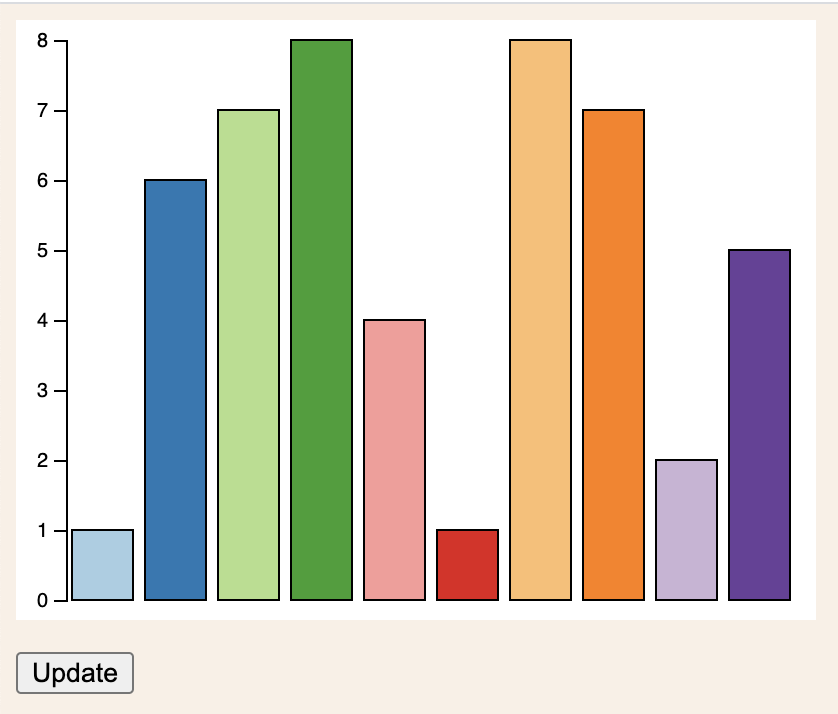
We will create a bar chart like the following:

The "Update" button generates new, random data and updates the bars. This is implemented by the files index.html, bar-chart.css, and bar-chart.js which are shown below.
This code gives us a good base for adding features. There are many D3 concepts to cover here. See the comments in the code for details.
index.html
- <html>
- <head>
- <title>D3 Bar Chart</title>
- <meta charset="utf-8" />
- <meta name="description" content="D3 Bar Chart" />
- <meta name="viewport" content="width=device-width, initial-scale=1" />
-
- <link rel="stylesheet" href="./bar-chart.css" />
-
- <script src="https://d3js.org/d3.v5.min.js"></script>
- <script src="./bar-chart.js" defer></script>
- </head>
- <body>
- <!-- The bars will be added in this svg element. -->
- <svg id="chart"></svg>
-
- <div>
- <!-- Render a new version of the chart when this is pressed. -->
- <button onclick="updateData()">Update</button>
- </div>
- </body>
- </html>
bar-chart.css
- body {
- background-color: linen;
- font-family: sans-serif;
- }
-
- .bar > rect {
- stroke: black;
- stroke-width: 1;
- }
-
- button {
- margin-top: 1rem;
- }
-
- #chart {
- background-color: white;
- }
bar-chart.js
- // Later these will be adjusted to make room
- // for a vertical and horizontal axis.
- const BOTTOM_PADDING = 10;
- const LEFT_PADDING = 10;
- const RIGHT_PADDING = 10;
- const TOP_PADDING = 10;
-
- // Full size of the svg element.
- const HEIGHT = 300;
- const WIDTH = 400;
-
- // Size that can be used for the bars.
- const usableHeight = HEIGHT - TOP_PADDING - BOTTOM_PADDING;
- const usableWidth = WIDTH - LEFT_PADDING - RIGHT_PADDING;
-
- // Random data will be selected from this array.
- const allData = [
- {name: 'apple', colorIndex: 1},
- {name: 'banana', colorIndex: 2},
- {name: 'cherry', colorIndex: 3},
- {name: 'date', colorIndex: 4},
- {name: 'grape', colorIndex: 5},
- {name: 'mango', colorIndex: 6},
- {name: 'peach', colorIndex: 7},
- {name: 'raspberry', colorIndex: 8},
- {name: 'strawberry', colorIndex: 9},
- {name: 'tangerine', colorIndex: 10},
- {name: 'watermelon', colorIndex: 11}
- ];
-
- let barPadding, barWidth, xScale, yScale;
-
- // This is used to select bar colors based on their colorIndex.
- const colorScale = d3.scaleOrdinal(d3.schemePaired); // 12 colors
-
- // This returns a random integer from 1 to max inclusive.
- const random = max => Math.floor(Math.random() * max + 1);
-
- // This returns an array of objects taken from allData.
- // A "score" property with a random value from 1 to 10
- // is added to each object.
- function getRandomData() {
- const count = random(allData.length);
- const shuffled = allData.sort(() => 0.5 - Math.random());
- const data = shuffled.slice(0, count);
- data.sort((f1, f2) => f1.name.localeCompare(f2.name));
- for (const item of data) {
- item.score = random(10);
- }
- return data;
- }
-
- // This updates the attributes of an SVG rect element
- // that represents a bar.
- function updateRect(rect) {
- rect
- // Each fruit will keep the same color as its score changes.
- .attr('fill', d => colorScale(d.colorIndex))
- .attr('width', barWidth - barPadding * 2)
- .attr('height', d => usableHeight - yScale(d.score))
- .attr('x', barPadding)
- .attr('y', d => TOP_PADDING + yScale(d.score));
- }
-
- // This updates the bar chart with random data.
- function updateData() {
- const data = getRandomData();
-
- // Calculate padding on sides of bars based on # of bars.
- barPadding = Math.ceil(30 / data.length);
-
- // Calculate the width of each bar based on # of bars.
- barWidth = usableWidth / data.length;
-
- // Create a scale to map data index values to x coordinates.
- // This is a function that takes a value in the "domain"
- // and returns a value in the "range".
- xScale = d3
- .scaleLinear()
- .domain([0, data.length])
- .range([LEFT_PADDING, LEFT_PADDING + usableWidth]);
-
- // Create a scale to map data score values to y coordinates.
- // The range is flipped to account for
- // the SVG origin being in the upper left corner.
- // Like xScale, this is a function that takes a value in the "domain"
- // and returns a value in the "range".
- // The d3.max function computes the largest data value in a given array
- // where values are computed by the 2nd argument function.
- const max = d3.max(data, d => d.score);
- yScale = d3.scaleLinear().domain([0, max]).range([usableHeight, 0]);
-
- // Create a D3 selection object that represents the svg element
- // and set the size of the svg element.
- const svg = d3.select('#chart').attr('width', WIDTH).attr('height', HEIGHT);
-
- // This is the most critical part to understand!
- // You learned about about selections and the general update pattern
- // in the previous section.
- const groups = svg
- .selectAll('.bar')
- .data(data, d => d.name)
- .join(enter => {
- // Create a new SVG group element for each placeholder
- // to represent a new bar.
- // For now the only thing in each group will be a rect element,
- // but later we will add a text element to display the value.
- const groups = enter.append('g').attr('class', 'bar');
-
- // Create a new SVG rect element for each group.
- groups
- .append('rect')
- .attr('height', 0)
- .attr('y', TOP_PADDING + usableHeight);
-
- return groups;
- });
-
- // The join method call above returns a selection that combines
- // the update and enter sub-selections into its update selection.
- // This allows operations needed on elements in both
- // to be performed on the new selection.
-
- // Translate the groups for each bar to their
- // appropriate x coordinate based on its index.
- groups.attr('transform', (_, i) => `translate(${xScale(i)}, 0)`);
-
- // Update all the rect elements using their newly associated data.
- updateRect(groups.select('rect'));
- }
-
- // Render the first version of the chart.
- updateData();
Adding a Y Axis
Now let's add a y axis to the chart that indicates the bar values. We want this to be dynamic so that the highest value matches the highest value of any of the bars that are present.
Here are the steps to add a y axis:
- Increase the value of
LEFT_PADDINGfrom 10 to 25 to leave room for the y axis. - Add the variable
yAxisGroupto theletstatement near the top as follows:
let barPadding, barWidth, xScale, yAxisGroup, yScale;- Add the function
updateYAxisshown below:
   function updateYAxis(svg, data, max) {
     if (!yAxisGroup) {
       // Create an SVG group that will hold the y axis and
       // translate the group to the appropriate position in the SVG.
       yAxisGroup = svg
         .append('g')
         .attr('class', 'y-axis')
         .attr('transform', `translate(${LEFT_PADDING}, ${TOP_PADDING})`);
     }

     // Create an array with values from zero to max
     // that will be used as the tick values on the y axis.
     const tickValues = Array.from(Array(max + 1).keys());

     // Create an axis generator function that renders the yAxis.
     const yAxis = d3
       .axisLeft(yScale)
       .tickValues(tickValues)
       .tickFormat(n => n.toFixed(0));

     // Pass the selection for the group to the
     // axis generator function to render it.
     yAxis(yAxisGroup);
     // An equivalent way to do this is yAxisGroup.call(yAxis);
}- Add the following at the bottom of the
updateDatafunction:
updateYAxis(svg, data, max);The result looks like this:
Adding an X Axis
Now let's add an x axis to the chart featuring values that correspond to the fruit name labels associated with each bar.
In our example the values represent scores in a poll where respondents name their favorite fruit. Of course all our data is randomly generated.
Here are the steps to add an x axis:
- Add the following to
bar-chart.cssto position and rotate the x-axis labels:
.x-axis > .tick > text {
  /* Translate and rotate labels so they fit below bars better. */
  transform: translate(-8px, 15px) rotate(-45deg);
}- Increase the value of
BOTTOMfrom 10 to 50 to leave room for the x axis. - Add the variable
xAxisGroupto theletstatement near the top as follows:
let barPadding, barWidth, xAxisGroup, xScale, yAxisGroup, yScale;- Add the function
updateXAxisshown below:
   function updateXAxis(svg, data) {
     if (!xAxisGroup) {
       // Create an SVG group that will hold the x axis and
       // translate the group to the appropriate position in the SVG.
       xAxisGroup = svg
         .append('g')
         .attr('class', 'x-axis')
         .attr('transform', `translate(0, ${TOP_PADDING + usableHeight})`);
     }

     // Create a scale that maps fruit names to positions on the x axis.
     const xAxisScale = d3
       .scaleBand()
       .domain(data.map(item => item.name)) // fruit names
       .range([LEFT_PADDING, LEFT_PADDING + usableWidth]);

     // Create and call an axis generator function that renders the xAxis.
     const xAxis = d3.axisBottom(xAxisScale).ticks(data.length);
     xAxis(xAxisGroup);
}- Add the following at the bottom of the
updateDatafunction:
updateXAxis(svg, data);The result looks like this:

Adding Text on Bars
Now let's add text to each bar that shows the bar's value. The text should be positioned near the top of each bar and centered horizontally.
The bars have a variety of fill colors. Using white text will look good on some fill colors, but using black text is better for others. We can choose between white and black text by calculating the relative luminance of the bar fill color. A formula for this can be found in Wikipedia at https://en.wikipedia.org/wiki/Relative_luminance. This is used in the getTextColor function below.
Here are the steps to add text to the bars:
- Add the following CSS rule in
bar-chart.cssto center the text for a bar horizontally within the bar.
   .bar > text {
     text-anchor: middle;
}- Add the following function for choosing the text color to use on a bar with a given fill color.
   // This returns a text color to use on a given background color.
   function getTextColor(bgColor) {
     // Convert the hex background color to its decimal components.
     const red = parseInt(bgColor.substring(1, 3), 16);
     const green = parseInt(bgColor.substring(3, 5), 16);
     const blue = parseInt(bgColor.substring(5, 7), 16);

     // Compute the "relative luminance".
     const luminance = (0.2126 * red + 0.7152 * green + 0.0722 * blue) / 255;

     // Use dark text on light backgrounds and vice versa.
     return luminance > 0.5 ? 'black' : 'white';
}- Add the following function for updating the text for a specific bar:
   // This updates the attributes of an SVG text element
   // that displays the score for a bar.
   function updateText(text) {
     text
       .attr('fill', d => {
         const barColor = colorScale(d.colorIndex);
         return getTextColor(barColor);
       })
       .text(d => d.score)
       .attr('x', barWidth / 2) // center horizontally in bar
       .attr('y', d => TOP_PADDING + yScale(d.score) + 20); // just below top
}- Add the following inside the
updateDatafunction after the line that appends arectelement to the SVG group for a bar:
   // Create a new SVG text element for each group.
groups.append('text').attr('y', TOP_PADDING + usableHeight);- Add the following after the call to
updateRect:
   // Update all the text elements using their newly associated data.
   updateText(groups.select('text'));
The result looks like this:
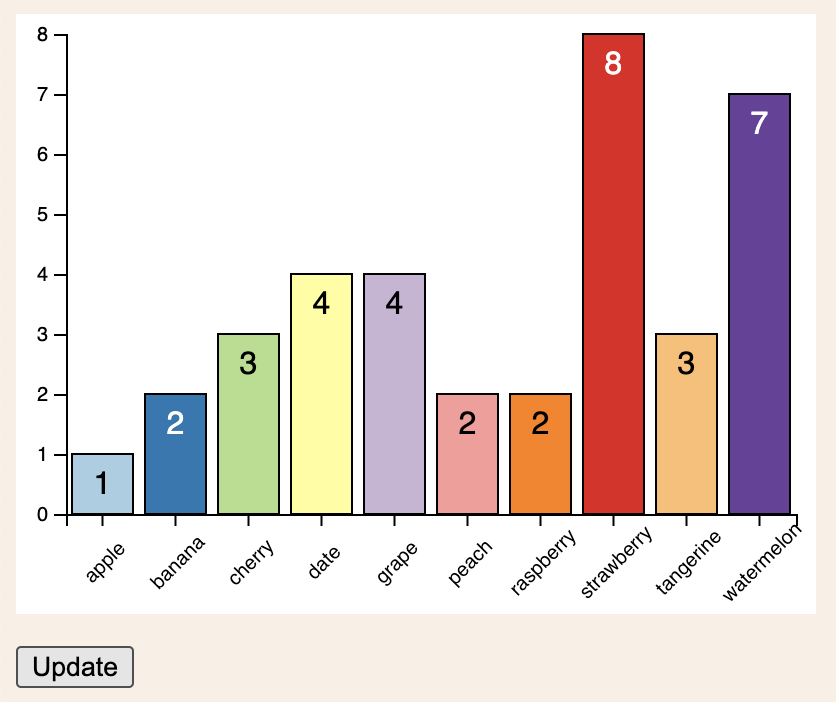
Note how some bars have white text, while others have black text.
Adding Transitions
D3 transitions animate changes to DOM and SVG properties.
Let's add code to animate the following:
- changes to the position, width, and height of bars
- changes to the position of text on bars
- changes to the x-axis and y-axis
- removal of bars
We can define a transition function that applies a specified transition to any selection. This function can be used to add all of the transitions listed above. Our transition function will specify only a duration, but it is also possible to specify an amount of time to delay before the transition begins (defaults to zero) and an easing function.
Easing functions control the speed of the transition at various times throughout its duration. The easing function defaults to d3.easeCubic when not specified. For descriptions of the provided easing functions and graphs that show their effect, see https://github.com/d3/d3-ease.
Here are the steps to add transitions to the bar chart:
- Add the following constant:
const DURATION = 500; // of transitions- Add the following transition function:
   // You cannot invoke this with the call method on selections
   // because that will return the selection
   // instead of the result of the last call made here.
const myTransition = selection => selection.transition().duration(DURATION);-
In the
updateRectfunction, replace the first line, which is justrect, withmyTransition(rect). -
In the
updateTextfunction, replace the first line, which is justtext, withmyTransition(text). -
Add the following line at the end of the
updateXAxisfunction to create a new selection forxAxisGroupthat has the transition applied:
xAxisGroup = myTransition(xAxisGroup);- Add the following line at the end of the
updateYAxisfunction to create a new selection foryAxisGroupthat has the transition applied:
yAxisGroup = myTransition(yAxisGroup);- Currently in the
updateDatafunction, only one function is passed to thejoinmethod. It processes the enter sub-selection. Add two more arguments to thejoinmethod shown below. The last argument is a function that processes the exit sub-selection by animating bars leaving the DOM.
     // This is only needed so we can specify
     // an exit function as the third argument.
     update => update,
     exit => {
       // Remove the score text from the
       // exiting rect elements immediately.
       exit.selectAll('text').remove();

       // Shrink the height of the exiting rects gradually
       // and then remove them them.
       myTransition(exit)
         .select('rect')
         .attr('height', 0)
         .attr('y', TOP_PADDING + usableHeight)
         .on('end', () => exit.remove());
     };
The result looks the same as before, but now when the "Update" button is pressed, changes to the data cause everything in the bar chart to transition from its previous state to its new state.
The final code can be found on GitHub at https://github.com/mvolkmann/d3-bar-chart-with-transitions.
Conclusion
There is much more to learn about D3, including how to create additional kinds charts such as pie charts, line charts, scatter plots, geographic maps, and more. What you have learned here about D3 selections and the general update pattern will serve you well as you dig in further.
Feel free to email me comments and questions about this article.
References
Official introduction to D3: https://d3js.org/
Examples of D3 creations: https://observablehq.com/@d3/gallery
D3 API documentation: https://github.com/d3/d3/blob/master/API.md
For a good book on D3, check out the O'Reilly book Interactive Data Visualization for the Web, 2nd Edition by Scott Murray at https://www.oreilly.com/library/view/interactive-data-visualization/9781491921296/.
Bonus Material
The same bar chart has been implemented using the C3 library. To see how this differs from using D3 directly, see https://github.com/mvolkmann/c3-bar-chart. The text for the values of each bar is always black in this version. It seems very difficult to make this dynamic in C3.
Also, the same bar chart has been implemented using the Svelte web framework. This can be found at https://github.com/mvolkmann/svelte-bar-chart. This required manually implementing the x and y axes which is much more work than letting C3 provide those or even asking D3 to render them.
Software Engineering Tech Trends (SETT) is a regular publication featuring emerging trends in software engineering.
