Deploying Applications with Java Web Start
By Brad Shuler, OCI Senior Software Engineer
December 2001
Introduction
Using Java Web Start, developers can deploy full-featured Java 2 applications over a network.
As easy to use as accessing a web page, Java Web Start provides one-click activation and guarantees that users are always running the latest, centrally controlled version of the application, all made possible using the new Java Network Launch Protocol (JNLP).
The possibility for peaceful coexistence of multiple applications all with unique runtime environments, security needs, and system properties is reason enough to be excited about this technology.
The only catch is that the user must install the Java Web Start client program.
When Java 2 SE v1.4 is released, the user can simply install the Java 2 Runtime Environment (JRE). There is also a small, time penalty for the first use of an application during the download from a web server (possibly including a security scan of the Java Archives for certification).
This article will discuss how it all works and how to deploy client applications. Near the end, we will show how to make a privileged application (requiring local file system access) network accessible using JNLP and Java Web Start.
Write Once, Deploy Anywhere
In the dark ages of Java, a good user interface meant your web page could animate an image file. The age of the applet soon followed, fueling Java's growth.
Applets were innovative because they allowed a web page to present a full-featured user interface. Java's promise of Write Once, Run Anywhere seemed unstoppable.
As the browser wars erupted, incompatibilities emerged. Applet developers could not predict or control which version of Java the user had installed. Tradeoffs had to be made:
- Use fewer features (older versions of Java) in order to support more browsers?
- Commit to a certain browser to take advantage of new features and leave potential users out of luck?
One popular solution to the applet issue was the Java Plug-in: a technology allowing JRE selection and caching through the browser.
Unfortunately, support for the Java Plug-in was not the highest priority for browser developers. The technology proved awkward, requiring custom downloads and complicated HTML (EMBED tags instead of APPLET). In the meantime, managers (who despise uncertainty) looked for alternatives.
One of the most popular alternatives proved to be the use of markup language technology, such as servlets, combined with JavaServer Pages (JSP) to serve up dynamically generated web pages. Thus began a migration to server-side development for Java developers and browser-based "thin" clients for users.
The server-centric model has met the challenge of a consistent, responsive user interface. It has not, however, met the challenge of a full-featured user experience.
Sun's next release of the JRE changes all of that. Version 1.4 includes Java Web Start.
Launching a Java Web Start Enabled Application
Each application is deployed using a special file called a deployment manifest, or .jnlp file. To make the application launch from a web page, the deployment engineer must place a Hypertext Reference (HREF) anchor tag pointing to the deployment manifest file in the web page HTML file.
Once the web page containing the application link is served to a browser, users may click on the link. When they do so, the following occurs:
- The web server instructs the browser to run Java Web Start.
- The Java Web Start splash screen appears.
- Java Web Start looks in the local cache and determines which application Java Archive (JAR) files are needed by the application to be run.
- Any missing or out-of-date JAR files are downloaded to the local machine cache.
- If the application has requested access to sensitive resources (such as the file system), a security check is made.
- Java Web Start launches the application, running totally on the local machine.
Lets look a little more closely at what happens, then discuss how to prepare the server.
The Application Cache
For each application, Java Web Start prepares a dedicated directory containing compressed and name-mangled versions of the JAR files downloaded. All class files, property files, image files, etc. must be packaged in a JAR in order for this model to work. On demand, Java Web Start downloads a JRE to match the needs of each application (independent of the client machine's JRE setup).
Installation of Java Web Start requires JRE v1.3 (included with the install image). The cache strategy makes it possible to run applications without a connection to a network. This can be disabled, forcing a reconnect to the server each time the client runs if, for example, the deployment team wants the option of tweaking the client using system properties controlled at the web server.
Security Concerns
As a Java 2 application, Java Web Start takes advantage of a comprehensive security scheme. This restricted environment (called the Java sandbox) disallows access to the local file system and network. Applications can request additional system privileges (such as printing or access to the system clipboard), but they will only be granted if the user chooses to trust the application.
Trust requires using a certificate, which is used by the application developer to digitally "sign" their application. Once the user has a certificate from a certifying authority, they can verify where the application came from. They can then decide whether to trust it.
A certificate is a digitally signed statement from one entity (person, company, etc.), saying that some credentials (public key) really belong to some other entity. There are certifying authorities (such as VeriSign, Thawte, and CyberTrust) that specialize in providing certificates for others for a fee.
Digital code signing involves a procedure (described in detail later) used to "sign" the JAR files holding application resources. Signing the JAR allows Java Web Start to verify that some third party has not altered the JAR after the developer signed it.
This should not be confused with JAR sealing – a process where packages stored in JAR files can be optionally sealed so that all classes defined in that package must be found in the same JAR file.
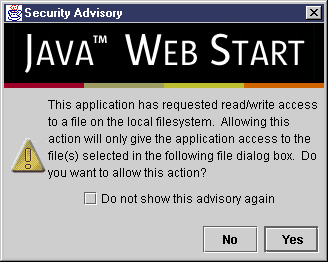
Java Web Start alerts the user to a request for access to system resources using a number of security dialogs. Here is an example for an application attempting to gain access to the local file system using the JNLP API:
Fig. 1 Security Advisory Dialog
Securing the Application
Support for fine-grained permissions is specified in the JNLP specification, but not supported in Java Web Start. Unfortunately, this makes security an "all-or-nothing" proposition, at least at this point.
Applications launched with Java Web Start are deployed using JAR files. If an application also specifies it needs to break out of the security sandbox, all of the JAR files will need to be digitally signed.
After each download of a signed JAR file, Java Web Start will verify that the contents have not been modified (since they were signed). If verification of a digital signature fails, Java Web Start will not run the application.
JAR Signing Using a Test Certificate
Java uses public-key encryption to sign JAR files. This involves two keys, one private and the other public. Both keys are stored in a database called a keystore, with the private key being encrypted. Public keys are exported from the keystore in the form of a certificate.
For this example (and other testing needs) it is possible to use a self-signed test certificate. These can be used to temporarily avoid the cost and delays of getting a formal certificate from a certifying authority.
Test certificates do not provide any guarantees about the identity of the source of the JAR, but they can be created on demand using the keytool program included with the Java 2 SDK.
To begin, create a new keystore:
>keytool -alias myalias -genkeyThe user is prompted for a password and some identifying information.
Next the command generates the keys (this may take some time) and stores them in a file called .keystore. The file location varies by platform (c:\Documents and Settings\Username\.keystore on Windows 2000 for example).
To verify the process worked, list the contents of the keystore file using the same command with different arguments:
>keytool -list

    Keystore type: jks
    Keystore provider: SUN

    Your keystore contains 1 entry:

    myalias, Tue Nov 13 21:23:57 CST 2001, keyEntry,
    Certificate fingerprint (MD5): 1C:D8:CF:F0:C2:87:BA:A8:A0:52:E9:A3:FB:1E:44:48
The procedure to prepare a signed JAR file involves using the jarsigner tool included with the Java 2 SDK:
>jarsigner FileChooserDemo.jar myaliasThe altered JAR file is now ready for deployment with Java Web Start. For those interested in the details, the modifications to the JAR file include:
- In the
manifest.mffile, an enumeration of all classes in the JAR is created with one-way hashes of each of the class files (used to verify the class file has not changed). - Inclusion of a Signature (.SF) file containing an enumeration of all classes in the JAR, with one-way hash codes generated from the corresponding entries in the manifest and signed by the developer. This lets Java Web Start check that the hashes from the original class files are really signed by the developer's certificate.
- A Signature Block (.DSA) file containing the developer's certificate allows Java Web Start to verify the Signature file.
Java Web Start reads the test certificate inside the JAR file and, during application launch, displays an imposing Security Warning dialog.
Fig. 2 Security Warning Dialog
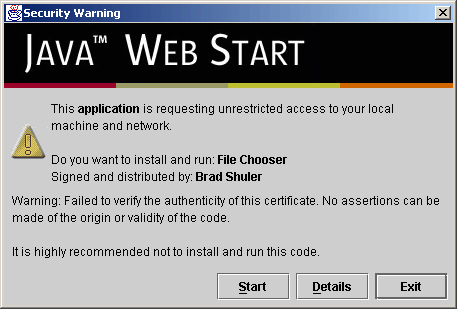
If a proper certificate (from a certifying authority) had been used, the dialog would look the same except the warning text would be replaced by:
Caution: Brad Shuler asserts that this content is safe. You should only install and run this application if you trust Brad Shuler to make this assertion.
The name of the certifying authority would also be shown. Once all the JAR files are signed, the host can be prepared to serve them.
Setting up the Web Server
JNLP makes Java Web Start possible. This technology (defined through the Java Community Process) defines the standard file format describing how to launch applications – the .jnlp file.
In addition to the Reference Implementation (RI) from Sun (Java Web Start), several open source projects are attempting to implement the JNLP specification (see References).
Web servers use a Multipurpose Internet Mail Extensions (MIME) lookup table to determine how to serve content to a browser.
Java Web Start launch files use a new MIME type:
application/x-java-jnlp-fileThis requires a mapping between the MIME type and the JNLP file extension.
For example, with Apache, add the following to the configuration file mime.types:
application/x-java-jnlp-file JNLPThe JNLP file describes how the application will be launched and how it will appear in the Java Web Start Application Manager. The format for the file is the Extensible Markup Language (XML).
We will now demonstrate setting up a JNLP file for use with Java Web Start.
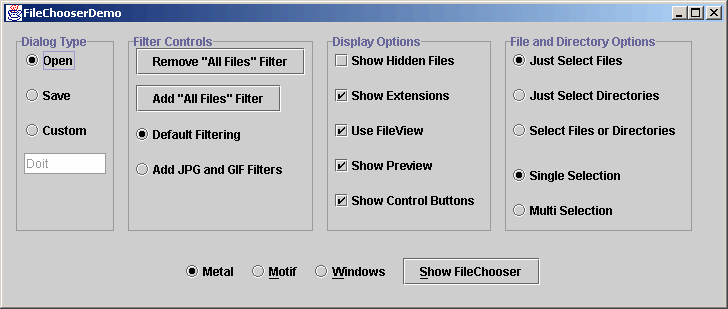
The Java 2 Java Developers Kit (JDK) from Sun includes several demonstration applications utilizing the Java Foundation Classes (Swing). One very basic application is called FileChooserDemo (Figure 3). This program displays a Swing dialog allowing the user to configure a file selection dialog and then run it, browsing the local network (potential security hazard!).
Fig. 3 Java 2 SDK JFC/Swing FileChooserDemo Application
The corresponding deployment manifest (example.jnlp) is shown here:
- <?xml version='1.0' encoding='UTF-8'?>
- <jnlp
- codebase="http://www.bradshuler.com/jws"
- href="example.jnlp">
- <information>
- <title>FileChooserDemo</title>
- <vendor>Object Computing, Inc.</vendor>
- <homepage href="index.html"></homepage>
- <description>Sun's JFC FileChooserDemo Application</description>
- <icon href="oci_logo.gif"></icon>
- <offline-allowed></offline>
- </information>
- <resources>
- <j2se version="1.3"></j2se>
- <jar href="FileChooserDemo.jar"></jar>
- <property name="key" value="value1"></property>
- </resources>
- <security>
- <all-permissions></all>
- </security>
- <application-desc main-class="FileChooserDemo"></application>
- </jnlp>
The XML document shown above contains several key pieces of information:
- The
codebaseattribute of thejnlproot element provides the base URL for allhrefattributes which follow. - The
hrefattribute "example.jnlp" specifies the name of the JNLP file itself (used by Java Web Start to add the application to the list of installed programs in the Application Manager). - The
informationelement provides data presented to the user when viewing the description of the application in the Application Manager or when viewing the desktop icon (optionally installed by the user). - The
offline-allowedelement indicates Java Web Start will allow the application to run if the deployment web server cannot be reached. - The
resourceselement specifies:- The JRE version to be used (and possibly downloaded if necessary)
- All JAR files used to hold class files, images, and native code
- System property names and values
- The
securityelement is used to specify access to the client machine and local network. This requires that all JAR files be signed. As mentioned previously, fine-grained permissions are not yet supported, makingall-permissionsthe only option at this time. - The
mainclass for the application, specified via theapplication-descelement.
More on the Resources Element
There are several features that can be configured using the resources element:
- Each resource may have a
downloadattribute set to one of two values:eager(default) orlazy. Eager resources must be downloaded before the application will start.
For example:
<jar href="application.jar" download="eager"></jar>
<jar href="fluffySounds.jar" download="lazy"></jar>- Multiple
resourceselements are allowed. This allows a default set of resources with another set specified to narrow down what to download to the client by locale, operating system, or architecture (i.e., Windows vs. Solaris).
Here is an example:
- <!Common Resources for all -->
- <resources>
- <jar href="jars/windows/coreComponents.jar"></jar>
- </resources>
- <resources os="Windows">
- <jar href="jars/windows/audio.jar"></jar>
- <nativelib href="jars/windows/utilDLL.jar"></nativelib>
- </resources>
- <!-- Linux IBM J2RE -->
- <resources os="Linux" arch="x86">
- <jar href="jars/linux/i386/audio.jar"></jar>
- <nativelib href="jars/linux/i386/util.so.jar"></nativelib>
- </resources>
- <!-- Linux SUN JRE -->
- <resources os="Linux" arch="i386">
- <jar href="jars/linux/i386/audio.jar"></jar>
- <nativelib href="jars/linux/i386/util.so.jar"></nativelib>
- </resources>
- <resources os="Solaris" arch="sparc">
- <jar href="jars/solaris/audio.jar"></jar>
- <nativelib href="jars/solaris/util.so.jar"></nativelib>
- </resources>
-
- The
j2seelement controls which JRE is used:
- <j2se version="1.4.0-beta3"
- href="http://java.sun.com/products/autodl/j2se"></j2se>
- <!-- Use production release of JRE 1.4 or use the beta if not available -->
- <j2se version="1.4 1.4.0-beta3"
- href="http://java.sun.com/products/autodl/j2se"></j2se>
- <!-- JDK 1.3 or better -->
- <j2se version="1.3+" href="http://java.sun.com/products/autodl/j2se"></j2se>
- One JNLP file may delegate JAR dependencies to another JNLP file using the
extensionelement, providing a powerfulCLASSPATH-like capability across the Internet or intranet (since the first JNLP file need not be on the same server as referenced JNLP files).
Managing the Desktop with Java Web Start Application Manager
The Java Web Start Application Manager GUI allows users to view, launch, and configure downloaded applications. The main window is shown below:
Fig. 4 Java Web Start Application Manager
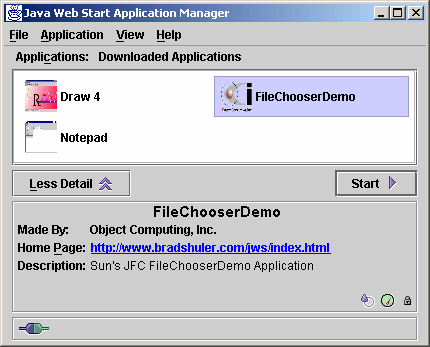
The information shown (home page, description, and author) is derived from each application's JNLP file.
The user launches an application by selecting the icon desired and pressing the Start button.
Other, advanced features accessible from the Preferences dialog include:
- Managing the download application cache (removing applications, for example)
- Add desktop icons (and Start menu entries) to launch a particular application without launching a browser
- Enable the Java Console
- Enable logging
- Configure HTTP proxy settings (some platforms)
- View installed Java 2 JRE's (add and delete from list)
- View, import and export security certificates
Advanced Topics
Sun provides a JNLP API to provide additional information and features to Java Web Start enabled applications (even in restricted environments).
Code examples for the following services are available in the Sun Java Web Start Developer's Guide (see References):
BasicService(query and interact with the host environment)ClipboardService(access the shared system-wide clipboard)DownloadService(allows an application to control how it is cached)FileOpenService(import files from the local disk)FileSaveService(export files to the local disk)PrintServicePersistenceService(store data on the client, similar to cookies)
Summary
Java Web Start is relatively new deployment technology for Java 2 applications. It provides a seamless gateway between the client computer and Internet (or intranets) that allows the user to launch and manage applications right off the web.
With point-and-click activation of applications, Java Web Start guarantees users they will always be running the latest version, eliminating installation and upgrade headaches.
Java Web Start is available for a wide variety of platforms, including Windows 95/98/NT/2000, Linux, Solaris, and Mac OS X.
References
- [1] Apple (try the security demo)
http://developer.apple.com/java/javawebstart - [2] IBM
http://www.ibm.com/developerworks/library/j-webstart/index.html - [3] Java Community Process (JNLP Specification)
http://www.jcp.org/aboutJava/communityprocess/final/jsr056/index.html - [4] Java Web Start
http://java.sun.com/products/javawebstart/index.html - [5] JavaWorld
http://www.javaworld.com/javaworld/jw-07-2001/jw-0706-webstart.html - [6] OpenJNLP, an Open Source Project for a JNLP Client
http://sourceforge.net/projects/openjnlp - [7] Packaging JNLP Applications in a Web Archive
http://java.sun.com/products/javawebstart/docs/downloadservletguide.html - [8] RACHEL, Open Source Project for a JNLP Client
http://sourceforge.net/projects/rachel - [9] Sun Java Developer Connection JWS/JNLP Forum
http://forum.java.sun.com/forum.jsp?forum=38 - [10] Sun Java Developer Connection Tech Tips Newsletter May 2001
http://developer.java.sun.com/developer/JDCTechTips/2001/tt0530.html - [11] Unofficial Java Web Start FAQ
http://www.geocities.com/vamp201/jwsfaq.html
Software Engineering Tech Trends (SETT) is a regular publication featuring emerging trends in software engineering.
