1 Introduction
In the April 2017 issue of SETT, my colleague Mark Volkmann laid out a detailed blueprint for developing a modern web application from beginning to end. In this article, we will demonstrate how to develop the same web app using the Grails framework.
The only explicit technology change will be the use of Grails over Node/express for the backend – otherwise, we will use the same stack, including React and PostgreSQL. We will demonstrate similar features, including token-based authentication, REST services, and websockets.
It is my hope that this side-by-side comparison will show you how Grails simplifies and accelerates the development process and makes developers more productive without giving up finer-grain control where needed.
The emphasis of this article will not be so much learning how the “innards” of web applications work, but rather on developer productivity. In addition, we will refer readers to Mark’s article for details on the implementation of the React application, as there we will be using almost the exact same code (any changes will be highlighted and explained).
TIP: This article is based on an upcoming Grails Guide (not available as of the time of publishing) by the same name: Web App, Step by Step. The Grails Guide will include further code samples and unit/integration tests for readers who would like to see more advanced techniques and best practices using Grails.
2 Writing the Grails Application
The completed sample project for this article can be found at https://github.com/grails-guides/web-app-step-by-step/tree/sett/complete
2.1 Grails
From the official website: "Grails is a powerful web framework for the Java platform, aimed at multiplying developers' productivity."
Web frameworks provide an array of features designed to make developers' lives easier when building web applications. Sometimes, however, web frameworks get in the way or force developers to write boilerplate or framework-specific code that’s not relevant to the business need of the app. Understandably, many developers are wary of "yet another web framework" and of the hidden costs that using one might incur.
In the case of web applications, Grails is truly different. The Grails framework goes the extra mile by providing developers with a set of sensible but customizable, defaults, encouraging a "convention over configuration" approach to development, while providing a powerful set of tools that make developing data-driven web apps fun again.
TIP: Grails 3.x is based on the Spring Boot framework but includes substantial features and improvements to the developer’s experience over a "plain" Spring Boot project. See this article for more on the differences between Grails & Spring Boot.
Much of Grails' "magic" comes from its use of the Groovy programming language. From the official website, Groovy is a "powerful, optionally typed and dynamic language, with static typing and static compilation capabilities, for the Java platform."
Grails apps can be written using Java; however, Groovy’s flexibility and developer-friendly features can make your code much more expressive and readable. If you are familiar at all with Java syntax, you will be able to read (and write) Groovy code. All of our server-side code in this article will be written in Groovy.
Every Grails project begins with a single create-app command. For the purposes of following along with this article, you may choose to install Grails via the official website or using sdkman (recommended). However, there is no need to install the framework on your machine to create your Grails app; instead, let’s browse to http://start.grails.org and create our application using the Grails Application Forge.
Choose the latest version of Grails (3.3.0 as of the time of writing) and select the react profile.
Once you’ve downloaded your application, expand it into a directory of your choice, cd into the project, and run the following two commands (in two separate terminal sessions):
~ ./gradlew server:bootRun //Windows users use "gradlew.bat" //in a second terminal session
– ./gradlew client:bootRunThe gradlew command launches the Gradle wrapper, which is provided by the Gradle build tool, used in all Grails projects since Grails 3.0.
The wrapper is a special script that actually downloads and installs the Gradle build tool (if necessary) before running your commands. Gradle will then download all needed dependencies (including Grails) and install them in your project (caching them for future use as well). This is why you don’t need to install Grails on your machine; if your project includes the Gradle wrapper, it will handle that for you.
TIP: You can think of Gradle roughly as an alternative to npm (which "does not" stand for Node Package Manager). It doesn't provide the CLI that npm offers, but it fulfills a similar purpose in dependency management and build-processing. When a Gradle command (or "task") is run, Gradle will first download all dependencies listed in the project'sbuild.gradlefile, similar to runningnpm install.
What about the server and client portion of those two commands?
Because we’re using the react profile, Grails has actually created two separate “apps” for us:
- The backend Grails application
- The React application (which in turn is generated via
create-react-app)
Gradle treats these two apps as independent subprojects with the above names. This is called a multi-project build.
When running a Gradle task from the project root directory, anything after ./gradlew [project_name]: will match a task specific to that subproject.
The bootRun task is configured in both projects to start the respective app.
TIP: Where doesbootRuncome from? This Gradle task is inherited from the Spring Boot framework, upon which Grails is based. Of course,create-react-appprojects don’t have such a task by default. The React profile provides theclient:bootRuntask as a wrapper around the npm/yarnstartscript. This allows you to use advanced Gradle features, like running bothserverandclientin parallel mode with one command. For developers, running../gradlew client:bootRunis the same as runningnpm start(oryarn start) in a stockcreate-react-appproject, and in fact you can run theclientapp exactly that way if you havenpm/yarninstalled on your machine.
Once the gradlew commands have completed downloading dependencies and launching their respective apps, you should be able to browse to http://localhost:8080 to see the Grails backend application, and http://localhost:3000 to view the React app.
Before we continue implementing our application, take a moment to explore the app we have right now.
The Grails application by default is providing some useful metadata in JSON format, and the React app is consuming that data via a REST call and displaying it via the app’s navigation menus. This isn’t a very useful app, but you can see a lot of boilerplate has already been set up for you.
2.2 Datasource
Now that we have our basic application structure, its's time to set up our database.
As in the previous article, we will be using PostgreSQL. However, it’s worth noting that Grails has already set up a basic datasource for us in the form on an in-memory H2 database. This database is destroyed and recreated every time the app is run, and it will even be updated during runtime if new tables/columns are added to the domain classes (more on those later).
For many apps, this default database will be very well suited for the initial stages of app development, especially if you’re making many iterative changes to your data model. However, in keeping with the previous article, we are going to replace this default H2 datasource with our desired PostgreSQL database.
Let’s recap the steps to install PostgreSQL on your machine:
- To install PostgreSQL in Windows, see https://www.postgresql.org/download/windows/.
- To install PostgreSQL in macOS:
- Install Homebrew by following the instructions at http://brew.sh/.
- Enter the following: brew install postgresql
- To start the database server, enter
pg_ctl -D /usr/local/var/postgres start. - To stop the database server later, enter
pg_ctl -D /usr/local/var/postgres stop -m fast.
— Web App Step by Step by Mark Volkmann
Once you’ve installed Postgres (or if you already have it installed), create a new database for our app using createdb
~ createdb ice_cream
If you recall in the previous article (where the above installation steps were taken from), the next steps here would be to create the database tables needed for our app. However, we won’t be using any SQL in this project. That’s because Grails offers a powerful and developer-friendly alternative: the Grails Object-Relational Mapper, a.k.a. GORM.
2.3 GORM
GORM works with any JDBC-compatible database, which includes Postgres (as well as more than 200 other databases).
To begin using Postgres with our new Grails app, we have 2 steps to complete:
Step #1
Install the JDBC driver in our server project.
- Edit
server/build.gradle, and find the section nameddependencies. - Add the following line of code:
runtime 'org.postgresql:postgresql:9.4.1212'This will tell Gradle to download version 9.4.1212 of theorg.postgresql.postgresqllibrary from the Maven Central repository, and install it in our app.
/server/build.gradle
runtime 'org.postgresql:postgresql:9.4.1212'TIP: You can think ofbuild.gradleas filling a similar purpose to apackage.jsonfile in a Node.js project. It specifies repositories, dependencies, and custom tasks (similar to npm scripts) for your project.
Step #2
Configure GORM to use our PostgreSQL database instead of the default H2 database.
- Edit
server/grails-app/conf/application.yml, scroll down to the section starting withdatasource, and replace it with the following content:
/server/grails-app/conf/application.yml
dataSource:
    dbCreate: create-drop
    driverClassName: org.postgresql.Driver
    dialect: org.hibernate.dialect.PostgreSQLDialect
    username: postgres
    password:
    url: jdbc:postgresql://localhost:5432/ice_cream
Now our Grails app is connected to our database, but we haven’t created any tables yet. With Grails, there’s no need to create the database schema manually (although you certainly can do so if you want). Instead, we’ll specify our domain model in code, by writing Domain Classes.
By convention, Grails will load any Groovy classes located under grails-app/domain as Domain Classes. This means that GORM will map these classes to tables in the database and map the properties of these classes to columns in the respective tables. Optionally, GORM will create these tables for us, which we have already enabled in our application.yml file with the dbCreate: update setting.
This means it’s actually quite trivial to set up the database schema from the original article.
For each of the tables we need in our app, we will create a domain class under the grails-app/domain directory.
- Run the following commands:
~ ./grailsw create-domain-class ice.cream.IceCream
~ ./grailsw create-domain-class ice.cream.User
~ ./grailsw create-domain-class ice.cream.UserIceCream
These commands will generate three Groovy classes, under grails-app/domain/ice/cream.
- Edit these files with the following content:
/server/grails-app/domain/ice/cream/IceCream.groovy
package ice.cream

class IceCream {

    String flavor

    static constraints = {
    }
}
/server/grails-app/domain/ice/cream/User.groovy
package ice.cream

class User {
    String username
    String password
}
TIP: You may have noticed we have not encrypted our password column – don’t worry, we’ll get to that later on.
/server/grails-app/domain/ice/cream/UserIceCream.groovy
package ice.cream

class UserIceCream {

    User user
    IceCream iceCream

    static UserIceCream create(User user, IceCream iceCream, boolean flush = false) { //(1)
        def instance = new UserIceCream(user: user, iceCream: iceCream)
        instance.save(flush: flush) //(2)
        instance
    }
}
Because this domain class represents a join table for our User and IceCream classes, we’ve defined a static create method that will create the UserIceCream instance for a given User and IceCream instance.
Flush tells GORM whether to immediately persist changes to the database, or whether the change can wait until GORM decides to persist the current session (possibly along with other database updates at the same time).
We are using a default flush argument to turn flushing off by default, while allowing the caller to override this and flush immediately if desired. For more details, please see the GORM Documentation.
2.4 Package Naming
As is common in Java projects, we have created a package for our domain classes.
Packages help distinguish our classes from classes from libraries or plugins that we might use later. The package is reflected in the directory structure as well: these two files will be created under grails-app/domain/ice/cream/.
TIP: Why are we using period instead of dash separators, as was shown in the previous article? In Java, it is generally considered against convention to use dashes (hyphens) in package names. See this link for details on Java naming conventions.
2.5 Run the App
If you were to start up your app now, Grails will connect to the Postgres database and create the tables and columns needed to persist your domain objects. Of course, there would be no data in the database initially. We will solve that issue shortly, but for now, we can run a Grails command that will give us an interactive console where we can create, update, delete, and query our domain objects.
- Run the following command:
~ ./grailsw console
(If you have Grails installed locally on your machine, you can run the grails command directly, e.g., : grails console. However, Grails projects include the grailsw wrapper command, which will install the correct version of Grails for you.)
Now you should see the Grails Console. You can import any classes from your project (both your own code and any dependencies) and run any Groovy code you’d like.
The following code will show how to accomplish the database operations from the previous "Web App" article, using GORM and the Groovy language:
import ice.cream.*

// Delete all rows from these tables:
// user and ice_cream via HQL updates (efficient for batch operations)
IceCream.executeUpdate("delete from IceCream")
User.executeUpdate("delete from User")

// Insert three new rows corresponding to three flavors.
def iceCreams = ['vanilla', 'chocolate', 'strawberry'].collect { flavor ->
    new IceCream(flavor: flavor).save(flush: true)
}

// Get an array of the ids of the new rows.
def ids = iceCreams*.id
println "Inserted records with ids ${ids.join(',')}"

// Delete the first row (vanilla)
def vanilla = IceCream.get(ids[0])
vanilla.delete()

// Change the flavor of the second row (chocolate) to "chocolate chip".
def chocolate = IceCream.findByFlavor('chocolate')
chocolate.flavor = 'chocolate chip'
chocolate.save(flush: true)

// Get all the rows in the table.
iceCreams = IceCream.list()

// Output their ids and flavors.
iceCreams.each { iceCream ->
    println "${iceCream.id}: ${iceCream.flavor}"
}- Enter the above code into the Grails Console (launched with the previous command), and click the "Run" button to execute the script.
If you like, you can save the script to be reused later.
Note that this Groovy script will work only in the Grails Console, not via the "plain" Groovy Console or Groovy compiler (groovyc). This is because our domain classes need to be loaded by Grails in order for this code to work.
You might think this method could be used to populate our database with some initial data, and you’d be correct; any inserts or updates we make in the Console are persisted to the database we configured in our application.yml file. However, Grails provides a BootStrap.groovy file which is much better suited to this.
- Edit the file
server/grails-app/init/ice/cream/BootStrap.groovyand add the following code:
/server/grails-app/init/ice/cream/BootStrap.groovy
package ice.cream

class BootStrap {

    def init = { servletContext ->
        println "Loading database..."

        if (!IceCream.count()) {
            def iceCreams = ['vanilla', 'chocolate', 'strawberry'].collect { flavor ->
                new IceCream(flavor: flavor).save(flush: true)
            }

            def ids = iceCreams*.id
            println "Inserted records with ids ${ids.join(',')}"
        }

        if (!Role.count()) {
            new Role(authority: 'ROLE_USER').save(flush: true)
            println "Inserted role..."
        }
    }
    def destroy = {
    }
}
As you can see, we simply borrowed some code from our script and used it in the init method, which Grails will execute during application startup.
2.6 REST Services
Now that we have our database configured and populated, it’s time to set up our service layer.
Before we do this, it’s important to understand the two main data-handling artifacts provided by the Grails framework.
- Controllers. Grails is an MVC framework, where "C" stands for Controller. In an MVC app, controllers define the logic of the web application and manage the communication between the model and the view. Controllers respond to requests, interact with data from the model, and then respond with either a view (HTML page) or some other consumable format (such as JSON). Controllers are Groovy classes located in
grails-app/controllers. - Services. Many times we need to do more with our data than simply take a request and return a response. Real-world apps typically include a substantial amount of code dedicated to business logic. Grails supports services, which are classes that have full access to the model but are not tied to a request. Controllers, as well as other parts of your app, can call services (which are made available via Spring’s dependency injection) to get back the data they need to respond to their requests. Services are Groovy classes located in
grails-app/servicesand can be injected by name into other Grails artifacts.
To implement our RESTful API in our app, we’ll use controllers to respond to API requests (POST, GET, PUT, DELETE) and services to handle our business logic (which is pretty simple in our case).
Let’s start with a controller:
~ cd server
~ ./grailsw create-restful-controller ice.cream.IceCream
Note that we are using the create-restful-controller command, which is provided by the rest-api Grails profile. The generated controller inherits from the RestfulController class, which implements all the standard RESTful endpoints for us.
/server/server/grails-app/controllers/ice/cream/IceCreamController.groovy
package ice.cream

import grails.rest.*
import grails.converters.*

class IceCreamController extends RestfulController {
    static responseFormats = ['json', 'xml']
    IceCreamController() {
        super(IceCream)
    }
}
With RestfulController, Grails has already taken care of the following endpoints for us:
DELETE /iceCream/:id  //deletes iceCream with id
GET /iceCream/:id     //retrieves iceCream with id
POST /iceCream/       //save a new iceCream instance
PUT /iceCream/:id     //update iceCream with id
This is a great start. However, to satisfy the requirements of the React app, we’ll need to customize our controller quite a bit.
Here’s our complete controller code:
/server/grails-app/controllers/ice/cream/IceCreamController.groovy
package ice.cream

import grails.plugin.springsecurity.annotation.Secured
import grails.rest.*
import grails.gorm.transactions.Transactional

//(1)
@Secured(['ROLE_USER'])
class IceCreamController extends RestfulController {

    IceCreamService iceCreamService

    static responseFormats = ['json']
    IceCreamController() {
        super(IceCream)
    }

    def index(Integer max, String username) {
        params.max = Math.min(max ?: 10, 100) //(2)
        User _user = getUser(username)
        if(_user) {
            List iceCreams = UserIceCream.where { user == _user }
                    .list()
                    .collect { it.iceCream }
            respond iceCreams //(3)
        }
        else
            render status: 404 //(4)
    }

    @Transactional
    def save(String username, String flavor) {
        User user = getUser(username)
        if(user) {
            def id = iceCreamService.addIceCreamToUser(user, flavor).id
            render id ?: [status: 500]
        } else
            render status: 404
    }

    def delete(String username, Long id) {
        User user = getUser(username)
        if(user) {
            respond iceCreamService.removeIceCreamFromUser(user, id) ?: [status: 500]
        } else
            render status: 404
    }

    private User getUser(String username) {
        return User.findByUsername(username)
    }
}
- The
@Securedannotation specifies the access controls for this controller; authentication andROLE_USERis required. - In a Grails controller, you have access to the request parameters in the
paramsobject. Here we are checking for amaxparameter, using the Groovy ternary operator?:(aka "Elvis" operator) to supply a default max of 10 records and using theMath.minmethod to limit the maximum number of records to 100. - The
respondmethod uses content-negotiation to determine the appropriate format to respond to the request. See the Grails documentation for more details. - The
rendermethod responds to the request without content-negotiation. We’re using it here when we have no content to return but need to specify an HTTP error status. See the Grails documentation for more details.
We now need to create IceCreamService and implement the addIceCreamToUser and removeIceCreamFromUser methods.
Again from the server directory, run the following command, and edit the resulting IceCreamService.groovy file with the content below:
~ ./grailsw create-service ice.cream.IceCreamService
/server/grails-app/services/ice/cream/IceCreamService.groovy
package ice.cream

import grails.gorm.transactions.Transactional

@Transactional
class IceCreamService {

    IceCream addIceCreamToUser(User user, String flavor) {
        IceCream iceCream = IceCream.findOrCreateByFlavor(flavor)

        if(iceCream.save(flush:true)) {
            UserIceCream.create(user, iceCream, true)
            return iceCream
        } else {
            iceCream.errors.allErrors.each { log.error(it) }
            return null
        }
    }

    Boolean removeIceCreamFromUser(User user, Long id) {
        IceCream iceCream = IceCream.get(id)
        if(iceCream) {
            UserIceCream.findByUserAndIceCream(user, iceCream)?.delete(flush: true)
            return true
        } else {
            return false
        }
    }
}
Thanks to GORM, our persistence code is very expressive and self-documenting.
Now we need to create a second controller and service to support user signups. From the server directory again, run the following commands:
~ ./grailsw create-controller ice.cream.User
~ ./grailsw create-service ice.cream.User
Again, edit the generated files with the following content:
/server/grails-app/controllers/ice/cream/UserController.groovy
package ice.cream

import grails.plugin.springsecurity.SpringSecurityService
import grails.plugin.springsecurity.annotation.Secured
import grails.plugin.springsecurity.rest.token.AccessToken
import grails.plugin.springsecurity.rest.token.generation.TokenGenerator
import grails.plugin.springsecurity.rest.token.rendering.AccessTokenJsonRenderer
import org.springframework.http.HttpStatus
import org.springframework.security.core.userdetails.UserDetails

//(1)
@Secured(['IS_AUTHENTICATED_ANONYMOUSLY'])
class UserController {
    static responseFormats = ['json', 'xml']

    UserService userService
    TokenGenerator tokenGenerator
    AccessTokenJsonRenderer accessTokenJsonRenderer
    SpringSecurityService springSecurityService

    def signup() {
        def json = request.JSON
        def username = json.username
        def password = json.password

        //(2)
        if (User.findByUsername(username)) {
            render status: HttpStatus.UNPROCESSABLE_ENTITY.value(), "duplicate key"
        } else {
            User user = userService.createUser(username, password)

            //(3)
            springSecurityService.reauthenticate(user.username)
            AccessToken token = tokenGenerator.generateAccessToken(springSecurityService.principal as UserDetails)
            render status: HttpStatus.OK.value(), accessTokenJsonRenderer.generateJson(token)

        }
    }
}
The @Secured annotation specifies the access controls for this controller; anonymous access is permitted
Check for duplicate usernames
Authenticate the newly created user and generate the authentication token. This step saves the React app from having to make a second login request after the /signup request
/server/grails-app/services/ice/cream/UserService.groovy
package ice.cream

import grails.gorm.transactions.Transactional

@Transactional
class UserService {

    User createUser(String username, String password) {
        User user = new User(username: username, password: password).save()
        Role role = Role.findByAuthority("ROLE_USER")

        UserRole.create(user, role, true)

        return user
    }
}
Again, GORM makes creating and saving our new User instance a breeze!
Hyphenated URL Formats
The last step to completing our API is to update the URL endpoints.
In the previous article, all the API endpoints were prefixed by ice-cream/. By default, Grails uses a camelcase convention for URLs, e.g., iceCream/.
Fortunately, Grails allows easy customization of URL formats.
To use a hyphenated URL format, all we need to do is add the following configuration variable:
server/grails-app/conf/application.yml
grails:
    web:
        url:
            converter: hyphenated
TIP: The format of a typical URL mapping is[HTTP method (optional)] "[url]"([controller, action or URI to map to the URL])As you can see URL mappings accept variables (like$username) and wildcards (*), allowing very flexible routing control. See the Grails documentation for more on URL mappings.
2.7 Authentication
Because Grails is based upon Spring Boot, it is compatible with many other projects in the Spring Ecosystem. One of the most popular such projects is Spring Security.
Spring Security provides powerful authentication and access control for Java web apps and supports many authentication methods, from LDAP to OAuth2. Even better, there is a set of Grails plugins that makes Spring Security a breeze to set up.
Edit server/build.gradle again, and add the following two lines: server/build.gradle
/server/build.gradle
compile 'org.grails.plugins:spring-security-core:3.2.0.M1'
compile "org.grails.plugins:spring-security-rest:2.0.0.M2"
We’ve installed the Spring Security REST plugin to support token-based RESTful authentication, which is a standard approach in most modern web apps.
The Spring Security Core plugin provides a handy script to generate our security configuration. It’ll give us a good start from which to customize.
IMPORTANT: The command we are about to run will generate a new User domain class, which we will use going forward instead of the class we created above. Delete the old file before continuing; don’t worry, it’ll be recreated by the next command.
rm server/grails-app/domain/ice/cream/User.groovy
Run the following command:
./grailsw s2-quickstart ice.cream User Role
This will generate the domain classes and config to get our security system working. It will also generate a listener which will encrypt our password field whenever a new User is created.
Feel free to check out the generated code under server/grails-app/domain, server/grails-app/conf, and server/src/main/groovy. For now, let’s edit our configuration to support token authentication.
Edit server/grails-app/conf/application.groovy and replace its contents with the following:
/server/grails-app/conf/application.groovy
// Added by the Spring Security Core plugin: //(1)
grails.plugin.springsecurity.userLookup.userDomainClassName = 'ice.cream.User'
grails.plugin.springsecurity.userLookup.authorityJoinClassName = 'ice.cream.UserRole'
grails.plugin.springsecurity.authority.className = 'ice.cream.Role'
grails.plugin.springsecurity.rest.login.endpointUrl = '/login'
grails.plugin.springsecurity.useSecurityEventListener = true


grails.plugin.springsecurity.controllerAnnotations.staticRules = [ //(2)
        [pattern: '/stomp/**', access: ['permitAll']],
        [pattern: '/signup/**', access: ['permitAll']]
]

grails.plugin.springsecurity.filterChain.chainMap = [ //(3)
        //Stateless chain
        [
                pattern: '/**',
                filters: 'JOINED_FILTERS,-exceptionTranslationFilter,-authenticationProcessingFilter,-securityContextPersistenceFilter,-rememberMeAuthenticationFilter'
        ]
]
Here we:
- Configure the framework to use our domain classes:
User,Role, andUserRole - Permit access to specific URLs
- Set up a filter chain, which Spring Security will use to process our authenticated requests. Please consult the Spring Security docs and the Grails Spring Security plugin docs for more information,
2.8 SSL
We can follow the commands from the previous article to generate our self-signed SSL certificate:
~ openssl req -x509 -newkey rsa:4096 -keyout key.pem -out cert.pem -days 365
However, we have one more step to use our SSL certificate with Grails.
Grails (and Spring Boot) doesn’t support the PEM format. Instead, we need to use the PKCS12 format for our keys. Fortunately, there is a single openssl command to make the conversion:
~ openssl pkcs12 -export -in cert.pem -inkey key.pem -out keystore.p12 -name tomcat -caname root
IMPORTANT: When deploying to a server like Tomcat, it is necessary to use the Java KeyStore (.jks) format for SSL certificates. See the following post on the OCI Grails blog for information on the conversion and configuration of JKS: Running a Grails 3 App with a Self-Signed SSL Certificate
To configure Grails to use our SSL certification, update the application.yml config file with the following lines:
/server/grails-app/conf/application.yml
server:
    port: 8443
    ssl:              #HTTPS configuration
        enabled: true
        key-store: /Users/zak/Dev/OCI/temp/keystore.p12
        key-store-password: password
        keyStoreType: PKCS12
        keyAlias: tomcat
TIP: In Java apps, it is more typical to use port 8443 for HTTPS traffic, which eliminates the need to use sudo to run the server.
2.9 Websockets
Our final server-side feature is to push session timeout events to the client over a websocket connection. We’ll use another Grails plugin, the Spring Websocket plugin, to support this feature.
Install the plugin by adding another line to our build.gradle file:
/server/build.gradle
compile 'org.grails.plugins:grails-spring-websocket:2.3.0'
We now have to implement three classes to get our web socket session timeout working:
- A configuration class to configure our websocket connection
- A listener class to keep track of when new authentication tokens are created
- A scheduler class to periodically check for expired sessions and push events over the websocket connection.
Because these classes are not Grails-specific, we will create them as Groovy classes under server/src/main/groovy.
Here is the complete code for these three classes:
/server/src/main/groovy/ice/cream/CustomWebSocketConfig.groovy
package ice.cream

import grails.plugin.springwebsocket.DefaultWebSocketConfig
import org.springframework.beans.factory.annotation.Value
import org.springframework.context.annotation.Configuration
import org.springframework.web.socket.config.annotation.EnableWebSocketMessageBroker
import org.springframework.web.socket.config.annotation.StompEndpointRegistry

@Configuration
@EnableWebSocketMessageBroker
class CustomWebSocketConfig extends DefaultWebSocketConfig {

    @Value('${allowedOrigin}')
    String allowedOrigin //(1)

    @Override
    void registerStompEndpoints(StompEndpointRegistry stompEndpointRegistry) { //(2)
        println "registerStompEndpoints with allowedOrigin: ${allowedOrigin}"
        stompEndpointRegistry.addEndpoint("/stomp").setAllowedOrigins(allowedOrigin).withSockJS()
    }
}
Loads our allowedOrigin config property from application.yml
Configures the websocket connection to accept requests from our client server
/server/src/main/groovy/ice/cream/TokenCreationEventListener.groovy
package ice.cream

import org.springframework.context.ApplicationListener
import grails.plugin.springsecurity.rest.RestTokenCreationEvent

class TokenCreationEventListener implements ApplicationListener {

    void onApplicationEvent(RestTokenCreationEvent event) { //(1)

        User.withTransaction { //(2)
            User user = User.where { username == event.principal.username }.first()
            user.lastLogin = new Date()
            user.save(flush: true)
        }
    }
}
We are extending an ApplicationListener interface, which is part of the Spring Framework and allows us to listen to specific application events. In this case, we are listening for RestTokenCreationEvent. You can find other events to listen for in the Spring Security REST plugin documentation.
The withTransaction method is needed here because our custom class doesn’t have access to GORM by default (unlike controllers and services). The User domain class is not actually important - we could use any domain class here. withNewSession will initiate a GORM/Hibernate transaction and allow us to query the database and persist changes. See the GORM documentation for more details.
/server/src/main/groovy/ice/cream/SessionExpirationJobHolder.groovy
package ice.cream

import groovy.time.TimeCategory
import org.springframework.beans.factory.annotation.Autowired
import org.springframework.beans.factory.annotation.Value
import org.springframework.messaging.simp.SimpMessagingTemplate
import org.springframework.scheduling.annotation.Scheduled

class SessionExpirationJobHolder {

    @Autowired
    SimpMessagingTemplate brokerMessagingTemplate //(1)

    @Value('${timeout.minutes}') //(2)
    Integer timeout

    @Scheduled(cron = "0 * * * * *") //(3)
    void findExpiredSessions() {
        Date timeoutDate
        use( TimeCategory ) { //(4)
            timeoutDate = new Date() - timeout.minutes
        }

        User.withTransaction {
            List expiredUsers = User.where { //Query for loggedIn users with a lastLogin date after the timeout limit
                lastLogin != null
                lastLogin < timeoutDate
            }.list()

            //Iterate over the expired users
            expiredUsers.each { user ->
                user.lastLogin = null //Reset lastLogin date
                user.save(flush: true)

                //(5)
                brokerMessagingTemplate.convertAndSend "/topic/${user.username}".toString(), "logout"
            }
        }
    }
}
This class is provided by the spring-websocket plugin and allows us to push an event over a websocket channel
Loads our timeout.minutes property from application.yml
Run method every minute
Use Groovy's TimeCategory DSL for time operations
Send a websocket message to a user-specific "channel" for each expired user - we’re using their username as the unique key for each channel
With these classes in place, we need to plug them into the Spring context by adding them as “beans” in our resources.groovy file. Edit the file as shown below.
/server/grails-app/conf/spring/resources.groovy
import ice.cream.CustomWebSocketConfig
import ice.cream.SessionExpirationJobHolder
import ice.cream.TokenCreationEventListener
import ice.cream.UserPasswordEncoderListener

// Place your Spring DSL code here
beans = {
    userPasswordEncoderListener(UserPasswordEncoderListener, ref('hibernateDatastore')) //(1)
    webSocketConfig(CustomWebSocketConfig)                 //(2)
    tokenCreationEventListener(TokenCreationEventListener) //(3)
    sessionExpirationJobHolder(SessionExpirationJobHolder) //(4)

}
Added by Spring Security Core plugin
Custom settings for websockets
Listens for new access tokens and sets the loginDate
Checks for expired sessions
We have a couple loose ends to tidy up, and then we’ll be done with the server.
Sharp readers will have noticed that in two of these classes we referenced a lastLogin property on the User domain class, but we haven’t actually added that property yet! Let’s do that next. Edit the User class and use the following content (be sure to use the entire file as shown below).
/server/grails-app/domain/ice/cream/User.groovy
package ice.cream

import groovy.transform.EqualsAndHashCode
import groovy.transform.ToString
import grails.compiler.GrailsCompileStatic

@GrailsCompileStatic
@EqualsAndHashCode(includes='username')
@ToString(includes='username', includeNames=true, includePackage=false)
class User implements Serializable {

    private static final long serialVersionUID = 1

    String username
    String password
    Date lastLogin = null //(1)
    boolean enabled = true
    boolean accountExpired
    boolean accountLocked
    boolean passwordExpired

    Set getAuthorities() {
        (UserRole.findAllByUser(this) as List)*.role as Set
    }

    static constraints = {
        password nullable: false, blank: false, password: true
        username nullable: false, blank: false, unique: true
        lastLogin nullable: true
    }

    static mapping = {
        table '`ic_user`' //(2)
            password column: '`password`'
    }
}
We'll use the property to keep track of expired sessions
"User" is a reserved table in Postgres, so we change the table name to avoid conflicts
There’s a lot of code in that class! Almost all of this code was generated by the Spring Security plugin, of course; just make sure to add the two lines marked with comments above.
TIP: Take a look at the rest of the code in theUserdomain class. This was generated by the Spring Security plugin and demonstrates some advanced features of Grails and the Groovy language. In particular, the@GrailsCompileStaticannotation (along with the relatedCompileStaticannotation) enables static compilation of this class, which has been supported in Groovy since 2.x. This means that you will get compile-time error checking that is normally missing from a dynamic programming language like Groovy. Advanced features like this allow Groovy to match the capabilities of both dynamic and static languages.
Next, in order for our scheduled SessionExpirationJobHolder class to actually fire as scheduled, we have to enable scheduling in our application (it’s not on by default). We do that by editing our app’s Application.groovy file (note the capitalization!).
/server/grails-app/init/ice/cream/Application.groovy
package ice.cream

import grails.boot.GrailsApp
import grails.boot.config.GrailsAutoConfiguration
import org.springframework.scheduling.annotation.EnableScheduling

@EnableScheduling
class Application extends GrailsAutoConfiguration {
    static void main(String[] args) {
        GrailsApp.run(Application, args)
    }
}
And finally, you may remember we referenced a couple of new config properties in the classes above. Let’s add those to our application.yml file (add the lines below to the end of the file).
/server/grails-app/conf/application.yml
allowedOrigin: https://localhost:3000 #accepted origin URL for websocket connections
timeout.minutes: 1 #config setting for timeout
TIP: Grails applications can read config values set in a variety of ways, including YAML files, Groovy files, and system properties. See the Grails documentation for more on how to use configuration files.
That’s all for the Grails backend server. We have support for CORS (out of the box), websockets, authentication, RESTful web services, SSL, scheduled methods, and persistence to PostgreSQL.
2.10 React
Now we’re ready to turn to the client-side portion of our app.
For this step, we are going to use the code found in the Github repo for the previous article. You can access the code here: https://github.com/mvolkmann/ice-cream-app/tree/master/src
Download (or git clone) the source files at the URL above and copy them into the client/src directory (overwriting any existing files).
~ cd ../
~ git clone https://github.com/mvolkmann/ice-cream-app tmp
~ cp -Rv tmp/* ice-cream/client/
This will make the client subproject identical to the Ice Cream app from the previous article.
Now, let’s delete the files we don’t need.
~ cd ice-cream/client
~ rm -rf database/ server/ css/ images/
This should leave you with the following directories under client:
-rw-r--r--  LICENSE
-rw-r--r--  README.md
drwxr-xr-x  build
-rw-r--r--  build.gradle
drwxr-xr-x  node_modules
-rw-r--r--  package.json
drwxr-xr-x  public
drwxr-xr-x  src
-rw-r--r--  yarn.lock
And the following files under client/src:
-rw-r--r--  App.css
-rw-r--r--  App.js
-rw-r--r--  App.test.js
-rw-r--r--  config.js
-rw-r--r--  ice-cream-entry.js
-rw-r--r--  ice-cream-list.js
-rw-r--r--  ice-cream-row.js
-rw-r--r--  index.css
-rw-r--r--  index.js
-rw-r--r--  login.js
-rw-r--r--  main.js
We only have to edit two of these src files and update our package.json to hook up the React app with our new Grails backend.
First, edit client/package.json as shown below:
/client/package.json
{
  "name": "ice-cream-app",
  "version": "0.1.0",
  "private": true,
  "devDependencies": {
    "eslint": "^3.17.1",
    "eslint-plugin-flowtype": "^2.30.3",
    "eslint-plugin-react": "^6.10.0",
    "react-scripts": "0.8.4"
  },
  "dependencies": {
    "react": "^15.4.2",
    "react-dom": "^15.4.2",
    "sockjs-client": "^1.1.4",
    "stompjs": "^2.3.3"
  },
  "scripts": {
    "build": "react-scripts build",
    "coverage": "npm test -- --coverage",
    "lint": "eslint src/**/*.js server/**/*.js",
    "start": "react-scripts start",
    "test": "react-scripts test --env=jsdom"
  }
}
We’ve removed several packages that were needed by the Node Express server, and we’ve replaced the socket.io package with sockjs-client and stompjs, which is supported by the Spring Websockets library we configured previously (socket.io is designed for Node apps and is not compatible with Spring Websockets).
We also need to edit the config.js file. This is provided by the React profile for Grails and simply holds a few config variables, including a SERVER_URL value which sets the API base URL. Edit the file as shown below:
/client/src/config.js
//Remove the other variables as they aren't needed in this app

//Set the SERVER_URL to our backend URL
export const SERVER_URL = 'https://localhost:8443';
Now we have to update two of the React components in our Ice Cream app:
LoginApp
Edit the login.js file as shown below (changes from the original code are marked with //NEW: comments).
/client/src/login.js
import React, {Component, PropTypes as t} from 'react';
import 'whatwg-fetch';

function onChangePassword(event) {
  React.setState({password: event.target.value});
}

function onChangeUsername(event) {
  React.setState({username: event.target.value});
}

class Login extends Component {
  static propTypes = {
    password: t.string.isRequired,
    restUrl: t.string.isRequired,
    username: t.string.isRequired,
    timeoutHandler: t.func //NEW: propType for our timeoutHander function
  };

  // This is called when the "Log In" button is pressed.
  onLogin = async () => {
    const {password, restUrl, username, timeoutHandler} = this.props;
    const url = `${restUrl}/login`;

    try {
      // Send username and password to login REST service.
      const res = await fetch(url, {
        method: 'POST',
        headers: {'Content-Type': 'application/json'},
        body: JSON.stringify({username, password})
      });

      if (res.ok) { // successful login
        const text = await res.text(); // returns a promise

        //NEW: Spring Security REST returns the token in the response body, not the Authorization header
        const token = `Bearer ${JSON.parse(text).access_token}`;

        React.setState({
          authenticated: true,
          error: null, // clear previous error
          route: 'main',
          token
        });

        timeoutHandler(username) //NEW: Connects to a user-specific websocket channel

      } else { //NEW: Any error response from the server indicates a failed login
        const msg = "Invalid username or password";
        React.setState({error: msg});
      }
    } catch (e) {
      React.setState({error: `${url}; ${e.message}`});
    }
  }

  // This is called when the "Signup" button is pressed.
  onSignup = async () => {
    const {password, restUrl, username, timeoutHandler} = this.props;
    const url = `${restUrl}/signup`;

    try {
      const res = await fetch(url, {
        method: 'POST',
        headers: {'Content-Type': 'application/json'},
        body: JSON.stringify({username, password})
      });

      if (res.ok) { // successful signup
        const text = await res.text(); // returns a promise
        const token = `Bearer ${JSON.parse(text).access_token}`; //NEW: See above

        React.setState({
          authenticated: true,
          error: null, // clear previous error
          route: 'main',
          token
        });

        timeoutHandler(username) //NEW: Connect to user-specific websocket channel


      } else { // unsuccessful signup
        let text = await res.text(); // returns a promise
        if (/duplicate key/.test(text)) {
          text = `User ${username} already exists`;
        }
        React.setState({error: text});
      }
    } catch (e) {
      React.setState({error: `${url}; ${e.message}`});
    }
  };

  render() {
    const {password, username} = this.props;
    const canSubmit = username && password;

    // We are handling sending the username and password
    // to a REST service above, so we don't want
    // the HTML form to submit anything for us.
    // That is the reason for the call to preventDefault.
    return (
      <form className="login-form"
        onSubmit={event => event.preventDefault()}>
        <div className="row">
          <label>Username:</label>
          <input type="text"
            autoFocus
            onChange={onChangeUsername}
            value={username}
          />
        </div>
        <div className="row">
          <label>Password:</label>
          <input type="password"
            onChange={onChangePassword}
            value={password}
          />
        </div>
        <div className="row submit">
          {/* Pressing enter in either input invokes the first button. */}
          <button disabled={!canSubmit} onClick={this.onLogin}>
            Log In
          </button>
          <button disabled={!canSubmit} onClick={this.onSignup}>
            Signup
          </button>
        </div>
      </form>
    );
  }
}

export default Login;
Finally, we can edit the App.js file to support our new websocket channels, as well as our SERVER_URL config setting. As above, all changes relative to the original code are marked with NEW comments.
/client/src/App.js
import React, {Component} from 'react';
import Login from './login';
import Main from './main';
import 'whatwg-fetch'; // for REST calls
import {SERVER_URL} from './config'; //NEW: Base url for REST calls
import './App.css';

// This allows the client to listen to sockJS events
// emitted from the server.  It is used to proactively
// terminate sessions when the session timeout expires.
import SockJS from 'sockjs-client'; //NEW: SockJS & Stomp instead of socket.io
import Stomp from 'stompjs';

class App extends Component {
  constructor() {
    super();

    // Redux is a popular library for managing state in a React application.
    // This application, being somewhat small, opts for a simpler approach
    // where the top-most component manages all of the state.
    // Placing a bound version of the setState method on the React object
    // allows other components to call it in order to modify state.
    // Each call causes the UI to re-render,
    // using the "Virtual DOM" to make this efficient.
    React.setState = this.setState.bind(this);
  }

  //NEW: Remove the top-level websocket config in favor of user-specific channels (set on login)

  // This is the initial state of the application.
  state = {
    authenticated: false,
    error: '',
    flavor: '',
    iceCreamMap: {},
    password: '',
    restUrl: SERVER_URL, //NEW: Use our SERVER_URL variable
    route: 'login', // controls the current page
    token: '',
    username: ''
  };

  /**
   * NEW: Clears the token and redirects to the login page.
   * No logout API call is needed because JWT tokens
   * expire w/o state changes on the server */
  logout = async () => {
      React.setState({
        authenticated: false,
        route: 'login',
        password: '',
        username: ''
      });
  };

  /**
  * NEW: This function will be passed into the Login component as a prop
  * This gets a SockJS connection from the server
  * and subscribes to a "topic/[username]" channel for timeout events.
  * If one is received, the user is logged out. */
  timeoutHandler = (username) => {
    const socket = new SockJS(`${SERVER_URL}/stomp`);
    const client = Stomp.over(socket);

    client.connect({}, () => {
      client.subscribe(`/topic/${username}`, () => {
        alert('Your session timed out.');
        this.logout();
      });
    }, () => {
      console.error('unable to connect');
    });
  };

  render() {
    // Use destructuring to extract data from the state object.
    const {
      authenticated, error, flavor, iceCreamMap,
      password, restUrl, route, token, username
    } = this.state;

    return (
      <div className="App">
        <header>
          <img className="header-img" src="ice-cream.png" alt="ice cream"/>
          Ice cream, we all scream for it!
          {
            authenticated ?
              <button onClick={this.logout}>Log out</button> :
              null
          }
        </header>
        <div className="App-body">
          {
            // This is an alternative to controlling routing to pages
            // that is far simpler than more full-blown solutions
            // like react-router.
            route === 'login' ?
              <Login
                username={username}
                password={password}
                restUrl={restUrl}
              ></Login> :
            route === 'main' ?
              <Main
                flavor={flavor}
                iceCreamMap={iceCreamMap}
                restUrl={restUrl}
                token={token}
                username={username}
              ></Main> :
              <div>Unknown route {route}</div>
          }
          {
            // If an error has occurred, render it at the bottom of any page.
            error ? <div className="error">{error}</div> : null
          }
        </div>
      </div>
    );
  }
}
3 Running the Application
Run the server application as follows:
~ ./gradlew server:bootRun
Grails application running at http://localhost:8443 in environment: development
Run the client side application (with HTTPS enabled) as follows:
~ export HTTPS = true
~ ./gradlew client:bootRun
Starting the development server...

Compiled successfully!

The app is running at:
https://localhost:3000/
Follow the steps below (from the previous article) to configure your browser to trust the self-signed SSL certificate:
Tell the browser to always trust the self-signed certificate by browsing https://localhost
- Chrome. Click "ADVANCED" and then "Proceed to localhost (unsafe)".
- Firefox. Press the "Advanced" button, press the "Add Exception…" button, and press the "Confirm Security Exception" button.
- Safari. Press the "Show Certificate" button, select "Always Trust" in the "When using this certificate" dropdown, press the "Continue" button, and enter your password to confirm this action.
— Web App Step by Step -- Mark Volkmann
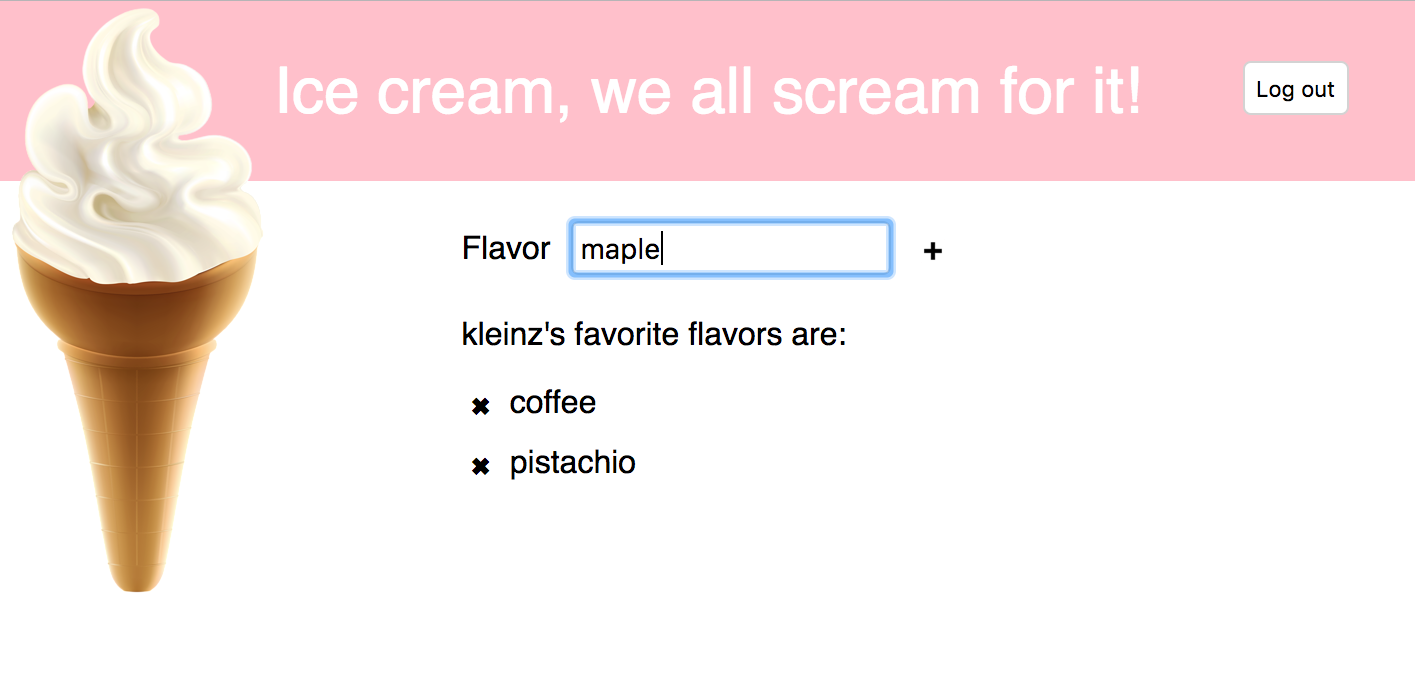
You should be able to browse to https://localhost:3000, create a new user, and log in.
Try out the app! Add and remove some flavors to your user account.
After one minute, your user session will end and you’ll be logged out (you can change this duration in the Grails’ app’s application.yml file). If you open multiple browsers and log in with different users at different times, each user will be logged out separately only when their own session expires.
Congratulations! You’ve got the Ice Cream app running with a Grails backend.
3.1 Deployment
Deployment is a big topic on its own and one that we won’t cover in-depth. As with many Java web apps, our Grails backend can be deployed to any JEE container as a WAR file (this will require some additional configuration) or more cleanly as a self-contained JAR file (which doesn’t require a separate server to run).
Our React app can be built just like any create-react-app project using npm run build (or yarn build) and deployed to a standard web server. Obviously, attention must be given to making sure the React client can reach the API backend (and the SERVER_URL variable may need to be set accordingly).
An attractive way to package and deploy a Grails/React app is to bundle both apps together into a single executable JAR file. This approach is documented in tutorial form in the “Combining the React profile projects” Grails Guide.
4 Summary
Of course, this project has been a bit unusual in that we were taking an app designed with one technology stack and reimplementing in another. However, I hope this exercise has shown you the capabilities and flexibility of the Grails framework, particularly with the minimal number of changes needed to use the same React app against the new Grails backend.
Grails offers a slew of powerful web development features that we haven’t had occasion or time to demonstrate in this app, including JSON views, HAL+JSON support, custom data validation and constraints, NoSQL support, multi-tenancy, and much more. Please check out the Grails Guides website for more tutorials on building fun and powerful apps with Grails (including several Guides featuring React).
Software Engineering Tech Trends (SETT) is a regular publication featuring emerging trends in software engineering.
