Enabling the Wireless Enterprise with Java 2 Micro Edition
By Mark Balbes, Ph.D., OCI Senior Software Engineer
November 2001
Introduction
In a previous article, Java 2 Micro Edition: Java for Small and Embedded Systems, we explored how Java 2 Micro Edition (J2ME) can be used to program Palm devices. A lot has changed on the J2ME landscape since then.
In this article, I will give you an update on the current state of J2ME. We will then explore how J2ME can be used to extend your enterprise applications to wireless devices.
The Mobile Information Device Profile
The Mobile Information Device Profile (MIDP) is the first J2ME profile to be available on multiple devices.
Currently, MIDP is supported on:
- Three Nextel phones
- PalmOS-compatible devices
- RIM Blackberry devices
During 2002, we will see other mobile phone networks support MIDP, including Sprint, which recently announced support by mid-2002.
One obvious omission is the current lack of MIDP support on PocketPC. However, PersonalJava implementations with more capabilities than MIDP are available, and the J9 VM from IBM should soon support MIDP.
MIDP provides four major additions to the Connected Limited Device Configuration (CLDC) we discussed in the previous article:
- A well-defined lifecycle for the application
- A GUI toolkit
- Persistent storage
- HTTP networking capabilities
1. MIDlets – Controlling the Lifecycle of a MIDP Application
The entry point to any MIDP application is the MIDlet class defined in the javax.microedition.midlet package.
Just as the Applet class contains methods that allow a browser to control the lifecycle of an applet, the MIDlet contains similar methods, which are manipulated by a device-dependent application manager. However, unlike an applet, a MIDlet is not a GUI component.
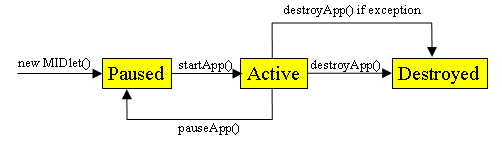
The MIDlet class defines the methods startApp(), pauseApp(), and destroyApp(), which can be called either by the MIDlet itself or by an application manager on the device.
The application manager is responsible for creating the MIDlet and starting it. It will also pause the MIDlet when necessary, such as when a phone call comes in, and it will destroy the MIDlet if there is an uncaught exception (see Figure 1).
Figure 1: MIDlet Lifecycle
Here is a simple HelloMIDlet that shows how to use these methods.
- import javax.microedition.midlet.*;
-
- public class HelloMIDlet extends MIDlet {
-
- public void startApp() {
- System.out.println("Hello MIDlet");
- }
-
- public void pauseApp() {}
- public void destroyApp(boolean unconditional) {}
- }
Since the MIDlet class is not a GUI component, the above code has no screen presence. Depending on the device, you may not even see "Hello MIDlet" printed out. On most emulators, standard out is redirected to a console window.
Each time the user invokes the MIDlet, "Hello MIDlet" will be sent to standard out. Since we don't have to do anything special when the MIDlet is paused or destroyed, these methods are empty.
Typically, pauseApp() and destroyApp() would contain any code needed to free resources that were grabbed by startApp(). It is important to remember that startApp() can be called multiple times during the lifetime of the MIDlet.
If you need to perform a task only when the application is first started, for example showing a splash screen, it will be necessary to set an appropriate flag in the startApp() method.
2. Building User Interfaces with MIDP
Building a GUI in MIDP is very different from the Java 2 Standard Edition (J2SE).
In J2SE, we have a rich set of visual components that we can place in our application using layout managers. In MIDP, the assumption is that the screen is not large enough to display a lot of components at once.
It is also desirable to display the application in a way that is natural for the device it is running on. Just as AWT applications look different on different computer systems, MIDP applications may look different on different devices.
MIDP specifies both high-level and low-level user interface APIs in the javax.microedition.lcdui package.
The high-level API specifies a small set of Screen objects, only one of which can be shown at a time. Because of the limited size of the devices, we leave behind the notion of layout managers. When the object is shown, it takes up all of the screen real estate available to MIDP (note that some of the screen may be reserved for device-specific information, as well).
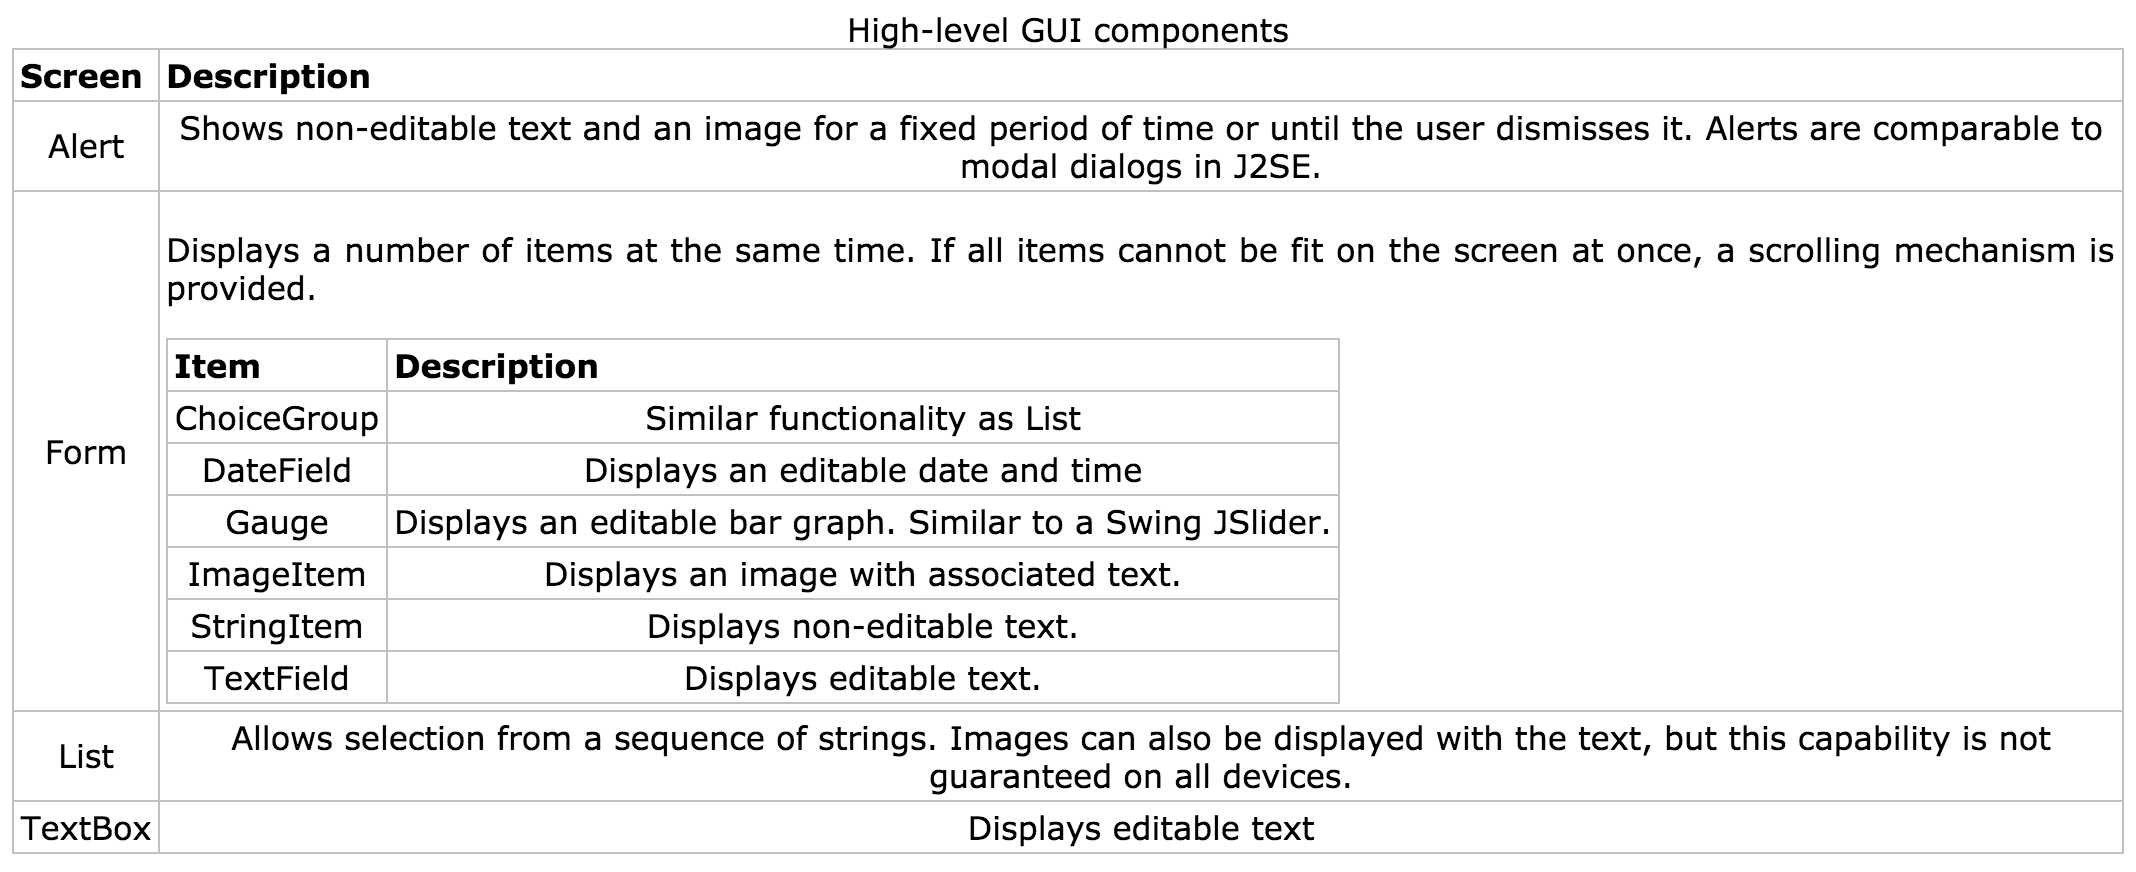
High-level objects include an Alert, List, TextBox and Form. See the table below for a description of each.
We can now improve our HelloWorld MIDlet so that it displays "Hello World" on the device's screen.
- import javax.microedition.midlet.*;
- import javax.microedition.lcdui.*;
-
- public class HelloMIDlet extends MIDlet implements CommandListener {
- private Command exitCommand;
- private Display display;
-
- public HelloMIDlet() {
- this.exitCommand = new Command("Exit", Command.SCREEN, 2);
- }
-
- public void startApp() {
- this.display = Display.getDisplay(this);
- TextBox textBox = new TextBox("Hello MIDlet", "Hello World!", 256,
- TextField.ANY);
- textBox.addCommand(this.exitCommand);
- textBox.setCommandListener(this);
- this.display.setCurrent(textBox);
- }
-
- public void pauseApp() {}
- public void destroyApp(boolean unconditional) {}
-
- public void commandAction(Command command, Displayable displayable) {
- if (command == this.exitCommand) {
- destroyApp(false);
- notifyDestroyed();
- }
- }
- }
Note that if a phone call is received while HelloMIDlet is running, the MIDlet is paused. When the user resumes HelloMIDlet, startApp() is called again, and the GUI is recreated from scratch.
In a more sophisticated application, you may instead test if display is null to determine if the GUI needs to be built.
The HelloMIDlet class above is built using the high-level GUI components. It also uses a Command to indicate that the user has the option to exit the application.
Commands can be associated with any Screen component except an Alert; unfortunately, adding a Command to an Alert will produce a runtime error, not a compiler error.
The same command can be associated with multiple screens. Depending on the type of command (as defined by constants in the Command class), the command may be mapped to a hardware key or a soft key on the device. For example, an exit command may be mapped to the "hang up" key on a phone.
It is up to the device manufacturers to map the commands appropriately. MIDP gives no direct control to the developer for the placement of the commands. Indirectly, we can affect the placement by manipulating the command's type and priority.
In addition to the high-level API, the lcdui package also defines a Canvas class, which provides similar drawing functionality to the AWT Canvas.
The Canvas class also provides methods to access pointer and keyboard events. This allows the developer to create interactive games or custom components. However, cross-device compatibility may be compromised.
For example, a game that relies on pointer-based events may not work on a phone. On the other hand, a game that only uses key events will be awkward – but possible – to use on a Palm device.
Thankfully, Canvas gives us methods like hasPointerEvents(), so we can write code that works in either environment.
3. Persistent Storage
MIDP provides the ability to persistently store data on a device. The javax.microedition.rms package defines classes to support data persistence across different invocations of the MIDlet and across device power outs.
Only one concrete class, RecordStore, is defined. It has static methods to create and destroy data stores, as well as instance methods to manipulate the contents of a record store. A single record is stored as an array of bytes.
Having persistent data on the device itself allows network-dependent MIDP applications to run, even when the network is inaccessible. For example, an application could store data on the device when no network is available and then send that data to a server at a later time.
A full exploration of the capabilities of the MIDP persistent storage mechanism will be the subject of a future article.
4. HTTP Networking
The CLDC defines a Connector framework to support networking. The framework is much smaller than the J2SE network-support classes; however, it is very flexible and easy to use.
The CLDC itself does not require support for any specific protocols. MIDP requires that HTTP support is available.
Creating an HTTP connection on a MIDP device is quite easy. The following code opens an HTTP connection, sends a GET request, and reads some text from the response.
- /**
- * Use an HTTP GET request to retrieve the contents of the URL as a string.
- * @param url location of the desired information
- * @return the contents of the URL.
- */
- public static String get(String url) throws IOException {
- HttpConnection httpConnection = null;
- InputStream inputStream = null;
- String content;
- try {
- httpConnection = (HttpConnection) Connector.open(url);
- httpConnection.setRequestProperty("User-Agent",
- "Profile/MIDP-1.0 Configuration/CLDC-1.0");
- httpConnection.setRequestProperty("Content-Language", "en-US");
-
- // Check that everything is OK
- int status = httpConnection.getResponseCode();
- if (status != HttpConnection.HTTP_OK) {
- // we could choose to handle redirects here by looking
- // for a status of HttpConnection.HTTP_TEMP_REDIRECT,
- // HttpConnection.HTTP_MOVED_TEMP, or
- // HttpConnection.HTTP_MOVED_PERM
- throw new IOException("Server response not OK");
- }
-
- // Get the response back from the server
- inputStream = httpConnection.openInputStream();
-
- String type = httpConnection.getType(); // Get the ContentType
- int length = (int) httpConnection.getLength();
- if (length > 0) {
- byte[] responseData = new byte[length];
- int actual = inputStream.read(responseData);
- content = new String(responseData);
- } else {
- StringBuffer stringBuffer = new StringBuffer();
- int ch = inputStream.read();
- while (ch != -1) {
- stringBuffer.append((char) ch);
- ch = inputStream.read();
- }
- content = stringBuffer.toString();
- }
- } finally {
- if (inputStream != null) {
- inputStream.close();
- }
- if (httpConnection != null) {
- httpConnection.close();
- }
- }
-
- return content;
- }
Extending the Enterprise
One of the most exciting aspects of J2ME is that it enables us to extend our network infrastructures into the wireless world. Using the networking classes described above, we can write software for wireless devices that interact with a server.
In order to demonstrate how to wirelessly enable an enterprise application, we will create a small client-server system that consists of:
- A web browser client
- A J2ME MIDP client
- A servlet that can serve custom content to the two clients
Tools
As with any job, it is important to have the right tools.
There are several tools available on the market today for J2ME development. Sun has the J2ME Wireless Toolkit, which can run in stand-alone mode or as an integrated piece of Forte for Java. JBuilder 5 includes integration with the Nokia toolkit. Motorola and Nokia offer tools through their developer web sites designed to work with their phones.
See the References below for links to these sites.
Building the Servlet
We will write a simple servlet that simply echoes the data sent to it by the client (for more about servlets, see the previous SETT article What is a Servlet?).
The servlet will do all of the following:
- Accept incoming requests, read the parameters of the request, and send back the parameter names and values as the response
- Service both a standard HTML web browser client and a MIDP client
- Send HTML to the web browser and plain text to the MIDP client
The code for the servlet, named EchoServlet, can be found here.
You can access the servlet directly by typing its URL into your browser and appending some request parameters:
www.example.com/J2ME/echo?myParam=Test+Param.
In the URL above, "myParam" is the parameter name and "Test+Param" is the parameter value, where the "+" is used to represent a space between the two words.
Building the HTML Browser Client
Now we will create an HTML front end to our application. Don't get too excited, though. We will create a simple web page that lets us test our Servlet.
Simply type in a parameter value and click the GET or POST button. This will send the text to the servlet in a GET or POST request, respectively.
Building the MIDP Client
Now that we have our servlet working, and we've tested it with our web browser, we can begin the much more interesting task of creating a MIDP client.
The client consists of the WirelessMIDlet class and the HTTPHelper class. The MIDlet builds the user interface, and HTTPHelper contains utility functions to send HTTP GET and POST requests to a given URL and retrieve the responses as text.
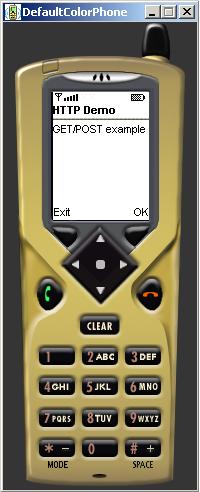
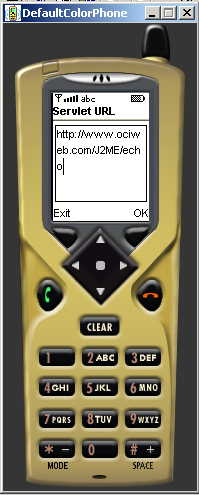
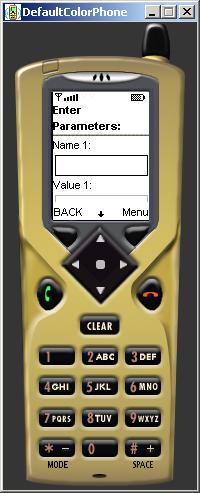
The application itself consists of four screens (see the images below):
- Initially, a splash screen is shown.
- Next, the user can type in the URL for the servlet. For convenience, the URL of our servlet is the default value.
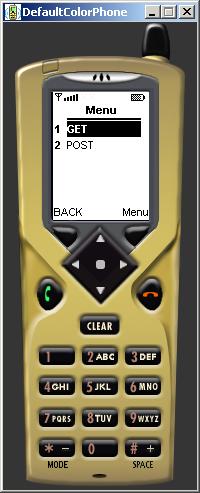
- Next, the user can enter in two name/value pairs and choose to either use GET or POST to send the data.
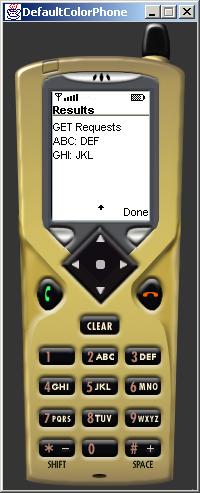
- Once the servlet sends back a response, it is displayed in an
Alert.
Splash Screen
URL Entry Screen
Parameter Entry Screen
GET/POST Options
Results Screen
Summary
We have explored how J2ME MIDP can break the tether of the wired connection, gaining us access to enterprise functionality in the wireless world. Using the simple and well-understood HTTP protocol, MIDlets can access data anywhere on the Internet.
It is important to remember that, although we have access to all of the information on the Internet, MIDP applications should not be modeled after the familiar web browser paradigm to which we have all become accustomed.
Because of the limited screen size, awkward input mechanisms, low computing power, and slow connection speeds of these wireless devices, the browsing paradigm of the Web does not work. Instead, MIDP applications must be small, targeted applications that solve a single problem quickly and easily with a minimum of user involvement.
References
- [1] Forte for Java
http://www.sun.com/forte/ffj/ - [2] IBM J9 VM
http://www.embedded.oti.com/learn/vaesvm.html - [3] Java 2 Micro Edition - Java for Small and Embedded Systems
/resources/publications/sett/january-2001-java-2-micro-edition-java-for-small-and-embedded-systems - [4] J2ME Wireless Toolkit
- http://java.sun.com/products/j2mewtoolkit
- [5] JBuilder 5 Personal Edition
http://www.borland.com/jbuilder/mobileset - [6] MIDP documentation
http://java.sun.com/j2me/docs - [7] Motorola iDen Development Tools
https://idenonline.motorola.com/ideveloper/index.cfm - [8] Nextel Open Source J2ME Toolkit
http://nextel.sourceforge.net
Software Engineering Tech Trends (SETT) is a regular publication featuring emerging trends in software engineering.
