IoT Application Development with AWS, Azure, and GCP
Part 1: Process Management
By Chad Elliott, OCI Principal Software Engineer, and Kevin Stanley, OCI Partner and IIoT Practice Lead
January 2020
Introduction
Internet of Things (IoT) technology has progressed a lot in the last few years to help connect devices via the internet and enable them to send and receive data. It is a relevant concept for any system that must leverage physical devices to perform data collection or to control mechanical devices.
One of the most important aspects of IoT is that it defines a set of standards for connecting these devices, which should simplify their use in applications and avoid lock-in with proprietary applications and components. In reality, we still have a way to go to achieve standardization similar to what we see with browsers connected on the internet.
There are many IoT platforms available – too many to try to cover in one article. We have decided instead to focus on platforms provided by three leading cloud providers. The purpose of this article is to provide an overview and comparison of these cloud vendors' IoT platforms:
- Amazon Web Services (AWS)
- Microsoft Azure
- Google Cloud Platform (GCP)
Our focus will be on how they support the development of a complete IoT application.
Each IoT application is unique, but there are common aspects to most of these applications. Figure 1 provides one perspective, with a standard 3-tier reference model as defined by the Industrial Internet Consortium (IIC), consisting of the Edge, Platform, and Enterprise tiers.
The edge tier is where processing occurs related to data collection from sensors and the control of actuators.
The platform tier is responsible for ingesting, processing, and storing data, analyzing it and providing capabilities to the enterprise tier.
The enterprise tier provides interfaces for the end users and operations team to review data and issue commands for the application.
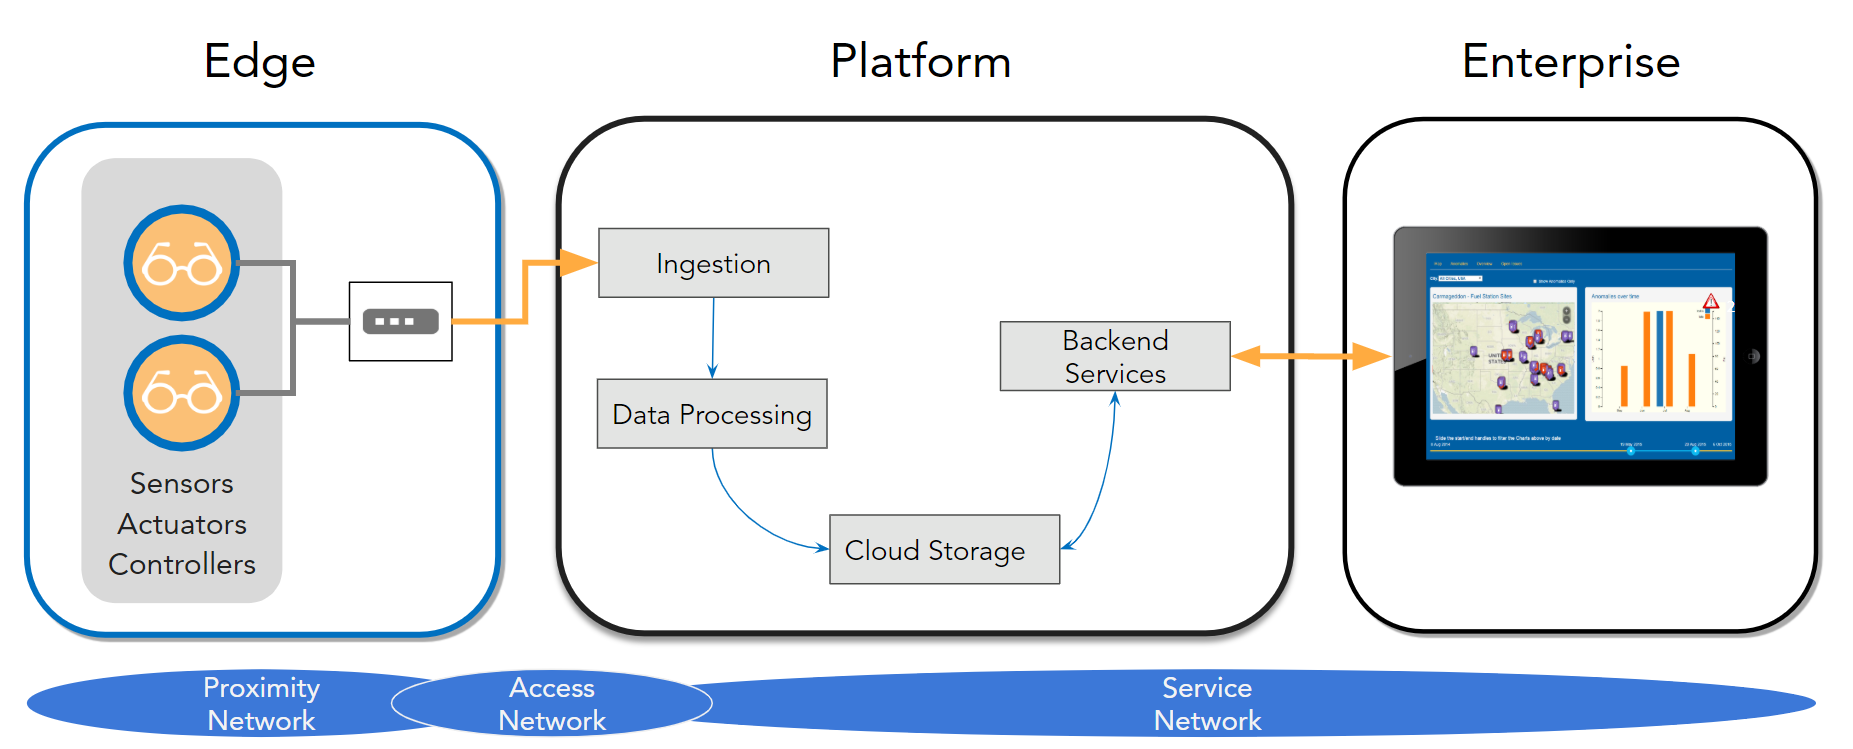
Figure 1. IoT Platform Tiers
From a network perspective, communication between devices and gateways is performed via a proximity network dedicated to each edge site.
Gateways typically bridge the proximity network and the cloud via some form of access network, which can be via a dedicated network, the public Internet, or a cellular (4G/5G) or other wireless network. Typically, cloud platforms provide for creating dedicated virtual networks using a software-defined network (SDN) and connect with the enterprise via a dedicated network or via the public Internet.
Our review is decomposed into an exploration of the IoT platform functional categories outlined by the IIC. We have taken their original set of functions and further categorized them into the following supersets (as shown in Figure 2):
- User Management
- Business Management
- Security and Disaster Management
- Process Management
- Analytics & Data Management
- Provisioning and Device Management
The primary reason we focus on these functional areas is that the vast majority of these functions need to be addressed in a complete IoT solution. It is, thus, helpful if an IoT platform provides support for these capabilities, minimizing the amount of development and maintenance that is required to satisfy these key functional requirements.

Figure 2. IoT Platform Function Categories
This article is the first of a series that will explore each of the function categories separately. We will start with the Process Management category, which is primarily focused on communication with IoT devices and processing the data from these devices in support of the application that's leveraging them.
Problem Statement
For the purposes of this article, we will show code related to integrating a general-purpose device, Bosch's XDK 110, with each of the three identified cloud platforms.
The XDK110 is a prototyping platform that provides CPU processing capabilities, along with a rich set of sensors, including:
- Pressure, temperature and humidity sensors
- A gyroscope
- A magnetometer
- An accelerometer
- An acoustic sensor
- A digital light sensor
The basic task of our application is to ingest data provided by the XDK110's sensors and store it in a database so that it can be accessed by a visualization suite.
The XDK110 is small and has limited resources; however, it has wi-fi and supports the IoT standard Message Queue Telemetry Transport (MQTT) protocol, so it has most everything we need to demonstrate a representative IoT application.
The general flow for each cloud platform is to collect data on the XDK110, package it up, and send it to an MQTT broker in the cloud. After that, the broker gives the data to a serverless application, which stores the data in a database as a time-series representation.
Note: Serverless is really a misnomer, as it still requires a server, but the term refers to the fact that provisioning and scaling of the servers is handled by the cloud platform for us, greatly simplifying the development of an application to process the data at scale.

Figure 3. Basic IoT Flow
The data is gathered on the XDK110 by polling the sensors. Once the sensor provides the data, it is converted into JSON format and sent to the MQTT broker.
Here is an example of the data provided by the XDK110 in JSON format:
{"acc":{"x":21,"y":38,"z":1013},"mag":{"x":-9,"y":-15,"z":-66},
 "gyr":{"x":-671,"y":-61,"z":-183},"env":{"r":25,"p":99804,"t":23.921}}
Communication Management
For an IoT application to provide value, it must enable communication between users (who can be located anywhere) and the IoT devices that are collocated with whatever it is the user wants to monitor. This includes ingesting data from the devices, as well as controlling and managing the configuration and software versions of the devices. Commonly, this is mediated through a set of services hosted in the cloud.
The cloud platform is typically where the data is collected, aggregated, stored, and analyzed. Communication with the cloud is simplified through a set of communication protocols used by the device and the cloud for interaction.
A common set of protocols supported by most cloud platforms is MQTT and HTTPS.
- MQTT supports a publish/subscribe communication style with dedicated topics for communication in both directions (to the device and to the cloud).
- HTTPS is an alternative protocol commonly used to securely publish messages, but it is one way – from the device to the cloud.
AWS
The primary component of the AWS IoT platform is IoT Core, which supports the connection of devices, interacting with the devices and supporting the development of applications.
In support of connection management, AWS supplies a Device SDK that can be used on the device to simplify device connection to IoT Core. Within IoT Core, there is a Device Gateway that supports scalable communication via MQTT, WebSockets, and HTTP 1.1 protocols.
The Message Broker is a managed service that provides support for publish/subscribe-style interactions with devices. Additionally, AWS provides a few abstractions for managing interactions with devices: a Device Shadow and a Rules Engine.
Setting up your IoT device to connect to the AWS cloud requires that you first create a Greengrass Group and IoT Core. This can be performed by accessing the IoT Core console under the "Internet of Things" category on the main AWS console. Under the Greengrass->Cores page, you create a new Greengrass Core by clicking the "Add a Greengrass Core" button found on the Greengrass Cores interface.
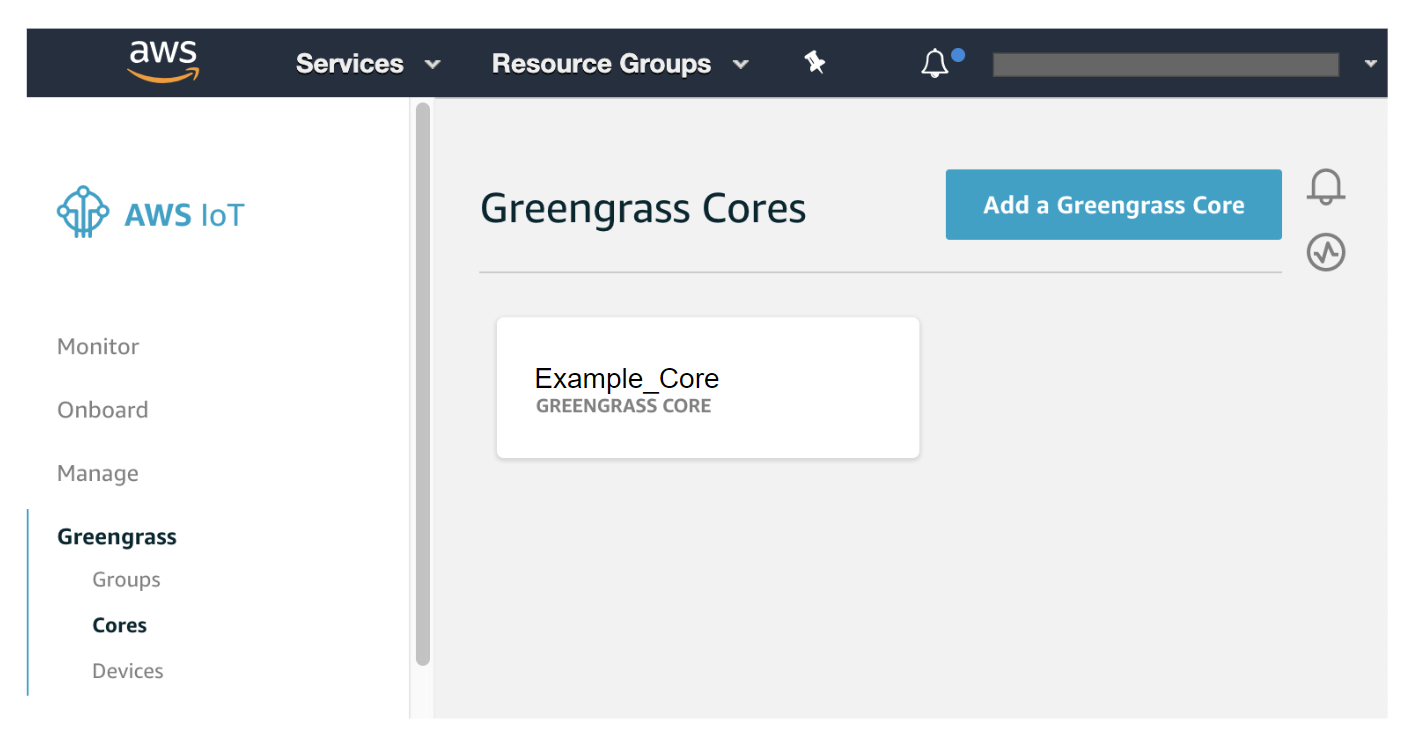
Figure 4. AWS IoT Core Console
Many of the required tasks are performed automatically by AWS including:
- Greengrass group creation
- Creation of the IoT core in the registry
- Addition of the core to the group
- X.509 public and private key generation
- Security certificate and default security policy creation
You provide the group name, and AWS will take care of the rest.
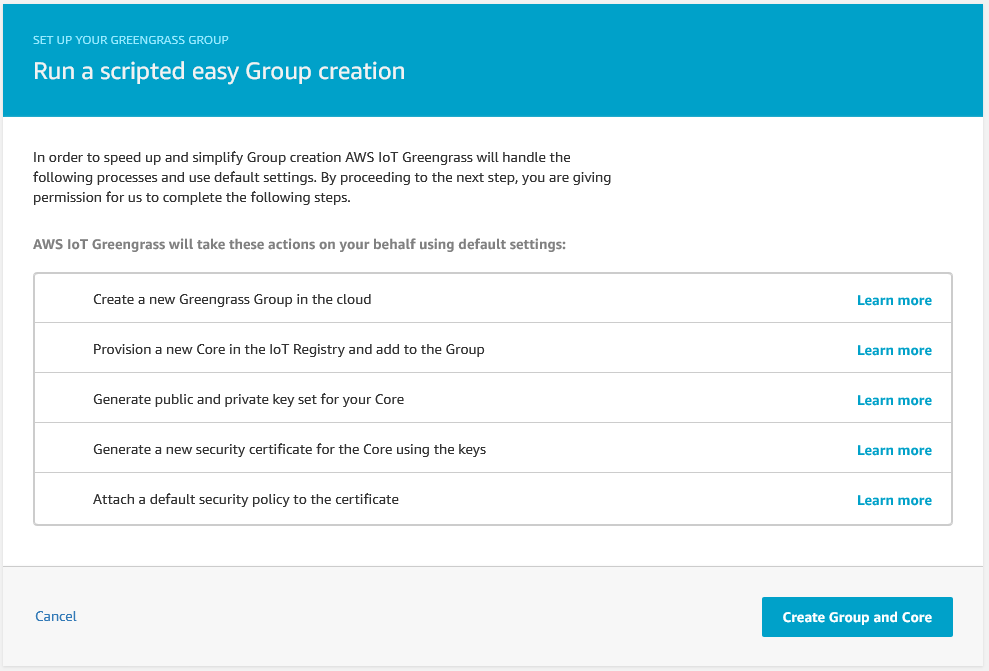
Figure 5. AWS Greengrass Group Creation
When the IoT group is created, a security policy is attached to the certificate. This allows any IoT device that connects using this certificate to use the IoT services (i.e., send and receive IoT messages, etc.).
Messages are published by the IoT device to the broker via an endpoint specific to your AWS account. If you are using the AWS SDK, knowledge of this endpoint is not necessary; the endpoint will be determined automatically. However, developing your application without the AWS SDK will require you to provide your AWS broker endpoint and port number in order to be able to publish messages.
An example of this is using boto3 in Python to publish MQTT messages without providing any endpoint information. Credentials and endpoint information are obtained behind the scenes.
## Set up the MQTT client
client = boto3.client('iot-data')

## Publish the message
client.publish(topic='any/topic/name', payload=json.dumps({'key': value}))
AWS provides some fairly sophisticated code for device client-side application development. It is possible to develop your client-side application for AWS IoT Greengrass as long as your target device is able to run a general-purpose OS, such as Linux.
For our purposes here, we are using the Bosch-provided XDK example code to develop the client side application using FreeRTOS, which works out-of-the-box. We provide the necessary certificates, private key, and endpoint information, and we are publishing MQTT messages in no time.
static MQTT_Connect_T MqttConnectInfo =
{
  .ClientId = APP_MQTT_CLIENT_ID,
  .BrokerURL = APP_MQTT_BROKER_HOST_URL,
  .BrokerPort = APP_MQTT_BROKER_HOST_PORT,
  .CleanSession = true,
  .KeepAliveInterval = 100,
};

retcode = MQTT_ConnectToBroker(&MqttConnectInfo, MQTT_CONNECT_TIMEOUT_IN_MS);
…
retcode = Sensor_GetData(&sensorData);
if (RETCODE_OK == retcode)
{
  int32_t length = snprintf(publishBuffer, APP_MQTT_DATA_BUFFER_SIZE,
                            publishDataFormat,
                            sensorData.Accel.X, sensorData.Accel.Y,
                            sensorData.Accel.Z,
                            sensorData.Mag.X, sensorData.Mag.Y, sensorData.Mag.Z,
                            sensorData.Gyro.X, sensorData.Gyro.Y, sensorData.Gyro.Z,
                            sensorData.RH, sensorData.Pressure,
                            (sensorData.Temp /= 1000));

  MqttPublishInfo.Payload = publishBuffer;
  MqttPublishInfo.PayloadLength = length;

  retcode = MQTT_PublishToTopic(&MqttPublishInfo, MQTT_PUBLISH_TIMEOUT_IN_MS);
}
AWS provides a feature called IoT Rules, which allows you to define actions to perform on the receipt of a message from a device.
To define a rule, you provide an identifying name, an SQL query that applies to matching MQTT messages, and one or more associated actions. Potential actions include:
- Inserting a message into a DynamoDB
- Sending a message to a Lambda
- Sending a message to another AWS topic
- Sending a message to a Kinesis Data Stream
- ... and more
We use an IoT Rule to determine what happens when a message gets published to our IoT Core endpoint by the XDK110. In our case, we want the action to be performed for every message published. We accomplish this using the following query within our IoT Rule.
SELECT * FROM 'devices/XDK110/events'The action that we associate with this rule is to pass the message along to a Lambda.
When a message has been sent to the topic to which our Lambda has been subscribed, the Lambda code is invoked with the message payload as a parameter to the function. How that data appears depends upon the implementation language and the data itself. For example, a JSON message such as {"id":0,"dtime":"2019-11-23 14:57:41","final":true} will be provided to your Python Lambda as a dictionary with keys of “id,” “dtime,” and “final.”
Azure
Azure describes the decomposition of an IoT application into:
- Devices
- Gateway/hub
- Stream processors
- User interface
Azure provides the Azure IoT Hub SDK for enabling secure device connectivity and communications for devices and gateways. The platform also provides services for stream analytics to support scalable rule processing, including Azure IoT Hub Routes and Azure Functions.
The Azure IoT Hub provides a scalable mechanism for bidirectional communication between devices and the cloud, supporting multiple protocols. Azure also provides Azure Event Hub for highly scalable streaming of telemetry data.
The Azure Device SDK is an open-source framework intended to simplify the connection of devices or gateways to Azure's IoT Hub. This SDK supports the development of an edge client in support of connection and communication with the cloud with a variety of communication protocols, including MQTT, AMQP, and HTTPS.
Setting up Azure to enable connection by your IoT device requires the creation of an IoT Hub and creation of an IoT Device under the IoT Hub interface from the cloud platform. IoT Hub creation requires an Azure subscription, and selection or creation of a resource group, region, and name.
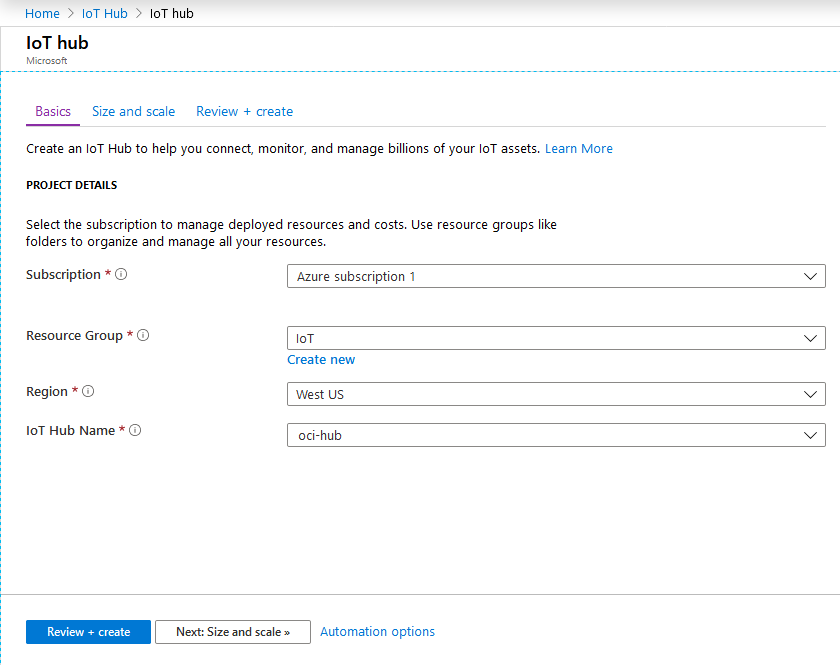
Figure 6. Azure IoT Hub Creation Console
Once the IoT Hub is created, registration of the IoT Device is simple. You supply a device ID and decide whether or not the device will be connected to the hub.
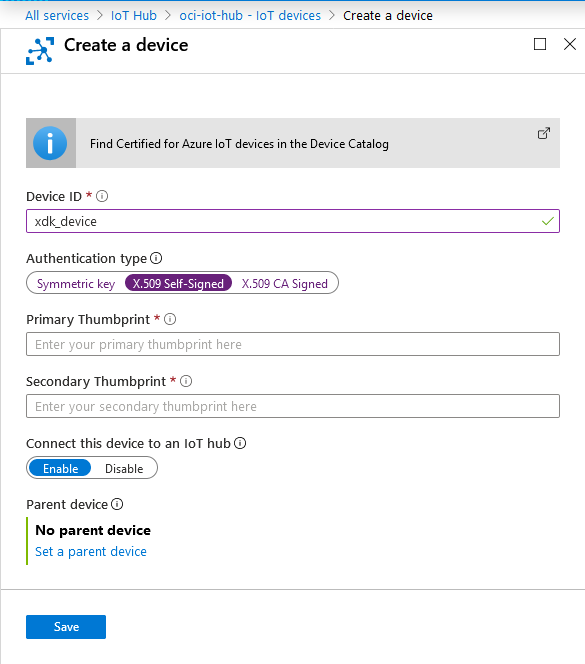
Figure 7. Azure IoT Device Registration Console
For security, if you plan on using an X.509 certificate, self-signed or otherwise, you have to provide a fingerprint of your certificate, which can be created using the openssl command:
openssl x509 -in root.pem -fingerprint -noout | sed 's/.*=//; s/://g'Once the IoT device is registered, it has the ability to send and receive messages when it connects using those credentials. No other security configuration or policy needs to be created.
Connecting to Azure’s IoT Hub requires that we provide the client certificate and private key during TLS setup. But the generic XDK MQTT configuration follows a different code path than that of AWS, which did not support Azure’s connection requirements. Therefore, some code was added to the XDK110 MbedTLS implementation to handle the client certificate and private key.
  mbedtls_x509_crt_init(&client_cert);
  const char* cl_cert = CLIENT_CERT;
  if (0 != mbedtls_x509_crt_parse(&client_cert, (const unsigned char *)cl_cert,
                                  strlen(cl_cert) + 1))
  {
    mbedtls_printf(" failed\n  !  mbedtls_x509_crt_parse returned failure\r\n");
    return RC_SERVAL_ERROR;
  }

  mbedtls_pk_init(&client_key);
  const char* cl_key = CLIENT_KEY;
  if (0 != mbedtls_pk_parse_key(&client_key, (const unsigned char *)cl_key,
                                strlen(cl_key) + 1, NULL, 0))
  {
    mbedtls_printf(" failed\n  !  mbedtls_pk_parse_key returned failure\r\n");
    return RC_SERVAL_ERROR;
  }
…
  if (0 != mbedtls_ssl_conf_own_cert( &conf, &client_cert, &client_key ))
  {
    mbedtls_printf(" failed\n  !  mbedtls_ssl_conf_own_cert returned failure\r\n");
    return RC_SERVAL_ERROR;
  }
Connecting to the Azure IoT Hub requires a specific user name based on the broker URL and the client ID, which we add to the MqttConnectInfo instance.
static MQTT_Connect_T MqttConnectInfo =
{
  .ClientId = APP_MQTT_CLIENT_ID,
  .BrokerURL = APP_MQTT_BROKER_HOST_URL,
  .BrokerPort = APP_MQTT_BROKER_HOST_PORT,
  .CleanSession = true,
  .KeepAliveInterval = 100,
  .UserName = APP_MQTT_BROKER_HOST_URL "/" APP_MQTT_CLIENT_ID "/?api-version=2018-06-30"
};

retcode = MQTT_ConnectToBroker(&MqttConnectInfo, MQTT_CONNECT_TIMEOUT_IN_MS);
…
retcode = Sensor_GetData(&sensorData);
if (RETCODE_OK == retcode)
{
  int32_t length = snprintf(publishBuffer, APP_MQTT_DATA_BUFFER_SIZE,
                            publishDataFormat,
                            sensorData.Accel.X, sensorData.Accel.Y,
                            sensorData.Accel.Z,
                            sensorData.Mag.X, sensorData.Mag.Y, sensorData.Mag.Z,
                            sensorData.Gyro.X, sensorData.Gyro.Y, sensorData.Gyro.Z,
                            sensorData.RH, sensorData.Pressure,
                            (sensorData.Temp /= 1000));

  MqttPublishInfo.Payload = publishBuffer;
  MqttPublishInfo.PayloadLength = length;

  retcode = MQTT_PublishToTopic(&MqttPublishInfo, MQTT_PUBLISH_TIMEOUT_IN_MS);
}
In addition to the TLS code mentioned above, a small amount of code needed to be added to the underlying XDK MQTT connection code to handle the user name and the optional password.
Retcode_T MQTT_ConnectToBroker(MQTT_Connect_T * mqttConnect, uint32_t timeout)
{
…
  if (mqttConnect->UserName != NULL)
  {
    StringDescr_wrap(&username, mqttConnect->UserName);
    MqttSession.username = username;
  }

  if (mqttConnect->Password != NULL)
  {
    StringDescr_wrap(&password, mqttConnect->Password);
    MqttSession.password = password;
  }
…
}
Azure gives you the option of having multiple IoT Hubs, through which messages can be published using the MQTT, HTTPS, and AMQP message protocols. The IoT Hub is not a general purpose MQTT broker, though. You can publish MQTT messages through it, but you are restricted to a predetermined topic name based on the device ID used during connection to the hub. The following Python code better illustrates the restrictions on client setup and publishing.
## Set up the MQTT client.  The user name must contain the fully qualified
## IoT hub and the device ID along with an api-version choice.
client = mqtt.Client(client_id=device_id, protocol=mqtt.MQTTv311)
client.username_pw_set(username=iot_hub_name + ".azure-devices.net/" +
                       device_id + "/?api-version=2018-06-30", password=None)
client.tls_set(ca_certs=path_to_cert, certfile='cert.pem',
               keyfile='private.key', cert_reqs=ssl.CERT_REQUIRED,
               tls_version=ssl.PROTOCOL_TLSv1, ciphers=None)

## Connect to the Azure IoT Hub
client.connect(iot_hub_name+".azure-devices.net", port=8883)

## Publish through the predetermined topic name (based on the device ID)
client.publish("devices/" + device_id + "/messages/events/",
               message_body, qos=1)
Azure has something similar to AWS Lambdas, called Azure Functions. The platform requires you to define a Function App to host your Azure functions. A Function App can be created and configured such that it is triggered for every message sent to an associated IoT Hub.
When we add our function to our Function App, we choose the in-portal development environment in order to be able to use the IoT Hub (Event Hub) template. With this, messages sent to the IoT Hub will trigger the execution of our function.
The message body is provided to the Function App as a string, regardless of the language used to implement the function.
One thing to note is that in order to have the option to choose the in-portal development environment, we have to choose Windows as the host OS for our Function App. Doing so removes the option of using Python as the development language; we are left with the programming options of .NET Core, Node.js, Java, and PowerShell Core.
GCP
Google Cloud IoT Core is GCP's IoT cloud platform for device connectivity and communications. It provides mechanisms for ingesting and processing device telemetry and state data.
Similar to the other platforms, GCP divides an IoT application into device, gateway, and cloud components.
Device state information defines the current status of the device, and telemetry defines the data collected by the device about its environment.
Additionally, GCP supports the definition of commands for devices that allow the application to issue control related messages to the edge. Google's IoT Core is integrated with a number of their cloud platform services for data-stream and event-based processing of device telemetry.
IoT Core supports MQTT and HTTP 1.1, which is directly connected with Google's Pub/Sub managed service to support scalable communications with multiple devices. Google recommends MQTT for communications that require lower latency and higher throughput and HTTP to simplify the interface and reduce firewall issues.
Setting up your IoT device to connect to GCP requires the creation of an IoT Registry and creation of an IoT Device under the IoT Registry. IoT Registry creation requires a registry ID, region, and default telemetry topic.
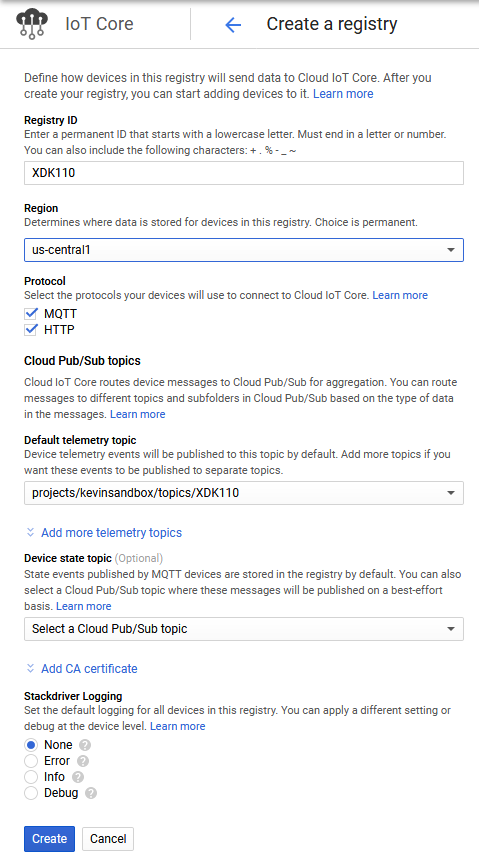
Figure 8. GCP Registry Creation Console
Once the registry is created, you can create an association for the device, which requires a device ID and a public key.
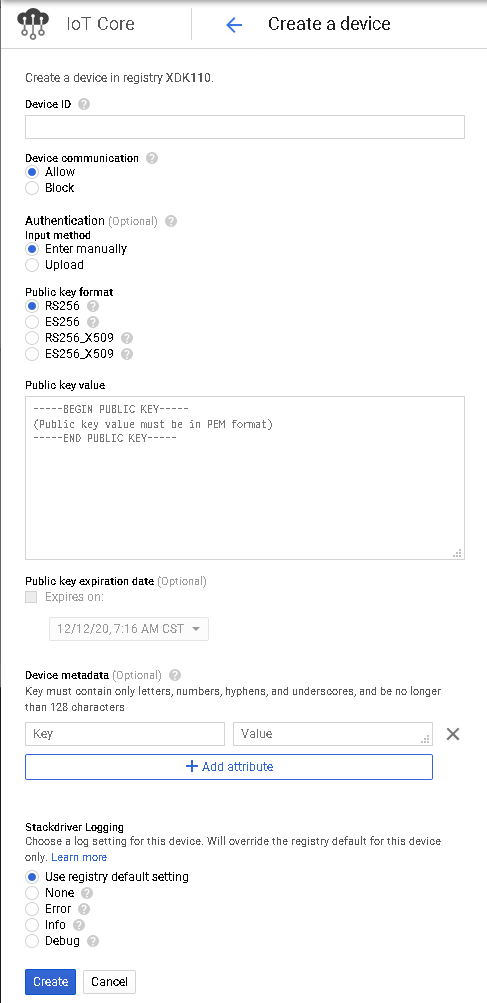
Figure 9. GCP Device Registration Console
Once a public key has been associated with an IoT device, and the private key has been provided to the physical device, the device can connect to a communications bridge using those credentials to send and receive messages.
GCP provides a bridge for both MQTT and HTTPS. The MQTT bridge is a full-fledged MQTT broker, but topic names are partially predetermined based on the project name. Connection to the bridge requires a specific client ID based on the project ID, region, and device ID, as well as a JSON Web Token (JWT) built from the project ID and private key associated with the device.
The following code demonstrates the basic steps required to connect to the GCP MQTT bridge.
GCP does not require a private key during TLS setup. It uses a JWT as the MQTT password, which must be signed with the private key. The XDK example code does not provide code to create a JWT, but the GCP IoT Device SDK does. Using the SDK code to create the JWT allows us to connect to the Google MQTT bridge and publish messages to a device-specific topic (determined by the IoT Core Device name).
static MQTT_Connect_T MqttConnectInfo =
{
  .ClientId = APP_MQTT_CLIENT_ID,
  .BrokerURL = APP_MQTT_BROKER_HOST_URL,
  .BrokerPort = APP_MQTT_BROKER_HOST_PORT,
  .CleanSession = true,
  .KeepAliveInterval = 100,
  .UserName = "not_used",
  .Password = NULL
};
…
status = iotc_create_iotcore_jwt(APP_MQTT_PROJECT_ID, 3600, private_key_data,
                                 passwordBuffer, sizeof(passwordBuffer), &bytes_written);
…
MqttConnectInfo.Password = passwordBuffer;
retcode = MQTT_ConnectToBroker(&MqttConnectInfo, MQTT_CONNECT_TIMEOUT_IN_MS);
…
retcode = Sensor_GetData(&sensorData);
if (RETCODE_OK == retcode)
{
  int32_t length = snprintf(publishBuffer, APP_MQTT_DATA_BUFFER_SIZE,
                            publishDataFormat,
                            sensorData.Accel.X, sensorData.Accel.Y,
                            sensorData.Accel.Z,
                            sensorData.Mag.X, sensorData.Mag.Y, sensorData.Mag.Z,
                            sensorData.Gyro.X, sensorData.Gyro.Y, sensorData.Gyro.Z,
                            sensorData.RH, sensorData.Pressure,
                            (sensorData.Temp /= 1000));

  MqttPublishInfo.Payload = publishBuffer;
  MqttPublishInfo.PayloadLength = length;

  retcode = MQTT_PublishToTopic(&MqttPublishInfo, MQTT_PUBLISH_TIMEOUT_IN_MS);
}
Application Management
Each cloud platform provides complete support for developing, hosting, and managing applications. The complete lineup of capabilities for general application management is outside the scope of this article, so we will focus primarily on services provided to specifically support processing of incoming device data. This processed data will be used in support of a domain-specific application, such as a dashboard for monitoring the monitored environmental conditions.
All three cloud platforms support both event processing and stream processing capabilities, although our focus will be primarily on processing individual messages from the device.
Our needs do not require a dedicated server to run our application, since it is only active when we receive a message, and it is not a long-running activity. We use a serverless function from the cloud provider as a conduit from a MQTT message into our database.
Serverless technologies, such as Lambda functions, are ideal for IoT applications due to the capabilities of Lambda functions (or their equivalent across cloud platforms) to process publications from devices on the cloud. Each of the cloud vendors provides support for handling publications with Lambdas that can scale out with additional devices.
When it comes time to develop your IoT application, you typically have the option of developing it within a system outside of your chosen cloud platform, or you can develop it with a built-in editor and deployment system. The robustness of the built-in development system will vary depending on the platform. These capabilities will also be explored in the following sections.
AWS
In our AWS IoT Rule, we configure our rule to trigger our Python Lambda, which will take the provided data and store it in our database. Since the message sent from the XDK110 is in JSON format, it is automatically parsed into a dictionary by the Lambda framework and passed as the first parameter to our handler function. There is very little code needed to perform this task, mainly because the InfluxDBClient does most of the heavy lifting for us:
import os
from influxdb import InfluxDBClient

InfluxHost   = os.getenv('INFLUXDB_HOST')
InfluxPort   = 8086
InfluxDBName = 'xdk'

def handler(event, context):
    ## Build the data points
    data = []
    for key in event:
        data.append({'measurement': key,
                     'fields': event[key]	})

    if (len(data) > 0):
       ## Insert them into the influx db
       client = InfluxDBClient(host=InfluxHost, port=InfluxPort)
       client.switch_database(InfluxDBName)
       client.write_points(data)
With this Lambda in place, every message sent by the XDK110 triggers the storage of data in the database.
AWS provides a complete inline editor for Lambdas written in Node.js, Python, and Ruby. Language support is also provided for Go, C#, and Java, but source code written in those languages must be created externally and uploaded.
The editor provides a full-tree view of directories and files that belong to your Lambda and a tabbed text editor to allow for editing or viewing multiple files.

Figure 10. AWS Inline Editor Console
Azure
As you may recall, our Azure Function App is hosted on Windows, so we cannot use Python to implement our function. We implement it using C# to parse the MQTT message received from the IoT Hub into a JSON object and then iterate over that object to store the data into a table for each data subset.
using System.Data.SqlClient;

private static void create_table(SqlConnection connection, string table,
                                 System.Collections.Generic.ICollection<string> keys)
{
    SqlCommand command = new SqlCommand("select case when exists((select * " +
                                        "from information_schema.tables " +
                                        "where table_name = '" +
                                        table + "')) then 1 else 0 end");
    command.Connection = connection;
    if ((int)command.ExecuteScalar() == 0) {
        string cmd = "create table " + table;
        string sep = "(";
        foreach (string key in keys) {
            cmd += sep + key + " float";
            sep = ",";
        }
        cmd += ")";
        command = new SqlCommand(cmd);
        command.Connection = connection;
        command.ExecuteNonQuery();
    }
}

private static void store_table_data(SqlConnection connection,
                                     string table, JsonObject data)
{
    string cmd = "insert into " + table;
    string sep = "(";
    foreach (string key in data.Keys) {
        cmd += sep + key;
        sep = ",";
    }
    cmd += ") values";
    sep = "(";
    foreach (string key in data.Keys) {
        cmd += sep + data[key].ToString();
        sep = ",";
    }
    cmd += ")";
    SqlCommand command = new SqlCommand(cmd);
    command.Connection = connection;
    command.ExecuteNonQuery();
}

private static void store_tables(JsonObject tables)
{
    string DatabaseHost = "dbname.database.windows.net";
    string DatabaseUser = "dbuser";
    string DatabasePass = "dbpasswd";
    string DatabaseName = "xdk";

    string connectionString = "SERVER=" + DatabaseHost + ";" +
                              "DATABASE=" + DatabaseName + ";" +
                              "UID=" + DatabaseUser + ";" +
                              "PWD=" + DatabasePass;
    using (SqlConnection connection = new SqlConnection(connectionString))
    {
        connection.Open();
        foreach (string name in tables.Keys)
        {
            JsonObject data = (JsonObject)tables[name];
            create_table(connection, name, data.Keys);
            store_table_data(connection, name, data);
        }
    }
}

public static void Run(string body, ILogger log)
{
    Object jval = SimpleJson.DeserializeObject(body);
    if (jval.GetType() == typeof(JsonObject)) {
        store_tables((JsonObject)jval);
    }
}
Azure has a high-quality inline editor as well, with support for C#, Java, and Node.js. Function Apps written in Python, which must be hosted on Linux, must be created externally and uploaded. The editor does not have a tree view, but you are able to add and switch between multiple files.
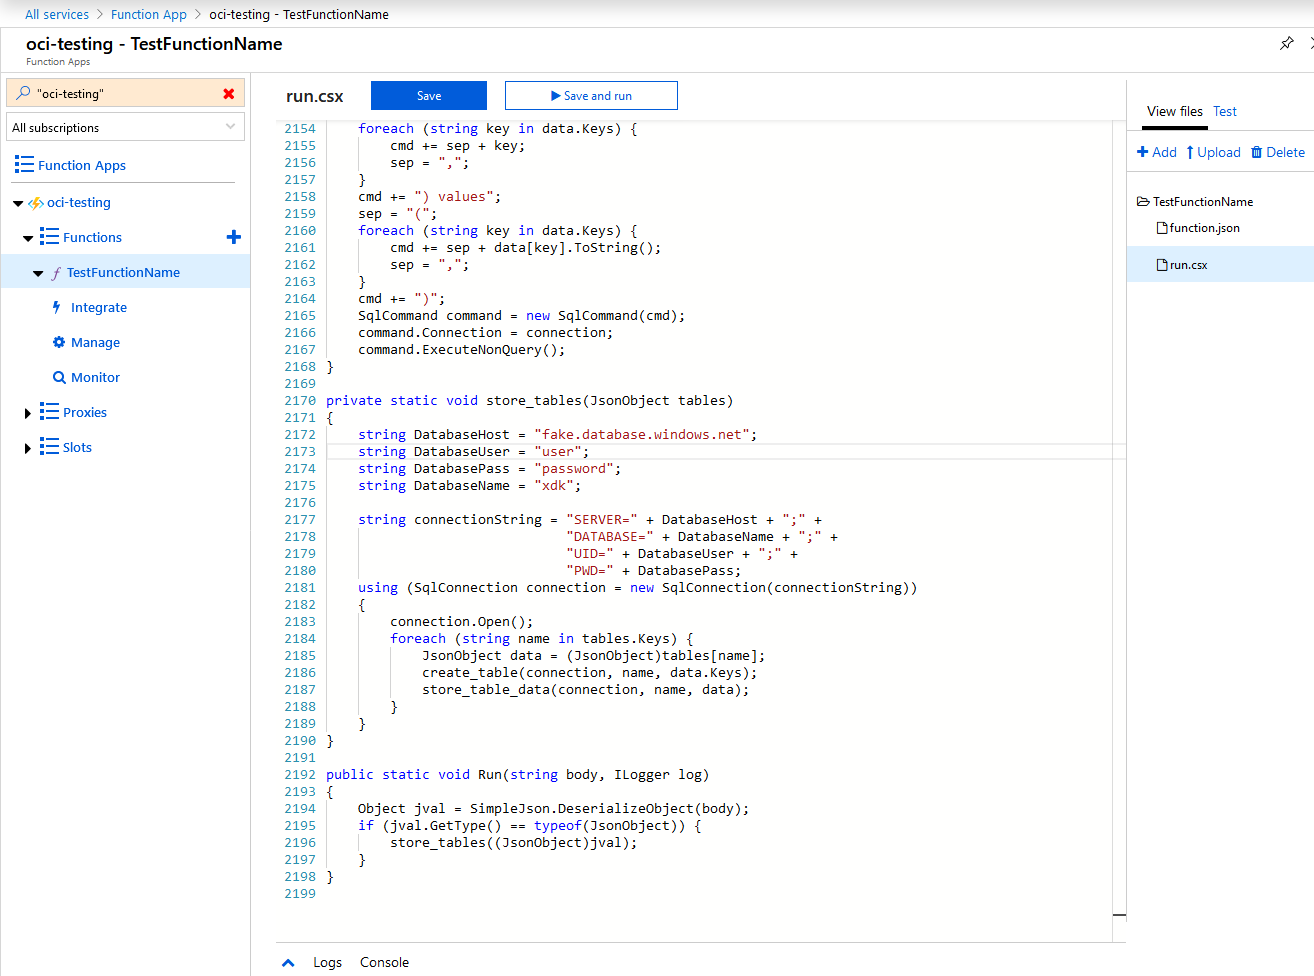
Figure 11. Azure Inline Editor Console
GCP
GCP uses the IoT Core Registry to route messages sent to the IoT Core Device topic to other Pub/Sub topics. Cloud Functions, similar to AWS Lambdas, can be configured to be triggered by messages sent to a specific Pub/Sub topic. They can be written in JavaScript (Node.js), Python, or Go. The payload from the published message is provided as a parameter to your Cloud Function in a base 64 encoded string.
We set up our registry to forward all messages to a Pub/Sub topic so that we can use the Pub/Sub topic as a trigger and thereby receive the data from our XDK110 in our Cloud Function. Configuring the registry to forward messages sent to the device topic is an extra step that is not necessary with AWS or Azure.
We create a Cloud Function with a Pub/Sub topic as our trigger. The implementation is similar to the one used for Azure, except that it is written in Python.
import json
import base64
import mysql.connector

DatabaseHost = '/cloudsql/projectname:us-central1:xdk'
DatabaseName = 'xdk'

def create_table(client, table, keys):
	client.execute('select count(*) from information_schema.tables ' +
               	 'where table_name = \'' + table + '\'')
	if (client.fetchone()[0] != 1):
    	cmd = 'create table ' + table
    	sep = '('
    	for key in keys:
        	cmd = cmd + sep + key + ' float'
        	sep = ','
    	cmd = cmd + ')'
    	client.execute(cmd)

def store_table_data(client, table, data):
	cmd = 'insert into ' + table
	sep = '('
	for key in data:
    	cmd = cmd + sep + key
    	sep = ','
	cmd = cmd + ') values'
	sep = '('
	for key in data:
    	cmd = cmd + sep + str(data[key])
    	sep = ','
	cmd = cmd + ')'
	client.execute(cmd)

def store_tables(params):
    try:
    	## Connect to the database
    	connect = mysql.connector.connect(user='dbuser',
                                      	password='password',
                                      	unix_socket=DatabaseHost,
                                      	database=DatabaseName)

    	client = connect.cursor()
    	for table in params:
        	data = params[table]

        	## Create the table, if it doesn't already exist
        	create_table(client, table, data.keys())

        	## Store the data in the table
        	store_table_data(client, table, data)

    	connect.commit()
    except Exception as err:
    	print('ERROR: ' + str(err))

def handler(event, context):
	store_tables(json.loads(base64.b64decode(event['data'])))
GCP has an inline editor for its Cloud Functions as well. This editor supports editing and viewing multiple files in all of the supported languages, which include Go, Node.js, and Python. However, in order to include multiple files, you must zip your files and upload them when creating your Cloud Function.
Creating a Cloud Function using only the inline editor restricts you to a single source file.
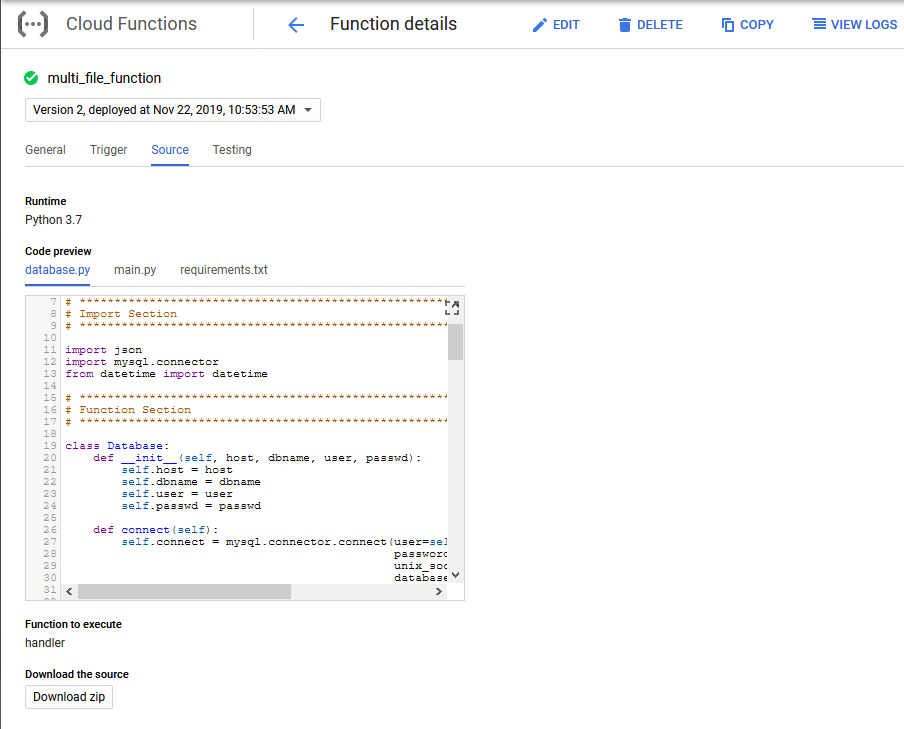
Figure 12. GCP Inline Editor Console
Conclusion
Each of the three cloud providers has a solid foundation for connecting and communicating with devices and for providing the ability to develop web applications on top of these connected devices.
Common among all of the providers is support for MQTT and HTTPS as mechanisms for publishing messages from the device to the cloud at scale. Each provider has also produced SDKs for simplification of the integration of devices with the cloud and for implementing event-based processing of these messages in the cloud.
AWS and GCP provide the most simple and straightforward mechanisms to implement serverless data processing for device events and streams. Each of these platforms provides a simplified mechanism for creating scalable handlers for devices messages with Lambda and Cloud Function abstractions, enabling a developer to define the required processing, regardless of backend server configurations. This simplifies the development of cloud function code without having to consider what server architecture will be used to host the function.
In terms of user interface support for configuring IoT capabilities, both AWS and Azure provide simple and intuitive interfaces for device association and configuration, with a slight edge for AWS. These platforms provide a mature and complete set of interfaces that can be used to integrate edge devices with the associated cloud processing. Many of the details about managing device provisioning and security will be covered in a separate discussion related to those functional categories in subsequent articles.
The other functional categories for IoT applications, Provisioning & Device Management, User Management, Business Management, Security & Disaster Management, and Analytics and Data Management, provide some additional differentiators. One major difference about these categories is that they are not as well supported by standards as are the communication protocols under the Process Management Category. One of the consequences of this is that once you begin to leverage the cloud platform to implement support for these other categories, it will be more challenging to develop common components that work across multiple IoT platforms.
Software Engineering Tech Trends (SETT) is a regular publication featuring emerging trends in software engineering.
